Browsed by
Month: October 2020

Decorating the cowl

Decorating the cowl

As you recall I was dying some silk lap for my cowl. They turned out well. Silk always looks so raggy after dying. I think it’s the squeezing out of the excess water. They look a little better dry after a little shake and stretch.

With the cowl being different colours of purple I think either the gold/orange or gold/ orange/purple.


I decided on the gold/orange/purple. the gold/ orange was to close the leaf fabric. I cut a small amount from one side of the lap.


I stretched the silk over the back of the cowl leaving enough on each end to cover the front.

I flipped it over and then cut up the leaves to decorate the ends. I put some on the underside( the silk side) and some on the top.

Then the other end

You saw above I had about 10 grams of silk. After stretching it out to get the amount of silk lap I wanted, I ended up cutting about 1/4 of it off the 2 ends.

I covered it up and gave it a good rubbing on both sides and rolled it up. Next up, the rolling. I am starting to feel like this is the never-ending cowl but I hope to show you it all finished in the next post. Before I can do that, I have to make some more masks, my mom wants a couple and some more pie making. And of course, today is Halloween. No trick or treating for the kids but the grandkids are having a haunted walk in the field. The grownups have as much fun setting it up as the kids will have running around in it.


Mystery Fabric Nuno Scarf

Mystery Fabric Nuno Scarf

We were having a discussion on the forum about nuno felting and how to maintain the length of fabric without too much shrinkage in that direction last week. Then I happened to find a piece of mystery fabric cut in a scarf length in my studio. I can’t remember where I got it but I think one of my fiber friends must have given it to me. It has a loose weave and appears to be a man made fabric and feels fairly soft, kind of like jersey.

Here’s a photo of the scarf and a close up. If you look on the mid to lower right hand side of the right hand photo you can see the weave. (click on photos to enlarge)

The fabric has a fun pattern and I decided to use blue green for the wool color. I wanted to use a minimal amount of wool so the scarf stayed light weight and I wanted to avoid shrinkage of the length of the fabric as it was already fairly short.  I had some blue green short fiber merino in batt form that I decided to use.

I decided to use blue tape to outline the fabric so I would have a pattern for laying out the wool. I could have turned the fabric over and laid out the wool on to the fabric but didn’t feel like turning it over after layout. (Being lazy again)

So I laid out a very thin layer of wool laying the fibers at a right angle to the length of the scarf.  Then I put the fabric back on top of the fiber, wet it down and began rubbing on the fabric side. I usually always recommend doing a sample first to make sure the fiber will migrate through the fabric but since this was such an open weave, I didn’t think it would be an issue. And, luckily, I was correct in that assumption. The fiber migrated very quickly and I ended up just rubbing the scarf with soapy hands, rubbing the scarf with fabric side down on a rubber ridged surface and it held together very quickly. Then I did some fulling holding the scarf in my hands and accordion (sort of) style folding and stretching lengthwise to full.

Here’s the scarf after felting and fulling. As you can see, it shrank more than 50% of it’s width but minimally lengthwise. The scarf is very lightweight and still long enough to wear as a scarf instead of a cowl.

So now I have a new scarf just in time for 6 inches of snow and 1 degree F cold that dropped on us this past weekend.

Cute distractions and stashes

Cute distractions and stashes

I am writing and scheduling this post ahead of the imminent new regulations to be announced in two days time by BJ….so typing with fingers crossed, is a little like patting one’s head and rubbing one’s tummy!

The reason for my contortions is that we are expecting to meet our newest member of the family, now 8 weeks old. The visit was not originally on our calendar as they live out of the country, but circumstances have intervened – our daughter has fractured the head of her femur and if it shears off, she will need a joint replacement. C-19 totally prevented me from getting to them (Arrrrgh 😤😭) so with doctor’s certificates they are coming with wheelchair and baby et al for some much-needed help and TLC.

The imminent visit is having an effect here in the house….a grand clear-up! Whilst my garden archaeology (finding what once was 4 years ago) is on hold, I have been tackling large sewing projects put to one side ‘for when I have time’ – the ones that have piled up for way, way, too long.

In addition to this activity, I wanted to create a personal little welcome for our Grandson. Thinking of a friend’s story with her grandchildren whereby on their visits she always has a little something tucked into their pillows I decided to make a ‘pocket’. It is a work in progress….


Drawing out the letters and reversing them ready to draw onto Bondaweb. If I’m making one it makes sense to make one for our next youngest grandchild too (sadly, also an out of country resident!)

Fabric for little boys….denim of course! I took an already de-constructed and very worn pair of jeans from my stash.

I fiddled with the fabric to work out the construction….as many of you will have read previously – I often work things out as I go along, my thought process being like filtered coffee. Thankfully and necessarily, the filtered result came quickly!

I much preferred the back of the fabric (rather than the old, worn, almost see through, bleached front) so joined the pieces of leg fabric to allow for my construction.

Left overs bits….some for my stash box, threads from painstakingly pulling out threads to find the grain edges (for possible use in felt pieces etc) and some ‘fiddled with’ pieces for future sewing activities!

Then it was into my stash box to find appropriately colourful bits of fabric. It is here that I have to admit to having several stashes, all ironed and tidy – for large, medium and small pieces of fabric and another box for tiny bits….a ‘neat-nic’….guilty as charged!

Sadly, no photos, but I cut out the fabric letters and ironed them onto the base to start my appliqué stitching. Deciding to use Perlé thread, it was a dive into yet another stash to find the right colours.

In the meantime, my vast stash of ribbons, edgings and bias tape let me down – I just couldn’t find what I needed.

You will have now realised that I have many ‘stashes’ (hence the title of this post) and like so many of you I’m sure – all my stashes have been collected over many years (read that as decades!). Where would we be without them? But I digress….

I can count on one hand how many trips I’ve made into the high street since March, but this was totally an ‘essential’ trip! Strangely I can’t remember shopping for decorative haberdashery items for sooooo long that the prices took me totally by surprise – ‘how much for a metre?’ In the second shop I finally found my ‘ah-ha, that’s the one’.

Stitching then commenced. The back shows the faded jeans and my attempts to keep the stitching neat.

Tadaa….thus far!

Once all the hand stitching is complete, I’ll add interfacing and lining then tape the edges – I’ll post the finished ‘pocket’ next time.

I hope, by the time you read this, that I will be a less frustrated mum finally able to care for her offspring (with no more crossed fingers) and also a proudly doting Grandmother too….definitely a cute distraction!

A Long Wait for a Large Loom

A Long Wait for a Large Loom

There are many advantages to a guild such as the support and comradery of like-minded people who share an interest or passion in something. Sharing knowledge; whether in a library or through the members sharing their ideas or teaching. The pooling of resources to acquire equipment to be shared amongst the group that individual members either can’t afford or do not have space for.

Ann and I belong to the same guild here in Ottawa, Canada. It’s old as far as Canadian guilds go; having started as a group run through the Ottawa Civil Service Recreation Association from 1943 to 1946. In 1949 a few of their members went to a weaving conference.  When they returned home they decided to  start their own guild and became the Ottawa Valley Weavers guild. They eventually added “and Spinners” to their name. I joined in 1987 or 1988, becoming their new Librarian at my first meeting. (I did clearly warn them about the severe dyslexia but they didn’t think that would at all be a problem). So I started my guild career in  a closet, under the stairs, with the library. The guild was meeting down the hall in an old gymnasium at Devonshire Public School.  Ann joined a bit later.  By then I and the library were living in a different closet. She kindly decided to join me to help with the library. The library team eventually grew to Ann, Mary and I, but still in a closet with the books.

 1 Devonshire Public School (we were in the lower level with the closet under the stairs and the old gymnasium.)

For many years, the guild did not have a space to house equipment but always yearned to do so. We kept the shared equipment we did have in various members basements including a borrowed 90 inch loom (before my time), then a purchased, second hand 100-inch loom. The Library has sample binders from projects made on both of these.

Our 100-inch loom was second hand when we acquired it. It had moved multiple times, coming to rest for many years in one member’s basement.  It was used for many projects, mostly blankets and coverlets. If you have not seen one they are big looms.  It takes 2 people to weave on it.  This one was becoming more and more temperamental in its old age it took a large team to get the warp on. Warps were long to accommodate multiple blankets on the same threading. The treadling and colours would change between coverlets depending on what the weaver wanted.  Occasionally, between one coverlet and the next the loom would require readjusting of the tension. At this point the loom was functional but just a bit grumpy occasionally.

In 2003 the guild received a grant that allowed us to move into a space in Heartwood House (an umbrella group for many charity’s and the OVWSG) to set up our long dreamed of studio and house the library. The 100-inch loom as well as other floor and table looms left members basements and arrived in our new space.

2 Heartwood house.

 3 Our new home in the basement of Heartwood house, with the 100-inch loom warped and ready to go! The loom was often in use since it was much easier to get into the guild studio and use it.

4-7 Weavers work in pairs and weave 2 blankets. It takes two weavers weaving at once to make each blanket so they weave one for each of them. 2002

We moved to various rooms in the basement,  taking the looms with us.  In 2009 we made another move, this time going upstairs to one of the large classrooms which had large windows. We had to pick up and move all our guild stuff; the wheels, the library and the all the looms including the 100-inch up the stairs to the new space. All that moving was worth it since we now had a wall of windows and lots of bright light!

8-12 Upstairs in the light warping team in February 2009

After 10 years the building Heartwood house was renting was sold out from under them.  All the charity’s and us were on the move again. It took quite a bit of looking but finally a new location was found. We all moved to a building that once was a Giant Tiger Store with a small attached mall. Ann S., another member, headed up the design team that designed a purpose built studio space with a kitchenette, the library, and all the looms (wheels were moved to a storage closet down the hall.)

13 Moving Out of old Heartwood House! 2013

14-15 Moving into new Heartwood house (a lot of those boxes are the library!) 2013

 16-22 Weaving in the Studio 2014

After being in the space for a while, it was found to be a bit tight, so a classroom space was rented upstairs and the 100-inch loom moved yet again.

 23-24 Moved to the Classroom Nov-Dec 2014

The classroom originally was divided,  having a second smaller room where the loom was put, but we had the partition wall removed to create one big space. The space had carpet originally but we eventually upgraded to laminate in hopes we could have felting workshops upstairs and for easier clean up under the loom.

 25-27 This is the weaving draft for the coverlets. Here you can see tying on a new warp to the old. This is used to keep from rethreading the heddles or to save an expensive warp from being loom waste.  It is the second use as a dummy warp this time. 06-29-2015

28 Special guest in the studio (gratuitous lamb photo) Ann has the best living room decor!! Everyone enjoys when she shares and brings one of her bottle lambs to the studio.

  29-31 Our loom is getting more finicky to put the warp on the loom. 06 2016

32 They are adjusting heddles and leveling harnesses before threading the next warp. 7-4-16 (you can see the wall is gone so its easier to warp the loom. (Well relatively easier))

 33-34 You can see the treadle patter and more of the classroom. Aug 2016.

 35-36 Overshot is a weave structure with a distinctive 45-degree angle to the pattern. It is starting to show that the tension is not even and there are problems with the loom.

 37-38 The weavers are having to argue with the loom to stay square and get the correct angle. Weaving has become slower. 2018

By this point in its life, it was not keeping tension well and I think there were problems with the brake. A grant request was put in to acquire a more functional user friendly new 100 inch loom from Leclerc (an old Canadian company that has made looms since the beginning of the 1900’s). We wanted a 100-inch loom that was easier to warp, kept tension and did not have brake slippage. Therefore, we put in our grant request and were thrilled when it was accepted. <Weavers Celebrating!!>

The next project the executive undertook was what to do with the old loom. It had been repaired as much as was possible but really was now well beyond its working life so sending it off to another guild to fight with was not an option. They reached out to other provincial guilds and found a few had the same model of loom and could use parts of our old one to refurbish theirs. So the loom was mostly dispersed to upgrade other old looms.

 29-40 The new floor is put in as we prepare for the new loom. July 2019

We cleared the area for the new loom at the end of the classroom. With great excitement we awaited the arrival of the wonderful new loom! And we waited,  and waited, and waited…..

And now I will be horrible and make you wait till next week so you too will find out if it was worth the wait!

in the mean time keep felting! (i am still busy with data analysis of the guild library survey, which is actually lots of fun but keeping me from felting at the moment. i hope to have my part handed off to Ann soon so i can rejoin you in fiber fun!)

Next Steps for My Cowl

Next Steps for My Cowl

With a few weeks until the Christmas markets, I finally got back to my cowl.

This is as far as I had gotten before I had to put it aside. It took me forever to get the silk wrapped around the template properly and as you can see I had to use painters tape to do it.

The first job today was to sew the center together. I used some nylon thread and large basting stitches so I can pull it out at the end.

I put some tape on the one end of the thread so it should be easy to find when it is finished.

Time to add the wool, 3 shades of purple.

The next thing should have been cutting up the yellow/orange/red prefelt into some leave and put them on the cowl. But that would too easy. I decided I wanted to put some silk on top of everything. I thought about some silk hankies but remembered I had a big bag of silk lap. Silk lap is similar to silk hankies but much bigger and many layers.

As you can see the silk is bright white. I will have to dye it. I am not sure what would be the best colour so I cut several strips of the lap to dye.  I was thinking different shades of green but maybe copper or gold would be better. Maybe a combination s of all 3. What do you think?

First I had to find the end, easier said than done.

Even with many layers, it is still see-through.

Silk takes more preparation to dye than wool and other fibres. Silk is hard to get wet. I added a little dish soap to help the silk get wet. It will have to sit at least overnight to be properly wet so I can dye it. I will show you next week when it’s my turn to post again.

And a reminder about the holiday card exchange. You have until tomorrow night (Oct 24th at midnight) to sign up on the forum. holiday-card-exchange-2020 link  If You have signed up chec the forum on the evening of the 25 to find out who your partner is.

Past Holiday Efforts – Fourth Quarter Challenge

Past Holiday Efforts – Fourth Quarter Challenge

Annie and Lyn recently posted the Fourth Quarter Challenge. I thought I would take a look at what holiday decorations and cards I had created in the past. It’s always easy for me to forget about pieces I have created so it’s nice to walk down memory lane and I thought I would share what I found.

Here’s a set of cards that I made in 2017 for the Holiday Card exchange that we have on the forum. I used some samples that I had made for the Nuno Felting with Paper Fabric Lamination online class.

This is the card that I made last year.

And another card made in 2018.


Here’s the 2016 cards that I created.

And these are a few different ornaments that I created over the years.

In 2013, I stitched a bunch of these bowls to give to people filled with candy.

I just found another card from 2016. I’m not sure why I made so many different cards that year.

And just for fun, here I am with Deb and Nanci at Christmas Stroll at The Purple Pomegranate.

We did make some Ukraninan eggs one year (not exactly fiber but still holiday!)

And another just for fun photo of me as a baby by the tree.

Here’s a basket I made as a Christmas gift. I’m not much of a weaver but it turned out OK.

And I thought you might like to see a bit of winter decoration from Mother Nature.

That was a fun trip down memory lane. Now I need to get started on this year’s holiday card. If you would like to join in the forum’s Holiday Card Exchange, sign up here.

Or, if you have some holiday creations that you’d like to share, you can post them here.


Felting Sea Patterns

Felting Sea Patterns

I made my first felted picture maybe 8 years ago. It’s a seascape with a curlew based on a scene I’d photographed. I realise now I haven’t ever completely moved away from the sea and the birds in my felt making.  The picture is still hanging on my living room wall, though it’s not really my favourite.  I can see too much that I’d want to change.

Looking at the dark water I see I included strips of ribbon as well as nepps, locks and some non-wool fibres – probably bamboo. A little while later I made a second curlew which I much preferred. In this one the sea is slightly more abstract with silk hankies representing sea foam.

Second Curlew

I live by the coast and seem always to return to the theme of water – specifically the sea and even more specifically the water near where I live, some of which is technically an estuary: the mouth of the river Thames.  I’ve been looking recently at how I’ve tried to represent the sea in felt, then trying out some new water experiments.

In my last guest blog I showed how I made the watery background to my dark-bellied Brent goose. Here’s a reminder

Dark-Bellied Brent Goose

Brent goose: making a felt picture

This technique of laying cobweb pre-felt on top of base layers was something I worked out for myself and often use as I really like the effect

The first picture, ‘Winter Sea’ I made entirely using this technique. For the second picture ‘Big Wave 3’ I used straightforward tufts of different coloured wool for the darker water but a cobweb strip in front of the wave to suggest water from a previous wave.

‘Wide Sea Pattern’

For ‘Wide Sea Pattern’ I’ve added some silk fibres to enhance the foamy effect.

I’ve also tried nuno felted seas using large pieces of fabric. I’ve made two pictures of a lovely little ringed plover I watched a short distance from my house.

In the left picture I used a UK charity shop wool scarf that already had a crimp. I ran pewter-coloured merino wool on the back in only one direction to enhance the crimp, which I hope gives a distant wave-like pattern. In the one on the right I used some very dense silk (from a US thrift store sarong) which I only partially felted in as I wanted to keep as much as possible of the sarong’s watery pattern (also, the silk was VERY dense!). 

Thinking about how to represent sea patterns, I have spent a little time recently looking at photos and videos of how people do this when drawing or painting the sea, and wondering if I could use some of these ways of looking at and representing sea water in wet felt making.

Experiment one: I laid out two pewter merino layers then a fine horizontal layer of blues, which I pushed apart with 2 pencils hoping to evoke a choppy sea.  Then, I suppose because I thought the darker tones may get lost, I added some more dark wool into the gaps.

I ended up with something that looked very flat – perhaps like dappled water but not what I had in mind.  I wish I was more strict in sticking to my original intentions: I think it would have been better without the dark wool I added at the end. Maybe I’ll come back to that in the future and do the experiment properly.

Experiment two: Estuary Water. Next I wanted to experiment with the dark colour of the water.  Out came the trusty drum carder and I blended pewter, beige and green wools which I laid horizontally on a vertical layer of mixed pewter and beige.  I made a single layer of mixed blue prefelt that I pulled apart and laid on the top.

I call the result ‘Estuary Water’ as there’s often a lot of muddy sediment in the estuary which gives it an opaque, brown look.  I like it but haven’t decided what to do with it yet – its dimensions don’t fit any standard canvases or frames. Maybe I’ll use it as the background to something else.

Experiment three: I decided to made some smaller felt pictures that were just sewn onto stretched painters’ canvases rather than being framed behind glass. Focussing on the sea water: this time I snipped into the prefelt blue layer with scissors after I’d laid it on the background.

I like this effect and could maybe take it a bit further in the future: make some bigger cuts or more of them.  I stitched these onto pre-stretched canvases that are slightly smaller than the felt so the canvases aren’t visible when looking head on.

Experiment four:  Harbour Water. I took a photo of the water in the harbour a few months ago that I found interesting and wanted to investigate in felt. 

‘Harbour Water’ Photograph

I’ve thought for a while I’d like to blend just two colours with each other and black and white and this seemed like a good opportunity.  I used the drum carder to blend duck egg and teal merino wool with charcoal grey and natural white in various proportions.

I then made prefelts which I cut up and placed on a background of teal (1st, vertical layer) and duck egg (2nd, horizontal layer)

Quite interesting but I liked it a lot better before I’d felted it. I had a second go, using a piece of the duck egg prefelt as the base, which I like slightly better.

I like the shimmery water better than the round sections, which are a bit too round. Again, I’ve stitched the pieces of felt onto smaller canvases so they can hang but appear to be floating. I will look at them for a while until I decide how and if to develop the ideas further.

Experiment five: Choppy Whitstable Waves.  In July a customer asked me to make her a picture similar to one I had but in a smaller size.  I tried to use some of the things I’d seen in videos of how to paint water using acrylics and adapt them to my local sea colours and patterns and the medium of wet felting.  I laid out darker ‘windows’ at the front of the waves with some water being pulled upwards by the wave (with the top fibre running upwards) then blue sky reflections made from cobweb prefelt sitting behind the wave foam.

I feel this has some potential.  I particularly like the wave second from bottom and am tempted next to make a single long wave using this technique.

At this point I had to break off to set up my harbour hut exhibition for a week.  Interestingly, the customer didn’t like the smaller picture I’d made as much as the original and decided to buy the bigger original instead.

I still find sea patterns endlessly fascinating. Each experiment seems to ask more questions than it answers and produce new avenues to investigate.  I have no doubt I’ll keep on coming back to sea patterns (and birds) again and again.

Are there any effects here that you particularly like or don’t think worked so well?

Do you have a theme, subject or colour-way you keep going back to in your work?

A Small Infestation on the Back Patio

A Small Infestation on the Back Patio

I have been very busy with the Guild Library Survey this week. (19 fantastic questions covering 5 topics!) I hope that I will have the first draft of the data done in the next few days so I can get back to felting. (Not that I am not having excessive fun with data analysis!!) Who knew this could be such a blast!! (Bernadette, you should have told me how fun this is! you have one of the best jobs ever!!).  So while I am wrapped up in thoughts of trends and preferences and comparing sub-groups, I wanted to tell you about the Blue tarp you saw last week in the background of this shot. So now it is later and I should get to explaining about it!

1 from last week

In 2020, most people don’t get to see a blacksmith or smell that distinctive aroma of a forge starting up. It is a smell that clings to clothing, hair and especially damp wool. Like the sudden mysterious appearance of Fairy rings of mushrooms in your lawn, you too may wake up one morning go out to check your…. Well, attempting to dry fleece and find you have an infestation of a blacksmith on your patio! But take heart!! It’s not all bad. They are often photogenic, their pounding tends to remove chipmunks from the area at least for a short time and they can be persuaded to make useful things for spinners, basket makers or for my felting friends; self-nailing hooks!!

Quick note: it is important to keep your fleece-drying upwind from the forge if possible.

A few fleece piles of washing back Glenn removed one of the two blue tarps. Underneath was the smaller forge that one of the chipmunks had thought was a good overwinter nest last spring. I had been requesting a few more hooks for the fleece straining buckets and he had another project he wanted to work on too.

  2-4 The Infestation (not necessarily a bad thing)

So he dug around in the garage, pulling out tools and the ¼ inch stock for the hooks. He also pulled out a railroad tie for his other project. He actually has 2 forges on the back patio. This one is the Sears light-duty farm forge. (check out the Sears Robuck catalogues for the end of the 1800s/ beginning of the 1900s.)  if only we had bought it then, it would have been $18.00 and came with an anvil and a foot vice. let’s just refer to it as the over-enthusiastic barbeque but it would be better not to cook steaks on it since it can melt metal and that is coal, not charcoal he is using.  His other forge is bigger and maybe a homemade arrangement with wheels. It is under the black covers on the other side of the blue bins full of coal (when we could have put them to better used holding fleeces!)

Now I may have already confused you, why would we want to have this odd self-nailing hooks?  And what would a hook self-nail? This is something you may have seen at a homestead museum or an old barn.

5 hooks and guillotine

These are self-nailing hooks, beside them is a Guillotine tool. you can change the parts inside it to make different effects on the stock. The hooks are freshly out of the forge and have yet to be lacquered so they won’t rust.

The trellis along the side yard is made of 4×4 lumber which is perfect for putting hooks into.

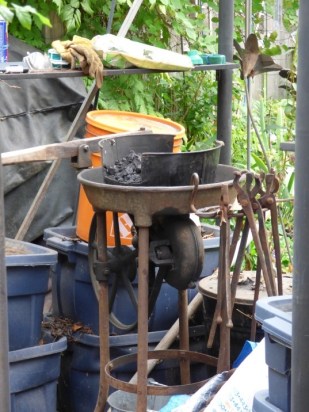
6 These are over 2 years old and I need to use a wire brush and a bit of spray lacquer. After a couple of winters, they have picked up a bit of rust. I use them to hang and drain the strainer baskets between the washing and rinsing soaks of the fleeces.

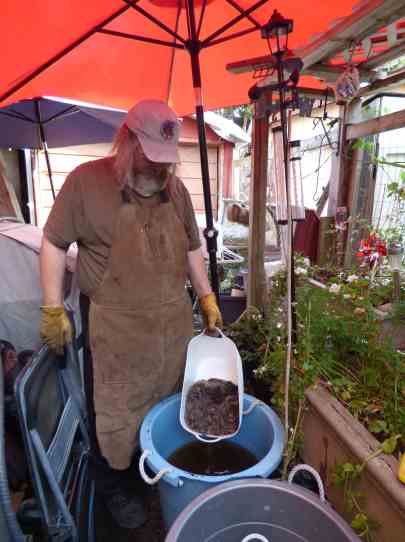
7 blacksmiths are also handy for lifting strainer baskets out of the soaking buckets.

  8 At his point I have a backlog of fleeces sorted and waiting to be washed.

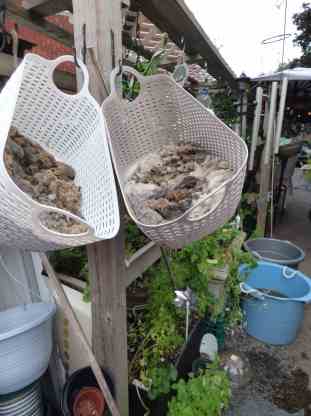
  9-10 My present 2 hooks and the sorting table.

 11 I hang the baskets on an angle so the water drains from one corner removes more of the water than when it hangs straight.

12 He has also made me a couple of hooks designed to hang over 2×4’s both horizontal and vertical orientation. I have been using this for the 3rd strainer basket but it drips right in the carrots and I don’t like to think of the soap and other material the carrots are getting from the drippings.

I was checking the unwashed side of the covered side yard and found another fleece! It is a small Romney lamb  (1lb 1oz.) that said it was washed but didn’t look like it. So into a couple of bins for washing it goes.

 13 Oops, found one more this was hiding!

Now back to that little blacksmith infestation on the patio…

 14 Once the fire is made and the coal had burnt off the green smoke (don’t breathe that part!) it’s time to start heating up the bar stock to make hooks.

   15-17 Blacksmith at work, don’t startle him.

He is putting a twist in the hook. This is similar to spinners putting twist in yarn. For spinners a successful twist is produced with even drafting, allowing the same amount of twist into the same amount of drafted fibre each time. Since twist is lazy it will leap to any thin sections and build up more twist there. For blacksmiths, if the heat is not even across the section you want to twist it will not spread the twist evenly, going instead to the hotter spots producing an uneven twist. Think of the bar stock as just very stiff spinning roving or maybe since the fibres are so well aligned we should consider it top rather than roving.

Here is a little taste of blacksmithing but without that distinctive aroma.

18 (the loud sounds that are not blacksmithing is the medivac orange helicopter heading north up the Ottawa Valley) please note his forge squeaks worse than any of my wheels, even the Hatbox on her grumpiest day before she got her new tension band.

 19 This is his bigger anvil hidden partly amongst this year’s very good growth of catnip. The tool in the hardy is for cutting metal.

 20 These are the hooks he made while I was wrangling dirty fleeces.

If you awake one morning with an odd smell coming from your yard and find your back patio has had a sudden infestation of blacksmith do not fret. Find some bar stock and whatever you think will appease the blacksmith (chocolate, coke zero and raspberries works for mine). Luckily some will work for treats, so they are sort of like brownies which you appease with milk (but not as clean).  If you are very lucky and don’t scare them away, you too may get self-nailing hooks, drop spindles, manual double-ended ball winders, and other fibres related delights!


Soon to be leaves; purpose made prefelt

Soon to be leaves; purpose made prefelt

If you remember I started to work on a new cowl design for maybe teaching or maybe selling but at least one for myself. here the blog if you missed it or want to remind yourself. https://wp.me/p1WEqk-9Ha

Sorry to disappoint but it still isn’t finished. I did decide I wanted to put some autumn leaves on it so I made some prefelt to cut them out of. I started with green, I want it to be in the middle. I was thinking of having a little green showing at the edges might look nice.

then I added some reds orange and golden yellow. I did it in an odd pattern so I could cut out leaves that were not all one colour. The pictures are not great. No matter what I did they looked blurry. I think it’s too much light bouncing off the fibres it just can’t focus.

I flipped it over and laid out to “match” the other side. The green is thin so it wasn’t hard to see the colours through it.

Next, I got out my silk top and my silk hankies and put some on both sides to give it some shine. I tried to get pictures of it but it doesn’t show at all.

This is the finished piece. You can see the silk now.

There is only one more regular market day, this Saturday and then I get a break until the Christmas markets on Nov. 21 and 28. I plan to get the cowl done and to make some baskets to sell. So, fingers crossed, more to come.


Getting scissor happy with your felt

Getting scissor happy with your felt

Hi all!  Firstly, let me introduce myself.  My name is Helene Dooley and I would describe myself as a textile adventurer.  I am largely self taught but I have been fortunate enough to be in a position to undertake workshops with some very prominent felting tutors and masters.  I work under the name Feltzen.

This summer, the family took a cottage in the south west of Ireland – on the beautiful Valentia Island.  Kerry is famous for its scenery and we made the most of every precious day there.  One day involved a trip to Killarney’s National Park and I took this photo at the Torc Waterfall.  It became the main source of inspiration for this piece.


I also managed a trip to the Kerry Woollen Mills as I wanted to experiment with some of their fibres.  My main focus was on the Galway/New Zealand blend. They stock a vast array of colours and the best news is that they ship worldwide.

So, with inspiration and raw materials with a firm Kerry provenance I decided that I wanted to make a piece that would show off the fabulous colours of the wool.  As this is an experiment with the wool, I thought I would go into a little detail on what it feels like to work with along with the various steps I took to make the piece.  The joy of this technique is that each piece will be original as the end result is very much dependent on the colours used, where/how much you decide to sew into it and where you make the final cuts.  Also, of course, the type of wool you use.  I would tend towards a shorter fibre to minimise colour transmission between the layers but this is something you may be happy with.  The technique was taught to me by the very brilliant Marjolein Dallinga, a Dutch Fibre Artist now living in Canada.

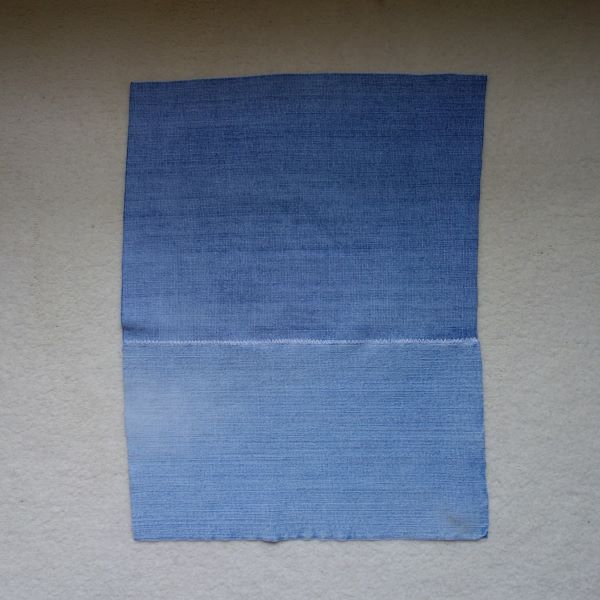
For this experiment I worked on a flat surface but the technique could easily be used on a 3D surface.  Just be sure to make your resist big enough to accommodate your sewing as you will lose a fair bit of surface during the gathering and felting process.  To familiarise myself with the fibre, I made up my sample which comprised of two layers (10 grams each) on a 25cm square.  Shrinkage was around 30%.

I will briefly go through the making up of the prefelt.  I made a rectangle (43cm X 28cm)which comprised of 4 layers using 20 grams per layer.

Each layer was a different colour and I very roughly laid down three different tones of wine/pink on one of the layers.

Top layer which is a dark green was embellished with a viscose – just for the fun of it.

I wet this down.  The fibre was a bit of a sponge when it came to this stage – it took a lot of soapy water (nearly a litre).  Because it was a bit of a challenge to permeate the layers, I ended up focussing the water on the centre of the piece and then I popped the bubble wrap on top and pressed the water to the outermost area of the rectangle.    The prefelt formed quickly.  I then rolled it very lightly.  My aim was to end up with a fabric that was stable enough to hold together but would not withstand any rough treatment.  I then left it to drip dry (over the clothes horse) overnight.  Then came the fun!

It’s worth having a few things to hand before you start this technique:

  • Strong thread – preferably nylon – this is for a couple of reasons. You want something that will withstand a bit of rough treatment (when it comes to gathering the fabric).  Also you want to be able to remove the thread at the end of the process so you don’t want it to felt into the piece.
  • A long sharp needle – you are going to be working through layers of thick prefelt (example: if you lay down 4 layers you will be stitching through 8 layers with this technique.
  • Long pins – make sure that there is a large visible pin head on these as you won’t want to lose the pins in the work (hidden pins + felting by hand = agony).

Now it’s time to play.  Using the pins, start by creating folds in your prefelt and work on this until you create folds.  My inspiration was the exposed tree roots (first photo) so I opted to have my folds radiating from the centre of the prefelt.


I then took each fold and tacked a running stitch through it.  To do this I started by knotting the thread unto itself (leave a tail and take your needle through the prefelt then back to the side facing you, tie the tail to the main body of the thread three or four times).  Doing this will secure your thread so that it stays put when you pull to create the gathers.  Then I ran a stitch through to the end of my fold, I gathered it up and tied it off (knotting the thread into the last stitch in the gather three or four times.  It needs to be robust and not fall out when you start the felting process.  Be sure to take out the pins as you go along.  Continue gathering until you are happy that you have the basic shape you want to achieve.


Now it’s time to start felting.  I used a pair of poly gloves for this part of the process.  I wet the piece in the usual manner (warm soapy water).  At this point I needed to be methodical in how I felted the folds so I marked my starting point with a peg and started working my way around the folds (rubbing each one a hundred times).  I did two rounds.  The folds felted to each other really fast.  I was able to turn the piece over and see that the underside of the piece had melded together so I was pretty confident that my cutting into the piece would not cause disintegration.  I finished felting and fulling the piece and left it to dry.


Then I cut into the folds.  I used a very sharp scissors and cut through the folds just a little at a time.  By doing this I controlled the colour that was visible.  First skim revealed the third colour, second skim brought up the second layer colour etc.


Other possibilities are to cut into the sides of the folds. Or perhaps change the shape of the flat sections.  In my case I reshaped the centre of the piece to make it stand above the rest of the cuts.  A bit like a tree trunk.


I decided against felting the cut edges as I didn’t want to disturb the cut lines.

Here is a close up of the effect.

The Galway/New Zealand mix was an interesting experiment.  I reckon I will use it again.  The sample felted into a sturdy fabric. I think it would work well for structural pieces slippers, bags, sculptures etc but not for clothing.  There’s quite an array of colours at the mill so I think I will soon be placing an order.  After all, you can never have enough fibre.

Happy felting!