Cuffs and Stuff
A couple of years ago a friend alerted me to the wonderful Australian magazine simply called “Felt”. It’s only published twice a year but I look forward to it eagerly as it’s always crammed with interesting photographs and articles including artist profiles and project tutorials.

One of the artists featured in the latest edition is the Canadian born feltmaker Christianna Ferguson. Christianna’s work is very colourful and textural and, as well as teaching and exhibiting, she also creates what she calls “more functional art: scarves, purses, cuffs, tea-cosies and wearables.”

So, having read about her work, when I turned the page and saw the tutorial for making her fabulous little Nuno felted and hand embroidered cuffs I had to have a go!

The fasteners are particularly cute and make an interesting feature but I struggled to get them as firm as I would have liked. For an added twist I’ve included some hand stitching and a bead to my fasteners. I added some hand embroidery to my green cuff but wasn’t happy with it…..looking back at Christianna’s examples I can see that my stitching wasn’t subtle enough! I much prefer the grey one which I left plain.

The good thing to come out of this exercise, having made two in this style, is that I’ve been reminded how much fun cuffs are to make. I designed several Nuno felted & free motion stitched cuffs for my sales tables last year and this has encouraged me to get on and make more.


I also got thinking about other possibilities and how much more sculptural I could make my cuffs. The next set are based on the design of one of my bangles, using a felt ball as the fastener and keeping the little beaded element.


They were all fun to make but I’ve come to the conclusion that I prefer the irregular shaped, Nuno style with the stitched edging (from last year) so I’ve come full circle! These are two I started this morning…..

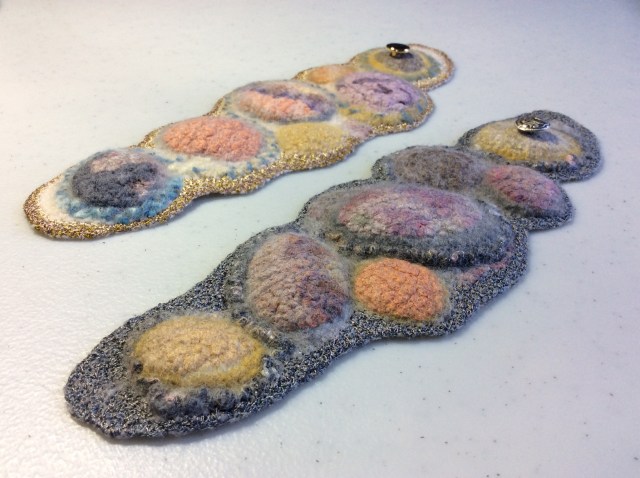
And this is them finished. Christianna said that when she makes hers “each cuff feels like a little piece of abstract art” and I couldn’t agree more. Although I love creating larger pieces of work there is something very satisfying about making these little cuffs and ending up with a totally unique, wearable item.

23 thoughts on “Cuffs and Stuff”
I have a subscription to this magazine also Karen. It is great! So many things to try, and so little time! hehe! I have never made cuffs, and I should really as they are small and there are so many possibilities. They are definitely more comfortable to wear than metal bracelets if working at the computer all day (why I don’t wear bracelets). I really love the ones you made with slits, very cool. You can also modify the style to make cafetière cosies. I have some samples I am revisiting and unfortunately they are not wide enough to make a cozy with, but might be worth turning into cuffs or some other small object. You have just given me some ideas! Thanks! x
Glad I’ve sparked your imagination Arlene, be sure to let me see what you do with those samples!
Interesting post Karen! Pretty photos. Love the cuffs with the half balls – very unusual.
It’s too easy to be critical of your own work – the two cuffs you made following the tutorial are lovely!
But you are right to make what you like – it’s the best way – and your two new cuffs are beautiful, thus proving the point.
Thanks Lyn, I’ve been wearing one of the “ball” cuffs this week and had lots of great comments on it so have decided to make more of those after all!
The cuffs are all very attractive. I have quite often seen different designs of cuff and thought “very pretty, but why?” It has taken Arlene’s comment above to make me think further: bracelets – of course! I suppose the word could have different connotations to different nationalities, I have never got past the point of cuffs being the end of sleeves rather than pieces of jewellery, which is silly.
Guess what’s next on the list of “must makes”.
I also take “Felt” here in England and also “Embellish” from the same stable. I think that one is 4 times a year. There’s lots of wet felt and needle felt in that too.
Ann
Sorry for the confusion Ann, you might be right about it being a language thing. I sometimes call them cuffs but do normally call mine bracelets or bangles as that’s how I tend to think of them. In this instance I used Christiannas reference to “cuffs”. Like you, the friend who recommended Felt also subscribes to Embellish…..maybe I need to take a look at that too.
These are so cool. In the pre-felting photo they look huge! Was it difficult to come up with a formula for how large the pre felting layout should be?
What size you begin with will depend on lots of different factors Kathryn so it’s always a good idea to make yourself some samples before starting a project. What fibre you use, how thick you lay your fibres, how thick your prefelts are, what you place on top for decoration and how much fulling you want, or are prepared to do will all make a difference to the finished size. As a rule of thumb I normally take the size I want to end up with and multiply it by 1.4 to get my start size. Having said that, when I’m working with thin layers I often start much larger because I feel I get a far better quality of felt that way. The two final cuffs both started out 45cm x 15cm and were fulled until they wouldn’t shrink any more. The grey one went down to 25cm x 8cm and the cream one to 25.5 cm x 9cm. Hope that helps.
These are great Karen! It’s always fun to try a new take on a project. Then, you can see what you like about the new way and add it to your bag of tricks or not. I really like the organic feel to your method of making cuffs.
Thanks Ruth, I think I’m always going to be more of an organic, let’s see where this goes type!
Will I be able to comment on this post? (I’m having trouble logging in, it never recognises my data) I have to try, though.
Karen, your cuffs look fantastic! I absolutely love your colour choice and textures. That bangle is to die for. Do you have a website with your work displayed? I’d love to see more 🙂
Now… fingers crossed I didn’t write all this for nothing!
Thanks for persevering Leonor! I know what it’s like….I’ve been having lots of issues recently with WordPress not functioning as it should. Glad you liked the post and yes, you can see more of my work at http://www.lincsinstitches.com I’m currently catching up with posting work I’ve done since January…..really must get more disciplined with posting!
Love the cuffs. Must give this a try!!
Thanks Sue, would love to see them if you do!
You have given us an interesting post & given me some inspiration with your ‘fab-u-lous’ cuffs. Like you my favourites are the organic designs. Once they are fulled & dry, have you FME’d all the edges?
Thank you for introducing Christianna Ferguson….more research!
But no thanks for possibly spending my money….with the Felt magazine!
Yes Antje, FM around the edges and Felt magazine is available as a digital or a hard copy through Manor House Publications…..https://www.manorhousemagazines.co.uk/products/textile-art-knitting-embellishment-felting/felt
Great cuffs. I really like the ones with the partially hidden beads.
Thanks Ann, glad you like them.
Thanks Ann, they’ve become a bit addictive!
I get Felt as well. I love your cuffs. You certainly made a variety of interesting colors and styles.
I’ve done several more since these Marilyn…..I’ve not got one for almost every outfit!
This is great work – how did you create the texture round the edges of the final cuffs? What is the FM mentioned by Antje? Thanks
Glad you like them Nancy. FM stands for “free motion” machine stitching which is what I used to create the texture around the edge of the cuffs.