I am out of time to do an original post today. So it’s a throwback post. This one is from the early days of 2012.
Doing samples is fun and I still have the last two. They are just fun to have.
I haven’t been doing much that is interesting to look at lately. Everything is white and is waiting for the dye pot. I thought I would show you some samples I made a little while ago. The first 2 are purple merino with some silk strips on them. I thought they came out nicely with lots of texture.
Purple wool with strips of silk before feltingPurple samples after felting
The second is orange merino with some silk and curls on it, here I wanted to felt the curls right into the background. I also wanted to see how it would stick if I put it over the silk. I really like the way the little blob of curls all became one with nice texture. The curls going across the silk stuck down very well. Enough wool migrated through the silk to grab the courser wool of the curls.
Orange wool with silk and curls before feltingOrange sample after felting
This last set I wanted the curls to be attached at the base and left loose and hanging for the rest of their length. I use a small piece of scrap floor underlay with a hole in it so the wouldn’t stick down. It worked very well. I am not sure how I ended up with one really long curl.
Small samples with curls with their resists on before feltingSmall samples with curls after felting.
I am not sure what I am gong to do with these. I might make some buttons or hair clips. Do you have any ideas?
I’ve been practicing my spinning skills for a while now, and although I have mastered the technique of spinning finer yarn, I have a true passion for the more bulky, art yarns. I’m not a great knitter, I do occasionally enjoy crochet but I much prefer to weave. When I first took up spinning, like everyone I found that my yarn loosely resembled an ‘art yarn’ more than a fine yarn. It lacked a sense of purpose and it didn’t have that look of “yes, I intended to make this”! So my priority was to be able to spin an art yarn that looked like it was meant to be an art yarn! However, at the same time, having read so many comments about people who can only spin fine yarn or art yarn I didn’t want to reach a point where I was only able to spin one or the other. So I have tried really hard to chop and change my ideas, to try and avoid the pitfalls associated with spinning only one style of yarn. I’ve also tried really hard to make an art yarn that looks like it is meant to be an art yarn. I definitely think I am making some progress on this front. Let me know what you think…
I started with a selection of merino wool top in various colours, including an orange, cerise pink and teal as a base for my art yarn. I then decided to jazz it up with some beautiful turquoise bamboo, which I thought would add some sheen and lustre to the project. Like all good art yarns, I wanted to add in some interest so decided I would use curly locks of various different colours. Finally, to finish the interest side of things, I decided to include some recycled sari silk that was made up of different random colours.
To start off, I began to add the base merino to the carder. Unfortunately, I have broken one of the belts on my carding machine – it’s the one that operates the smaller of the two drums. But for this project, it didn’t really matter as I was not wanting a fully blended batt. So I was able to add all of my fibre direct to the larger drum. I did use my little packing brush to flatten it down as I went along.
You can see some of the recycled sari silk running through this photo.
In this photo, I’m adding sari silk again to the the mix. It was helpful that it seemed to work using it like a bangle, wrapped around my wrist enabling me to place it where I wanted it. If I hadn’t done it this way, it would have been hanging down and could easily have got caught up in the drum.
Once I’d finished carding a nice thickness of batt, it looked like this…
I was happy with the way in which it turned out as I wanted to keep the definition and not have a muddy blend at the end of it. But before I started making any more, I decided to spin it, just to check I was happy with the way in which the colours turned out.
These are some shots of the spun art yarn on the bobbin but only after I plyed it! Unfortunately, I got slightly carried away because I was enjoying myself so much, I forgot to take any photos! For the main art yarn, I spun this using a fine mohair yarn to core spin around. I made a mixture of thick slubs and thinner spun yarn, so that when I came to plying I could make some nice twirly spirals to add interest. When spinning the core yarn I also added in some random curly locks, which were all sorts of colours, that contrasted with the base colours I’d used in the batts. I also added some extra sari silk into the spin at random points through the yarn when I felt it needed a bit of Va Va Voom!
I was quite pleased with the spin…but as I said, unfortunately I didn’t take any photos of the yarn before I began plying. However, I did take a photo of one of the fat singles in teal. I also spun some in orange but no photo sorry.
A fat single in teal merino.
As you can see, there was quite a lot of twist in this as I was scared it would all fall apart when I was plying!
This was my first attempt at core spinning, so I was pleased to see it coming together as I intended. I started plying the art core spun yarn with the fat single, and it looked promising…
As you can see, I’m using an Ashford Jumbo Bobbin with my Ashford Traditional wheel.
I then transferred it to my niddy noddy. I didn’t want to soak the yarn in case I damaged the slubby spirals, so decided to set it using a hand held steamer. These are a few photos of the yarn on the niddy noddy.
I tried to take different angles to show the range of effects.
All in all, I made two batts of art fibre, which were about 100g each that I used for the core spin. I didn’t weigh the fat singles but by the end, I had four skeins of art yarn, weighing approximately 300g.
Looking at three of the skeins hanging up together, it looks quite ‘jewel’ like. So pretty, I’m pleased with the colours…
These skeins look almost ‘jewel like’
I wanted to use my yarn to make a woven scarf. However, I’m not confident enough in my home spun yarn yet to risk using it as a warp. This was especially true as I was hoping to use this project for the blog. I was mindful that the art yarn was going to be quite chunky. I only had a 7.5 30/10 dent reed for my rigid heddle loom, which would have been much too small for the art yarn. This was another reason I had to choose a different yarn for the warp. Having used mohair in the core spinning, I toyed with the idea of using it as a warp. However, I had read that mohair is very ‘sticky’ when used in weaving, so I did some research first before trying it. I did find some advice that said you can use it, if you utilise a pick-up stick behind the heddle to help clear the shed. The only way to know if it would work was to try it! So, having looked at my reed, I decided that given the thickness of the art yarn I would only use every third reed. That way, I envisaged that I would be able to space the warp out evenly when I when I separated each strand. Also, it would allow more space for the art yarn to show in all its glory.
This is the warp before I started weaving. As you can see, I decided to use three different colours of mohair, just to see what the effect would be…
This photo show how fluffy that mohair really is!
I started to weave with the art yarn, and to my surprise it was far easier to weave with than I had anticipated. The ‘stickyness’ of the mohair really didn’t present any issues for me. I think that because I had only warped every third reed, it didn’t have the impact it could have had, which was good.
I only took these two photos of the actual weaving process. One thing that I discovered when doing this project, was that I don’t actually have the weaving loom that I thought I did. When I first got this loom, as I always intended weaving with art yarn so I also purchased a freedom roller. I didn’t want to have the restriction in length of weave that I would face when using really chunky art yarns. Having never used the freedom roller before, I decided I would fit it onto the loom for this project as I really didn’t know how bulky the final weave was going to be.
However, when I got the freedom roller out and started looking at how it would fit on the loom, I soon realised that there was no way it was going to work! I struggled to understand why, so I took some photographs of the freedom roller and my loom, and sought some advice on a Facebook weaving group. It was only then, I discovered that my rigid heddle loom was in fact a samplet loom!!! I realised that what I thought I had ordered, was not in fact the loom I did order! School boy error on my part, as a complete novice!
In the end, all was good as it turned out, I didn’t need the freedom roller after all (she breathes a sigh of relief!). When the project was finished, I removed it from the loom, and considered what to do with the ends. The mohair was very thin and sparse, so would not make for a good fringe. Having twirled the mohair into little tassels, I then decided to tie some additional curly locks to pad out the effect.
Here, you can see one end completed…
When I tried on the scarf, I realised that I had made it a little too wide to make it into a comfortable scarf. So it was at this point, I decided that rather than using it as a scarf, it would work better as a stole. However, this now presented me with another need…
If I was going to use this as a stole, it would need to have some sort of decorative pin to hold it in place. I didn’t want to have anything too colourful or fussy, as that would be lost in amongst the art yarn. So I decided to make a wet felted butterfly, with wings that were primarily one colour, with some accents of a different shade.
Here is my blue butterfly…who does have an orange body, just to make the body stand out a little…. The wings and body are made from merino and the accents of paler blue, are made of the bamboo, which I fixed with wisps of the merino to felt them into place. I decided to leave the resist inside, just to provide a little more firmness to him.
I did try to add some sequins as way of creating more sparkle, but as they were so small, I found them difficult to sew on (my fingers are not so nimble as they used to be!). I tried gluing them in place, but that didn’t work either! So in the end, I just left him as he was. I do intend making him some antennae, but I haven’t had time to add those in yet. He is attached to a large kilt pin, so he can be used to hold the stole in place.
I’m really happy with my first project, using my own spun yarn, hand woven, and completed with wet felted butterfly pin. I’ve used three different skills in this project, and I’m really pleased with the end result. I was surprised at how dense the weave turned out. Having only used every third reed, I expected it to be much looser than it ended up. Perhaps next time, I will try an even wider warp, using the whole loom and leaving a larger gap between the warp threads. It’s all a learning curve, but for now, I am really pleased with the results. It’s lovely and warm too! I’m almost sad summer is on the way, but I’m sure I’ll get lots of use out of it next winter,
A few weeks ago I experienced the delight that is the Auckland Fun Felter’s Retreat, 2 full days of felting bliss! 🙂
We were 13 like-minded ladies at a retreat centre, tucked away in a quiet and leafy corner of west Auckland, we had the entire centre all to ourselves and were blessed with some lovely weather.
Jenny, our organiser extraordinaire, asked if anyone would be willing to teach / lead a short workshop on Saturday morning. Due to the pandemic, I haven’t had the chance to teach face to face since 2019 so jumped at the chance and then immediately panicked that I had nothing to teach this incredibly creative and experienced group (most of the members have been felting at least as long as I have!).
After several weeks mulling it over and talking to other AFF members I settled on “animal textures in felt”, I thought this would lend itself to a series of pre-prepared samples that we could discuss the potential pitfalls and then each member could incorporate one or two into their own project. This group is so experienced I couldn’t imagine any of them wanting to waste their precious felting time watching me laying out fibre over a resist.
We all arrived on Friday afternoon, settled into our rooms and started playing with our fibres in the main hall. After talking to a few members I realised not everyone would be happy for me to share some samples and tips on how to achieve different effects, they wanted a project to follow…. my heart sank, I hadn’t planned for this, how was I going to come up with a project that included, fur, scales, eyes and locks before tomorrow morning?!!
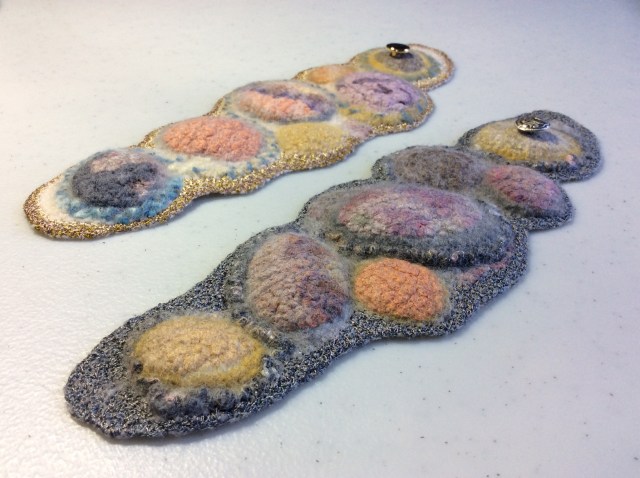
So it was that Fugly was born….
A little pod critter, with eyes, scales on his back, a lambs tail and an unfortunate ear-hair problem – for the record I would never normally recommend trying to cram so many different techniques onto one item but now he is finished I do find Fugly quite endearing 🙂
To my surprise most of the group also made pods that incorporated most or all of the techniques and we ended up with a ?gaggle, ?fright, ?laughter <insert collective noun of your choice here> of funny little monsters:
A couple of members applied to techniques to small bags with great effect…
This weekend was such a success we agreed to do it all again in just 6 months time! 🙂
The silk recycling is woven, it’s all done, finished, tutto finito bandito! I actually ran out of the red and orange silk so for the last little bit I had to dig in the bag and retrieve some matching silk with blue, red and orange. It looks just fine. Once the weaving was done I hem stitched the edge, wove in any loose warp threads and washed the yardage.
The whole mass went into the washing machine on a regular cycle, in cool water with my usual detergent. This is the way I plan on washing the finished jacket. I also did this to release any dyes that are lurking in the silk. The jacket will probably bleed dye for the rest of its life because some dyers do not set the dye in silk. The cotton warp took on a slight pinkish tint, so that helped to level the overall look of the fabric.
I plan to hang dry the jacket, so the material was taken outside to hand dry and freshen in sunlight. This proved a tiny bit problematic. The fabric was really, really heavy when wet. This is also when the light began to dawn that this was not, I repeat not, just a four yard warp. I left the fabric to dry on the railing overnight, where it promptly froze into position. Freeze drying works too, so two days later, in it came.
I was able to measure and confirm that this was clearly a massive piece of fabric. Originally, the warp was estimated to be ‘maybe’ 4 yds or 3.5 meters. It was purchased at an estate sale from one of our guild’s best weavers, but the labels fell off and things got a bit muddled when best efforts were at hand. I knew I was taking a risk, even getting it on the loom was a challenge, but I have no regrets. The length proved a great surprise and reward at the same time. It also explains why I ran out of weaving material. There are 8 yards or 7.5 meters, plenty here to make two jackets if I’m careful!
The final product is gorgeous. It just shimmers in the right light and I really want to do it justice. Even though it is a recycled product, or maybe because it is recycled, it’s important that the final result show the very best characteristics of the fibres that have gone into making it.
Our guild has an amazing resource for researching just about anything fibre related. Jan is our librarian. She is the lead book slinger in our heavy rental group called Jan and the Librarians; they have sessions once a month at the guild. I joined in last weekend and Jan supplied me with my requests for information on Japanese clothes, braids and ‘Saori’ weaving.
Japanese clothes design save weavers from the angst of having to cut their beloved fabric. The patterns are usually straightforward, basic, and interesting. I qualified this statement with ‘usually straightforward’ because I had never seen Saori weaving before nor the clothes that have been designed to use the material woven on a Saori loom. the book is in Japanese, the patterns are like origami on crack and they fascinate me endlessly. Until I can figure out the patterns I opted for a very conservative jimbei pattern from the jacket my son lent me. There are examples of simple patterns in one of the books.
This jimbei is meant for hot summer days. The sides are not stitched close but fastened with a cable stitch or stitched close with a decorative embroidery stitch. The underarm is left open, again for summer comfort.
The front is loosely tied or left open as preferred. I was interested in the reinforcement used at the bottom of the sides. These were the same reinforcements I found on the kimonos, so they clearly work.
The female version of this simple jacket has a closed wrist. It’s called a hippari. I might do one of these for winter if I have enough material left. The photos of the jimbei and hippari are from “Make your own Japanese Clothes” by John Marshall ISBN 0-870110865-X, I really enjoyed reading this book, lots of ideas for ways to incorporate the Japanese style into my life.
There are so many new things I will need to explore once I decide to start sewing this jacket. I’m really looking forward to getting the sewing machine out again.
With the first quarter challenge being all about making samples by deconstructing/reconstructing different materials I had intended to spend a day doing precisely that and detail them in this post. Like a lot of well intentioned plans time slipped away and I’m sitting here with no new samples and a post to write!
For the sake of getting this post out on time I’m going to have to cheat and show some of the deconstruct/reconstruct work I’ve made in the past.
This sample was my first attempt at Nuno Felting, made with synthetic sheers and some cotton fabrics. I remember thinking at the time “never again” as the process seemed to take forever! Obviously I did do it again and soon learnt which fabrics I prefer to work with. This sample eventually got cut up and used for brooches. Thanks to Helene and her post, which you can find here, for reminding me about these.
My second sample had silk fabrics top and bottom, cut from charity shop scarves, with a piece of my aunties wool shawl in the centre. As you would expect, being somewhat bulky, the wool section shrunk far less than the silks but all three pieces felted very quickly and easily so I was encouraged to go on and make lots more Nuno felt.
It hung around for quite some time before I decided to cut it down, add some stitching and put it in a frame. It’s now a lovely reminder of aunty Das who has since passed away.
Off cuts of prefelt, or deconstructed fully felted pieces, never get thrown away as they are always useful for cutting up and using as inclusions beneath fabric when Nuno felting.
This little fossil sample was a trial using Merino fibres and cotton wadding left over from a quilting project. The wadding felts very easily and is useful for creating ”lumpy” relief designs.
One of the great things about making felt is that, even if it doesn’t work out how you wanted, it needn’t be wasted. This mossy pebble necklace is an example of that. I had intended it to be asymmetrical but when it was finished it wasn’t asymmetrical enough. There’s a fine line between something looking intentionally asymmetrical and looking like you tried to make it symmetrical and failed! This looked the latter….. just plain wonky!
Thinking I would work on it at some point I left it on display next to a grey Bergschaf bowl……… and months later had a light bulb moment! The necklace was deconstructed and recycled to create the large surface “bumps” on this bowl.
Another deconstruct project was this triangular scarf. I loved the combination of the Superfine Merino and Viscose Fibre but wasn’t particularly happy with the design of the scarf. Several months later, after never being worn, it got cut up, pleated, beaded and recycled to create this chunky, highly textural bracelet.
My final samples were inspired by a photograph I took of barnacles. I can’t remember now what they were attached to but I saw them in the harbour in Ullapool and just loved the shapes and colours.
The hand dyed cotton fabric, left over from an old project, was given to me by a friend. The barnacles are constructed from several pieces sewn together on the machine and stiffened using acrylic wax. The next step will be to sample materials and techniques to create the very textural background.
If you have any deconstruct/reconstruct projects you would like to share, big or small, we would love to see them over on the Forum.
This is our first blog for 2022 and I can’t believe we are in February already! Christmas seems ages ago now, but I wanted to talk about a gift that I had for Christmas. I’ve been wanting to have a go at weaving, and have been looking for an excuse to splash out on a loom for quite some time. But I was really lucky, because my partner Peter bought me one for Christmas. Boy was I chuffed!! Having it as a Christmas present meant I didn’t have to explain why I was adding even more fibre equipment to my ever-expanding hobby! Poor Pete, at this rate he’ll be baa-ing me from the house! I knew that he was getting me one, as having tried to find his way around the copious models and types of loom, he thankfully realised that a surprise was probably not the best way to proceed! So I was lucky enough to get the loom I’d had my eye on for about 8 months, having settled on an Ashford 16″ loom as it looked to be a great starter model and the reviews were good. Nothing to do with the fact that about six months ago, Pete offered to go and pick up a second hand loom I bought off Facebook Marketplace, that turned out to be a 16″ Vari-dent reed instead!! (It could only happen to me lol)
So, after Christmas, I couldn’t wait to get started on putting it together. I’d watched YouTube tutorials, so had a pretty good idea how to put it together, but I also wanted to make my setup my own, by staining some of the wood a different colour. I knew from a previous project, that if I diluted Cuprinol external wood paint, I could change the colour whilst still allowing the grain to show through. Having stained the stand the colour I wanted using a sponge as an applicator, I left those pieces to dry before waxing every piece of the loom and stand as advised.
Then the fun part – putting it all together.
I’m quite pleased with the final result, and I like some of the parts show the original colour of the wood. I like that the stand is a different colour from the loom. But I found later on that I had not assembled the stand correctly, as the loom wouldn’t tilt downwards. I found out that the diagonal struts supporting the loom should have been on the outside and not on the inside of the loom! Thank goodness for Facebook, where there are a wealth of knowledgeable people to ask for advice!!!
Once I had corrected the stand, I was ready to start weaving my first project. Now anyone who knows me, also knows that I want to run before I can walk. I had told myself that I needed to start with some basic wool, to practice with first. Mmmm….that didn’t quite happen!!!!!!! I was so enamoured with this beautiful hand spun Merino Sock Crimpy Yarn I bought from a local Welsh Etsy seller called Misguided Sheep, that I just couldn’t resist the temptation. Risky I know, but I figured that if I really didn’t like the end result, I could always take it apart and start again!
It’s so lush, I just couldn’t wait to use it!
For the warp, I dug out some lovely cotton yarn that I had left over from previous projects, which I had used to crochet babies’ hats. I looked at the cerise pink yarn, and having tested it was strong enough, decided that I would use this for the warp. I liked the contrast of this yarn with the Merino Crimpy yarn, and decided to experiment.
I didn’t take a photo of the cotton yarn to show you, but I did work out that the WPI (wraps per inch) was 20, to give you some idea of the thickness of this yarn. I do have a photo of some of the hats I have made with this supply of yarn!
So – having finally managed to secure my loom at one end of my craft table and the peg at the other, I started warping my loom for the very first time!!!
I don’t think I did too badly for my first attempt. I did have a panic at one point, as I thought I was doing something wrong when the yarn returning from the peg seemed to want to go above the warp stick sometimes and over the warp stick at other times. But thanks for my friend YouTube, I realised that it is supposed to alternate between over and under each time you go around the warp stick!!! Oh, the joys of self-taught crafts!!
The next step was threading alternate threads through the eye of each heddle reed. The reed I used was the basic 7.5 DPI (30/10) one that came with the loom.
Once that was done, then I needed to tie the ends as neatly as I could to the front warping stick.
Yayyyyyy! I had done it!!!! Now for loading my shuttle with my beautiful ‘Opalescence’ blended yarn!!
But before I did that, I had to work out how to transfer the wool from a skein! I’ve not used wool from a skein before, so this was quite a nerve-wracking moment for me as I had a vision of disappearing under bird’s nest of yarn but I managed to sort it out without too much effort, with the help (or potential interference) of Eccles (one day, I’ll be trusted to do a project without feline supervision!!!).
I found the loom useful for holding the yarn for me, much to the disappointment of Eccles, who only wanted to help bless her! (Likely story!)
So – once that was done, I was ready to start weaving…
I was quite pleased with the effect. I love how the bobbly bits stand out from the rest of the weave. The other thing that surprised me was how quickly the project progressed, far quicker than if I had knitted it.
I found it interesting how the bright cerise yarn changed the overall colour of the wool….
One thing I didn’t mention, was that Alex came home for Christmas, but unfortunately the day before he was due to return home, we both tested positive for Covid. Thankfully, he sailed though it with no major problems, and the up side of covid was that by the time I managed to assemble the loom, he was still here to help me get started with the weaving!! He really enjoyed learning to weave alongside me…
as you can see………. by the smile on his face!!!!
We were both really pleased with the final result, and we decided to have some ‘Welsh Felters’ labels printed, just for the fun of it, which I attached to the bottom corner of the scarf!
We know it’s not perfect, but it’s not bad for our first attempt!! After Alex went home, I decided to have another go, and used the same type of cotton yarn for the warp and the same crimpy yarn for the weft. But this time, I decided to try alternating two different shades of lilac for the warp….
I love the candy stripes!!!
It’s surprising the difference it makes, just changing one component. I think there is some improvement second time around, as the weave looks to be a little more even I think?
One think is for sure, we’ll be weaving more projects very soon!!!
A couple of years ago a friend alerted me to the wonderful Australian magazine simply called “Felt”. It’s only published twice a year but I look forward to it eagerly as it’s always crammed with interesting photographs and articles including artist profiles and project tutorials.
One of the artists featured in the latest edition is the Canadian born feltmaker Christianna Ferguson. Christianna’s work is very colourful and textural and, as well as teaching and exhibiting, she also creates what she calls “more functional art: scarves, purses, cuffs, tea-cosies and wearables.”
Examples of the colourful and textural work of Christianna Ferguson
So, having read about her work, when I turned the page and saw the tutorial for making her fabulous little Nuno felted and hand embroidered cuffs I had to have a go!
The fasteners are particularly cute and make an interesting feature but I struggled to get them as firm as I would have liked. For an added twist I’ve included some hand stitching and a bead to my fasteners. I added some hand embroidery to my green cuff but wasn’t happy with it…..looking back at Christianna’s examples I can see that my stitching wasn’t subtle enough! I much prefer the grey one which I left plain.
The good thing to come out of this exercise, having made two in this style, is that I’ve been reminded how much fun cuffs are to make. I designed several Nuno felted & free motion stitched cuffs for my sales tables last year and this has encouraged me to get on and make more.
Some of my earlier cuffs – can’t help but think of bacon rashers when I look at this photo!Nuno felted and free motion stitched cuffs
I also got thinking about other possibilities and how much more sculptural I could make my cuffs. The next set are based on the design of one of my bangles, using a felt ball as the fastener and keeping the little beaded element.
The bangle that inspired the cuffsThe slits have been filled with half balls and metal buttons
They were all fun to make but I’ve come to the conclusion that I prefer the irregular shaped, Nuno style with the stitched edging (from last year) so I’ve come full circle! These are two I started this morning…..
Pre-felts laid out and wetted prior to feltingUsing differential shrinkage creates an undulating surface
And this is them finished. Christianna said that when she makes hers “each cuff feels like a little piece of abstract art” and I couldn’t agree more. Although I love creating larger pieces of work there is something very satisfying about making these little cuffs and ending up with a totally unique, wearable item.
My best-laid plans have gone awry, so I am going to show you a short piece I did back in 2012. Texture seems to be a popular topic so this should fit right in. Although this is an older post if you want to comment or ask about it you can.
People seem to be interested in how to make bubbles in felt. I know there is more than one way but this is how I did it. This is the storey of my bubble hat. I had made a renaissance hat form Chad Alice Hagen’s hat book. I t was to show a group of ladies that were taking a hat class with me. It is a big hat made on a resist that is shaped like a big droopy mushroom. When you finish it you make wrinkles in it and clothespin them till it dries. The problem is it looks great if you push it all forward and take a picture but from the back, it doesn’t look very good. I am sorry I don’t have a picture of it at that point.
What I did was use a shibori dying technique. I used felt balls but marbles or crumple tinfoil will work the same. I started in the middle. You pull the felt around the ball and tie it off as tight as you can. Move out from there repeating the wrap and tie. When it was all done I dropped it in a simmering dye bath. I let it boil for about an hour. When using this as a dye technique it is usually done on a non-felting fabric so you open it up later and flatten it out you have a die pattern. When you do it to felt at a boil it felts more and the bubble shapes stay in. Making bubbles takes a lot of felt. The hat would fit my dog now. If you put your hands in like a puppet it makes s great Muppet monster.
I am very busy getting ready for the first Farmers market of the season and forgot it was my turn to make a blog post. I thought You might like to see this one from 2012 again.
Ann
Last week I sorted out my wool and put all the decent size pieces on the new shelves. this left me with a lot of little bits. I usually keep bins of little bits to use as accents. Now I had way to much of that too. I sorted it all, picked out the stuff I really wanted to keep and put the rest into 4 piles for carding.
I have a large carder, a Patrick Green Cottage Industry Carder.
A friend came over and we carded it into a 4 fun textured batts.
pink/red/purple batt
orange/yellow batt
brown/gray/black/white batt
blue/green batt
The batts came out really nice and will be great for felting or for spinning textured yarn. I didn’t think I had that much until we fluffed it up to card. It is amazing how much you can compress wool when you’re stuffing it into a little storage box.
Later this month I will exhibiting at an arts and crafts event at the Baumber Walled Gardens near Horncastle so I’ve been making various small items, including these Tyvek Brooches, for the sales table. Since it’s invention by DuPont, Tyvek has found uses in a huge range of situations. The fact that it is much stronger than paper and many fabrics, as well as totally waterproof, has led to it being used as a replacement for these materials in many applications. It is widely used in the construction industry but you may be more familiar with seeing it used as packaging, FedEx envelopes are made from Tyvek paper. If you don’t have the envelopes you can buy packs of Tyvek quite cheaply from Amazon.
Tyvek paper is extremely strong and durable and great for creative crafts as it can be easily cut, coloured using any paint medium, heat distressed with an iron and stitched by machine or hand.
I made my first brooch using this material when I was looking for a contrasting texture to use with my wet felted collars.
To make a brooch I normally cut out a piece of painted Tyvek in an oval shape approximately 4” x 3” and lay it between two pieces of tracing paper. You can use baking parchment or copier paper but I find I get a clearer picture of what’s happening to the Tyvek when I use the tracing paper. Once it starts to react to the heat things happen very quickly!
With the iron on its hottest setting I hover over the Tyvek, just touching the paper but with absolutely no pressure on it. The heat causes the paper to shrink creating bubbles on the underside and ridges on the top side.
Bubble side
When the paper is peeled back you will find that it has stuck a little but it cools down quickly and can easily be peeled off.
Ridges are created on the top side
The underside of the Tyvek bubbles to create a pebble effect
The next step is to cut out a piece of felt slightly smaller than the brooch and attach it to the back using a hot glue gun. This allows me to add the hand stitched knots
Another piece of felt is cut out and has a brooch back sewn onto it before being stuck in place, again using the glue gun.
I love the fact that each brooch is totally unique as this method of working means that non of the designs could ever be repeated. My only problem is letting them go as I love them all!


 I tried to take different angles to show the range of effects.

 This photo show how fluffy that mohair really is!

 When I tried on the scarf, I realised that I had made it a little too wide to make it into a comfortable scarf. So it was at this point, I decided that rather than using it as a scarf, it would work better as a stole. However, this now presented me with another need…
 I did try to add some sequins as way of creating more sparkle, but as they were so small, I found them difficult to sew on (my fingers are not so nimble as they used to be!). I tried gluing them in place, but that didn’t work either! So in the end, I just left him as he was. I do intend making him some antennae, but I haven’t had time to add those in yet. He is attached to a large kilt pin, so he can be used to hold the stole in place.


 It’s so lush, I just couldn’t wait to use it!


 I love the candy stripes!!!


 Since it’s invention by DuPont, Tyvek has found uses in a huge range of situations. The fact that it is much stronger than paper and many fabrics, as well as totally waterproof, has led to it being used as a replacement for these materials in many applications. It is widely used in the construction industry but you may be more familiar with seeing it used as packaging, FedEx envelopes are made from Tyvek paper. If you don’t have the envelopes you can buy packs of Tyvek quite cheaply from Amazon.


