Browsed by
Month: June 2020

Creativity old and new

Creativity old and new

Imagine if you will Inspector Clouseau with a huge magnifying glass….that’s me looking everywhere for my felting mojo! Nada. But I did find some ‘energy’ – woohoo! So with the recent good weather and this found bit of energy I have been in the garden….but still as Inspector Clouseau!

In my defence I have sewn a batch of 18 then a batch of 15 masks for our village (whoah, the folded version is fiddly, you just get going and then have to keep stopping the sewing machine, and particularly as at one point I’ve been sewing through 13 layers of fabric – in hindsight I wish I’d chosen the shaped masks!). I’ve also finally made lining covers for two large upholstered sofa cushions. A three year out-standing project now ticked off my to do list. The stuffing had expanded and was taking up so much room. Also, in my defence I’m mulling over how best to create the cushions I mentioned in my previous post (https://feltingandfiberstudio.com/2020/05/12/a-yarn-and-preparation-experiments/), to make use of the waste yarn, (which I have rolled into hundreds of circles and now crocheted together). Sometimes my thought process has to filter through many layers!!! Although, even with my magnifying glass, I haven’t found my mojo, I haven’t really been idle.

So, I will briefly show you my recent endeavours – to find what once was….my former creative garden – hence Inspector Clouseau. Due to illness 4 years ago my ‘arty’ garden became lost and is only just emerging. Some plants that should only have been a metre high have been 4 metres high. Mother nature has had a field day, with green thugs smothering and killing so many beautiful ‘specialist’ plants. But I am determined to stay positive and see the bare soil as an opportunity for me to source new plants when we finally emerge from our lockdown.

01

Somewhere in here is a path, you can just see a watering can in the middle of the picture below. I’m about halfway into this corner of the garden (we have 7 corners!), having already macheted my through to this point several weeks ago.

Tadaa. A path, complete with the watering can! The rain we had weeks ago was welcomed by the weed seeds and the part area I had previously weeded is covered in weeds….again, shin high (by the watering can). It is true what they say about one years seeding = seven years weeding, because if you look closely these weeds are giving way to a fine carpet of yet more, over the very bare surface!

01d

02a

This corner is still a work in progress but the last two days of my heavy manual labour (good for removing bat-wings!) has seen the chest-high nettlesagainst the far wall and other thugs dug out and some creativity brought back.  Before anyone inquires of the brown plant in the pot – it is dead!

02b

This has all been current activity and not of the fibre kind, so I thought I would go back to some old creativity.

Many years ago I had a function to attend and I wanted to ‘jazz’ up a black dress. At that time burning through layers of organza/voile was popular.

I’m an avid collector of interesting images, whether from a magazine or my own photos and often reference and use these images to inform various pieces of work. The process is simple – trace the dominant lines. If the image is too small, or the colour confusing, enlarge it to a black and white copy. This can then be flipped, rotated, mirror imaged, cut and random pieced etc etc.

01a

01b

Thankyou Tesco – part of your magazine lives on as your photos will become more design inspiration!

For my dress embellishment I recorded inspiration from various places and finally traced the lines from 2 landscape pictures.

03

04

Using leaves and autumn leaf colour as further inspiration I selected appropriate pieces of organza/voile and cut some into snippets.

The above tracing for my sleeve embellisments is a portion of the Chinese terraced rice field picture.

A base layer of organza was laid down (there are no photos as this was done long before I ever thought to take ‘stage’ shots), the various coloured snippets were scattered over in sufficient number to build up about 3 or 4 layers, then another continuous piece of organza was laid over to ‘trap’ the loose pieces. On top of this sandwich a piece of clear, water dissolvable fabric was laid, onto which I had drawn the design. If any snippets were extremely out of place they were adjusted before everything was pinned in place.

08

Following the design, I machine stitched over the lines using a simple running stitch, ensuring that I also stitched the edges. The collar and sleeve leaves were all undertaken as one piece.

At this point I have to tell you I was creating this piece in my talented sewing buddy’s (SB) house who was also using the same method to create her own piece.

After completing all the running stitching, the dissolvable fabric was washed away and the piece was dried – easy with a hair dryer.

Then it was onto the fun element….using a soldering iron to burn away successive layers of the organza. On my traced design you can see the shaded areas that I used as a guide for the full cut-outs (the tracing is handed to the finished piece). This is delicate work, requiring concentration and a delicate hand….SB was not quite so delicate handed and gradually she ended up with a smaller and smaller main body of work until all that she was left with was a piece the size of a small mobile phone and lots of pieces. She kept burning through all the layers! We have recounted this memory many times and each time it produces fits of giggles.09b

Having decided I’d burned enough away I then reinforced the edges of the cut-outs and added decorative satin stitching over the running stitches.

The final flourish was to add beads to the collar and sleeve leaves.

The collar is still intact (some of the photos here were taken today), in fact I actually wore it this last festive season. I mention this because the model is sooooo much younger. It wasn’t until I checked the properties of the old photos that I realised I was 14 years younger!!!

I’m sure many of you tackled this technique – oh so many years ago – what did you produce?

Felting Alfresco (Outside! Its Summer!)

Felting Alfresco (Outside! Its Summer!)

Fortified with Ann’s Butter tarts with pecans and raisins as well as cheesy scones I was ready to begin.

  1-2 Ann inspires more felting with her fine baking!

We were expecting dry, very warm temperatures for most of the week so up went the umbrellas to keep the lettuce from bolting out of their planters and add a bit more shade to the side yard. (Really, it’s just the part of the driveway we don’t drive on.)

  3-4 the side yard with Lots of potted plants and a few trees.

You may have heard me mention we use to have a very tall dog (he was a failed lab experiment. He seemed to be an attempt to combine a lab with a Russian wolfhound. It did not go as well as expected.) He also thought he was a cat. He didn’t like to get wet so we built him a covered area by the gate. He also used my flower boxes by the garage as a litter box.

5

5 Since Miaka’s, centre of the Universe, slept on the big  couch pillow,

66 Barking Cat, Mr. B, was determined to balance on edge of the oversized pillow too.

77 the covered area that we had to make so Mr. B would go out to the side yard if it rained.

I cleared the metal bench of plants and gardening clutter that had collected there and moved the stack of mesh plastic baskets holding fleece to be washed to one side. This gave me room to sit. I brought out a small folding table. Glenn had used it for a blacksmithing demo and it has not been quite the same since. Now with a place to spread out a bit and a lovely view of the snow blower I was ready to start work.

When we last left off,  Mer-pet 1, aka the young female great white shark, was looking vary shark-ish. Well, at least shark-ish enough that she would not easily be mistaken for a gold fish. I think we could make her happier if she were not easily mistaken as coral or other oceanic rocks (she is made of  brown/beige  mixed alpaca fibre so she was rocking the camouflage look a bit too much).

After a quick acquisition run last week to get better base colours for the Mer-family, I am now ready to think about colours. With Guild work increasing and a trip out to get the walker (which I took for a test roll)  i cut back my goal for this week.  It is now to get the base colour onto the shark. So I started up my audio book and got to work making her more colourful.

 8-10 Sharkette lounging in fibre.

1111 She is either tying to help speed up the addition of colouring or she is hungry and is eating the needle holder.

If she doesn’t eat my needle pen, I will be adding layers of shading to give her a more sexy shark look. i am pleased with the way her skin ripples as she flexes her tail, i hope with a bit more added shading she will be much more impressive.

This slideshow requires JavaScript.

12-15 A few shots of the not quite as naked sharkette during the alfresco felting.  Please don’t mention cream sauces to her, it may make her nerves or hungry.  (Neither state is good in a shark.)

Basket Mark 2 Finished.

Basket Mark 2 Finished.

This week I finished the basket. All it really needed was to have the handle finished and that would have been fast and easy. But a white basket is not only boring it does not fit with me. I can’t keep anything white clean for long.

So faze to of the basket: dying.

I have a turkey fryer/corn cooker for dying outside. After clearing a spot on the porch for the dye pot and my son cleaning all the bugs and spiders and webs out of the hose and burner I got some water heating. Usually, when you are going to dye wool you wet it first. it gets you a more even take-up of the dye. I didn’t want that in particular so I popped it in dry.

you can see I only put it in partway. Ther is about half the bottom of the basket sticking out. This is limy green. after it had cooked for about 45 min just under a boil the water was clear and I removed it and added a dye from ProChem called Mallard. It’s a blue-green and put the basket into the pot the other way up. I forgot to take a picture of that, sorry.

Once the dye was exhausted I rinsed it and blew the beach ball up in it again, another alien.  I am really pleased with the way the colours came out.

Since I had the dye pot hot I dyed some wool too.

My original idea was to use a piece of a tree branch in the handle.

It was ok when I was holding it but as soon as I put it down this happened.

It dropped right to the bottom. So much for the cream buns you just bought. It is much too heavy. Looking back at the pictures I had seen with wood in the handles, they were all small and the wood was mostly driftwood, which is much lighter. Those baskets seemed to be more decorative than useful.  I went back to just rolling all the excess wool up into the handle. It makes a nice sized comfortable to hold handle.  You can see the colour mixing better now its dry.

when I let go of the handle It still falls to the side but not nearly as much, so the cream buns are safe.

You may have noticed that one side of the basket stretched out more than the other. I think it was from the ball being blown up in it. I should have rewet it and fulled it some more but I didn’t want to. I was thinking of how to fix it or make it a feature rather than a flaw.

I pinched it a couple of different ways and that would have worked but I didn’t really like it. the heck with it, it’s just for me.

The basket part feels a little light even though there is 200grams of fibre in it.  It was a bigger resist but I reasoned to myself that there is more wool in 200 grams of Corriedale then there is in the same weight of Fin. I didn’t put any yarn in it, mostly because I forgot. I wanted to prevent the basket lip form stretching out any more. I tend to overfill my baskets and bags. Off to search my handspun for some appropriate yarn. I found a yarn that is predominantly the same colour as the Mallard on the bottom of the pot and did some decorative and structurally helpful stitching. I am pleased with the results.  Sorry about the pictures. I was trying to keep my arm out of the way and get far enough back to get the whole basket.

I think there will be more baskets in my future.

Color Mixing with Drum Carder

Color Mixing with Drum Carder

Experimenting with color mixing by drum carder was on my list of to do’s and I got around to that this past week. I created a sample with similar colors when color mixing by felting alone in this post.

First off, I had to get the drum carder out and find a space for it on my studio table. The chosen colors were blue green and red orange. I wanted to see how the drum carder mixing differentiated from the felted layers of the same colors. I used the same proportions of colors that I used in the prior sample, which was about 3 to 1 red orange to blue green.

Here is the batt that I created with those colors. The photo on the left is one run through on the drum carder and the photo on the right is two runs through the carder. I then tore the batt in half as I didn’t need that big of a felt sample. So I still have another sample I can make in these colors.

I wanted to try a different way to texture the bark so I used some cut up pieces of heavy interfacing (Pellon). It’s probably about a quarter of an inch thick. I peeled apart a layer of the batt, put the interfacing pieces down and covered with the rest of the batt. After felting, I should have split the batt into two equal pieces, that would have worked better than a thinner layer on the bottom.

The front is shown on the left and the back on the right after felting. As you can see, the interfacing came through the ends as I didn’t have enough wool covering the ends. And the back shows that I had too thin a layer under the interfacing pieces. But it was easier to see the interfacing to stitch around. The interfacing was not thick enough to feel through the wool and didn’t give a good texture. (Doesn’t the photo on the left remind you of a short rib?)

I then added some free motion machine stitching so the texture was more evident from the interfacing pieces. I also trimmed off the ends that were showing and did a little needle felting repair in those areas.

Here are the two pieces side by side. The one on the right does have silk nuno felted on the top too. Which do you think works better? The carded sample is more homogeneous in neutralized red orange but I do like the mottled appearance of the layered color mixing on the right. The carded sample definitely needs more value contrast than what it has now. How do you mix your colors of wool? We’d love to hear about over on the forum.


Dipping my toe back in …….

Dipping my toe back in …….

During most of the Covid 19 lockdown in the UK I couldn’t travel the 8 miles to my studio. I did bring wool home, but I haven’t made much felt recently. Early on in lockdown I decided, while the weather was good, to focus on my long-neglected garden. I thought it would take a couple of weeks to knock it into shape. The weather stayed good so I stayed in the garden. 10 weeks later I found I’d slipped into gardening full-time.

As the only fibre involved in my garden project was the permeable membrane under the reclaimed brick circular patio I built…

brick circle
Very proud of my reclaimed brick circle!
View from brick circle
View up the garden

….that adventure doesn’t have much relevance here. So, I’m going to tell you about my first felt-related venture back into the outside world.

One outlet for selling my work is a beach hut gallery in Whitstable harbour (the coastal town where I live). It’s an open-air market offering locally created art and craft plus international food. I’m a member of a group called ‘Made in Whitstable’ which rents one of the harbour huts year-round and we share the time there between 7 individuals / groups.

As it happens, one of my weeks in the harbour came very soon after open air markets were allowed to reopen in England on 1st June. What to do? The leap from venturing out only once a week (to food shop) to market trading seemed quite daunting. After much thought and discussion (via Zoom and FaceTime, of course) I decided I’d give it a go.

clean hut
I gave the hut a good clean as it’s been empty for a while

The market organisers have done a lot of work to put in safety and social distancing measures in preparation for reopening. I visited the market before it reopened to have a look around and see what other traders thought.

I then filled the hut with my pictures (about 50:50 felt and photo canvases). I only took felt that was behind glass as felt asks to be touched and I couldn’t be sure that was safe. I stocked up on hand sanitiser and antibacterial cleaners. I made various signs to cover different scenarios. I thought I’d probably only take card payments, though I did have my cash bag and disposable gloves just in case.

inside hut left
Inside left
Inside hut left felt
Some of the felt pictures
inside hut back
Back Wall
inside hut right
Photos on the right

I planned mostly to stay outside the hut when open but I had two fallback positions in case there were too many people. First, I could cordon off the entrance so I could be in the hut and other people could look in but not enter. Second, I could close it and go home at any time.

I had a few ‘social distancing’ nightmares in the nights before opening the hut and did feel quite anxious as I took the short walk from my home to the harbour on the first day.

Hut with barriers
My hut with barriers & tape

There were lots of barriers and hazard tape everywhere; signs reminding people to keep 2 meters apart; a one-way circulation system with arrows on the floor and boxes drawn around the hut entrances. It looked a bit like a crime scene!

My first day, a Friday, was very quiet in the morning. People seemed to be a put off coming into our part of the market. At lunchtime it started to rain, so I closed and went home. Saturday and Sunday were warm & sunny. Whitstable is a very popular day / weekend trip destination within easy reach of London and can get very crowded, especially with good weather. Was this going to be a problem? No!  There were lots of people on the beach and the food huts were busy but the footfall in our area was low.  By Sunday the barriers were slightly adapted to improve flow. By Monday, even more so. There was always the option of putting in more barriers or limiting the overall numbers but these weren’t needed.

market and relaxed barriers
Sunday
hut with no barriers
Monday


Sales overall were disappointing but I don’t regret having a go. It was nice to chat to people, even if it was from at least 2 meters away. There were some issues with queues near the food huts but people are tackling them and they didn’t impact on my area. My next week in the Harbour is in late July and this has given me a chance to try things out; to see how it works and how it feels. Indeed, the chance to dip my toe back into the water. I can look forward to the next time with more confidence that I can cope with and adapt to the new environment.

whitstable panorama copy (2)

First Mer-Pet

First Mer-Pet

First Pet for the Mer’s (“it followed me home, can we keep it?” begged Mer-Teen “Only if you take it for walks and clean its litter box” replied Mrs Mer.)

This has again been a busy week. We were off to see if the walker had arrived on Friday and found out that they had received 2 walkers they hadn’t ordered and not the one I had ordered. So maybe it will be this week.  Saturday we had a trip out the Farmers Market at the log farm not too far away from home. Ann and her Husband have a booth there. (go for the butter tarts, stay for the cookies, sausage, meat pies, bread …. And that is just at Ann’s booth. Ann is multi- talented!!)


    1-4


I added the fingers and hands to my Mer-Teen and worked on musculature for the forearms  I did a bit more musculature on the tail giving it vestigial quads, Knees, gastrocs and even Glutes (I may have to upgrade the gluteal endowment on her parents!! They are sadly lacking.) I now have the under-structure about to the stage I want for the Mer’s. So I ordered some coriadail.  Most were for possible skin tone blending from our local fibre store, Wabi Sabi on Wellington St.  They were doing order on-line with pick-up 2 days a week. Glenn kindly said he would go fetch the fibre for me.


 5-6

While I was waiting for the fibre pick-up day to arrive, I considered possible pets that the Mer’s should have. So I browsed Google image for sharks and found I liked the great white and the huge one that had some particularly good photos taken of her.

This slideshow requires JavaScript.

 7-13

Armed with a substantial selection of sharkness from many different angles I set to work building an armature. Using the aluminum wire from the dollar store I made a basic skeleton with lower jaw, pectoral, dorsal, second dorsal and caudal fins.

14 14

Working from the same, now quickly shrinking batt of alpaca, (thanks Ann!! I hope you find another one you don’t want!), I started at the head/jaw and worked towards the tail.  As you can see, I was watching Sara’s Felt along flowers while building a juvenile great white shark.  Just to the right is my photo reference to help me get the jaw and head the right shape.

1515

After the felt along was finished I switched back to playing Runescape while felting (Multitasking!! That is my greatly missed Dog’s character in the gold armor. I got him an account because it wasn’t fair that the cat got to have an account and he didn’t.) You can see I have reached the pectoral fins and the nose angle and jaw line are now closer to realistic.

16 16

Eventually I put on an audio book and really made some progress. Now I’m only a few fins short of a shark.

  17-18

A quick break for gardening and it was on to the missing bits to finish her off.

   19-21

So now I have the Mer-teen under layer reasonably close to what I was hoping for and the female juvenile great white shark under layer done .  I have one more pet underway but I will show you that later.

This slideshow requires JavaScript.

 22-31

3232

Today I was off to Wabi Sabi to pick up my wool order (Coriadail and Shetland). I separated each colour into its own bag with a tag so I can reorder, as I get low. (This will help a lot since I don’t always remember where I got a fibre)

33-34

Tomorrow I am hoping to start some colour blending, now that I think I have the base colours I want to work from. I still have to find the alpaca I was looking for and part of that bump of white South American coriadale I got quite a few years ago. I think I saw them in the living room last, now where could they be hiding?


Stay healthy and keep your hands in warm soapy water with wool.


3535


Felt Basket Mark 2

Felt Basket Mark 2

I thought I would have a try at another felt basket. If you missed the other one it is here: https://feltingandfiberstudio.com/2020/06/01/second-quarter-challenge-mark-1/  It was part of the second quarter challenge and I guess this one counts too as we aren’t out of the second quarter yet. This one I wanted to be bigger and wider. I made the resist 30 inches (76 cm)across

This is how it compares to the one for the grey basket

I decided to use white Corriedale wool for this one. Corriedale is readily available so it might be a more useful example for people. It’s white because I only 100 grams of dyed Corriedale. I used 200 grams for the basket. I was sure I took a picture of the resist covered in wool but it seems to have disappeared. I am sure you can imagine a big circle covered in white wool.

Ta da, a wave of my magic felting wand and

The finished basket is 19 inches ( 48 cm ) across.

Next, I blew up a beach ball inside the basket and rubbed away some of the wrinkles that showed up when I tried to make it round with the ball.

It is now sitting outside on the table drying. It looks pretty freaky but it will be the right shape when it’s dry. Next week I hope to show it to you finished, and looking pretty and more basket like.


Update on Nuno Felted Landscapes

Update on Nuno Felted Landscapes

I started working on some nuno felted landscapes in April. It has been stop and start on getting them completed. But I thought I would give you an update on the results so far.

I showed you Flathead Lake at the end of April. I got a few comments on perhaps adding more stitching to the trees. It took a bit of contemplation about whether I should add more stitching. The main reasons I decided to go ahead and add some stitching is to bring the trees more into the foreground and to hide some of the horizontal stitching that I did on the lake area.

I used a #12 variegated cotton thread and free motion stitched the branches. I do like the highlights that it added and it definitely helped cover the horizontal lines of “lake stitching”. Now I need to find a “matte” fabric and get it ready for framing.


This is another background. I decided to hand stitch this one. I’m not sure why since it is the biggest one. It should take me quite a while especially since I have become disenchanted with it. I was working on it steadily but that has gone by the wayside.

Here it is after stitching the distant pine trees.

Then I stitched more foliage and aspen trees. I am using seed stitch and using a variety of colors. I was thinking it was similar to impressionist paintings with little dots of color. I think painting is significantly faster than stitching. So this is definitely a slow stitch piece.

Here’s a closer look at the stitches. I think I got discouraged because I still had so much to fill. I will be adding some different stitches into the foreground but I have to get the further distances completed before I can start on the foreground. What do you do when you get discouraged in the middle of a project? I have been working on other stuff, so it isn’t that I am not doing anything. But this one is not very appealing right now. Any suggestions?

Time for a new hobby

Time for a new hobby

For many of us going into lockdown meant we suddenly found ourselves with lots of free time. For the first month I carried on felting and stitching, working on a few projects I had planned for Summer exhibitions. By the time we got to the end of April reality had hit home and it was looking less and less likely that those exhibitions would be happening before the Autumn, if at all this year! For ages I’ve been wanting to take up dressmaking and it suddenly dawned on me that I’d now got the time for a new hobby.

I’d only tried this once before when I made my “duvet dress”, a tunic made from an old Ikea duvet cover. It was a very simple pattern, bought because I liked the style but also because it said “Yes, It’s easy” on the front of the packet! I was pleased with the result but never got around to doing any more.

img_2746

What I really wanted to do this time around was to make a pattern taking inspiration  from a Masai dress I particularly liked that was well worn, and accidentally splashed with bleach. I took it apart, laid each section onto lining paper and traced around, adding half an inch all round for seams. I found some 3/4″ elastic for the sides of the hem but didn’t know how to create the elasticated band across the back of the dress. In the end I figured, as it was such a loose fit, an elasticated back wasn’t really necessary. Instead I cut a pattern for a plain band, the same width and depth as the elastic panel, and gathered the excess fabric onto it. I didn’t have any dress fabric, and besides I wasn’t sure if the pattern would work, so used the old left over Ikea duvet cover to make a toile, or muslin.  

This was quickly followed by a couple of camisoles. The pattern was created by tracing over the top section of the See & Sew tunic pattern.  I took the bottom of the armhole and the centre fold as my base.  It didn’t want to be as loose as the tunic so the side seam was narrowed, the neckline lowered and the shoulders were shortened and narrowed. A quick search on YouTube provided techniques for adding facings and for making and inserting thin straps. Once I knew the pattern worked a Principles skirt was cut up and used for the second cami…..nothing will be safe in my wardrobe any more!

The next item was based on a favourite jacket. It’s had a lot of wear and become very pilled and bobbly but I was determined not to throw it out until I’d found a replacement. This was a bit trickier to trace around as it’s stretchy and I couldn’t bring myself to take it apart! There are lots of Youtube videos showing how to fold items to trace around them…..it’s easy enough as long as there are no darts involved…..nothing I’ve traced so far has had darts! One thing I learnt from drawing around the jacket sleeves though is that it isn’t enough to simply mark the fold line…..you need to allow a little more width when dealing with thicker, folded fabric. My first attempt resulted in the sleeve being a little too narrow. The other thing to bear in mind is your choice of fabric. It was quite a challenge searching the house for a fabric with similar properties to the original to make the toile. It needed to be thickish, stretchy and ideally something that wouldn’t need hemming. The nearest match I could find was an old fleece blanket with a pattern of enormous spots! I’d no intention of this being a finished item, it was just meant as a trial, but since the weathers cooled off I’ve worn it twice already!!

Another project has been this midi length dress, recycled from a charity shop buy. It was four sizes too large for me but I loved the fabric and knew it would come in useful sometime! After taking it apart the sleeves were used to made saddle bag pockets, the side seams were taken in and the hemline scalloped. I’m not normally a flowery type but it’s worn with a pair of wide leg linen trousers and I absolutely love it! 

img_2721-1

I’m loving my new hobby and getting a bit obsessive with it….these items are just a few of what’s been made so far from recycled fabrics.  Although our shops are not fully open yet, last weekend I did manage to pick up a couple of new dress fabrics, neither are quite right for the Masai dress but it will be fun making something from them! 

BC4B4D7D-685E-4EF4-B551-8F721B81F60D

A Busy week, but my Mer-Teen is underway

A Busy week, but my Mer-Teen is underway

Today I wanted to tell you about the Quadra-dents, and show you how i made them.  I know they should be Tri-dents but I like the look of Four points better than three.  As frequently happens life gets busy or interrupts and plans get put aside for other plans. so i will get back to the quadra-dents i promise!

P1650915

 the Quadra-Dents

Unfortunately, last week I started to feel a bit better, so tried to catch up on gardening while sitting in a chair. I was working on weeding the tall pots along the driveway, transplanting catnip out and planting the herbs and vegetables in. I think I just did too much of it. To be fair the side yard and some of the back patio look much better.  I will be having words with that chipmunk that seems to have other plans since he or she keeps digging deep holes in pots I have already planted and moving or removing things I had wanted there.

This slideshow requires JavaScript.

1-10 Maybe these will give inspiration, Highlights of the front, back and side yard (yes that is a portable forest. the city wont let me plant poplar trees in the ground so the self seeded ones that start in my garden get moved to pots and grow happily there)

I did get a bit of felting in between meds, Dr’s visits, checking out a walker and weeding.

11 11  it is important to check Vital ergonomics when getting a vehicle.  My early cars were purchased on their ability to carry my warp waited loom in the hatchback.  Now its wheels and fiber as well as the looms!

 My Mer-teen is underway. i think she is taking after Mr. Mer since she also has great lats! (It must be all that swimming).  My goal is to get all the under-structures done so I can look at the proportions and keep them in scale.

12 12 Skeletal Mer-teen, Mrs. Mer and Mr. Mer.

This time I started working from the head down instead of starting with the legs and tail then working up. I have varied the order of application of fiber each time and seem to be getting a good outcome from all three.  So order may be more preference or to help keep in scale for the head and body.  This time I am going to add hands after I have the rest of the body blocked in. That will allow me to lengthen where the wrist is, if I need to. I think the torso may be a bit long on her parents but I’m short wasted and don’t like water thus haven’t seen a mer-person so maybe they are longer wasted than I am.

I have yet again notice felting while listen to an audio book ( this time  part of Wen Spencer’s Tinker series)  while  it is very productive, does make me forget to take photos. I remembered to take some as I switched books to Lynsay Sands’ the Trouble with Vampires.

I made latissimus dorsi, SCM and upper traps. I made use of the 3-needle pen tool, and the up to 20 needle tool (set up for 12 needles) and various single needles for different parts of the body, head and arms. i am continuing to use the slightly felted batt of alpaca in variegated  shades of light brown- beige. it may felt a bit quicker with some wool content but i am liking the effect the alpaca is giving.

131415 
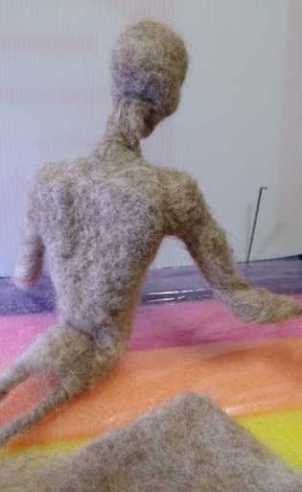
13-15 making and adding upper Trapezius

1617 16-17 you can see the lateral superior border of pec major heading towards the bicipital grove,  the deltoids,  both the clavicular and sturnal heads of SCM and both clavicle.

I will keep working on the under-structure and hopefully will be ready to start the top layer soon.

I hope you are all having fun felting! Hopefully you are felting and relaxing out in your garden enjoying the summer! Stay safe and healthy!