Recently, I got an order from Sulky for more machine threads and a product that I have wanted to test out for a while.
It’s called Sticky Fabri-Solvy. I have used the Fabri-Solvy for machine lace and liked it. But this one has a sticky surface, so you can press it down on a piece of fabric or felt and it sticks. Or you can stick smaller bits of fabric or felt down to it and then stitch. You can also run it through the printer to print a design on it and then use the printed design for your stitching guidelines. I haven’t tried that yet but I’m planning on testing that out as well to see how that works.
Here is a piece of the Sulky Sticky Fabri-Solvy. It has a backing paper which you pull off to reveal the sticky surface. I did a small square about 6″ x 6″ for my sample. I cut two pieces the same size.
I then cut up some old printed felt in small bits and place it over the surface. The felt sticks down and holds fairly well.
I kept adding felt in a variety of colors filling up the blank spaces. You could certainly leave blank spaces if you wanted the result to be more open and lacey.
Once I had all the felt laid out, I then put the other piece of Sticky Fabri-Solvy on top with the sticky side down. I should have left a bit more room around the edges but it ended up working out OK although the edge pieces tended to bulge out and want to jump off before being stitched.
I then used four of my new thread colors to free motion machine stitch over the sandwich. I didn’t use a hoop and it seemed to work just fine. You have to be careful that the edges don’t get sucked down into your machine though. I used a meandering stitch to give an organic feel. I didn’t want any straight lines.
And here is is with all of the stitching done. You need to catch all of the pieces of felt with your stitching to prevent the pieces from falling apart once you dissolve the water soluble fabric.
Then you just stick the whole thing in some warm water, let it soak for a bit and the Sticky Fabri-Solvy dissolves and disappears. If you don’t wash it all out, you can use it to help hold the shape in different positions. It acts like a stiffener. I washed mine mostly all away so there is no residual stiffness. I plan on trying this technique with some sheer fabric pieces too.
Hi all of you amazing felting and fiber Creatives! My name is Tesi Vaara and I do not work with felt but I really enjoy following this blog and seeing your work and your processes! Ruth Lane asked me to blog about some recent machine lace work I have done, so here goes! I met Ruth in Feb 2017 when we both began a journey with Gail Harker in LaConner, WA. USA. We spent two plus years taking Gail’s Level 3 Art and Design course together. I really admire Ruth’s art work and her journey to express herself through her work.
My maternal grandmother was always working on some type of project. She was a weaver who also did pillow lace and tatting and other fiber work. She had her own “tribe” back in her day that would get together every week. The women in her group were an important part of her life. They were a pretty tight group. When I was young, I would take her hankies that had tatting around the edges around to all our neighbors and sell them for next to nothing.
I recently took a Machine Stitch class from Gail Harker. http://gailcreativestudies.com/. One of the techniques we learned was to make lace using our sewing machines on wash away stabilizer. I was playing with some designs in my sketchbook and remembered that I had a box of my grandma’s lace pieces stored away. I’d never really studied her work before. I had watched her create her work, but she never taught me how to do any of it. I’m not sure that she had the patience for teaching a young child to do such fine work.
It was interesting to study her patterns and figure out if I could mimic them on my sewing machine. I felt a deep connection to her as I studied her work. I have a greater appreciation of her skills now. I don’t know if her patterns were her own design or if she followed someone else’s design.
This first piece is part of a table runner. Back then the threads she used all seemed to be white or off white.
The second photo is my interpretation of her work.
Her second piece is also from a table runner. This is some of her pillow lace work. My grandfather made many of the tools and devices my grandmother used for her work. Lucky her to be married to such an ingenious man! He made several different size pillows that she worked her lace on and I think he even made some of her bobbins. They had beads and trinkets hanging off them. I can still hear them clinking together as she worked. I have fond memories of watching her work on her pillow lace. I had strict orders to never touch anything but sometimes I just had to fondle her bobbins when she wasn’t looking and take a closer look!
The following is my version of her pillow lace work. My first passion is creating art quilts and I had envisioned placing this piece on a fabric background and adding machine stitch in the open areas to mimic the woven look of her piece.
Then the vision of this piece becoming part of a garden gate popped into my head. I had to quickly sketch that idea out for future use. I can make lace flowers, lace leaves, lace stems, lace pebbles!! My very own rabbit hole…
I’m pretty sure my love of lace came from my grandmother. I had designed and crocheted a shawl for an assignment in my Creative Clothing class to create a statement piece to be worn around your neck. A few months after I made the shawl I came across the box filled with my grandma’s work and found a pink shawl wrapped in tissue paper. It was pretty delicate after all these years but I was so amazed at how similar the two were! In 2018 I participated in an exhibit at the Pacific Northwest Quilt and Fiber Arts Museum called “Making It My Own”. https://www.qfamuseum.org/. It was a great honor to be able to exhibit my work next to hers at the museum.
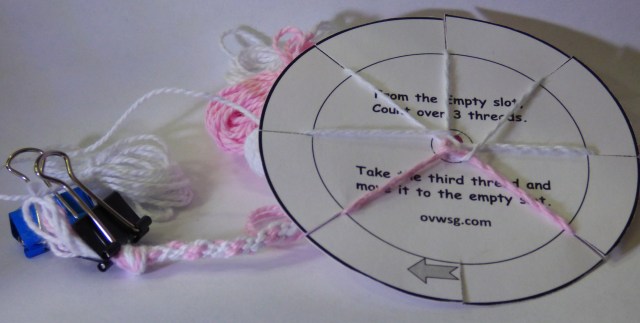
For this falls’ guild sale and exhibition hands-on area, one of my suggestions was a cardstock marudai. Since then I have been sampling colours, and varying thicknesses of cotton yarn.
Prototype marudai with garden Rabbit holder.
I started with the “embroidery” cotton from the local Dollerama. Since you can’t pull it apart it’s not really embroidery thread but it is cotton! The cotton comes in packs of dark solid colours, pastels and variegated colours. I have a fondness for blue so I pulled those colours for my lanyard. I had a mid-tone and light blue as well as variegated.
“100% Cotton, each skein is 7.3m/23.9ft.”
The marudai should be printed out on a heavy cardstock. I made a template in publisher then saved it in PDF and Jpeg.
the 4 version of the English edition
You will also require;
8 slots,
a hole in the center and
7 strands of yarn.
Good options are
tiny elastics and a
mid-side Bulldog clip
Tiny hair elastics and Bull dog clips were available at the Dollar Tree and Dollarama
With help from the guild I made a French side. Originally it was to be on opposite sides from the English one but my printer would not pull the paper in consistently so I was getting miss-registration I couldn’t correct, So it looks like there will be French and English versions separately. (Sorry!!)
Set up:
Depending on how you set up the colours and position them you will get different patterns. (I have not yet tried all the variables) gather all the 7 strands together and Tie a knot (leave extra length after the knot if you want to have a fringe). Ether push the knot through the hole in the centre to the back side or from the back side, thread the yarn through leaving the knot. I add the bulldog clip to the knot so it won’t slide through the centre hole. Skipping one slot, space your strands into the 7 other slots. Wind your strands up so they’re about 4 inches loose; the rest wound up in a butterfly. Use the knot for marudai bobbins or elastic to keep if from slipping when you don’t want it to. (See the picture above)
How to weave:
This is really important. I’m sure you have heard how complicated weaving can be! without trepidation keep reading!
Step 1) From the empty slot count clockwise to the third strand.
Step 2) Pull it out of its’ slot and move it to the empty spot.
Step 3) rotate the marudai so that the empty slot is towards you again.
Repeat from step 1 until you run out of yarn to weave.
When the cordage you are making gets too long curl it up and clip it with the bulldog clip.
Keep the marudai surface flat and the strands will not tangle as much. Also keeping them not too long will help keep them in order.
So that wasn’t too bad for instructions. Even if you have the type of dyslexia that gets left and right confused and thinking clock wise and anticlockwise dose not help, it will still work as long as you keep going the same direction for the length of the band. I look forward to seeing what you do with your cordage. Trim for hats or ties to keep the hats on, lanyards for scissor cases?
Some of the patterns I have tried so far;
I tried 1 colour /6 of another colour
I tried 2 of one colour / 5 of a second colour
I tried 3 of one colour / 4 of a second colour
I tried 1 colour / 2 of one colour / 4 of a second colour
I also tried a pattern called Fenestrations (it’s a fancy way to say windows) but I did it backwards (it’s probably the dyslexia) Fenestration requires multiple threads or using a thread of a larger diameter for most of the yarn and the last one being significantly smaller (3 or 4 threads to 1 worked well for me with the embroidery cotton) It is supposed to look like windows if it’s done right. Mine was inverted so the window stuck out instead of in!
You can see how the dark blue is multi strand (3 or 4 strands) while the light blue is only one strand.
One of the weavers (Janet Whittam) brought in a bag of scraps and thrums (the leftovers from a woven warp which are lengths or bits or yarn) thrums can be cut up and carded into fiber to make interesting pops of colour. Or you can do as I did and take a long time untangling the mess it had become and use them for further experimentation with the cardstock moridis. (I’m sorry I didn’t take a before sorting picture it really was a mess)
the mostly untangled thrums
I have 5 colour samples on the go plus a few others I have been puttering on in various baskets around the house. I have found they are easy to keep in an extra-large Sandwich Ziploc bag so you can easily bring them with you. I don’t find I get as many people asking what I am doing they may be miss identifying what I’m up to as corking instead of Japanese braiding.
This is a fast portable way to make cordage. This particular pattern, 7 strands in an 8 slot marudai, makes a number of variations depending on colour and strand placement. It is easy to pick up and put down and not lose your place. So interruptions won’t destroy your progress! i have defiantly found the equivalent to a drop spindle for weaving!
Cordage can be used as pull tabs for zippers, fobs for key rings, trim on garments or accessories, and ties and laces. It is highly portable. ( I keep mine in individual extra-large sandwich Ziploc bags. I used it last night chatting with Glenn at Al’s Diner before dinner arrived. ) they are also extremely cheap to make so you can have more than one! (OK i do have a lot more than one spinning wheel or one loom and a lot more than one felting project on the go!)
Check back, Part 3 will be the needle felting of the picture and the name. Now what will I do? I suppose I should stick with Jan since I can mostly spell that correctly!
I had several requests from readers to show my finished pieces once they were framed. I framed 8 pieces. Three are for an exhibition in September and the rest are for sale in the shop. (If you’re interested in purchasing, let me know in the comments and I will contact you by email.)
Tokyo Sakuru 13″ x 13″
Orthoceras 16.5″ x 13.5″
Lavender Jade 14.25″ x 17.5″
Trail of the Cedars 18.5″ x 15.25″
Sanctuary 16″ x 21″
Evening on the Range 10.25″ x 16.25″
From Tiny Acorns 11.5″ x 18.5″
Overlook 18.25″ x 24.25″
I have my work professionally framed with a simple black wood frame. I do all the prep work of attaching the felt to a background fabric and then stretching and lacing on to a background board. I like to show the organic edges of the felt so this is the best method I have come up with. How do you frame your pieces?
Intrigued (and often intoxicated) with different fibres and yarns that just dazzle me on the shelves to the point that I can’t walk past them (tripping over my storage boxes of yarn is testimony to this fact!) I thought I’d read Zed’s pdf book – The Right Fibre A guide to using embellishment fibres in wet felting – which I devoured from cover to cover. Since discovering the Felting & Fibre Studio I have long been fascinated particularly by Zed’s experiments which have given me the confidence to say ‘anything is possible’.
Zed’s book is really for those wanting to know what a fibre such as silk, viscose, jute, milk protein etc will look like when wet felted. It is not a fancy colourful ‘how to’ book. She splits her fibres into 3 groups Cellulose, Protein, and Synthetic and then with almost laboratory precision undertakes three different experiments with each one. Zed’s photographs are very professional showing both the overall look and, where appropriate, the texture, and she describes how each fibre reacts. Whilst the latter can be a bit repetitive, she is ensuring consistency – again quite a scientific approach!
In terms of the layout I am at odds with myself. Zed works her way through each fibre in its totality before moving on to the next, which means if I want to compare fibres directly I have to keep scrolling back several pdf pages. I love ‘books’ so perhaps in paper format I wouldn’t struggle so much. Now this is where I am conflicted – ideally I’d love to have all the fibres in a comparative table….
BUT…. to do that I wouldn’t be able to study and enjoy the photographic detail that Zed has captured! Also on the plus side for the pdf format I can enlarge the photos to my hearts content. Paper v computer….my dilemma continues.
For me this is a great reference book – Thank you Zed for producing it.
As I’ve already mentioned I’ve seen many of Zed’s posted trial and error ‘learning’ experiments, which has fed my ‘what if’ mentality and stopped EPH (Ever Patient Husband) (and friends for that matter), throwing anything away until it has been cleared with me – thus adding to my storage situation! They all just shake their heads, speechless and smile benignly at me. Here, I must admit that I have been a gatherer but have not yet put into practice the ‘what if’ – they are in my head but, as we all experience, life seems to swallow up my time.
However….
Recently on the forum a member asked a question about templates needed to make a short-sided basket/tray posting a picture of what she had in mind.
Several suggestions were made for a ‘U’ shaped template, but I went against the crowd (what a surprise!) and suggested a circular template. Then I thought I’d better put my mouth and money in the same place! So, sacrificing the finding and restoration of my garden I set to….
I had it all in my head and decided that I would create a large flat vessel using two colours of wool with decoration on the inside and outside. I created the circular template, gathered two lovely silky yarns newly purchased on my travels, and set out the decoration.
Using the upturned bowl in the centre I created a ring of radiating shingles of Merino wool onto which I laid some dark Norwegian and white Shetland wools. The reason for this is twofold. First – Merino wool is so expensive and this vessel would need a considerable amount of wool considering its size, so I decided to use the merino to simply ‘face’ the core wool. Second – I wouldn’t actually have had enough Merino wool to undertake this project. The Shetland wool is what I’ve drumcarded myself and is the skirting rather than the back wool staples, so I tend to keep it for core or hidden bulk. The commercially carded Norwegian I’ve used quite often in its own right but in this instance it was a good match to the grey colour.
I don’t work totally conventionally (!!!) placing any felt work within a plastic sandwich. This allows me to flip my pieces over. So with the open side half completed and wetted down it was flipped over, where I could then finish the yarn design, add the ‘face’ Merino in the pattern I wanted and again add the Norwegian and Shetland wools.
A spoon helps tuck under any fibres so that the circular edge remains visible and tight.
More core wool was added paying heed each time to the alternating direction of the wool, in total 5 layers starting and ending with radiating shingles. However on the open side only one layer was laid in concentric circles to help the differential shrinkage – to shorten the height of the side rather than narrow the opening.
On the final layer of face Merino I added the decoration using viscose fibre, handmade wool nepps (bits from drumcarding), tiny offcuts of synthetic fabric and some synthetic fibre that I salvaged when the end fell off my dusting mop.
Wetted and back under the plastic, the air was paddled out gently, before flipping over. A top face of Merino was applied, the edges flapped over and the decoration continued. Spoons come in very useful as the fibre tends to stick to my fingers!
Template is wrinkling so time to be removed, felting complete.
Turned inside out to work the template edge area, fulling really starts.
Following the felting, which I start with sanding and rubbing through the plastic (I don’t use netting at all, or bubble wrap and as my plastic sits on a ridged surface, I only need to use enough soapy water to work the wool – I don’t lose it between the wrap bubbles) I continue with the usual rolling to full the piece, obviously paying particular attention to what was the template edge.
During the fulling stage the thin silky thread totally gave up the ghost (right photo) so I cut it off – note to self – this will need to be held down with wisps of fibre, similar to how the green mop fibres were being held in place.
Fulling continued with stretching the opening and rubbing the ‘tyre’ curved sides. At this point everything was going well except that the Norwegian and Shetland wools are slow to shrink tight (which in this case I needed) so the vessel was still larger than I wanted and it was getting late….solution – it went into the washing machine! At 10.15pm out from the machine, although shrunk, it was definitely not the carefully manipulated shape anymore ☹ (I should have taken a photo).
But some specific rubbing on the sides, stretching over a spring-form cake tin, and steam ironing with my new dinky steam iron, soon beat it into submission! Still damp I wrapped the sides with cling film allowing it to slowly dry over night with the sides supported. With the base measuring 24cm it now had a healthy shrinkage of 35%.
The following morning….Tadaaa! The sides are slightly undulating but I like that, and the decoration has carried through well with the integration of the main colour wools just softening the edges.
So I’ve experimented with different fibres and produced a straight sided tray vessel. I might add some hand stitching to it and then perhaps stiffen it just a little more.
Part 1: Old and New, Part 2: the Lanyard and the card stock marudai and Part 3: needle felting of the picture and the name
Many Years ago, Ann did a program at the OVWSG (local guild) on making your own felted name tag. She had taken a couple old blankets and fulled them (as you already know shrinking of woven or knit stuff is fulling, the term felting refers to coalescing fibres into a non-woven structure like fabric.) She cut paper of about the same size to work out our design (our name and something with it; flower, spindle, shuttle, etc.) She had felting needles to use with yarn to write our names and draw our picture. I hope we do this program again. it was quite a while ago and we have a lot of new members now.
My name tag is certainly showing its age. It’s usually in the bottom of one of my spinning baskets that I take to demos. It is now looking worn and it’s about time for it to be replaced.
Part 1 Old and New -the preparing of the tag
The original name tag was about 2 x 3 inches and used a pin to attach it to whatever I was wearing. Pins are not always appreciated by fabric so I wanted to upgrade my new one to a lanyard so I could just loop it over my head.
about 3 inches by 2 inches 2-3
I needed something sturdy and with enough stiffness not to bend when it was suspended. I picked a small, left-over cutting from my part of the unfortunately felted wool duvet that had been donated to the guild for dispersal amongst the felters who wanted it. ( I think I told you about that already). we carefully removed the outer cover to salvage the felted wool within.
-Carsonby Hall Felt in 2018 4-5
It was reasonably firm but not the colour I wanted as a base so I added a nice Prussian blue to even out the surface and fix the colour. I will cut it down to make it a bit more rectangular when I finalize the design.
I used the evil Metal Multi-tool that I got from the Woolery (Wow! That’s fast for laying in background!) if you are doing anything flat that you want to work quickly this may be the tool for you. I made fast work of the base for Sheep ears in a workshop with Wendo at Almonte Fiberfest.
“Felt Craft’s Ten-Needle Tool” I found mine at the Woolery
A while back I did a post about making scissor cases. scissor case post I made a prototype and everyone liked them when I showed them around. I ordered more scissors and last week I made some more.
The scissors I ordered were slightly bigger so I had to redo a prototype to get the sizing right.
This worked so I made several resists and got to work. These are wet. Most of the time I find it easier to add the decorations when they are wet. The fibres stay where you put them.
scull with teeth
paisley
silk flower and prefelt leaves
locks
I took more pictures. individual and group. I remember deliberately doing it but they are not on the camera. I did take pictures of them finished.
And here they are all felted and dry.
Both the lap and the scull need shaving. The silk will show more after shaving and the scull is a bit fuzzy and sadly I lost his funky teeth.
I like the way the nuno flower one turned out. The shorter locks on this Teeswater locks one went all fuzzy and they may get pulled or trimmed off. I don’t like them.
This lock one is Blue Faced Lester I think. it lost its 2 dark purple locks. I will needle felt them back on. the paisley got distorted because I used yarn and not roving. Despite that, it looks much nicer in person. the last one is a lock flower. It has more dimension in person and it like it. It’s a bit quirky. I will make some more and hopefully, they will sell at the fall shows.
I am continuing with my experiments with how fiber layout and prefelt effect the shape of three dimensional wet felt. I decided to combine two of the things that I had tried before.
Here’s the layout. There is a resist under the circle but I didn’t use it. It was just to get the circular shape easily. I removed it before felting. I then got so involved in working on the piece that I forgot to take any photos until I was finished. But I wet this down, turned it upside down and worked from the back side for quite a while rubbing and making sure that the yellow felt pieces were attaching. It actually worked better than I thought it would and the old felt attached right down to the orange wool. Thanks for the tip Kim!
Here is the result. When I was felting and fulling this piece, I kept working around in a circle so that the orange wool would shrink into a cone shape. With the addition of the yellow felt, the shape was definitely effected by the radiating felt shapes. It turned into a squash blossom all by itself! The formation of the 3D shape developed with minimal effort and shaping on my part.
Since it looked so much like a squash blossom, I added it to my squash pod from last week. They went together like I had planned it from the beginning. Of course if I had planned it, I don’t think they would have worked so well, but cheers for happy accidents.
Last month Glenn and I took a trip down to Oakville to visit his parents and one of his brothers and part of their family who had also come for a visit. It was going to be crowded at the house so we stayed at a hotel with a pool (I got to go swimming and do pool exercises each morning). I had been hoping to see both of my nieces but Fiona could not escape from her work so I was only able to enjoy the company of Jennifer and her Mom Marg (I did not inflict fibre on Grant!) (Really I will get to the fibre stuff)
When the nieces had been very young, both our families had all lived in Ottawa. I had bought them excessive numbers of Barbies (because there dog kept trying to keep the population down by eating them) and had taught them how to weave Barbie blankets on a plastic loom.
Two years ago they visited in Oakville at xmas. while I was desperately finishing Alex’s Xmas Polar bear, I got both girls doing sculptural needle felting. It went quite well and Fiona seemed to really like it.
This visit I was determined I would further their Fibre arts indoctrination. I brought supplies for pictorial needle felting, spinning (Wheel and spindle) and Japanese cord making (Kumihimo).
There was a lot of running around town and family visiting happening but in preparation for the landscape I took pictures of my Mother-in-laws amazing garden. I also caught shots of some of the wild life you see in their back yard. I was not sitting outside when the Raccoon and rabbit went by. (More about inspirational images in another post)
We finally had a quiet day (the day before they left) and started on the drop spindle. I used the same make-it-yourself Turkish drop spindle I had used at the Gaming convention to Spin the Golden fleece.
For those that missed it the DIY spindle requires;
4 six inch (short) meat skewers
1 longer meet skewer with the wide end cut down. (my cheap garden sheers cut them nicely)
(optional nail file to clean up the cut on the skewer)
6 small elastics
2 bulldog clips (I have medium ones but if you want less weight and momentum use smaller ones. If you want more weight and thus greater momentum use larger ones)
One leader cord (piece of string) about 3 feet long tied in a loop.
We assembled the spindles and I showed them the “Park and Draft” method of spinning. You build up the twist then park the spindle between your knees. Next focus on the fibre, draft out what you want the twist to deal with and let the twist slide up to the top of that section. Add a bit more twist if necessary then wind onto the spindle. After a bit of this they put it all together and did the drafting and adding twist together.
With the first yarn successfully completed we moved on to try the wheel.
I had brought with me from Ottawa the new-to-me Lendrum Rook. Gord Lendrum made about 40 of them between 1984 to 1986. There a very nice little upright wheel with a very odd tensioning system. The one I have has a problem with the upright that supports the wheel. It’s lost its’ glue and now will rotate so you have to straighten the wheel each time you set up to spin. But once you have her strait she spins like a dream!
Both Marg and Jennifer seemed to have enjoyed the wheel. Both were able to make respectable yarn.
Next Jenifer and I moved on to Kumihimo with the card stalk marudai. She selected her colours, and set up her marudai.
She also likes blue, the green was a nice highlight with the blues.
The supplies you will need to make a Moridi are heavy card stock (I’m using 110lb cardstock, a cereal box would work too). I made a template in publisher then saved it in PDF and Jpeg.
You will also require;
8 slots,
a hole in the center and
7 strands of yarn.
“100% Cotton, each skein is 7.3m/23.9ft.” I found these at Dollarama
Good options are
tiny elastics and a
mid-sized Bulldog clip
Ok now that you have run out and collected all the equipment, measured (I have heard it’s about 3 times longer than what you want to make) and carefully cut out your marudai, here is what to do next.
Set up:
Depending on how you set up the colours and position them around the marudai you will get different patterns. (I have not yet tried all the variables yet) gather all the 7 strands together and Tie a knot (leave extra length after the knot if you want to have a fringe). Either push the knot through the hole in the centre to the back side or from the back side thread the yarn through, leaving the knot. I add the bulldog clip to the knot so it won’t slide through the centre hole. Skipping one slot (I skip the one with the direction arrow when I am setting up) space your strands into the 7 other slots. Wind your strands up so there is about 4 inches loose; the rest wound up in a butterfly. Use the knot for marudai bobbins or elastic to keep if from slipping when you don’t want it to. (See the picture above)
How to weave:
This is really important. There are only 3 steps!
Step 1) From the empty slot count clock wise to the third strand.
Step 2) Pull it out of its slot and move it to the empty spot.
Step 3) Rotate the marudai so that the empty slot is towards you again.
Repeat from step 1 until you run out of yarn to weave.
When the cordage you are making gets too long curl it up and clip it with the bulldog clip.
Keep the marudai surface flat and the strands will not tangle as much. Also keeping them not too long will help keep them in order.
This is a fast, portable way to make cordage. This particular pattern, 7 strands in an 8 slot marudai, makes a number of variations depending on colour and strand placement. It is easy to pick up and put down and not lose your place
Jennifer really enjoyed Kumihimo. I sent her back to California with extra cotton to weave with on the airplane. I look forward to seeing what she will do with her cordage. Now let’s see if she finds herself a spinning wheel and a drop spindle!


 Prototype marudai with garden Rabbit holder.
 “100% Cotton, each skein is 7.3m/23.9ft.”


 the mostly untangled thrums


 “Felt Craft’s Ten-Needle Tool” I found mine at the Woolery


