Browsed by
Month: March 2016

Landscape and Nuno

Landscape and Nuno

A few weeks ago, I mentioned I hadn’t had time to felt my demo piece when we did landscapes at the well-being centre. As well as the general layout, I was showing ways of using some different fibres, like cotton, nylon, plastic and even mohair for effects in the sky, and how to tease apart and fluff up texturey wools or dyed nylon for adding depth and texture. I didn’t really give much thought to how it would look, just showed them all and then piled them on. All I can say is, the locks look nice 🙂  The patch of wool and nylon to the right looks like some green bodied, red headed creature looking over its own shoulder!

OLYMPUS DIGITAL CAMERAI took some fabric strips with me to the wet felting classes the week after for some experimenting. This is the piece I made:

OLYMPUS DIGITAL CAMERAI thought I’d make a bigger sample trying out more of the fabrics. Before I go back to the other well being centre, I want to get a better idea of which fabrics attach securely and will hold up to being handled a lot, which might need some stitching to secure and which will be better for more decorative pieces. This is the whole piece:

OLYMPUS DIGITAL CAMERAAnd here are some angled photos to show better how they attached and their texture (or not in some cases), left side:

OLYMPUS DIGITAL CAMERAMiddle pieces:

OLYMPUS DIGITAL CAMERARight hand side:

OLYMPUS DIGITAL CAMERAI still have a few more strips I want to try, hopefully I’ll get a chance later this week.

More hat classes

More hat classes

A week ago I taught 2 hat classes at Alpaca Tracks not to far from where I live. http://www.alpaca-tracks.com/

I had a small class and then a large class. Both were fun to do. The ladies were a fun bunch and although most do the same hat shape they all turn out very different. Please excuse the quality of the pictures but the lighting was not good  for picture taking.

Here they are all busy laying out wool for their hats. I couldn’t get everyone in the picture.

01 Everyone layomg out wool.

I got some pictures as they decorated their hats. The silk caps were very popular.  The first one got some silk hanky flowers on both sides and then a silk cap over top it all.  The next 3 also had silk hankies on them. It is very hard to get pictures because as they get wet they almost disappear. All but the thickest parts. Silk hankies ae great at holding everything under them in place so they felt in really well.

08 hat 05 hat 04 hat 03 hat 02 hat06 hat07 hat There were a few I didn’t get pictures of.  Everyone starts at the same time but then as we progress everyone one gets out of sync.

Here are some of the ladies are finishing up the shrinking on the washboard  and a boot tray.

10 shoe tray 09 washboardRolling on either of these really shrinks things but remember to roll and not rub. Rubbing seems to abrade the surface.

And now for some of the finished hats.

IMG_3780 17 finnished hat 16 finnished hat 15 finnished hat 14 finnished hat 13 finnished hat 12 finnished hat

Here are the front and back of one. I really upped the brightness on the back so you could see some of the colour.

11 finnished hat 11 a finished hat back

As the hats dry, the silk on them reappears. One trick I tell my students is if they want to bring the silk out more when it’s dry, they can shave their hat with a razor. A light shave to take the surface fuzz off makes a big difference to how shiny the silk appears too. I had a great weekend teaching. I real like teaching, seeing everyone’s amazement as their hat takes shape.


A Gift for My Husband

A Gift for My Husband

I got my husband a ceramic mug/glass for Valentine’s Day. It doesn’t have a handle though and when you put coffee in it, the mug is too hot to pick up or hold.

beloved cup

Since the purpose of the mug was for his coffee every morning, it made my gift not very practical. So felt to the rescue!

cozy resist web

I have made  a lot of felted cup cozies or sleeves but this needed a bit taller version. This is one of the resists that I usually use and generally, I lay the wool out to the edge of the lines. The top just happens to be curved because it was a scrap piece of foam that I used.

cozy layout web

Since I wanted this sleeve to be taller, I covered most of the resist, ignoring the lines.

cozy wet down web

Here’s how it looked after one layer of horizontal wool layout. I only did two layers all together.

cozy layout wet down web

And here is the wet down, finished layout. Now I needed to add a bit of embellishment but not too much since I didn’t want it to look “too girly”.

cozy circles added web

So I decided on some lime green circles. I just used roving and shaped it into different sized circles. It probably would have been more exact if I had made prefelt and then cut out the circles but I decided I didn’t want to take the extra time.

cozy felting web

Here it is after rubbing and felting and removing the resist. Still needs to be fulled down to size.

And here it is on the ceramic mug/glass. It’s a snug fit and works great for holding a hot drink now. The only issue is that the design on the mug no longer shows at all. Seems kind of silly to have purchased a mug for its design and then no longer being able to see it.

Yak, Mongolian, Churro and Zwartbles Fibers

Yak, Mongolian, Churro and Zwartbles Fibers

Our Guest Artist/Author today is Zara Tuulikki Rooke sharing her experience with some exotic fiber samples.

The Felting and Fiber Studio Forum is an excellent place to exchange ideas and experiences with other felters and fiber enthusiasts around the world. In addition, I have also done a couple of fiber swaps with other members on the forum. I have sent wool from our Swedish sheep breeds and have, in return, received a wonderful variety of fabrics and different types of wool and other fibers that can be used for felting. Now I have tried felting some of the exotic wool that I have received from Nada, Zed and Marilyn.

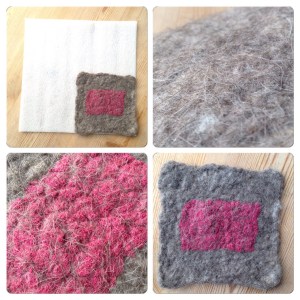
Nada, who lives in Slovenia, very kindly sent me Yak wool, which she got directly from nomads from Tibet. Apparently, Yaks have three different types of fibers; long and thick hairs forming the outer coat (79-90 microns), an intermediate type (20-50 microns), and a very fine and dense wooly undercoat (16-20 microns). The softness/fineness of the yak undercoat is comparable to the better known cashmere wool (which is a fine undercoat of goats). This particular carded batt also included some coarser fibers, but most of it was very fine wool. I laid out two thin layers of wool, on a 20 cm x 20 cm ( 7.87 x 7.87″) surface, put on a piece of cotton gauze, and attempted to felt it.
1 Yak

The Yak wool was surprisingly easy to felt. It quickly shrank down to a compact square of 10 cm x 10 cm (3.94 x 3.94″), and the fabric has felted in firmly. The coarser fibers give the felted piece a hairy appearance and reduce the softness, but I can imagine how luxurious pure, soft undercoat wool from Yak must be.

2 Yak

Zed, who lives in England, sent me some carded wool labeled “Mongolian.” A search on the Internet showed that there are quite a few local breeds of sheep in Mongolia, and crosses with imported breeds with finer wool. I found an article titled Sheep breeds of Mongolia describing 15 of their indigenous breeds of fat-tailed carpet-wool sheep. Our Swedish native breeds belong to the group Northern short-tailed sheep, while the sheep in the group fat-tailed sheep are adapted to harsh environmental conditions and are common in Africa and Asia.
Sheep breeds of Mongolia link:  http://www.fao.org/docrep/U4900T/u4900T07.htm#TopOfPage

I didn’t get any closer than that in the identification of the wool, but the carded wool feels like a mixture of coarse and slightly finer fibers, mostly black or dark brown (perhaps sun-bleached) with occasional white fibers. To be able to compare this to other wool, I chose the same method as I have used to make previous samples, i.e. 10 g of wool laid out in four thin layers to cover an area of 20 cm x 20 cm, and on top of it a piece of gauze. The wool was very easy to felt and full, and shrank to 12.5 cm x 12.5 cm (4.92 x 4.92″). Compared to Swedish wool, the felted piece feels similar to those I felted with wool from our landrace breeds Klövsjö and Åsen, although slightly rougher to the touch.

Previous samples can be seen here:  http://feltingandfiberstudio.com/2015/11/25/different-types-of-wool-from-a-swedish-felters-perspective/

3 Mongolian

Marilyn, who lives in the US, sent me wool from the American breed Navajo-Churro. The breed has its origin in the Spanish breed Churra, which the Spaniards brought with them when they colonized, what is now, the southwest of USA. Navajo Indians got hold of the sheep and saw a value in the wool, from which they made carpets and other weaved textiles. The breed’s origins, near disappearance and subsequent rescue, and its significance for Navajo culture and textile crafts, is a really interesting read. More on that can be found at The Navajo-Churro Sheep Association and The Navajo Sheep Project.

The Navajo-Churro Sheep Association link:  http://www.navajo-churrosheep.com/sheep-origin.html
The Navajo Sheep Project link:  http://navajosheepproject.com/churrohistory.html

The Navajo-Churro have a variety of colors, and three types of fibers. About 80% of the fleece consists of undercoat wool (10-35 microns), and the rest is coarser outer coat hairs (35+ microns) and less than 5% kemp (65+ microns). This wool was also easy to felt and full, although it didn’t shrink quite as much as the above. The final size was 15 cm x 15 cm  (5.9 x 5.9″), and it has quite a hairy appearance. In the photos below you can see the pure white kemp fibers that do not felt. But I like the rustic look and the different tones in the brown wool.
4 Churro

Zed also sent me some wool from Zwartbles sheep, which is a breed from the Netherlands, primarily used as meat and dairy sheep. The wool is black to sun-bleached brown, and the sheep have a white blaze on the face (hence the name “black” + “blaze”) and white socks on 2-4 legs. Pictures and more information about the breed can, for example, be found on The Zwartbles Sheep Association link.

http://www.zwartbles.org/

The wool is described as medium to fine (around 27 microns), thick and springy with a good crimp, and popular for spinning and felting. The latter surprised me, because to me this wool personifies all the descriptions I have read about wool from meat breeds, which are generally considered difficult to felt. It is really spongy and bulky, without any shine, and even makes a slightly crunchy sound when you handle it. I would describe this wool as something that should be excellent to use as pillow stuffing. But maybe it works well for needle-felting, and I actually found some examples on the internet where people vowed that it was good for wet-felting. So, I had to give it a try. It was not easy to press the wool down and start the felting process with soap and water, but after a while, the fibers began latching into each other. Then I tried fulling, with a little rougher handling, and then it started to disintegrate completely. The very loosely felted and spongy piece is the same size as it was from the beginning, and I am astonished that piece keeps together at all. Different types of wool definitely have their different uses, and this would not be my first choice for wet-felting.
5 ZwartblesZara, thank you for your insightful and detailed analysis of these fibers!
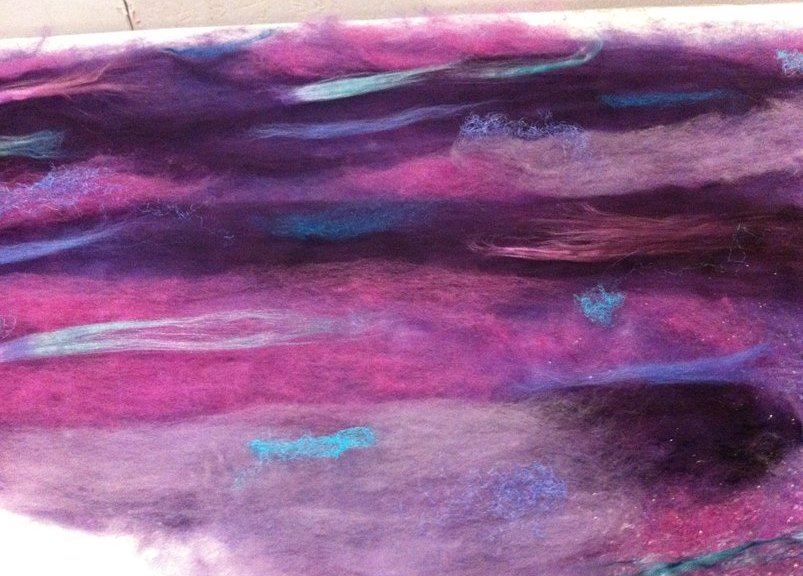
Landscapes and Knitting

Landscapes and Knitting

Ruth did a post a few days ago about a landscape tutorial on the Start2 website. I hadn’t come across that tutorial before and thought Ruth’s paintings were brilliant, so having been stuck in a recliner for a week and half with flu, I was itching to do something creative so gave it a go. I had some thick but cheap sketchbook paper and also a variety of printer paper samples to try it on. This first one is the sketchbook paper:

OLYMPUS DIGITAL CAMERAAnd this is the textured printer paper sample:

OLYMPUS DIGITAL CAMERAThey need flattening and cropping. I was disappointed they weren’t as nice as Ruth’s, but if I’d seen them before Ruth’s I’m sure I’d have been more impressed 🙂 I wish I had the artistic skills to add to them to improve them. I’m at least going to look for a white gel pen.

Start2 is the online resource for Start, an arts for good health centre. I did a couple of courses there in the last few months, and just a few weeks ago started going to a knitting group there too. I’d only really done knit stitch until I started going, apart from one row of purl I’d tried and wasn’t sure I’d done right. We had a pattern for making a small camera or phone pouch, but of course I had the wrong sized needles and yarn, so I’m making mine a bit bigger. I started with knit stitch then tried alternating knit and purl rows. I’d only done a few when I got confused doing purl and was wrapping the yarn around the wrong way so went back to knit then tried again. Once I got more confident on week 2, I added in another colour, well 2 really because I had blue aran yarn and had to double up some 4 ply.

OLYMPUS DIGITAL CAMERAThere’s a speckled beige colour which reminds me of Hob-Nob biscuits and a bluey grey, I think they work well together:

OLYMPUS DIGITAL CAMERABeing ill was a good time to practise my knitting. I thought I’d make a knitting needle holder. I used white aran and doubled up some blue 4 ply:

OLYMPUS DIGITAL CAMERAIt wants to curl up so I pinned it down. I like this angle:

OLYMPUS DIGITAL CAMERAI even made holes for a drawstring:

OLYMPUS DIGITAL CAMERAI’m not sure what I’ll do for the bottom, I did try to make a square, but it didn’t seem right so I’ll wait till the next knitting group to decide. And I still haven’t learned to sew seams, so that’s next on the list 🙂

A Mini Maker Fair

A Mini Maker Fair

This week I went to a Mini Maker Fair at one of the local universities. I went representing my Guild with my friend Elizabeth.  there were some their guilds there but also lots of interesting science.  There was R2D2. They were using him to talk bout robots.

mmf 5

There was a 3D printer, making some parts for something. I think it could make a cool spindle.

mmf 6 mmf 6b

This one they were have in the computer make picture using pointillism. they seemed to be writing it as it went.

mmf 7b mmf 7a

There was wood burning, print making and violin making.

mmf 8 mmf 9 mmf 10

And a fun one, Banana Piano. the size of the banana didn’t matter. They had hopped that they could line them up smallest to biggest but no luck. You play by tapping the bananas.

mmf 11

An now Us.

mmf 1 MMF 2

This is Elizabeth at her riged heddle loom and me teaching some kids show to make tube beads.

mmf 3 MMF 4

The beads are easy and fast to make. Just wrap some wool around 5 pencils, wet and roll in you hands. As it shrinks you remove pencils until you are down to the last one. When it’s tight around the last one, that’s it you have  bead. The kids like it because its a bit noisy too with the pencils clacking away. Well it wasn’t just the kids. We had lots of adults wanting to make them too.

mmf 12

Do you know any other fast easy ways to demonstrate wet felting?


Painting Landscapes

Painting Landscapes

Zed mentioned the Start 2 website quite a while ago but I hadn’t had much time to explore it before. I took a look and found a tutorial on painting simple landscapes. The tutorial was well done and the process was easy. So I decided to try it.

landscape original web

I used acrylic paints and pages from my sketchbooks. This is from a 4″ x 6″ sketchbook. You divide your page into thirds and paint the sky first, then you sprinkle salt over the lower third of the wet paint and put cling wrap over the middle third. Then let it dry. Take a look at the tutorial for further information if you want to try this technique. The landscape above has not had any details added.

landscape 5 webHere’s the same one where I have added a couple of details and cut the edge off. I am going to make greeting cards out of these small ones.

landscape original sea web

Here’s another one without adding anything.

landscape 4 web

And the finished result. I used color pencil to make the water look like it was flowing through the rocks and added the “waves” with white gel pen.

Here are two more finished ones.

landscape original 9x9 web

This is one of the larger ones that I painted. It’s 9″ x 9″ and it was previously painted blue and green. I added the paint on the bottom and in the mountain area. This is what it looked like before adding a few details to the mountain range.

landscape 1 web

And here it is finished.

Here are a couple more of the larger ones that I did. I’m not sure on either of these whether I am finished with the foreground. I also can’t decide if I should stick them back in the sketchbook or mount them somehow.

The small ones I made into cards. I just used fusible web and ironed them to the card. It holds really well and has less of a tendency to curl the paper underneath like wet glue does.

I really enjoyed painting these as it’s easy and you don’t have to worry about how it comes out because the salt and the cling film give you the details and the look of foreground and mountains or rocks. Anyone can paint these landscapes easily even if you don’t have any painting experience. Try it, it’s fun!

Automatic Machine Stitching

I would like to remind everyone that Gail Harker is planning on coming to Montana to teach a Level 1 Experimental Machine Stitch class in May. The deadline for sign up is coming up March 25th. It’s going to be a great class so I hope you’ll spread the word. Right now we don’t have enough students so it looks like the class might have to be cancelled. I would hate to do that though so would you help spread the word? Thanks!


A Parting Gift

A Parting Gift

My favorite physician is retiring this month and I wanted to give him a special parting gift.  So, what better than a good bottle of wine with a handmade cozy?

I had made a wine cozy/gift bag a while back, but the resist was just a bit off.  I took Lyn’s advice and straightened the lines and rounded the bottom slightly.

20160227_145820

I made some Nuno prefelt for the leaves and rolled a variety of grapes in preparation.

20160227_145944 20160227_150157

I didn’t want to replicate the whole first design, so I decided to have the grapes hanging from an old worn fence.  Of course, I forgot to take pictures after I laid out the background and began adding the design elements.  My bad.

Unlike the first one I did using corriedale as the base, I used black prefelt.  Then added some light gray batts from my scarflette, a little mulberry silk and a darker gray for texture in the fence.    Then I added the grapes, leaves and vines and began rubbing.

Some of the vines and grapes were stubborn so I had to do a little needlefelting to fix them after the fulling.  Also I think because of the prefelt, there wasn’t as much shrinkage, so I had to keep fulling to get a good fit.

For the turnover top I used a little green batt on the inside and attached the leaf and vine.  I made a few holes and wove the vines through the top to tighten it slightly.

Again for the bottom, I took Lyn’s advice and bashed the heck out of the bottom to get the rounded shape I needed.  Thanks Lyn!

Here are some views and a close up.

20160301_164913 20160301_164901 20160301_164851 20160301_164926(0)


More Wet Felting Class Pics

More Wet Felting Class Pics

I’m still recovering from a really nasty bout of flu, so I hope you don’t mind a short post on the well being centre again. Jo and Julie both brought their pieces from the week before in. This was Jo’s:

OLYMPUS DIGITAL CAMERAJulie had embelished hers with some stitching and beads:

OLYMPUS DIGITAL CAMERAWe did some nuno sampling last week, trying out strips of fabrics here are some drying:

OLYMPUS DIGITAL CAMERAThis is a slightly blurry photos of Linda’s piece:

OLYMPUS DIGITAL CAMERAWe got finished really quickly and were chatting about shrinkage, so we quickly laid out some small pieces to felt and full into coasters. This is Linda’s during layout:

OLYMPUS DIGITAL CAMERAAnd after felting:

OLYMPUS DIGITAL CAMERAAnd this is Pearline’s:

OLYMPUS DIGITAL CAMERAWe kept rubbing to shrink and firm until it was time to pack up,  and had quite a work out. I think Jo had shrunk her’s the most and it stood up without flopping over.

Triangle Nuno Scarf

Triangle Nuno Scarf

I saw a Knit triangle Scarf that looked interesting and thought I could do that with nuno felt.

pfeilraupe01_medium


If you would like to knit it here is the link. It is available in several languages. http://alpis-farbenrausch.blogspot.ca/p/strickanleitunen.html

I wasn’t sure of the finished length but I was thinking about 6 feet.  I cut a piece of silk 4ft by 8 ft. and then cut that corner to corner to make 2 scarves.

I cut the slits first, inserting resists to make sure they holes stayed open.

triangle scarf 3

The first layer of wool was one of my own batts that I split in to thin layers.

triangle scarf 1

Then more colours, well shades of purple mostly

triangle scarf 4

Then I added some silk top and throwster’s waste. Mostly purples again and I used some turquoise for pop.

triangle scarf 5

6 feet seems to be the right length. I think you could do it a bit smaller if you wanted or if you are petite.

scarf 2 scarf1

All in all I am very pleased with it. I may iron the folds in to it but I haven’t decided yet. I will add a picture on the mannequin a little later. I don’t want you all to be waiting for the post, thinking I have forgotten about you.

Here is the scarf on the mannequin.

triangle scarf finished 1 triangle scarf finished 2 triangle scarf finished 3 triangle scarf finished 4The first 2 are with the silk side out and the last 2 with the wool side out.