Browsed by
Month: March 2016

First Screen Printing on Felt Class Completed

First Screen Printing on Felt Class Completed

The first online class of Experimental Screen Printing on Felt just finished up and I thought you might enjoy seeing some of the creations of the great group of students that participated. I have also included their feedback and testimonials about the course. I am planning another session of this class in the fall if you missed it and you’d like to take the class.

This first set of work is by Teri and she posted quite a bit more over on her blog if you want to check out more of her screen printing. This is what Teri had to say about the class:

Two methods really stood out (and were new) for me:
– the deconstructed screen printing, I can see myself doing a LOT of this in various guises (mixed with some of the other techniques) and probably isn’t something I would have stumbled across on my own
– the vinyl resists, this is a great technique for making more permanent screens and I love the positive and negative option this method offers

The videos were a great addition although I found them a bit long (finding 2 hours to watch videos on top of making the screens and printing was pretty tough some weeks), is it possible to edit them down? That might also help with some of the download problems too?

The PDFs were great, I am sure I will be referring to those again and again, and the discussions on the boards was really helpful too, especially when other students shared what they had been doing.

Thank you Ruth, I have had an absolute ball with this class and I have a huge pile of printed felt to show for it! Now I just need to find some uses for it all….

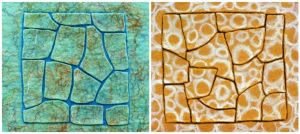
These next two pieces are deconstructed screen printing by Selma. Selma said:

I was behind in gathering all the right equipment in a new country and with a lack of space things didn’t really go smoothly for me. I liked the course as It gave us the basics and opened the door to many possibilities that screen printing has to offer. Now when I feel more comfortable with the whole process I will enjoy experimenting further. The videos are very clear and thorough but I had problems with loading some of the videos which definitely slowed me down as well. I couldn’t go back back and forth when needed and just wanted to see certain part of video so I printed all the PDF instructions and have them on hand while working. It was nice to see other people’s work and experience on the boards. Ruth was always very helpful and quick in her responses.

Cheryl created the screen prints above. Here’s what Cheryl had to say about the course:

Having online classes absolutely fills a learning gap for me. I live in a rural area and can not afford nor have the time to travel to locations to take these classes (although some of the classes I’ve seen offered in the UK or Australia might be wonderful to attend in combination with other travel).

Before seeing this class offering I had actually already read another book about screen printing! I am a visual learner so having the videos is good for me even though I ended up going to the library to view them. After seeing the videos having the pdfs to use is invaluable, trying to use the pdfs without having viewed the videos would not work for me.

I will continue to screen print, I will need to figure out how to incorporate it with what I’m doing now and experiment with other fiber techniques. I like the freezer paper resists and using the shredded paper and oatmeal resist the best. I have the painted interface ready to use and have the vinyl fuse for resists to use.

I hope to be on your email list for future classes.

The work above is by Tonya. She over-dyed a couple of the pieces which you can see on the top right. She also even screen printed a 3D vessel! We discussed some options on how to keep the print more visible on the finished vessel and she is going to explore this area further.

And last but not least, Sam created the screen prints above. She did a double layer of printing to get the tree scene with moon.

It was a great class and I really enjoyed teaching it. You don’t get to see everyone’s work in an online class because some people don’t participate in the sharing and discussion but the work I did get to see was awesome. I just love the different effects that you can get with these techniques. Thanks to the students that did participate and I look forward to the next class. I hope you’ll join me in the fall.

Ooops!

Ooops!

We’ve talked a lot lately on the forum about projects not turning out as planned.  Sometimes we have happy accidents like my scarflette that turned out better than I had planned.  However, that’s not always the case.  That’s why we all have UFOs.

Last year I decided to design a credit card wallet. I spent a lot of time measuring and making resists and batts, cutting prefelt and designing a master pattern complete with shrinkage built in.  I wanted it to be functional enough to be able to put most of the things I use in one place.

20150429_161653 20150428_113623 20150429_163547I didn’t have a wallet to use as a model, so I winged it.  I used the prefelt as the base and began adding resists then the batts on the inside.  To keep track of where my folds and placements were I used pieces of threads to help keep everything in line.

On the inside I wanted three long pockets, then eight credit card slots. There is one resist under the red batt.

20150430_154427Then I added the second lower pocket offset about a half inch, and began putting the credit card slot resists in.

20150501_151307

20150501_152541Once I finished adding the slots, I turned it over and added resists on the front. I wanted a license holder and a pocket.

20150501_160550Then after covering in black merino and decorating with some red silk throwsters waste, I began the felting and fulling process.

The hardest part and one of my big mistakes was cutting out the resists. I decided to use an Exacto knife to cut the top large opening.  Guess what?  Yes, that’s a pen sticking thru.  I couldn’t figure out how to take a pic with my finger thru it.

The lower hole is where I wanted the pic ID to be.  Unfortunately, it wasn’t large enough to put in the whole ID and cut out a window to view it.

20160226_12570820160226_125521

The pocket on the front was also too small an opening to put anything in there that wouldn’t fall out.

20160226_125849

On the inside the larger pockets were functional, but I made a mistake with the credit card pocket by making each row a little deeper.  Duh, what was I thinking?  All credit cards are the same size!

20160226_125616


There was room for cash and a checkbook and coupons, if need be.  However, the credit cards were a disaster.  I couldn’t reliably put them in there and think they’d stay put.

20160226_125503Folded over it doesn’t look bad on the front.

20160226_125843 The back is a different story.

20160226_125849

I had considered trying to save it, but I don’t believe it would be worth the time since many of the proportions are off and there a gaping holes. However, I did learn a lot from the experience.

  • Try not to make the project too complicated
  • Use a model for size proportions
  • Never use an Exacto knife to cut out a resist

I hope this may help others when they are planning a big project in the future. 🙂


Wet Felting Class Again

Wet Felting Class Again

I actually remembered to take photos at the wet felting class again last week! The first one is Linda’s piece that she made the week before. She embellished it with beads, buttons and ribbons when it was dry. She was asking about displaying it/mounting it on canvas, I said she could use invisible thread, but I know lots of people do various things, what do you think would look good?

OLYMPUS DIGITAL CAMERAThere were loads of us last week, even my dad called in for a nosey, the loose ‘theme’ was landscape/garden. I got a photo of the table and as Leonor pointed out in her blog post recently, you can tell it’s the UK from the mugs of tea 🙂

OLYMPUS DIGITAL CAMERAI can’t remember the name of who was laying out this piece, she was new last week, tilt your head to the right a bit:

OLYMPUS DIGITAL CAMERAI know this was Linda’s (tilt head to the left!):

OLYMPUS DIGITAL CAMERAAnd I know I shouldn’t have favourites, but I just loved this one by Pearline who was also new (both Pearline and her friend whose name I’ve forgotten were a bit late and missed the laying out demo, so just watched others and picked it up) she’d almost finished felting it here:

OLYMPUS DIGITAL CAMERAWe had so many people that there wasn’t space for me to felt my demo layout piece and I just haven’t managed to do it yet, but it should be interesting as I showed a few techniques for clouds and streaky skies with plastic, nylon, cotton and blends, so it might look like I went over the top a bit 🙂

Wet felted Hat Class.

Wet felted Hat Class.

I taught a wet felted hat class last week end. I ended up with four students. One unfortunately had to drop out at the last min.

I let students pick the style of hat they want to make.  Two students licked a pixy style to keep warm while having fun outside.

1 laying out wool 2 laying our wool

A hat with no brim and folds and one that will be a fedora style.

3 laying out 4 laying out

Everyone one want some like on their hats. Two chose to use silk caps to cover the whole hat.  The blue hat has silk that had lots of contrast but as it gets wet is seems to disappear.

7 silk hanky 6 silk hanky

One person wanted flowers under the silk cap. They are made by twisting a silk hanky.

5 silk flowers

The fedora will have wisps of silk top.

8 silk wisps

And then we got busy felting and talking and I forgot to take pictures, sorry. I almost forgot to get a picture of them all done. The green one will continue to be worked on. She isn’t sure how she is going to treat he brim. Probably she will roll it to get it to the depth she wants. The fedora will get its brim trimmed and shaped as well.

9 finnished hats

Jans hat Here is one finished. Excuse the Photo. I took it from a facebook message. She took it for me late last night.

Hear is the other pixy hat. You can really see the silk  now.

linas hat

Creative People on the Forum

Creative People on the Forum

Each time we have a quarterly challenge, there is a place to post everyone’s creations on the forum. This first quarter challenge has really brought in some great ideas and entries. The challenge was to use a flat resist in felting in a way that you hadn’t before. You can read more about the 1st Quarter Challenge here. I thought it would be fun to show you what everyone has created so far. And if you haven’t done anything for the challenge, there is still time as it lasts through the end of March!

These are in no particular order and I am using people’s forum user names rather than their real names. If you’d like to join us on the forum, please click on the forum button on the side bar, we’d love to have you!

These entries are from Frances. She made a rosebud pod, a vessel within a vessel and a scarf with a sleeve. You can see how to make the rosebud pod here.

ann vessel

Ann showed us her version of using a book resist in a previous post but I wanted to show you this configuration of it that she posted on the forum. If you want to know what a book resist is, please take a look at this tutorial post written by Terri here.

Carole aka craftywoman created the layered pod above. We all decided it had a very interesting organic look to it.

Next up is this puppet created by Janekiwi. You can see the resist that she used and the finished puppet on the right. His name is Garlic 🙂

Jill in progress

Jwugg created an “octopod”. Here is the in progress photo where she is using a book resist.

octopod 1

And here is the result. Just love this photo out in his habitat.

lyn giraffe crackles

Lyn posted two pieces using the same “cracked mud” technique using resists to create the cracked effect.

These pieces were created by Blythwhimsies. She used metallic fabric under resists in the top two photos and used a different resist than she had before in the vessel in the bottom two photos.

Mwes created the two vessels above. You can see the layouts/early felting stages on the left and the finished vessel on the right.

These projects were created by Halay. She used some different shaped resists than she had in the past.

Smiff created two different vessels with different book type resists. It is interesting to me that shaping makes all the difference in the world when you use these types of resist. Making the “leaves” become indentations really gives an entire different look to a vessel. Also where you cut the resist out makes a huge difference as well.

I believe Zed already showed her entry on a post here of her flower shaped pod.

The hats above were all created by Teri Berry. She used a variety of resist shapes and added some embellishing techniques including adding foil to her flame hat. All of us on the forum decided she should get a Royal Appointment to make hats for the Queen.

zara vest

Zara created this nuno felted patch mosaic vest on a resist type she hadn’t used before. You can see the variety of fabrics she used in the close-ups.

And I already showed you mine on a prior post but here’s the “thing” I made with a book shaped resist.

IMG_1498

A late addition by Luvswool, a cat cave.

I hope you have enjoyed seeing everyone’s creations. The creativity is astounding and I hope that if you haven’t tried something for the challenge that you will be inspired to try felting with a resist in a way you haven’t in the past. It was great fun and we have had a wonderful exchange of ideas on using resists on the forum. So join the fun! Do share anything with us by adding it to the challenge thread on the forum.