Browsed by
Tag: wet felting

Work in Progress.

Work in Progress.

Last year I joined a group of creative ladies who meet once a month at Waltham Windmill. As well as working on our own projects we have a number of set “challenges” requiring us to work to a certain theme. This week I began one those challenges which is to produces three A4 size pieces of work using just three colours. Each piece is to have one predominant colour, plus a small amount of the other two. The format can be landscape or portrait but all three will be displayed together. The design, techniques and materials are entirely up to the individual.

My first thought was that I wanted my 3 pieces to be joined together and initially I was thinking along the lines of a leaf motif, using the veins to span the gaps between the work. The first design was for a very simple “spear” shaped leaf.

The second idea was to simplify it even more and loose the outline of the leaf. The background would possibly be heavyweight interfacing or Lutradur and the veins would be free motion stitched, spanning the gaps by stitching onto dissolvable fabric.

In the meantime I happened to take my dog for a walk in the woods at Hubbard’s Hills in Louth when I had a lightbulb moment! There were some wonderful exposed tree roots at the top of the hill and I suddenly saw these as being the joining element of my 3 x A4’s. The design now was for a “forest floor”.

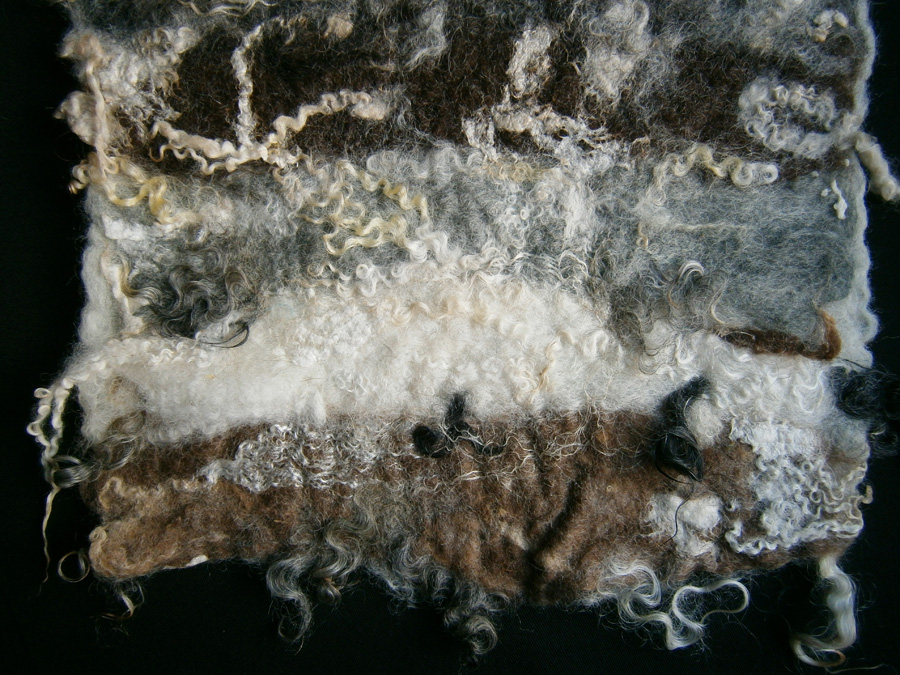
I realised that I would need a sturdy backing so I’ve wet felted these using Bergschaf fibres and they will be individually mounted onto stiff card…..at least that’s the plan so far! There will be little background showing on pieces two and three but far more on piece one so I included some thick cords under that sheet of felt to indicate buried roots.

The tree roots above ground have an aluminium wire as their core, wrapped with wadding and strips of medium weight Lutradur before being painted grey.

I’ve started making the weeds using free motion stitch on dissolvable fabric but I will look at alternative materials, possibly Lutradur, to introduce different textures, create more bulk and not least to speed up the weed making process!

The fallen leaves at the base of the roots will be FM stitched on Lutradur. Once they’ve been cut out using a soldering iron and heat distressed to make them curl they will be painted in varying shades of gold.

I’ve managed to get a couple of other group members to send me images of their work in progress…..

Jacky approached the challenge by choosing blue, green and gold as her colours and using the “stack and whack” method to cut them up. After selecting her fabrics they were cut up quite randomly and then machined together in strips. The three sets were then layed on top of each other and sliced through again. The yellow and green shapes in the resulting strips made her think of plant pots and this led to her theme of “neglected pots and plants”. In this piece Jacky has added an appliqué cactus and free motion stitched the neglected straggly plants on the left. This one isn’t far off being finished but Ive been told the other two are still piles of fabric on the workroom table!

Carole has chosen to use a combination of plain and patterned fabrics in her chosen colour scheme of red, blue and yellow. Each of her A4’s feature a different piecing technique i.e. strips, curves and crazy patchwork. Again this is a work in progress but already you can see how individual members are putting their own mark on their work and how different everyone’s finished work is going to be. I will post images of the completed challenges next time.

A New Hat

A New Hat

I have been working on a new “pillbox” type of hat. I got this great lattice yarn and wanted to use to add some interest to the hat. I got this yarn at Value Village, a big chain second hand store. They had over 100 bags of  4 skeins each for $3.99.  It was all new with the labels on them.  the black/grey is what I used on the wonky hat wonky hat and the green/purple/orange is what I used for this one.

This kind of hat is made in 2 pieces.

I used a nice orange wool that isn’t to bright for the base then I added the lattice yarn. It worked much better when the wool and the lattice were wet.

After the usual rubbing and rolling and whatnot they are done.

Checking the fit before sewing them together is important, can you guess ow I know? LOL


And here is the finished hat. The top is sewn to the bottom.

This hat works inside out too. It would need steam ironing to make the top seam fold properly.


Naturals For A Nature Lover

Naturals For A Nature Lover

I wanted to make a piece of felt for one of my friends as a thank you for helping us out recently, he’s into the environment and nature, so I thought a piece using all natural wools and undyed fibres would be something he’d like. I really enjoyed not having to put too much thought into it apart from trying to use as many different fibres as possible. I can’t remember all the wools and fibres, but I definitely used: English 56s; Gotland tops, scoured fleece and raw locks (from Zara-thank you, again!); Brown Finnish, Grey, Brown and White Merino; scoured Shetland; Bluefaced Leicester locks; hemp; flax; soy tops; cotton nepps; silk noil; silk coccon strippings; Tencel; viscose fibre; bamboo fibre and ramie. Here’s the finished piece:

Close up of the top:

Close up of the bottom:

It’s not as textured as some pieces I make, but you can see how it is looking at it from an angle:

This is a close up of some of the flax:

A really nice, shiny Gotland lock with a gingery tip:

Another Gotland lock with some Soy top above and BFL locks at the bottom.

This is the BFL, I bought a bag of washed locks ages ago and forgot all about them until I went looking for something else!

The Tencel looked really shiny against the darker wools:

This is one of my favourite parts, because it has lots of texture, there are Gotland and Bluefaced Leicester locks, flax and hemp, Tencel, and cotton nepps:

Do you  have a favourite combination of wools and fibres? I didn’t get a photo from this piece, but I really like the silk noils and cocoon stripings on the dark brown wools, you often get little holes which look like a tiny bug made them, and the brown shows through the thin parts giving a ‘rusty’ look to it!

Silk Threads Road Map

Silk Threads Road Map

I’ve been taking the same two pieces of silk to the well being centre for months with the intention of using them. Last week, I took them out and started tidying them up by pulling off the loose threads. Once they were neat enough to use, I decided I’d rather use the threads! I laid out a couple of layers of Yellow Merino, then started adding the threads. They were similar shades of greeny blue, so it felt like it needed something else. Luckily, I had a bag of red silk threads with me that I bought years ago, and they really made a difference once I added them:

It reminds me of a road map. I always like to take a photo on an angle, often it shows the sheen or texture better:

The threads have an interesting texture from where they were woven:

I don’t know what the red threads were waste from, they look like sewing threads, but are all short lengths between 6 and 12 inches.

One of the silk pieces had areas of a deeper blue, and even though they’re darker, they added patches or flashes of brightness:

I usually use black as the base for projects like this, but we’d run out, I chose yellow mainly because it’s one of the colours that shows well on camera, but I think it worked out well.

Iridescent Butterfly

Iridescent Butterfly

I was hunting around in my craft drawers a few weeks ago, and came across a stack of butterflies I’d made years ago from fusible film – it’s the sheet version of ‘Angelina’ fibre. I’d inked up a butterfly rubber stamp, laid the sheet over the top, covered with baking paper and ironed it. The sheets are iridescent and change colour where heat is applied, and also become ‘3D’ and mould to the shape/texture they are on when the heat is applied. This is one of the other butterflies I found:

It’s hard to capture all the different colours as they are really shiny, but you can see the texture clearer in this close up:

Most people have probably heard of the ‘butterfly bush’, Buddleja, and how invasive it is. I don’t know if it has the same association with railway lines in other parts of the world as it does here, but it always reminds me of days out to the Sefton Coast, seeing miles of Buddleja alongside the tracks. I had an (odd) idea about recreating the view from the dusty train window of a bright coloured butterfly fluttering around the Buddleja flowers. I wanted to use a piece of synthetic chiffon fabric over the top, which would ‘recreate’ the obscured view I’d get because of the combination of bright sun and dirty windows, and also it’d secure the butterfly. There wasn’t a piece big enough at the well being centre, so I made do with a piece of cotton gauze. It didn’t turn out quite as I’d hoped, but it wasn’t a disaster either!:

I even joked with one of the class members that I could pretend I’d meant the gauze to represent a butterfly net! The butterfly kept its shape right until the final rinse, I must have been a bit heavy handed and the slight extra shrinkage crumpled it 🙁

Here’s a close up of the irridescence:

I still have quite a few butterflies, so I’ll hopefully think of another way of incorporating them into felt. Have you used Angelina fibres or fusible film in felting?

Dog Hair Felting

Dog Hair Felting

This is a throw back post I thought you might enjoy because there have been a few people asking on Facebook about felting with dog hair. Just like sheep there are different kinds of dog hair and even the top coat and undercoat on every dog so you need to do a test piece for every new breed.

Recently I was asked to make something out of dog hair in memory of the dog it came from. Originally the woman asked a friend of mine to spin the dog hair so it could be woven into something. The hair was to short for that so she suggested talking to me. I wasn’t sure about doing it but she was so emotional I said I would give it a try. She had a large bag of hair that was quite short. The problem was she wanted me to use as little wool as possible and not to blend it. From My dog grooming days I knew this kind of curly coated small mixed breed dog felted their hair while wearing it so I was hoping it would do it here too. I laid out a base of wool and then add a thick layer of dog curls to the top. I made a sample that turned out quite well, I showed her and she agreed to me making a pillow and stuffing it with the remaining hair.

Here is one corner as I started to add the dog hair. You can see the blob of hair I am working from.


Starting to add dog fur


Here is the finished pillow.

and a close up of the texture.

The only problem with this felt is it sheds a lot. With the dog hair being so short, the really short straight dog hair sheds out very easily. Fortunately she will not be using it as a pillow but putting it a way to remember him.


Monet Challenge

Monet Challenge

I came across a couple of these pieces recently when I was packing up for a craft fair. It’s one of my favourite Challenges (My favourite was Ann’s Stewert Stephenson one) and these are some of my favourite pieces, so I thought I’d do a Throwback Post for anyone who missed it:

I didn’t get a chance to do any felting for a while until this week because we had a ridiculous heatwave here. I did manage to make a few batts for the Monet challenge though. After choosing some of my favourite paintings, or ones which I thought I might be able to use as inspiration, I made a simple montage:

OLYMPUS DIGITAL CAMERAI then messed about with it in Photoshop:

Using this for inspiration I made a couple of green batts; a purpley one; a purple and yellow blended one which looks kind of mustardy/mossy, and a mixed blue one. Looking at Monet’s style he mostly had a straight/dashy style, but some paintings or certain areas of paintings had a softer swirly style. For the first piece I made using the batts I laid out areas of different colours then added softer wispier swirls of wool and fibres:

OLYMPUS DIGITAL CAMERAI made this piece using the batts too. Neither of these first pieces copy Monet, they are just inspired by the colours.

OLYMPUS DIGITAL CAMERAI wasn’t very confident I could do an actual ‘copy’ of a Monet painting, but I thought I’d have a go of at least doing an impression of a Monet piece 🙂  I chose Morning On The Seine In The Rain.

Morning-On-The-Seine-In-The-Rain-largeI was actually quite surprised when this started to dry and it actually looked like something! I don’t know if it’s because I’ve stared at the original so much that I can see the similarity and that it’s meant to be it, but I’m pleased with how it turned out.

OLYMPUS DIGITAL CAMERAWhen I was fluffing up the fibres for the swirly piece, I thought I might have a go at needlefelting a piece too. Since I had all the colours out, and had really started to like it, I thought I’d do another based on Morning On The Seine In The Rain. I used a piece of thick commercial Merino prefelt as a base, and blended some texturey wools like Icelandic, carded lambswool and Devon longwool with Merino to get the colours and texture I wanted. I like the way this turned out too 🙂

OLYMPUS DIGITAL CAMERAIf you ever want or need some inspiration to get your creativity flowing, click on ‘Challenges‘ in the Categories drop down menu on the right hand side. We have new ones every quarter, but you might find something you prefer, like this Monet challenge, in our archives 🙂

Three Pieces

Three Pieces

We had a couple of new people join the wet felting group at the well being centre the past few weeks, so as usual, I started them off with a ‘beginner’s piece‘, which is my soft, wispy felt. If you’re new or haven’t seen me mention this, basically, it’s a 4 layer piece of felt, which is meant to be soft, and ‘scruffy’ and uneven, and piled with embellishments, and is designed so it’s almost impossible to make a bad piece! This is a red piece I made:

I think most of the fibres I used were Nylon:

This yellow Nylon was less ‘fluffed up’:

Some cotton scrim:

I made a blue piece the next time:

And most of the fibres on this seemed to be soy, and the two best pics were of the soy under cotton gauze. Grey under blue:

And a pinky grey under purple:

On Monday, I was the only one there, so I indulged myself and made a small mat/coaster for my best friend. I used wool tubes (or ‘kebabs’!) and filled in a rectangle on a template, then added Merino. Basically working upside down:

I like looking at these on an angle:

Even closer/more of an angle:

Have you made anything just for you or a friend lately?

Different Fibre

Different Fibre

I did another little fibre experiment a couple of weeks ago. I hoped to have more photos, but the light hasn’t been great again this week. Anyway, this is what I tried out:

And this is one of the locks:

I used 23mic natural white Merino, and this is the finished sample:

This is a close up of the top left where I fluffed up the fibres:

And this is how the migration looked on the back:

This is one of the felted locks:

Sorry there aren’t more/better photos, but did you guess what the fibre is? It’s my friend’s hair who gave me the extensions! I clippered it for her a couple of weeks ago and decided to see how it felted 🙂

More Hair Extensions

More Hair Extensions

I mentioned in my last post that I’d played around with the hair extension fibre a bit more. This is the finished piece:

I twisted some of it around some wool twists I’d previously made, spun some with some white pencil roving, fluffed some up and made a kind of ‘ball’ out of it, blended some with Merino, and used a couple of pieces which were still partly plaited/braided. The two biggest patches on the bottom of this angled photo are, on the left, the loose ball, and in the centre, the blend with wool:

This is a closer angled pic:

This is one of the partly plaited pieces:

I undid the ends of this one, sorry, not the best photo:

This last pic is a small amount spun with pencil roving on a drop spindle. I just twisted it, then used it so it’s loose:

I’ve been trying out more unusual embellishments, so I’ll show that next time!