Browsed by
Tag: wet felting

Still Sewing

Still Sewing

Well, my sewing stuff – and the mess – is still out! I realised I was running out of offcuts, so decided to make some more. I suppose technically they’re not offcuts if I make them with the intention of cutting into strips, but you know what I mean 🙂 I made a few different coloured nuno felt pieces:

I loved the variety of textures I got from using different fabrics on the orange piece:

The red piece was made with all silk pieces:

This is a corner of the red piece with sunlight on it:

I think this is my favourite close up, from the yellow piece I made, and a strip from a viscose scarf:

Before I got too attached to the pieces, I cut them all up into strips:

I made a mistake with some of them, because some pieces weren’t very wide. I should have left them ‘whole’ instead of cutting the strip in half like I did the others. I started with the red and orange strips, and matched up some pieces, it turned out some of the purple strips worked well too so I used some of them. I made them into a passport style shoulder bag. I made this side as the front:

I made the back to match, but different enough that it can be reversed for a different look:

It’s not very easy to see, but I finished the bottom of the strap off with some wooden beads.

Felt Landscape Picture

Felt Landscape Picture

Today we have the second in a series of guest post from Forum member Tracey:

I approached a gallery recently to ask if they would be interested in stocking my felt cards.  I took along four cards, three flower and one cottage picture.  I was thrilled when they bought all four! I only have pictures of two of them:


When I was next in the gallery the owner said ‘ We like your little house, can you make a larger picture’, Oh yes I said, whilst inwardly thinking – PANIC!

So here is my attempt.  Firstly I laid out white Merino wool for the sky and added blended blues, white silk caps and blue and white silk throwsters waste.  I then started on the bottom sections laying out green Merino, I didn’t blend the colours but pulled them into sections of wool, as I wanted a rolling hill feeling.

In the  next picture, I guess you will be wondering why the grey thick band, well I am planning to build my first wall! I blended greys with a little charcoal colour and added little bits of white here and there.

I then continued to build the picture adding my little house, this was cut from prefelts.  Prefelt is the stage between soft wool fibres and fully fulled felt, you can make your own or it can be bought commercially. You can use it to cut shapes, lay it on your work and it will felt into your piece. A few trees and wool nepps (little wool balls) by the house, and as the hills had emerged into a dip shape, I couldn’t resist adding a bit of sunshine!

So here is my picture after felting.

Then it is time for a little FME (Free Motion Embroidery).  Some (not all) sewing machines allow you to do this. If you can drop the feed dogs (the little ‘teeth’ that guide the fabric) you will be able to do this.  In effect you are then ‘drawing’ using the needle on your machine, the needle is your pencil!  Because the feed dogs are dropped, it is then down to you to guide the fabric, whilst the needle is drawing. The skill to master is controlling the speed of the machine in conjunction with moving the fabric. I really enjoy it.  Initially I drew the stones in with a magic fabric marker to follow, but then I grew more confident and went freestyle!

For the rest of the picture, I didn’t want to define much of the ‘distance’ with FME, as I wanted it to look exactly that – distant.  I did a little on the tree trunks though.
I then concentrated more on my wall, needle felting some dark sections, especially where the stones had ended up quite a strange shape!, good how you can cover and change your mistakes…..

So here is the completed  piece. I added a few FME grasses and French knot flowers by the wall. Apologies to any dry stone wallers out there!

A Few New Things

A Few New Things

We made felt flowers for brooches at the Well Being Centre last week. These are the three layers of one of mine:

I thought I’d found the perfect button when I tried it out:

But just before I sewed it on, I spotted an orange shisha mirror and sewed that on! I haven’t got a photo yet though. I was sorting some felt offcuts a few weeks ago, and thought I’d save some to use for greetings cards because turned sideways they looked like landscapes. I thought it’d be nice to make some new ones too, and was only reminded by someone on the forum (I’ve forgotten who, sorry!) and before I forgot again, I went and made some. I made them quite soft and thin since they’re for cards:

I thought they’d be nice for beginners workshops too. I put a few offcuts to one side while I was sorting, and made a new camera bag. I’ve been using my ‘prototype’ for at least 18 months to see how well it wore.  I suppose it’s two-sided/reversible, but I put the zip so that really this is the front:

I still like the back though, and can flip it if I feel like a change:

While the machine was out, I made a little coin pouch from an offcut:

How two small things can create such a mess though, is a mystery!

Birdhouse Class with the West Carleton Fibre Guild.

Birdhouse Class with the West Carleton Fibre Guild.

I gave a felt birdhouse class to 10 members of the West Carleton Fiber Guild last week.  The class was held at the Mississippi Valley Textile Museum’s  classroom space. They were a really fun and enthusiastic group and they worked hard.

Some how I missed getting a picture of the yellow one. As you can see 9 of 10 picked a gourd shape. For the round one, she decided she wanted a bowl. That’s easy it’s just a round birdhouse the other way up.

Here they all are at the end of the day. This is the only one I have a picture of dry. It belongs to Marie-France Gosselin

All in all a very fun day for everyone.


Different Shaped Pods From Circular Resists

Different Shaped Pods From Circular Resists

Today we have the first of a few guest posts from our forum member Tracey.

I am very interested in the different ways that pods and vessels can be shaped, often seeing a felted piece and thinking ‘what shape resist did they use?’
The first pod pictured here was made using a 12” diameter round resist.  It has six layers of blended Merino wool each side, and it is embellished with silk yarn and mulberry silks.  I cut a 3” slit in the centre to extract the resist once fulled, and it resulted in an oval opening.  A crossed slit would make the opening more rounded, or you can just cut a small circle.  It is always better to start small, you can then make the opening bigger if required.

I also made a seashore pod.  This was made the same way as the green pod but I think the resist was about 19” diameter, quite big! I blended blues to replicate the sea and added white silk caps and curly locks to hopefully look like the crashing waves. I then sewed a few shells and sea glass onto the beach, using invisible thread.

Then as an experiment, I felted over another slightly smaller resist of 10” diameter, decorated it with silk caps and silk tops.  This time I cut the opening to extract the resist on the outer edge of the circle, so the bottom of the ‘vase’ is the opposite side to the cut, and here is the result.

I may sew beads around the top in an idle moment!
Here is a picture of where the openings were cut to extract the resist on the green and blue pods:

Finishing a Vase Cover

Finishing a Vase Cover

Last year I made a couple of vase covers using hand dyed Domestic 56 wool from Cathy (Luvswool).  Normally, I like the bright colors, but I really liked these subtle natural colors. Here is front and back.

But it seemed like it needed something. So, it has been sitting in the UFO pile waiting for some inspiration on how to finish it.

A few weeks ago when I wrote about crochet, Lyn provided a link to make a rose. https://feltingandfiberstudio.com/2017/03/19/discovering-textures-in-crochet/

So, I tried it. It was very easy, thanks Lyn!

Then of course, I had to learn to make leaves and a stem.

When I laid it on the vase cover, I really liked it.

Then I sewed it on.  Here it is finished.

What UFOs have you finished recently?

First Quarter Fauvism Challenge

First Quarter Fauvism Challenge

I’m really late doing the first quarter Fauvism challenge, I thought I understood it, but every time I had an idea and started to work on it, it didn’t seem right. I finally decided on a picture to use last week, one of my favourite pictures of the lake at Sefton Park, Aigburth. I used it for a previous challenge, Marilyn’s Monet Challenge, and thought it’d be interesting to do a comparison. Then right at the last minute yesterday after looking at the other entries and googling ‘fauvism’ again, it didn’t seem right! But, looking at the other entries reminded me of my sister’s photo which I used to make a felt picture a couple of years ago. Here’e the post if you don’t remember: https://feltingandfiberstudio.com/2015/08/19/felt-picture/  and here’s the picture I made:

I took the original photo (without permission, hope she doesn’t mind!) and altered the colours in Photoshop:

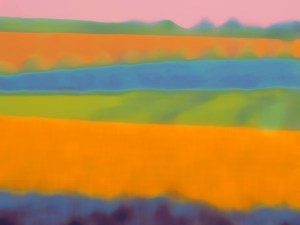
I’d had in my head that Fauvism was really bright, but the more I looked, the more I saw muted colours, unsaturated shades. There’s one particular jade green that I started to see everywhere! I simplified the picture to get the colour bands:

And added some ‘accented edges’:

Then I blended the last one and first one together:

A lot of the Fauvist paintings had roughly blended brush strokes and patchy areas so I blended some colours for each band to try to get that effect:

I don’t know which photo shows it better:

Then I added embellishment fibres for mre effect, this is some Kapok on the pink, there’s a bit of silk on the blue, trilobal nylon on the orange, and nylon staple on the blue:

I don’t know why I did that second band blue, I can see it’s green on the photo, I clearly wrote ‘green’ on my template, and somehow chose blue! Maybe I tilted my laptop screen back too far (good excuse!) I did realise before felting and changed it:

The other embellishments and fibres I added are: some dark blue wool and light blue nylon for trees at the top; some green wool and red nylon for trees between the top orange row and blue one underneath it; green and yellow viscose staple on the green layer and some dark blue nylon for a hedge. The track lines are wool; I used viscose and nylon on the lower orangey band, and the blue/purple band at the bottom has dyed cotton nepps and nylon staple fibre added. This angle might show them a bit better:

I only got it felted early evening, so here it is pegged on the washing line to dry, I haven’t even had a look at it yet today!

I love the colours, but I put far more detail and work into the first one, so it looks dull and flat in comparison, so I think I will add some stitching to this to improve it 🙂

Thin Felt and Spinning

Thin Felt and Spinning

Last week at the well-being centre I made a sample of felt that would be suitable for a lampshade cover. We’ve spoken about it there before, and samples usually explain things a lot better than words. I used a blended batt which was mostly Merino, but had some other fibres blended in too. I did two fine layers, then teased out some dyed locks to add, then did another two fine layers, and added embellishments. It was a lot duskier in colour than I expected:

Some of the embellishments I added were from a box listed as ‘silk threads’, I didn’t think they were, so burnt a piece when I got home, and it smelled like cellulose, so I’m going to guess they’re Viscose/Rayon. They’re really nice, whatever. I also used some throwster’s waste, nylon and viscose fibre:

I love holding thin pieces up to the window:

On this one you can see the losks between the layers a bit more clearly:

I mentioned not so long ago, I’d been writing a tutorial about how to make soft wispy felt, and I’ve finally nished it. Funnily enough, it’s called Learn to Make Soft Wispy Felt 🙂 I did a blog post about it the other day, and you can find all the info on the ‘Soft Wispy Felt’ page 🙂
I got my spinning wheel back out this week, I thought I’d finish off the batts I’d made with the ‘superwash’ type yarn to finish off the weaving. Apparently I hadn’t made any more purple, just a purple/blue blend and a multi batt. I span the multi batt first. It’s alright, but looks quite dull in places where there are too many colours:

I unwound some from the bobbin to see how it was looser, I liked how it looked in this photo when it twiddled itself together:

I was reading something for Ruth’s Fauvism challenge which got me thinking, so I made a thinner yarn with the purple/blue batt, really thin in places:

And I wanted something even thinner, so after a bit of a poor start with some green, got what I was after with some turquoise:

Then for some reason, yesterday, everything I tried was ‘bobbins’ as we say up here! (rubbish, from rhyming slang–bobbins of cotton=rotten). I must have put my tension spring thingie back on wrong!

Different Weavings

Different Weavings

I took a couple of my pencil roving mats, and some pencil roving waste,  to the Well Being centre a couple of weeks ago. We were talking about plaid and checks, and I’d mentioned the pencil roving waste and how great it is for making patterns. This is one I took in, I’m not sure if I’ve posted it before, but it does look similar to others I’ve shown.

This is another I took in, which I made a couple of months ago:

A couple of the group members tried out the roving and made mats, and for last week, I made some little cardboard looms, so everyone who wanted to could make a woven pencil roving mat. I think everyone was pleasantly surprised how quick it was to make a small weaving. I don’t have photos because they were all still wet. But just doing that little bit of weaving gave me the taste again, so I finished off a piece I started ages ago with my first wheel-spun yarn.

I used stripey green pencil roving waste for the warp.

And I started another with my second wheel spun yarn, which had baffled me a bit because my first one wasn’t too bad considering I’d used my own blended texturey batts, but this was very weird. I realised later why, it was that weird stuff I got in the botany lap waste which is still an unknown fibre. I made a nice weaving with some of the better stuff last year, but I thought I’d start something with the uneven pieces, maybe add something else to it at a later date.

I bent the cardboard to make it a bit easier, it looks like a medieval instrument. Oh, and I finally ‘finished’ my new tutorial yesterday, the proof reading can wait, the sun’s out!

Writing a Tutorial

Writing a Tutorial

It doesn’t matter how many times I write a tutorial, and many people will understand this, I always massively underestimate how long it will take. Actually, the underestimation probably increases each time as I think it should be easier/quicker having done it so many times! I started a new one recently on how to make one of those soft, wispy, scruffy, colourful pieces of felt everyone seems to love. We make them in about 45 minutes in classes, so I thought I’d just need one day to take all the photos, except my camera battery died after the layout photos. I probably won’t need all 120 photos, but I like to be thorough! This is the photo of the finished layout:

Luckily, it was bright enough the next day to finish off felting and get the rest of the photos done. This is just before it was rolled in a towel and left to dry:

I don’t know about anyone else, but when I take photos for tutorials, I jabber on to myself in my head, giving a running commentary on what I’m doing. I suppose I’m talking to ‘the reader’, so I can make sure all the steps are covered and I don’t miss anything out. This was going really well while I was doing the layout, I’m usually over-cautious (as the 120 photos would suggest) and end up with loads of photos unused. Let’s face it, even a complete beginner doesn’t need to see every step of the wool tops being laid out 🙂 But when I downloaded the photos and looked through, all the photos of adding the embellishments were missing! Where were they? Did I forget to download them and then delete them off the camera? No, because I didn’t download/delete anything until the 2nd day. So where were they?  I must have zoned out as some point, wandered off to get a drink or put music on, then got too engrossed in adding all the yarns and shiny fibres because there were no photos between finishing the top layer of wool, and that finished top photo above. Luckily that was all I’d forgotten. Or so I thought! I wanted to show the versatility of the felt pieces and how they can be made into other things, such as the concertina pieces I’ve made into danglie decorative pieces:

So, while I was ‘on a roll’ with the felting, I took photos of the process of how to do that. Here it is all bundled up:

And then how it doesn’t have to become a concertina piece, but a more 3D ‘sculpural’ piece:

But that meant, not only did I not have any photos of adding embellishments, I also didn’t have photos of the finished dried piece! Luckily, I’m used to myself and how gormless and forgetful I am 🙂 And when you don’t have to take 120 photos of the process, doing a layout is really quick and easy, so it wasn’t too time consuming to re-create the piece and take photos of the missing stages.