On looking through my file of possible posts I have found that there are several subjects on the list about which I don’t have a lot to say, so I thought I’d put them all together.
First, my work basket. You may recall that I told you about the craft basket makeovers that I had done some years ago https://feltingandfiberstudio.com/2023/06/12/craft-basket-makeovers-part-1/ After we moved to Dorset I acquired a marketing basket, can’t remember where from now but at the time it was “in” to be seen wandering around the shops with a basket on your arm. I didn’t use it for that for long though as I was worried about my purse sitting on top of shopping and being a bit of a temptation. So I decided that I’d turn the shopping basket into a work basket. At that time I hadn’t been introduced to felt, I was still spinning, crocheting, tatting, sewing and embroidering so a market basket would be ideal for that.
I used some more of the fabric remnants which I had bought from the same shop in Maidstone where I’d got those which I’d used for the spinning baskets. I lined the basket, having attached some internal pockets to the lining and made a padded/quilted lid. That was fixed at one end of the lining and a covered button and loop held it closed at the other end. I had found a miniature washing basket at a charity shop and I turned that into a pin cushion and I made a small pouch to hold small accessories like cotton reels. That was fixed to the side of the basket lining with a snap fastener.
The basket got quite a bit of use, as you can probably see from the state of the lining. One drawback I’ve found to sewing the lining to the basket is that it makes laundering it a bit difficult!
My marketing basket.
The lining sewn to the top edge of the basket. A bit rumpled I’m afraid.
The underside of the open quilted lid
Work basket with quilted lid.
Miniature cane basket with handles, containing a pin cushion made from more of the same fabric
The small accessories pouch.
One of the first projects I undertook once I had learned to needle felt was a challenge from a company which used to supply packs of mixed yarns – at least I think it was from them though it might have been a Guild challenge. It was back in 2002 and as I did not make any notes that I can find, I’m not entirely sure. I seem to have taken some progress images as I have found lots of these though unfortunately they are not of particularly good quality.
What I do remember is that I had decided that I would make a miniature of a herb knot garden but |’m afraid that my memory of how I found/chose the design is now so hazy that I can’t be precise. I do remember that when I learned to needle felt our teacher gave us pieces of old woollen blanket on which to draw a design that we could fill in with needle felted fibres. The idea was that we could then wash the work and it would become permanent. I have amongst the progress pictures images of the design as drawn on a piece of blanket and of the lines becoming “box hedges” and the spaces being filled with “flowers”. I can also see from the last couple of pictures that I added a “topiary tree” in each corner.
Knot Garden design
Initial needle felted sample (made a sample? me? Now that’s very unusual!)
The design drawn onto a piece of woolen blanket.
Starting to fill in the spaces with fibres and yarns.
The “box hedges” and most of the “flowers” filled in.
Finished Knot Garden with topiary trees in the corners.
A couple of years later, I acquired a quantity of (I think) Jacob fleece which had been carded all together so that what I had was a sort of grey mixture. I didn’t really want to spin it as I think I had been duped into buying a bag of really rough fibres. At about that time I had become interested in stone carvings – gargoyles (water spouts), grotesques, and heraldic beasts – particularly the Queen’s Beasts which are statues on display at Kew Gardens. Anyway, I decided that I’d have a go at needle felting some gargoyles using the grotty grey Jacob. No progress pictures I’m afraid, just finished pieces mounted on fabric covered card or canvas blocks.
The “Infernal Goat” gargoyle. The colour reproduction is poor it does actually look like grey stone (from a distance!)
Stone Man Gargoyle.
This Gargoyle is a direct copy of a waterspout mounted on the corner of a church tower.
Horned Man gargoyle. His curly hair and beard was, I remember, quite “fun” to do!
Ann’s idea made me think that some miniature gnomes impaled on the metal “spike” could look good as bag charm gnomes to sell in the Museum shop. I had to change the description from key chains to bag charms because the gnomes were a bit too fragile to sit inside someone’s bag/purse, but should look good dangling on the outside. Here are photos of the “shaft” on which the gnomes are made, and a few of the gnomes.
We have costumes for two Pantomimes and one Murder Mystery Play in this post; and yes at last I’m going to tell you about the costume hair and makeup for the Wicked Queen (above).
First let’s tell you about Dig for Vengeance, the Murder Mystery Play since there isn’t much to it. In fact the only textile “makes” involved as far as I was concerned were in makeup. I was playing the part of the Reverend Simeon Knatchbull (we were – as usual – short of men so I was to do a bit of cross-dressing.) Sid, who spent most of his time in his allotment shed to get away from his garrulous wife, was played by my friend Fiona. The textile parts of the makeup were our eyebrows and side burns (extra long ones for Sid) which I made out of Shetland Moorit fibres. The Rev. was the one “who dunnit” so I‘m able to show you his mug shots and here’s a snap of Sid at his shed.
The Rev. Simeon Knatchbull (source local fuzz)Sid in his shed
The Pantomime which was our February 2019 production was Treasure Island, and I was to be cross dressing again – not sex this time but species. I was Polly, Long John Silver’s parrot. As soon as I saw the script I knew that that was the part I wanted, and although there were a couple of others trying for it, I got it. I like to think that it wasn’t just my offer to make my own costume that secured it.
The Director, Fraser Wilson (a professional actor and director) decided that he would prefer Polly to be a cartoon, rather than a realistic, parrot. That did make things much easier. I had had a look at fabrics that I had available – there was some scarlet and some royal blue, which might work so I delved into Google Images and decided on a Scarlet Macaw as the basis for Polly’s caricature. I collected various reference pictures of real Macaws as well as some cartoon characters.
Reference image 1 – scarlet macaws
Reference image 2 – scarlet macaw back & top of wings
Reference image 3 – cartoon parrots
The fabrics that I used for the costume came from two sources. The fabric for the body and the hood came from some old red and blue curtains, and the wings and tail were made from some off cuts of some sort of plasticky fabric that I had acquired from somewhere, blue and red (luckily almost exactly the same hue as the curtain fabric) and some small pieces of yellow.
The costume was made in four sections and consisted of feet and legs; lower body and breast; a tail coat – literally in this case; and a hood with clashing pirate tricorn hat.
Having again resorted to Mr Google I obtained some reference shots of parrot feet.
Reference image – feet
I constructed the feet with toes from sections of foam pipe insolation covered in needle felted yellowish fibres. I stuck some bent pieces of black painted, cotton covered wire in the tips for claws, which actually wasn’t a good idea as they kept coming out. In the event it didn’t matter as they weren’t visible from the audience anyway. I stitched the toes to an old pair of fabric shoes which I had painted black, and added more yellow needle felt around the openings to represent the feet. We always lay a black floor on The Exchange’s shiny wooden stage for pantos, so my black shoes would be less visible under the parrot feet. I stitched a length of cotton fabric, much the same colour as the toes, to the opening of each shoe, with snap fasteners up the back, to make Polly’s legs. These came up to just below my knees and were tied with a draw string to make sure they didn’t slide down during a performance. Since Polly was old – 70 – I added some varicose veins (known as “various veins” in our house – thanks to Terry Wogan), couching on some blueish pieces of yarn.
I caused great hilarity at the first rehearsal when I donned Polly’s feet. I wanted to get used to moving in them so that I didn’t trip over the toes, but I admit that it did look odd the way parrot feet protruded from the end of my jeans.
Polly’s feet
The body consisted of a bib-type front, attached at the top to a red tee shirt. Parrots having short legs without visible “knees”, I had decided that the costume crotch should come down to just above my knees. I attached very short pant legs which covered my knees and the tops of the costume legs. It might have been slightly more realistic if the crotch had come below my knees, but I remembered just in time that I’d got to be able to walk and climb stairs in this costume. Climbing steps on stage was still a bit difficult, but then Old Polly could be seen to stagger from time to time. The back of that part of the costume came up to my waist and was again tied with a draw string.
Next came the tail coat. A couple of years earlier I had acquired a Vogue Pattern, one of Sandra Betzina’s Today’s Fit series which gave me exactly what I needed to help me with the design of Polly’s tail.
Vogue pattern V8136
Vogue pattern V8136 back – Polly’s tail coat design shown on right
I constructed the coat using the pattern back, but adding wings instead of just plain sleeves. The tail feathers I boned with extra large cable ties, which gave the length and amount of rigidity I needed and I did the same with the main wing feathers.
I extended the wings/sleeves to the tips of my fingers ending on the underside in a sort of glove construction making separate sections for my thumb and first three fingers. Then I added the feathers, attaching the first three pinion feathers to the backs of the fingers of the glove. I could then move the feathers with my fingers to simulate Polly’s cartoon hands, and co-incidentally was able to hold on to bits of scenery when climbing.
The fronts of the coat were reduced to just small “bolero” type fronts. These were affixed to the body/bib just in front of my shoulders with Velcro. There was also a strip of Velcro attaching the coat inside-back just above the tail to the back waist of the body. I padded out Polly’s stomach with a thinnish sheet of foam rubber to get the right parrot shape..
I do not have any progress pictures of the costume since this all took place before I found and joined the Studio. However, I did wear the costume again 2 years ago for an appearance at the Sturminster Newton Cheese Festival. SNADS were helping out with stewarding the Festival in return for a donation to our funds and I was allowed to dress up as Polly again. That was fun, but quite warm in view of the padding. It did mean that I had a short period in which I could take some photos of the tail coat just before I donned it.
Tail undersideThe tail feathers from the backThe right wing
The hood, was just plain red and tight fitting, and the hat was more of the plastic sort of fabric, with a wired brim, and skull and crossbones appliquéd to the front. The orangy-pink with pink feather edging to the brim clashed nicely Polly’s head. The tricorn was slightly too small so I had to resort to a large safety pin to attach it to the hood to avoid it falling off during performances.
The final touch, which I didn’t really want to do but I was over-ruled by the director, was to stitch feather boas to Polly’s breast. He was right, it added that je ne sais quoi to the costume.
I found a close up image of a parrot face for makeup reference, and used a lot of red water based makeup (I went home with a pink rinse every night – very fetching!) I made Polly’s beak from some thin EVA foam, painted yellowish orange, that was stuck onto my nose with spirit gum; and I had yellow feather eyelashes. The beak was a mixed blessing. We were “miked up” for the performances so I was able to tuck the end of mine under the beak so that it wasn’t obvious. However, the theatre was very hot on the Friday night performance and just before the finalé and walkdown the beak came unstuck. The audience didn’t seem to mind though. It’s amazing what you can get away with in a Panto. I made doubly sure of it for Saturday’s two performances though.
Makeup reference imagePolly complete with feather eyelashes.Polly peering through the big house gatesPolly with Long John Silver and random pirate (Silver with crutch made by my husband)
Now at last we come to the Wicked Queen. I was asked to dress Fiona (my friend who played Sid in Dig for Vengeance) as Averice, the Wicked Queen in Snow White. This was to include wig, makeup and Crown and two complete costumes. I was given two existing dresses which fitted Fiona and which I could adapt and add to; one was red and black and the other silver and black.
The red and black was to be worn in the first half, it had a red bodice and under skirt with black lace sleeves and a black lace over skirt. I altered the dress merely by lifting the over skirt up at the centre front and fixing it with some spare bits of jewellery. At that time Fiona had a habit of stepping backwards when about to speak, so we decided that she would need a train falling behind her to help her to lose this trait and, because she learned that if she stepped back, she’d step on it, it worked. As the dress was not quite floor length, we decided that a long cape type cloak would be worn over the dress. I had a small piece of red velvet which I made into a short cape covering the top of her shoulders, and added red braid around it’s edges. We had a large piece of heavy red lace fabric with sparkles in it, which we attached to the underside of the cape starting from the front of the shoulders. The cape was fastened with more jewellery pieces.
Avarice in Red
The second dress, silver and black, was pretty plain in design (although the skirt fabric was strongly patterned) and again had no train. So I decided that I’d try to make an overdress, which I would drape on my ancient dressmaker’s dummy. I had some mauve satin type polyester fabric which I decided could do the job. I made use of Google images for some design ideas and came up with two completely different styles that I thought could be amalgamated.
Overdress reference image 1
overdress reference image 2 – sleeve
I liked the cut away front of the skirt in the picture. This could be extended at the back into a train, and there could be full over-sleeves like those in the reference image with the cross over design at the shoulders.
Having had the design approved by the wardrobe mistress I set about draping some Vilene that I had had lying around, and making pattern pieces to be cut out of the mauve satin. That was silly mistake No. 1. It wasn’t until I was three quarters of the way through draping and pattern cutting that I realised that I was using lightweight iron on Vilene, not the old sew in version that I no longer used for dressmaking.
The sleeves I drafted by basing them on a normal sleeve pattern but moving the under arm seam to the top of the arm and extending each side to form the cross over at the shoulder seam, and at the same time greatly extending the sleeve length and width. I cut 2 sleeves out of the mauve satin and 2 more out of purple organza, which I would use as lining.
Getting all the pieces for the overdress out of the mauve satin was going to be tight. In fact, in making silly mistake No. 2, I made it even tighter. I must have put one of the cut out pieces in the wrong place on the work table, because I managed to cut another pattern piece out of it, so had to do a bit of “jigsaw” patching to get enough fabric for all the pieces I needed. It’s a good job that theatrical costumes are rarely seen up close – the joins were not discernible from the auditorium.
When I took the overdress in for Fiona to try on I found silly mistake No. 3. I had not allowed any ease in the patterns made with the draped Vilene so the garment was too tight. I had to alter some of the darts I had put in for shaping, and slim down a couple of the seam allowances as well as move the front fastening.
I had a piece of black and silver furnishing fabric which was decorated with large gothic type motifs. I cut out and applied these to the dress. One large one was placed at the waist on the wrap over front. This helped with disguising the “jigsaw” seams and the added decoration helped co-ordinate with the under dress. More motifs were appliquéd down the sides and end of the train to add weight to it. I also added a short length of curtain weights to the underside of the end of the train. This solved the problem of the train tending to flip over as Fiona moved around the stage.
Avarice in full rantAvarice showing the motif covering the “jigsaw”
All this work was obviously done at home in my workshop. However I still attended rehearsals twice a week, and while I was waiting to rehearse my cameo part (a bear!) I was working on a wig for Fiona.
reference images for the pony tail treatment
I had chosen an older synthetic wig mainly for its colour. It had become quite tangled so I was cleaning and combing it bit by bit whilst the rehearsals were progressing. I found that by using a light oil I could comb out the tangles in the wig without pulling too much of the hair out. Once all this was complete, I started to plait parts of the wig and these plaits were wound around the head, leaving the long back hair to be gathered at the nape of the neck, as shown in reference image 1, but with the ends doubled back up to the nape as shown in image 2. I made snoods to match each costume to cover the “tail”.
Next came the crown. Again I searched for reference images to help with the design. I wanted something strong that would add to Averice’s character, rather than a pretty tiara type crown, which would not do at all. In the end I decided to base the design on Ravenna’s crown (Snow White and the Huntsman).
Ravenna, crown and a glimpse of hairstyle
I made it from shiny, stiff card, which was actually some bobbin lace pattern pricking card that I had got from somewhere somewhen. I painted the card with bronze acrylic paint and added some braid with marcasite-like stones attached and a bead/pendant from an old necklace, which I painted with pearlised nail varnish. I had to stick a couple of loops on the inside of the crown, so that we could use hair grips to fix the crown onto Fiona’s wig, which was itself fixed to her “wig cap”. That’s in quotation marks because the wig cap was in fact a holdup stocking. The non-slip “stuff” on the inside of the stocking is just the thing to hold onto the actor’s head/hair. With hair grips fixing the wig to the cap it will not slip off. (touch wood!)
Finally the makeup. I looked for various types of makeup for Averice, looking at “Wicked Queen” references and also “drag” makeup (which I find great for exaggerated Panto styles). In the end I picked the image that would give Fiona permanently bad tempered eyebrows. I’m not a speedy MUA so although it would have been good to have fantastic eye makeup, there wouldn’t be time to do it and get Fiona dressed and crowned in time for curtain up.
Makeup reference image – it’s the eyebrows you knowAvarice Crown Wig and Makeup. See what I mean about the eyebrows?
I’m going to have to tell you about my bear costume and the other bits I helped with in these Pantos in another post as I’ve run out of space and time with this one, watch this space.
The next production for which I can remember making a costume was Sleeping Beauty in 2015. I was asked to make the costume and do the makeup for Baskerville, the blood hound. (You didn’t know that there was a dog in Sleeping Beauty did you? – How else did anyone find her inside all those brambles?)
After looking up some reference pictures (including one of Sir Clement Freud and his pet) I decided that the face would be part mask and part makeup.
Sir Clement Freud and his look alike pet and another bloodhound – my reference images for Baskerville
The costume was in the main made from an old poly-cotton sheet which was a sort of mid brown colour with the odd dark brown markings in acrylic paint, and included a hood from which the long ears hung either side of the face. The mask was wet and needle felt, which covered the actor’s forehead, cheeks and nose, leaving large eyeholes. This so that there was room for the eye makeup which revealed dropped lower eyelids. The forehead had bloodhound-like skin folds, and the muzzle had my usual needle felted nose painted with Artist’s Gesso and then with black enamel. The actor’s chin was visible beneath the mask so was made up to match it.
Baskerville the Bloodhound
The next panto we did was Alice in Wonderland and I got roped into making bits for various animal costumes. Unfortunately I don’t have any progress pictures and most of the pictures I do have have been extracted from the DVD we had made of the show, so they are not of the best. Hopefully they will give you a flavour of the costumes.
First there was the Cheshire Cat. As with Baskerville, the cat’s body was made from an old cotton sheet, this time “dyed” ginger-ish with acrylic paint and with stripes added roughly following tabby cat images from Mr. Google (what would we do without him).
Reference images for tabby cat markings
The head and mask were also made from the same fabric and from felt. The only photos I have of the Cat are of it inside a “tree”. They aren’t very clear because the hole in the tree is faced with gauze so that you could only see through it when what was behind it was lit from that side. This was so that the cat could slowly disappear as the light faded, leaving only a grin visible.
Cheshire Cat inside it’s treemore grinsAnd just the grin, with Alice, the Dame (Alice’s nurse) and Joker (Queen of Hearts’ Jester)
Next there was the March Hare whose ears I had made from felt and attached to a felted hood; and the actor also used the muzzle with two front teeth that I made for her, also in felt. Unfortunately it looks as if whoever did her makeup didn’t match the face colour to the mask so the Hare looks a bit odd. This could be because the actor had a couple of other, bigger, parts in the panto, so her makeup needed to fit all three parts as far as possible. I had made the mask so that it could be removed with the hood and that adds to the odd look I think.
March Hare with ears and teethThe Mad Hatter, Dormouse (without his teapot) and March Hare in the final walk down.
The next and most testing task was the Hookah-smoking caterpillar and the subsequent butterfly which emerged from it. The script called for the actual metamorphosis to happen on stage, which was really going to pose a bit of a problem. If this was going to work it would be necessary for the caterpillar costume to be worn over that of the butterfly.
In the story, the caterpillar sits on top of a large toadstool. Usually depicted as a fly agaric mushroom – the one having a red cap with white spots. This in fact is my scenery-making friend’s signature image and there are always some of these mushrooms somewhere about the stage in all our pantos (did you spot them at the bottom of the Cheshire Cat’s tree?) Before the mushroom was made I asked that the back be cut away to enable the actor to be able to stand up against and behind its (chunky) stem. I had decided that the caterpillar costume would be mainly affixed to the top of the mushroom and the head and “torso” would fit over that part of the actor which appeared above the mushroom. The costume would have to be open down the back so that the butterfly could immerge from the caterpillar by stepping down and backwards. I would need to make the butterfly costume first so that I would be able to fit the head and torso of the caterpillar costume over it with sufficient “ease” to enable her to get out of the caterpillar without assistance.
Again Mr Google helped me with reference pictures of a swallowtail butterfly, which I had chosen because of the lovely shape of its wings, and it’s caterpillar.
Reference images for the caterpillar and it’s butterfly
I wanted the costumes to be as naturalistic as possible, which meant finding a way of making enormous butterfly eyes, remembering that the actor would need to be able to see through them. I was sure that I had seen some half globes in clear plastic covering a large sweet, and after lots of buying and tasting (!) I found some, though I cannot now remember what the sweets were. I made a mask which held these over the actor’s eyes and side of her head and which also covered the top and back of her head but left her nose and mouth free. From the images on the DVD, it seems that I covered the globes in some way since it is not possible to see the actor’s eyes through them. I can’t now remember what it was I used, but it must have been transparent at close quarters because the actor was able to dance around the stage without falling over the “little butterflies” which were dancing with her.
I made up the lower part of the face and I seem to remember making “mouth parts” and a version of the curled tube the butterfly uses to suck up nectar. These were attached to the mask between the bottom of the eyes.
A very hazy image of the butterfly’s head (it looks as if she’s managed to dent one of the eyes, but I doubt that would have been visible from the auditorium.)
The butterfly’s wings, were painted white organza which had wire along the top edge. I couldn’t add wire in the usual way the whole way round the edge of the wings because they would have to be squashed and held behind the actor’s back whilst she was still a caterpillar. So we clad the actor’s arms and hands in black and she used her hands and arms to open and “flap” the wings. This meant that the verisimilitude of the butterfly costume ended there – only one pair of legs instead of three. I could have made some “pretend” legs to attach to the actor’s chest, but they would be likely to get hooked up inside the caterpillar costume and make metamorphosis difficult!
I made the caterpillar costume out of various bits of cotton fabric which I painted, and because the butterfly mask was quite large, the caterpillar had to be very large too. The head of the real caterpillar is as wide as it’s body, which made that a bit easier. I made it to fit right over the butterfly head and shoulders, with the actor’s black covered arms poking through as the first of the caterpillar’s six legs. This was so that she could use the mouthpiece to smoke from the hookah which was sitting on a little green hump beside the mushroom.
Hookah-smoking caterpillar. You can possibly just see that the mouthpiece of the hookah is clutched in one tiny “hand”.The emerged butterfly showing off her wings. The empty caterpillar on the fly agaric mushroom is no longer smoking its Hookah and Nursie and Joker are seeing the little butterflies off stage.
Our next panto was Ali Baba. I didn’t have to make any of the costumes for this. I played the front half of Kamil, the clever camel, and when I wasn’t doing that, made up one of a trio of revolting looking gossipy women.
This was followed by “A Right Pantomime”, written by two of our members – “a comic conflation of almost every pantomime story you can think of.…” I played one of Snow White’s dwarves (I can’t remember how many we were, but I don’t think there were seven of us) but wasn’t involved with more than helping with scenery.
I will end this Scene here, and yes I know that we still haven’t reached the Panto in which the Wicked Queen in the title image appears, but maybe next time.
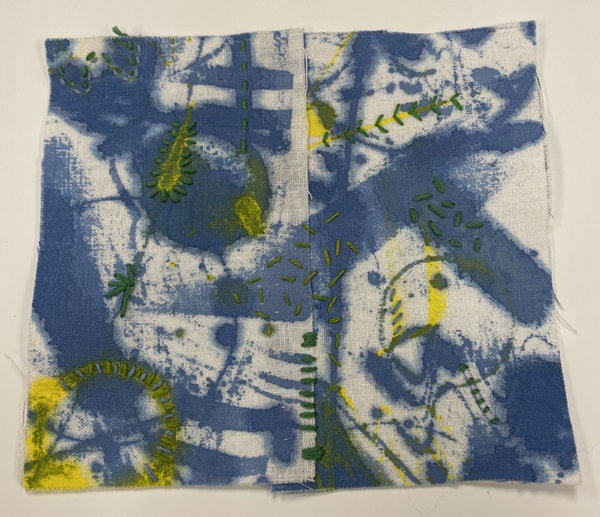
Continuing on from stitch camp I have started stitching. I like the pieces with a lot of negative space best but thought I should try to do something outside my natural inclination. So I picked one with mostly yellow but a nice distribution of blue too to start with.
I did a bit of stitching but decided it was too soft and floppy to work well. The stitching was distorting the fabric even though it wasn’t pulled too tight. Another thing I could see, that might happen, is the messy stitching on the backside might show through the white fabric. Iron-on interfacing would solve both problems. I know I have some……somewhere. And the Iron, I have one of those too, I am sure I saw it recently.
I found the iron first, but not before a mouse had found it. The mouse (the one we caught in the fall,) had chewed up the cord. Not a nice chew in half or in one spot but all the way along. You can tell how often Iron because the mouse was caught in the fall, late September or early October. Well, I didn’t like that iron anyway it tended to leak. I will have to buy a new one. Sorry, no picture of the chewed-up cord. I tossed it out on garbage day.
I never know what to buy, so I picked the middle price and the one that says it does not leak on the box. I was tempted by the one with the retractable cord but it was digital with little buttons. I don’t think my iron needs electronics.
Then I found my one-sided iron-on interfacing.
I am less thrilled with the pieces than I was so I picked 3 of the double pieces and one of the singles to use and I will see how that goes. If I start liking them better I can do some more.
I have 2 ironing boards. on is under siege in the spare bedroom and the other one, the small one, disappeared into the packed things. so I had to do it the old-fashioned way with a wool blanket on the table. I used a small piece of sheeting for the ironing cloth.
Stitching with the interfacing is better.
When I did this bit of badly done satin stitch, I noticed the distortion starting. Adding the interfacing and ironing seems to have fixed it.
I don’t know what stitching to do. I know it’s all just an exercise but I still want it to look good. I did some seed stitch and that is probably my favourite so far. I thought it was done but looking at it now it needs something else across the join down near the bottom between the woven circle and the yellow seed stitch I think.
Since I started writing this post I started the second piece. One of the more blue ones. I decided to use some green thread as there are some green spots where the blue and yellow paint crossed.
So far so good. I find it hard to decide where to stitch and what to stitch. I am enjoying it and I hope my stitching will improve with the practice. I find it hard to get my needle to go in or come up exactly where |I want it to. I am using a rounded tip needle. Perhaps a sharp one would work better but I didn’t have one with me. Another thing to look for. It is probably stuck in a piece of foam with some felting needles in a project bag or box.
It wasn’t until I started editing the pictures that I noticed this piece has a parrot in it. It is funny how we don’t see things until we take a picture of them. Do you see it too?
Thinking I would share with you something from my past – I went to search for various elements that I knew I had not thrown away and had just seen in the last few months. Suddenly, I was thrown into the midst of a magic trick….pooooof….they had completely vanished!
Much searching and wand waving resulted, some days later, with the completion of the magic trick….the big reveal….of that which was lost.
In deciding to share this ‘something’ from my past, I gave myself a shock….it was from 1997! Although off-piste re wool fibre, I think it might still hold some interest, so please ignore the date and 24 year gap.
To briefly explain the background – I had enjoyed upholstery and soft furnishing as a hobby for many years, then an opportunity presented itself for me to teach these skills. To demonstrate competence, I was ‘very-encouraged’ to get some ‘official’ qualifications, so set about studying upholstery. I managed to complete the two-year course in one year and won a significant award. Following this a few interesting opportunities came my way including an invite to be part of a calendar production, I agreed, and was then commissioned to make an upholstered item.
I was to be ‘April’….you can wipe away all images you might have conjured up of flower bouquets, artists’ palettes, extra-large buns or samples of fabric strategically placed. This was not to be a repeat of the Calendar Girls!
April….mmmm!
Upholstery……..April….mmmm!
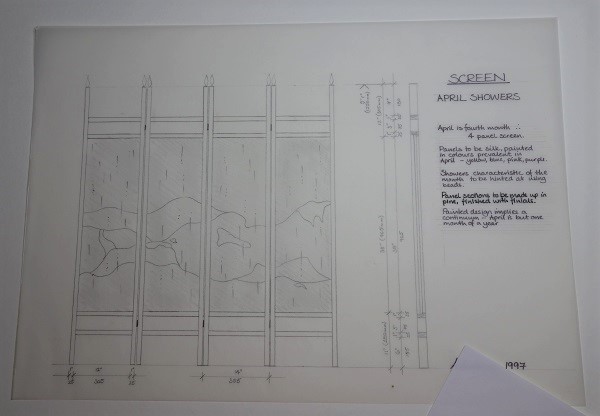
A few ideas floated around, but fairly quickly I had the….Tadaa moment….an upholstered screen!
I then pontificated (this word really does describe the process I went through) over how to represent the month of April in the screen. The big dilemma here, was that I normally used purchased commercial fabrics, so I was in a quandary as to how I could manipulate them.
Much of my early thinking revolved around the months, year and particularly the seasons and the continuum or seasonal cycle. There are four seasons so the screen could have four parts. Colours could blend from spring through summer and autumn to typical wintery colours. This also implied an organic quality. Another factor I had to bear in mind was that once finished with, the screen would be mine to keep, so I also needed to create something that would ‘fit’ into my life.
I then started to think more specifically about April and the first thing that came to mind was the phrase built into our British psyche – ‘April showers’ (in the UK April was always a month dominated by showers although global warming seems to be changing things a bit since). Then came the idea of which flowers bloomed in April – Forget-me-not, viola, wallflower, honesty, iris, primula, grape hyacinth etc. From this list I distilled the colours – yellow, purple, rose and blue. Then of course April is the fourth month….decision made – the screen must definitely have four parts!
So far so good.
Research & idea gathering
More research (there was no Google or Pinterest back in the day!) and thinking (my thinking, even to this day, involves doodles on scraps of paper, lots of them) followed, particularly in terms of how I could translate water/rain into an upholstered work. The only way I was going to achieve any of my ideas was to create my own fabric. So then started another direction of thinking and decision making. Fortunately, I had dabbled previously with painting on silk, so this seemed the natural path forward.
By this time I had also honed my thoughts as to the construction, made complicated by the fact that a screen can be viewed from two sides which meant attaching the fabric would be fiddly. With most of my main thoughts galvanised I produced a detailed drawing (the easiest task as an architect) that I sent off for approval from the relevant calendar committee.
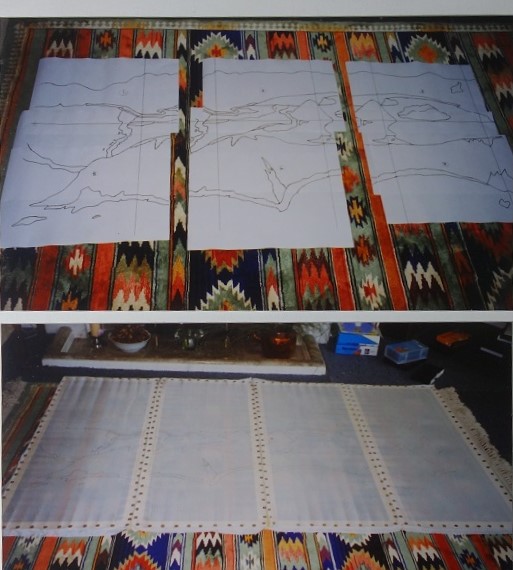
I couldn’t quite get the organic element I wanted then I struck lucky and saw an image in a National Geographic magazine that set the ball rolling for the final layout. Sadly, I cannot find that image today, but from memory it was one showing the broken circular rim of a volcano protruding through an ocean.
I often trace lines from magazine images, but these just didn’t cut the mustard.
Tadaa – the traced National Geographic image which I then enlarged.
A carpenter made 3 sets of frames – the main screen frame which I then dyed to the right colour and finished, the inner mounting frames for the fabrics and the frames for me to stretch and paint the silk.
I had the ironsmith create the post finials (normally found on iron railings) which I kept deliberately removable from the posts so that I would be able to transport the screen without injury either to person or vehicle!
Meanwhile I concentrated on getting the silk panels painted for which I trialled some coloured pencil alternatives. Missing ‘something’ I stamped a golden design over the top to create more texture using carved/scored pizza bases.
The photocopied enlarged design. The outline was traced with a clear gutta resist before applying heat-set silk paints
The silk was laid onto a strong supporting cotton fabric and bits of masking tape were used to plot where the raindrops should be. After some practice, these were then machine stitched using lustrous shiny threads. This was quite a nerve-wracking point as you can imagine. Realising that from a distance, the raindrops would need more impact against the colour, out came a variety of beads from yet another of my stashes!
Developing the raindrops idea.
My then seven-year-old son giving me a helping hand.
The silk panels were combined with the commercial fabric and the screen completed in sufficient time for the photo shoot.
Designed to fit into my ‘then’ house (floor to top of iron finial the screen measures 1.65m (5ft 5in)and taller than me!) which had 3m high ceilings. In my ‘now’ house I have just 28cm (11in) clearance above the screen!!!
24 years later!
April showers in sunshine.
Raindrop details.
The flip side
Continuing another side to the story….I’ll make it short!
The venue was set and to take place at the Keighley and Worth Valley Railway Museum in West Yorkshire. All the equipment was set up and my screen placed in position – complete with a free standing shower head!….April shower anyone? – Someone had some fun-thinking in the planning….all of which took hours as you can imagine.
Organised chaos and smoke screens!
Finally, after they had tested and rehearsed everything including a smoke bomb to represent the steam train, ‘the’ photo was captured.
The final museum photo with a museum railway guard doing the honors – I love how the colours echoed each other.
The published 1998 Calendar photo
Throughout the morning the crew and I had been laughing and joking….then came an unexpected question….would I be prepared to be tied up, and lie on the tracks in front of the train?….WHAT?!?!
Thus far the whole experience had been quite magical, and as I have a reasonably adventurous spirit….I agreed.
I won’t show you the photo where I was asked to ‘pretend’ to scream as if I was about to be run over by the train….I totally and utterly failed….it came out as a very real, loud, blood chilling, scream (definitely not a good photo)!
Waiting for them setting the camera up – thinking….“Did I really agree to this, it is soooo uncomfortable!”
What I haven’t mentioned is that all this took place on a Saturday and this popular museum was fully open to the general public….you might now be ahead of me….yes, we had built up quite an audience with our general activity behind the barriers….the ‘scream’ was the finale!
I will simply finish by saying – there was so much laughter all around, with folk bent over, much stomach holding and tears just rolling down.
Caught on camera, ages later, wiping away yet another round of laughter tears!
A long distant memory that continues to make me smile as I recount the tale 😊
It took a while but I worked my way through all the stitch families. I did get lazy near the end and I didn’t do all the wrapped stitches. It seems if you wrap another thread around through your stitching it gets a new name. If you weave it through it gets a new name. If you leave loops when you do it another new name.
I discovered that some stitches just didn’t work well with crochet cotton. I am using #8 mercerized and for some stitches it was to slippery and the stitch didn’t lie properly. I think it would have worked better with yarn. Some stitches were to small when pulled tight making it really hard to see the detail of the stitch. Some stitches looked messy when she did them and worse when I did them. Have a look at the top right sample.
These are the 2 pens I have been using to make lines.
and the marks they make
They are both permanent. I like the silver one better. It is a liquid but it stays put and would be fine to use if the line will not show after. The gold one seemed to get wider after a while. I am going to keep an eye out for the washable and air erase pens. One of the books I got said the was a pen that disappeared when heat was applied. I will keep an eye out for that too. Next I think I will try drawing on some water-soluble fabric and I might try some tear away. I think once I have an outline done I could fill it in ok.
And on another topic of my life; we had our first farmers market day of the year last week and it went well. I hope I can get back into the routine of baking (and then cleaning up) for the market so I have some time left for felting.
I hope everyone had a nice holiday and are ready for the New Year.
It’s almost the end of 2016 and looking back on the things I’ve done, there seems to be a few themes.
I did a lot of natural dyeing. Avocado skins, pits and the combo.
Cochineal
Alkanet/Logwood
Osage
Madder
Cutch, Rhubarb and Indigo
Eco printing
Resists
Under the sea theme
2nd Quarter challenge working with scraps – the former credit card case turned into an ear bud case.
Then the cityscape with scraps.
A scarflette with locks
Ginkgo stitching
Crochet piece felted and embellished with stitching
Felting wit my grandsons
Silk scraps into a free motion stitched vase
3rd Quarter challenge adding dimension from Kristy Kun’s class
Ruth’s Paper Lamination class
Teri’s hat class
Mini weaving wall hanging
More work with scraps for a sewing machine case
4th Quarter Challenge with embellishments for a coupon case.
And blue booties for a shower
Of course, there were also plenty of samples during the year including using the needle felting machine to felt some unfeltable fabrics.
A big thank you to Cathy Wycliff for her post on weaving and felting; my sister Carol Olson for sharing her new sheep with us; Nada for sharing her workshop experience in Slovenia; Zara for her posts on Felting on a Trampoline and her Yak, Mongolian, Churro and Zwartables samples; Leonor for her soap tutorial and Terri Simon on sharing her projects from Kristy Kun’s class.
It was a great year for me in terms of learning new things and doing some recycling. How was your 2016 year of fibers?
I managed to get quite a bit of felting done this week. I made a cover for the handle of my teapot so I can stop burning my fingers.
It would have been better if the hole in the centre had been a little bigger but a few stitches and it was good to go.
I discovered my felt background for a picture I am making was in the dryer way to long and was completely felted. I guess I turned it onto a longer time than I thought. Had to redo it. Here is the redone one.
I also made the prefelts for the buildings.
I got the wool laid out on the silk for a shawl. the first picture is the orange and yellow wool down but you can see some of the silk background. then I added several shades of purple. I think it looks like a sunset storm.
And lastly on the felting front I worked on dryer balls. here they are ready to go in the washer.
But most important thing this week my granddaughter was born. Here is Autumn, all 9 lbs 9 oz. of her.
A while back I dyed some silk and wool experimenting with making browns with acid dyes.
I wasn’t sure what I’d use it for, but I fell in love with the coppery silk habatoi. I made batts with the wool.
I had purchased some alpaca yarn this summer and wasn’t sure what I would do with it. For some reason it called to me even though it’s not my typical color way. But putting it next to the cooper silk, I had to come up with something to do with it.
I made felt base and placed the silk over it to nuno felt. I still wasn’t sure how I would attach the yarn. But then Ruth posted a blog about couching. Bingo!
I decided to make gingko leaves using the couching method of attaching the yarn.
It was a long process. I first had to outline the shape with stitching ( I tried white pencil and other pens, but this worked best.)
Then I pinned the yarn to the shape and began the couching process. Because the yarn was variegated it created some interesting color contrasts along with the variegated nuno background.
Then used straight stitching for the veins.
The yarn was two ply and I thought that the veins for the secondary leaves should be less obvious so I separated them to make the veins ( long process). Here is the progress –
Why gingko? I like the shape and also have a metal vase in my bedroom water closet that has the gingko leaves embossed on it. I thought this would tie the picture together with the vase.
The wall color is a purple haze which I thought would be a nice contrast. while the leaves aren’t perfect, I’m pleased with the result.
Drum roll please…… the winner of the December Green dyes and Silk Scarves is Maureen number 28!
Congratulations Maureen!
Please PM on the forum or send me an email to feltandfiberstudio@gmail.com with your full name and mailing address. I will have your prize in the mail asap.
When you have an opportunity to use the dyes and scarves, please share your results with us on the forum or write a blog about it. Just let us know you’d like to do that. We hope you enjoy using them!
Thanks to everyone who participated!
Before I had surgery I felted a couple of small things. The first was using the roving I had dyed for the 3rd Quarter Challenge to make a pod with cuts showing other colors underneath. I had used a lot of coarse fibers and decided I liked the rugged look so I didn’t shave it.
The next was a gift for a friend for her 70th birthday. Another pod, but slightly larger. I made some batts first. I used sparkly yarn as well as silk and milk protein for embellishments.
If you look closely you can see the sparkly yarn inside.
Then to get into the holiday spirit I made a poinsettia flower with the intention of embellishing it later.
I used very thin prefelt, cut out the leaf shapes and used layers of saran wrap to separate them.
While I’ve been recuperating from surgery, I’ve been working on some small projects. I finished the poinsettia by adding beads and adding stitching to the leaves and petals.
It’s now hanging on a wall to add a little holiday cheer to the house.


