Browsed by
Tag: nuno

Jackson Pollock Piece Finally Finished.

Jackson Pollock Piece Finally Finished.

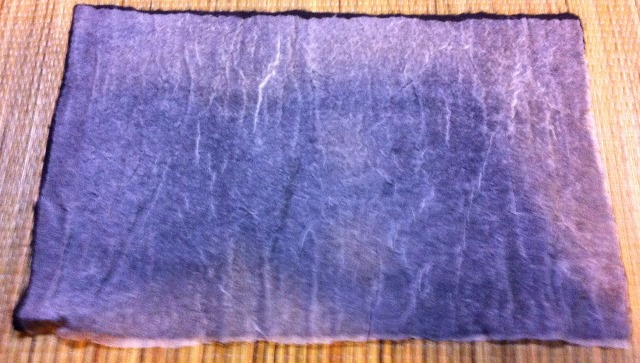
I started my first quarter challenge back at the beginning of February. I made a piece of nuno felt using black wool prefelt and white silk to make a canvas.

beginning beginning felted

Finally the other day I decided to try out my idea on how to paint the canvas. I thickened some die with arrowroot powder. I was aiming for a paint like texture. I had never thickened dye before and I didn’t want to spend any money ordering something special. I looked up thickeners and arrowroot was the one recommended for acidic things.  It is a very fine powder.

thickened dye

I added a little to each small batch of acid dye and heated it a little. The first one I heated too much and it was like vulcanised rubber in the bottom of the cup. lesson learned less powder and less heat.

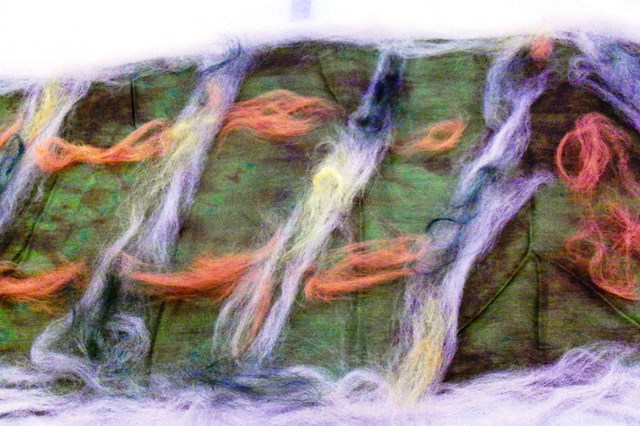
I started with yellow.It wasn’t dribbling how I wanted so I thinned it down. I didn’t like that either it  spread out too much. For the next 3 colours I poured it from the cups and moved them across the canvas quickly. That worked really well. Then I heated it in the microwave.

dye applied 1 into the microwave 1

While I was doing this I realised I had not put any vinegar in the dye. I heated up some water and put it in a basin and when the canvas come out of the microwave I put it into the acidified water and heated it in the microwave a bit and let it cool. having to put it in the water bath blurred the lines a bit but the arrowroot made it stay put for the most part. as you can see the thickened yellow is what moved in to the water the most.

after microwave vinigar bath 1

When I rinsed it and it felt really slimy. I thought I rinsed it well but it was harsh and stiff feeling when dry so I gave it a good wash with some shampoo. This is the finished piece. I think its very Pollock like.

finished pollock

I haven’t ironed it yet but I think I will and use the heat and steam to square it up.

A Fingerless Mitt Experiment

A Fingerless Mitt Experiment

Christmas is coming so I am still working on fingerless mitts for my guild sale the first weekend in November. One of my scarves made the poster.

OVWSGposter2012-3-400

I decided to try an experiment with a couple of pairs of Mitts. I wanted to make long cuts to reveal another colour.  I wrapped some shrink tubing and some regular tubing like you might use in a fish tank in some wool. I gave it a quick felt to get the wool tight around the tube. I thought this might be the best way to keep the fibers where I wanted them. I placed them between the layers of the mitts.

tubes collage

It worked really well.  After I cut the felt and took the tubes out I steamed them and opened up the slits. They are purple and pink and pink and purple but the cameras seems to think the purple is blue. I think it is because the wool of the table is so yellow.

purple and pink pink and purple

This is what they look like on. Sorry the pictures are bad I had to take it on my own arm.

purple and pink on pink and purple on

They turned out really well . I think I could have used less wool around the inclusions. I think I might felt them more next time too.

the other thing I did recently was make a matching set of hat and mitts. I added some silk to both, scrunching it  up to make it very textured. One small part didn’t stick down properly on the hat and will need a couple of stitches.

gray hat and mitts

I have more hats on the go and need to do some scarves before the sale but I think things are going well so far. Have you tried anything new recently?

Nuno Felt Experiments for the Studio Challenge

Nuno Felt Experiments for the Studio Challenge

Every quarter on the forum we do a challenge.   http://feltandfiberstudio.proboards.com/thread/622/second-quarter-challenge  I thought I better get on with it myself before the challenge runs out. I challenged people to try nuno felting or to try it on something they hadn’t before. I decided to try some fabrics that I wasn’t sure would work, to see what would happen. There are lots of pictures. I did shrink them so I hope they don’t overwhelm anyone’s computer connection.

For all the pieces I used merino wool in a contrasting colour so I could see how the wool migrated better.

The first is  a polyester knit that is like t-shirt material. It feels a lot like cotton.

poly knit

this is what it finished like. It worked really well. I think because it is a soft knit the fabric fibers could easily move out of the way letting the wool through.

polly knit felted polly knit felted cloce

This one is from a poly knit dress more like the polyester we used to wear in the 70’s.

polyester dress

It worked fairly well but it is heavier material and the wool didn’t come through as much.

poly dress felted poly dress felted close

These next two are different sides of the same silk fabric cut from a woven silk jacket. it was a pretty little jacket but small and out of date. The texture of the fabric is great, quite 3 dimensional. This is the right side.

silk jacket right side

silk jacket right side felted 1silk jacket right side felted close

I think it worked really well.

This is the wrong side.

silk jacket wrong side

It didn’t felt as well, I do not know why the fiber would not travel through fabric as well in this direction but as you can see not nearly as much wool migrated to the top.

silk jacket wrong side felted silk jacket wrong side felted close

Lastly is a mystery fabric. it is cut from a blouse. Both sewn into the seam together. one said 100% silk and the other said 100% polyester.

maybe silk

It did work very well but you can’t see its shine much at all. You do see it more in person.

maybe silk feltedmaybe silk felted close

There is still time to join in the challenge. Try something new or show us something old you tried that worked or didn’t. I think the failures or things that went sideways are sometimes the most interesting.

Nuno Challenge Experiment One

Nuno Challenge Experiment One

The second quarter challenge over on the http://feltandfiberstudio.proboards.com/ is mine but I have yet to start. Today I started. Months ago I made a shrug jacket and then died it blue. It would not stop bleeding. I rinsed it for days. Changing the water several times a day. I reheated it in vinegar water and still it bleeds, so I gave up. with all the work  it has great texture.

blue experriment 2 blue experriment

To get the great texture it shrank a lot. It will no longer fit anyone.

blue experriment 3

Next I unpicked the sewing. Not an easy task. The stitching was really sunk into the felt. Next it was into the washer. I have a front loader. I hope it works well it isn’t as aggressive as at top loader. I have shrunk a sweater down from an extra-large to a child’s small in it so I had high hopes.

Here is the finished twice washed piece. The red piece is the original finished sized before all the rinsing and  washing. The coke can is for size reference.

blue experriment 4

Here are the close-ups. The texture is much tighter and the piece is much stiffer.

blue experriment 5 blue experriment 6

The biggest surprise was that there are definite lines of wool on the silk side. I am imagine it’s where each rows of wool overlapped. I only laid the wool in one direction for this piece.


Classes at the Conference

Classes at the Conference

This last weekend I was teaching at the Ontario Handweavers and Spinners biannual conference. Here are pictures of the Nuno felting class. There where only 3 people in this class. It was a preconference class. The full conference started that evening with the workshops the next day.

Here they are putting the wool around the edges.

putting wool around the edge of the scarf 2 putting wool around the edge of the scarf

Then laying out the pattern.

making the pattern making the pattern 3 making the pattern 2

Close up

layout close up layout close up 3 layout close up 2

Fixing a spot that didn’t take. We needled it down and gave it a little rubbing on both sides and it was all fixed.

fixing a spot

Finished scarves

finished scarf 2 finished scarf finished scarf 3

And the happy ladies with their scarves and a sample done on cotton that they had time to do at the end of class.

happy felters

At the last minuet the needle felting teacher had to pull out with a family emergency so they asked me to fill in. I didn’t take any pictures of the process we only had 3 hours to complete a project so we really had to move.  Here they are at the end, happy with their projects. Four sheep ( I supplied the legs so they would have time to complete them. ), one pincushion flower and a little person.

Happy needle felters

All in all it was a great time with lots of friendly people. I will share more about the conference in another post later.

Pink!

Pink!

On my last post I showed you a sneaky peek of the ripples and ruffles of the nuno felted piece I made for Ann’s challenge. Well, here’s the finished piece in full:

pink nuno fullHere it is from another angle:

nuno rufflesIt’s kind of double-nuno because I started with some pieces of cotton gauze that I’d dyed a while ago. I wanted it to be extra sturdy to make a camera case out of it:

pinky gauzeI really liked how it turned out, so I thought I’d make a similar piece. I measured this one carefully to make a book cover out of it. I also added some wisps of orange, beige and white to the merino at each end to match the patterns and colours of the fabric.

nuno notebookYou can see the texture more from this angle:

nuno textureAnd of course, a supermacro close up 🙂

pink nuno flapsI have just one more piece I made from this fabric, but it is still drying.

The Felting and Fiber Forum

The Felting and Fiber Forum

I’ve had a lot of really nice comments and support recently since I published my book. One thing I noticed from the comments on the giveaway was how many people are fairly new to felting or in particular nuno felting, and would love to learn more. Buying a book can certainly be a good way, and most of us have probably learned most of what we know through trial and error, but another good way is learning from each other… and other people’s trial and error 🙂

A great place to do this is a forum. A little over a year ago we posted about starting The Felting and Fiber Forum. We said how we really wanted more interaction with like-minded people to share our enthusiasm for felt, fabric and fibres. We hoped we would get a few members and get to see what people are working on and share tips and get advice. I don’t think I’m alone in feeling that it is far more than that. The forum is somewhere I really look forward to logging onto each morning, to see what new projects everyone is working on, see if there are new replies to posts asking for advice, reading about what new crafts or techniques have caught someone’s eye, finding out what the weather is like all around the world! (We get a lot of weather!) 🙂  I was going to say that it really has grown into a great community of fibre artists from all over the globe, but we’re not just members, we’re friends.

zz 200 percent background for 1000 x 210 480 res plus text shift

It’d be really nice if we had even more artists in our community. I’ve been clicking to look at the blogs of recent commentors and there is such a wealth of talent, not just in felting, but all kinds of fibre art, mixed media, stitching and more. I know I’m not the only one who would be interested to know more about a wider range of fabric and fibre arts. And there are lots of members of the forum who would be more than happy to offer help, advice and support to those just starting out on their felting adventures. We even have a 12 step program for fibre addicts (1. Buy more fibre. 2. Buy more fibre 3…. Just kidding!)

The forum is open to everyone, just follow the link at the bottom of this post or click the forum button on the sidebar.  Once you’ve registered, we just have to ‘approve’ you… don’t worry, it’s just a measure to keep spammers out 🙂  The forum is free, which means it does get advert banners, but no one likes a forum full of annoying adverts, so…. we have a novel way of dealing with that… for $7 per month we can make the forum ad-free, so we replace the advert banner with one sponsored by our members which also redirects to their site. If you are interested just let us know. You don’t even have to be a member of the forum if you’d just like to support it while promoting your own blog, etsy store, website etc. but we would love it if you’d come over and join us 🙂

http://feltandfiberstudio.proboards.com/

Cotton Gauze

Cotton Gauze

I’ve been quite busy lately working on my project of ‘other’ fibres and fabrics used in felting. I’ve been making a lot of felt pieces using lightweight cotton fabrics like muslin and cheesecloth. Another fabric I’ve used is Cotton Gauze, this is sometimes called ‘Scrim’, and I’ve used a couple of different types. Here is a selection of some dyed pieces I have.

It’s really good for creating texture and effects. I’ve been making large bold pieces to use for bookcovers.

I’ve also made some smaller pieces with resists, using the gauze for texture. This piece was for making into a pouch.

and this became a textured sculptural vessel

I’m starting to have a huge pile of colourful, texturey felt pieces all waiting to be made into something once the weather gets too hot for felting. This is a close up of a large piece I made for making a purse and matching mirror case out of.

The lightweight cottons also work really well for using in scarves and wraps instead of the usual silk. Do you use scrim or cotton fabrics in felting, or fibre art? How do you find it to work with? Have you ever dyed your own? I’d love to hear about your experiences with it and see photos if you have links 🙂

Looking Back on 2011

Looking Back on 2011

Looking back on what I’ve done in 2011, I was surprised to find it was a lot more than I originally thought. I have a hard time felting when it’s warm, I can’t bear to get too hot and the wool always seems extra staticy, so I only really felt for half the year. At the beginning of the year I finished making a series of lampshade covers from felt and fabric. I really enjoy making felt for book-covers and coasters and made quite a few of these. A lot of the felting I did this year was just samples. I treated myself to a whole load of ‘other’ felting fibres from World of Wool, things like plastic fibre, Milk protein fibre, Ingeo, Flax, and different nylon fibres. I also gave myself a refresher course in nuno felting and discovered that pink isn’t that bad, really. I ended up making quite a few things from felt that I had in my ‘spare felt’ box, like book-covers, purses, coasters, glasses cases and bookmarks, which was fun.

I wrote a few more tutorials this year: How to make a zipper purse from felt; Using the textured felt method to make a bag; How to degum silk; Direct Dyeing and How to make a website banner using Photoshop. While I was looking for a button for one of my textured felt bags, I came across some old Fimo buttons I’d made a few years ago and realised that having a good stash of original buttons would be great. It seems a waste to put the oven on for just a few buttons, so I ended up making a lot more than I’d planned to 🙂

Starting the Felting and Fiber Studio with Karen, Ruth and Ann was probably the last thing I expected to do this year. What started as a comment from Ruth about us all keeping in touch, quickly evolved into a website with lots of photos and information. We all worked really hard in a very short space of time adding the content to the site, which wasn’t easy as we soon realised there were limitations to how we can present photos, and a major feature of the site was changed on us as we’d almost finished, and we’d used that feature a lot. It’s been great to be part of a community though, especially since we got the forum up too and have been joined by so many great friendly and generous fibre enthusiasts 🙂

I think the thing I was most proud of this year was the felt scarf I made for my girlfriend. It was made from 18.5 micron merino with Milk protein fibre. It was the first full length, non nuno scarf I’d made and though it’s always a pleasure to make something for her because she genuinely loves what I make; I really wanted to make something special because she’s so supportive and makes it all worthwhile.

Merino and Milk felted scarf