I am out of time to do an original post today. So it’s a throwback post. This one is from the early days of 2012.
Doing samples is fun and I still have the last two. They are just fun to have.
I haven’t been doing much that is interesting to look at lately. Everything is white and is waiting for the dye pot. I thought I would show you some samples I made a little while ago. The first 2 are purple merino with some silk strips on them. I thought they came out nicely with lots of texture.
Purple wool with strips of silk before feltingPurple samples after felting
The second is orange merino with some silk and curls on it, here I wanted to felt the curls right into the background. I also wanted to see how it would stick if I put it over the silk. I really like the way the little blob of curls all became one with nice texture. The curls going across the silk stuck down very well. Enough wool migrated through the silk to grab the courser wool of the curls.
Orange wool with silk and curls before feltingOrange sample after felting
This last set I wanted the curls to be attached at the base and left loose and hanging for the rest of their length. I use a small piece of scrap floor underlay with a hole in it so the wouldn’t stick down. It worked very well. I am not sure how I ended up with one really long curl.
Small samples with curls with their resists on before feltingSmall samples with curls after felting.
I am not sure what I am gong to do with these. I might make some buttons or hair clips. Do you have any ideas?
Having just read Kiki’s tutorial https://feltingandfiberstudio.com/2023/11/19/left-overs-yessss/ on using up prefelt scraps, it occurs to me that I may not have mentioned something we used to do at our Guild (Dorset Guild of Weavers Spinners & Dyers) mainly to raise funds for the Guild but also for fun.
When I attended the Stitch and Creative Crafts Show at the Bath and West Showground in Shepton Mallet (Somerset, UK) back in 2010 – I saw a stand selling (for £8.00 each) bags containing 35gr of silk fibres, yarns, fabrics scraps, carrier rods and cocoons in various colours, left over from old projects which, when put together, made a fascinating collection for future projects. So fascinating that I bought three of them.
They must have made quite a bit of profit on them because they appeared mainly to be the “waste” from artwork.
At that time (when I was part of the sub-committee organising the Guild’s Exhibition and Sale of Work) we were looking for a Guild Project which could be part of the exhibition or something hopefully to help raise some funds. Well, I thought, our weavers must have lots of off-cuts of hand woven fabric, not to mention warp ends. Then there were the spinners who would have odd bits of spun and unspun fibres of all types and colours. We also had members who were dressmakers, beaders and embroiderers, and a soft furnisher, who were bound to have the odd bits and pieces that they didn’t really need. So, with the blessing of the committee, I put it to the members in the next newsletter that if they would donate to the Guild any odd bits of fibres, yarns, threads, warp ends, bits of fabric, beads, button, feathers, felt, cords, braids, tassels, sequins, sequin waste, ribbons, silk flowers and any other bits and pieces they could think of, we could make up some “Bags of Inspiration” and sell them to members of the public at our open days and outside demonstrations. (I don’t know about in the rest of the world, but in the UK the word “bags” means “lots of” as well as “containers”, so the punning name “Bags of Inspiration” seemed apt.)
We used A4 sized polythene bags (which I was able to buy quite cheaply from our local green grocer) with an A4 sheet of card inside for stiffening, and I made up some stickers with the Guild’s logo on and a brief description of the contents, and posters also giving details of the contents.
Bag of Inspiration Poster
We arranged a few bag making days at a pub in the village where our then President lived. She had persuaded them to let us use their skittle alley at no charge, and we had a great deal of fun making up the bags and tucking in to “refreshments” from the bar and kitchen.
The members who came to these, brought with them all sorts of goodies which we spread out on tables, so that we could make collections of pieces which seemed to go with each other. Those who didn’t think that their colour theory was good enough, could pick out a picture from a selection of magazines and have a go at matching colours from this It was amazing how compulsive making the bags became. You could pick up a piece of fabric that looked so dull and dreary and be amazed how it perked up and positively shone with life when paired with different fabrics, yarns, trimmings etc. You just couldn’t stop picking up likely bits. The difficulty was keeping the weight of each bag between 80gr and 100gr, so we quite often ended up making up at least 2 bags with similar contents.
Equipment & Extra “Bits” for making up BagsProspective contents of at least one Bag of Inspiration
We put a price of £3.50 on each bag and they went like hot cakes – we sold out on their first appearance at our exhibition and sale of work. Embroiderers and mixed media artists in particular liked them.
After a couple of years, we didn’t get so many volunteers to make up bags but we still had mountains of “stuff”. So we added another string for our open days – Pick and Mix Your Own. I had remembered that Woolworths (now there’s a blast from the past) used to have a counter full of different sweets and you could take a bowl and pick and mix what you wanted, and in the process buying a lot more than you would have if just buying a ready filled bag.
Pick and Mix Sweets.
It worked with our stuff too. We gave the visitors the polythene bags and they could wade through all the bits and pieces picking what they needed, and we weighed them when they’d finished, charging £3.50 for 100gr.
We had had a lot of fibres donated so we started making up what are now called Art Batts and selling them as “Batts of Inspirations”, but because we were mainly selling these to Guild spinners and felt makers, they didn’t do quite so well as they were mainly able to make their own.
In all we made around £1000.00 for the Guild in the four years we were doing this. Eventually though the members got fed up with spending time on making up the bags and the whole thing was shelved, as the Guild seemed to be relatively well off at the time.
Some time after that I took the idea back to myself and I was making up Batts to sell at Guild meetings, using luxury fibres as well as merino and synthetic fibres. I made up some bands to fix around the Batts detailing the various fibres included in each.
This slideshow requires JavaScript.
I was also making up and selling Bags, mainly at a Needlework Festival in Dorset where most of the vendors were selling materials and equipment for crafters, as well as various craft fairs and so on.
This slideshow requires JavaScript.
I was getting the odd question like “they’re lovely but what do you do with them?” and “can you make a bag out of what’s in here?” So I made a sign from images of items that I’d made myself over the years and that helped.
Some of the things I’ve made with the contents of BoI over the years
However, once Covid started causing problems, my selling opportunities dried up. I had been intending to try selling Bags and Batts via my website, but it was very difficult and too time consuming to photograph the Bags so that the contents were visible, because of reflections on the polythene bags. So that sort of died a death too and I’ve now shelved that project, and am using the bits and pieces I’ve collected over the years on theatrical costumes and props.
Perhaps some of our readers’ organisations, like Ann & Jan’s OVWSG, might use this idea to raise funds?
Heres another throw back post. I thought if I do not remember doing this maybe you won’t either. I hope you like it.
After seeing Ruth’s jacket it reminded me I had made a small one for one of my daughter’s dolls years ago. I thought I should give it another try but life size this time. I thought about doing it seamless but decided that it would make something that is a simple design into something complicated. Although I am not a great sewer I was sure sewing 2 straight seems on my machine should not be beyond me.
There are quite a few pictures so I have put them in a gallery for ease of viewing. If I could figure out how to post pictures side by side or in groups I would but that is beyond my skill level.
First I made a large piece of nuno felt. I used silk gauze and merino wool. After it was finished I put it in a red dye bath. It came out quite nice. It’s hard to tell from the picture because my camera did not like the red at all. The one you see was the best of a bad lot.
The next thing to do was the shibori. I finger pleated the middle of the piece starting at one short end. I very carefully held it flat and tight while I tied it. The first tie is the hardest one. After that you just pleat it up tying every couple of inches. You don’t want to be too neat about it. If the pleats are to perfect you get straight lines. You want your pleats to be tight so some of the material will resist the dye in the second bath. This type of shibori is supposed to make a bark like pattern. I put the tied up piece in a purple dye bath hopping for a nice red purple to appear on my cloth. It came out black. After it was dry the gauze side had more of a purple look but still very dark.
I sewed up my jacket. I made the material far too wide so the jacket ends up long. The short sides overlapped a lot when folded up. I had to have long “lapels” to make it work. It is not a mistake it’s a design feature, just ask me :O) It is still to long for me. I think it may look good one someone who is tall and thin. Two things I am not.
All in all not a bad try. I’ve made another piece of nuno felt to try again, I made it narrower this time. Now I have to find the time to sew it up.
Another flash back post. some needle felted sheep. I hope you like them.
With the start of show season gets closer I realise I only had a few sheep left. Time to make sheep parts.
I have to make bodies and heads. I roll them up and give them a few pokes. I use 2 needles held together with a hair elastic. It makes them comfortable to hold.
There will be white sheep too
Once they are rolled and poked they get put in to the legs of some nylons.
These will go into the washer and dryer with a regular load of laundry.
I also make wet felted snakes to be cut for legs and a flat sheet of felt to cut ears out of.
I can’t find my bag of black spare parts. may need to make more.
This is what the finished sheep will look like.
They all get a safety pin on one side so you can wear them.
I’m tardy on completing the First Quarter Challenge using a resist in a different way. I had a few ideas, but then Cathy (Luvswool) loaned me a resist she had used in a class a few years ago. I still procrastinated not having a clue what to do with it.
I covered the resist using the first layer of Icelandic on all sides. then I left it for a week while I traveled. I was still unsure of what I wanted to do with it. Then on Earth Day I was inspired to use some deep jewel tone merino fibers and made some batts. I didn’t want really striped areas so they went back into the carder to blend them a little more.
I debated about using the fibers horizontally, but ended up using them vertically. I suppose it wouldn’t have mattered either way. I still wasn’t sure about what shape it would take until I finished fulling it.
Here it is drying on my towel holder.
Views from each side. The Icelandic wool underneath really muted the bright tones, but I liked the way it turned out.
From the top.
I don’t know what to call it, but it sits nicely by itself and will probably decorate the coffee table in my living room where the colors will be right at home.
I think I’ll try another shape after I finish the Second Quarter challenge.
Our guest artist/author today is Nada Vukadinovic also know as Halay on the Felting and Fiber Forum. She has generously offered to share her workshop experience learning a Fiber Inlay Technique.
A few weeks ago I attended a workshop in Maribor, Slovenia, given by internationally renowned textile artist and felter, Vilte Kazlauskaite from Lithuania. Her work is fabulous. You can see her creations here: http://vilte.tumblr.com/
She held three workshops, but I was able to attend only one. It was called Fiber Inlay Technique. Quite intriguing, I had no clue what this could mean and I was very excited to learn about it. I attended only one afternoon workshop. On the previous day attendants learned something about fabric manipulation in nuno felt, and the last day was devoted to the creation of a vest.
We were working with two types of silk: ponge and chiffon and were expected to create a piece of work, either a shawl or something similar, a flat piece anyway. I decided to make a square piece which I will probably use for a cushion.
First we were asked to draw a pattern on a piece of paper in the form of a mosaic that we would like to appear on the finished work, e.g. a bird, or something abstract.
I decided to draw something simple.
We used different sorts of fiber (mulberry silk, viscose, bamboo, and flax.)
When we were finished laying out fabric and fibers we began rolling and rolling. When we noticed that the wool has penetrated through all the layers of silk, we started kneading the piece and then rolled the project without the rod. The shrinkage percent was from 40-50%.
This is what we got in the end:
Unfortunately, we were working only with white silk and some blue and white fibers, but I imagine it would be interesting to play with different colours, especially different colour fibers. The fiber I personally used for the first time was flax and fell in love with it. I am already planning to buy some and dye it.
To put fiber inlay technique in a nutshell, it means lots of silk and different fibers. Here are some more photos showing Vilte’s work: beautiful textures.
And here is some yummy hand dyed silk.
Vilte uses natural dyes only.
It was nice to learn something new. Here in Slovenia we don’t have many opportunities for learning new felting techniques, but the situation seems to be improving. We are planning to invite another master from Ukraine and are getting quite excited about it.
Thank you Nada for sharing this exciting technique with us!
I didn’t think I’d ever find time to do the 4th Quarter Challenge. When I chose Land Art, I thought it had a really good scope for some interesting felt sculptures. I really liked the work of artists using twigs and branches, whether they were abstract, patterns, designed by colour, or like Tom Hare’s work in willow, sculptures of plants, leaves, seeds, or even a sliced apple. I really liked this lotus seed head: http://www.tomhare.net/files/cache/6241679806767b541ec85e7977677c16_f44.jpg
I had a vague idea of what I wanted to do and how I wanted to do it. Something sculptural based on the things I’d seen with holes and stems and curves. I even thought I might do a series. Well, time was running out and I hadn’t started, and I was thinking about what I could do to take part that wouldn’t take as much time. For a few weeks I’ve had a piece of felt with a balloon inside, hanging in my living room doorway, it was the result of me thinking I’d try felting a winter woolly hat, and it ended up looking more like the start of a balaclava or fetish mask! So, I thought I’d improvise and use that. It wasn’t far off the shape I’d pictured, and though I would have preferred to work with wet felt not fulled, I thought it was worth a try. So, I started cutting, wetting and shaping, and I was happy to see it was starting to look interesting! I rinsed it and put another balloon in to keep it’s shape while it dried. I thought it looked really good, it was nice and firm and kept its shape without the balloon. I attached some string to get a photo, and this is what I saw when it spun around:
A ribcage! My fancy felt sculpture was meant to look plant-like, but it looked like a carcass! I took the string off and put it on the table, but it sunk a bit and that didn’t look less dead either!:
I reshaped it, the way it was meant to be, and that looked much better! I know it doesn’t look like any plant or seed in particular, I wasn’t copying anything, I just had a vague idea of shape, lines and holes:
Different angle:
It does look much better hung up, less flat and more round. While I was messing around taking photos, I stood it upside down and squashed it, and that looked really interesting!:
The other week I decided to make a beret to see if I remembered how as I haven’t made one in years. They seem to be making a bit of a comeback where I live.
I decided on a nice bright red
I added some white throwsters waste for some interest
After some rubbing and rolling I cut a small hole to get the resist out and to make a hole for my head.
The whole stretches easily to the correct size
As it turns out a little bigger ( not much) would have been better it is a size small so tight on my head. I stretched it as much as I could. Just as well as I do not look good in a beret. I could make it bigger by cutting and adding sewn on brim but I am lazy.
I really like how the silk worked. It is quite big but I was thinking the you could put your hair inside it.
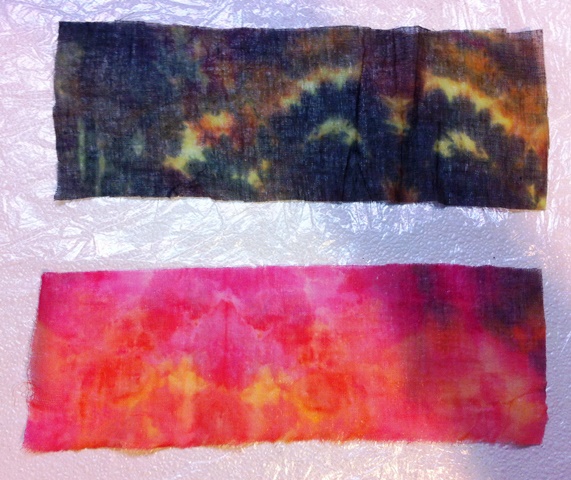
A while back Ruth got some free samples of some cheese cloth or cotton gauze from Cheese Cloth Fabric.com. She dyed some and sent me some samples. I also had a more open weave cheese cloth that I will use so you can see the difference. I thought if I am going to use my time I should make something that will be salable in the end so decided to make bracelets or cuffs so I could easily compare the cottons.
gauze on blackgauze on white
The pink on the left is the sample sent to Ruth and the purple on the right is the gauze I got at a place called Lens Mill http://www.lensmill.com/ in Guelph Ontario. You can see the purple is a much more open weave.
Ruth sent to colour samples. Here is before and after adding the wool.
I did one sample of the purple flat and one scrunched up. You can see my template marks behind the right one.
I like the way both these tuned out. they are very different than the tighter weave cotton.
I did a scrunched up pink one for comparison. I think I like the scrunched up ones the best. I may add some beads in to folds. They will be for sale later in the summer once I get some buttons and button holes done.
With Easter around the corner, I decided to make Easter baskets for my grandsons this year.
Since I didn’t have a container the size or shape I wanted, I chose to make a resist using Rosiepink’s “How to Make Vessels with a Resist” ebook.
I wanted to put a different design on each side, but have both the same. A bunny on one side and a chick on the other. Then I made a resist design on paper and cut a template from plastic flooring material. After sketching out a design, I made some prefelts in colors I didn’t have because I decided it would be easier to control the small design pieces.
I cut out the designs from the prefelt and needle felted them together using yarn to decorate the eggs. I used an extra white layer underneath the bunnies because I didn’t want the background colors coming through after fulling. I also used another layer under the bottom of the eggs to level them out. Before laying out on the resist:
At the last minute I changed the position of the eggs making them vertical instead of horizontal. When I put the designs on the resist they were too tall! Back to the drawing board to make a bigger resist. I added another two inches in height to accommodate the height and shrinkage.
Since they are baskets, I wanted to make them look like it. So, I alternated background colors on the first layer. It got tricky on the second layer because the roving was laid out perpendicular and the colors didn’t match because of the staple length. I found the sparse spots and filled in those colors first then proceeded with the second layer design careful to alternate the side colors as well. I used four layers total one side at a time.
First layer
After I finished felting, fulling and shaping, I noticed my bunny and chick designs were too low. I’m sure the kids won’t care, but I’ll know better next time. I was very pleased with the final result. Although, the bunnies need some whiskers. Any suggestions?
To finish it off, I made basket handles by braiding roving, then felting and fulling them. I also used Zed’s “Polymer Clay Simply Made” ebook to make “egg” buttons. That was fun, too. I still have to put them together. The handles are soft which was intentional so that we could easily pack them and use the buttons to remove the handles.
What spring or Easter projects are you working on?
Thanks to Lyn and Zed for creating such easy to follow tutorials!