Browsed by
Tag: hand stitching

25 Million Stitches

25 Million Stitches

A couple of people have introduced me to the project 25 Million Stitches. After taking a look at the site and seeing the work being created and the vision behind it, I thought all of our readers might also be interested in the project. The site has a lot of information so make sure to look through all the pages. Take a look at the 25 Million Stitches website.

Here is what the project is about in the words of 25 Million Stitches administrators:

The world is in flight. 25 million people* across the globe have been forced to flee their homelands as a consequence of genocide, war, poverty, natural disasters, targeted violence, and other grave threats. They leave behind everything they’ve known and possessed in order to live; they face immense struggles, misfortunes, and perils on their journey; and, through it all, survival, much less successful resettlement, remains but the slimmest hope.

Please join this project to hand-stitch 25 million stitches: one stitch for each refugee. How does making 25 million stitches help refugees? We believe that this project is a way for us to engage with this global crisis instead of ignoring it. And even though no single stitch can fully represent an individual, the act of stitching and the resulting work will help bring attention to the scale of the crisis. Two objectives of the project are:

  1. To engage as many people as possible to raise awareness of the global refugee crisis and

  2. To amass 25 million stitches to visually represent the sheer volume of this astronomical figure of refugees.

This is a community art installation. We are asking volunteers to hand stitch on fabric panels. We now have over 1,400 participants from 44 states and many countries overseas. However, another 1,000 panels will be needed to be stitched to add up to 25 million stitches. This huge community art project will come together into a single striking fiber arts display. When the panels are returned to us, we will assemble them in a grand installation of everyone’s personal expression of solidarity and support for the refugees. Once woven together with other lovingly contributed panels, each contribution will be a part of a tapestry of profound community support ⁠— but we can’t do it without your participation!

Take a look at the panels that have been created so far here.

Here is a rendition of what the inaugural show might look like. The rendition is by Joe Weber. The first show is planned for June 2020

at the Verge Center for the Arts, 625 S Street, Sacramento, CA
June 5–August 15, 2020
Opening Reception: Friday, June 5, 5–7 pm

I also wanted to share with you the 25 Million Stitches pieces by people that I know. Josie Dakers-Brathwaite, one of our forum members, recently shared on Instagram that she got together with a group of stitchers to work on their pieces.

Here are Josie and some of the group. They look like they were having great fun. This photo was contributed by Lenny Van Eijk, thanks Lenny!

And here are some of the works in progress. The photo on the right was contributed by another of Josie’s friends, Sarah Fader, thanks Sarah! I hope that we’ll get to see the finished pieces as well!

This is a work in progress by Penny Peters. This is just a portion of the design, this is about a third to half of the full panel.

Sally Glutting, in my art group, also created a piece for the cause. The photo above is Sally’s stitched piece that she is contributing to 25 Million Stitches.

I’m not sure that I currently have time to create a piece for this but they are looking for more participants. If you’re interested, check out the information on their website. If you have created a piece for 25 Million Stitches, we would love to see it. Share it with us on the forum.

Old Hand Stitched Projects, What to Do?

Old Hand Stitched Projects, What to Do?

In the quest to clean out some of the “stuff” in my studio, I found a couple of old projects that are hanging around either not finished or in the “why did I think this was a good idea” pile. The first is a printed sample from one of my online classes and I added some hand stitching.

I wanted to brighten it up a bit but then I think I might have gone past my comfort zone. I couldn’t decide if I should just keep adding more stitching or if it should be left as it is.

As you can see by the side view it is lumpy, wavy and uneven. The circles stitched on the felt caused the felt to buckle and push outward.

What would you suggest? Would you add more stitching? Just use it as is? Cut it up? Throw it away? What would you make out of it? I’ve love to hear your suggestions.

Here’s a little felt book that I started. I think I was mainly using this to make the binding but then decided I should stitch on the pages. The photo above shows the front cover.

And here’s the second page. I have three more pages that are not finished. I either got bored or couldn’t decide what to do on the last three pages. Perhaps I will look through my floral sketches and find some patterns that might work for those last three pages. The felt on this book is commercial felt in case you were wondering.

And I thought I would show this hand felted hat that I completed with embroidery. I’m not sure I have shown it before and it was hanging out in the studio with no better place to be. What do you do with finished pieces that are taking up space in your studio?


Slow Stitching

Slow Stitching


This is the landscape (on the left) that I showed you in my last post. I made a few changes including some new felt to indicate mountains in the distance and changing the diagonals in the foreground.  I was originally going to machine stitch this in place on its background of white felt but decided to do some “slow” stitching. So I am hand appliqueing all the pieces down. I didn’t want the machine stitch to overpower the simple shapes.

Here you can see the stitches a bit closer. I am using a machine thread and a short sharps needle to stitch each piece in place. Some of the pieces are overlapping and some are butted up against each other.

Most of the sky is stitched down and because I didn’t have a big enough piece of dark blue felt for the sky, I cut up the pieces into irregular triangles. I’m not sure if you can see or not but this is felt that had been printed and then over-dyed so there is some pattern in the sky that along with the triangular pieces is definitely giving some interest that a single, plain blue piece of felt would not display.


I have now started stitching down the blue mountain shapes and as I stitch, some of the felt pieces have shifted a little. I may also add either some more color to some of the mountains as the white is definitely bringing them to far forward and is distracting. But I will work on that once everything is stitched in place.

I do have a piece of silk that is shown in the upper left of this photo that I am considering using as clouds. I would have it in much smaller pieces and I’m not sure I’ll even use it but I might. What do you think? Do you think it needs clouds? Is that fabric too light in value against the really dark sky? I hope you don’t get bored with this piece as it will take me a while since I am stitching by hand.

Liberty Bodice

Liberty Bodice

This is a guest post by one of our forum members Antje Ream. 

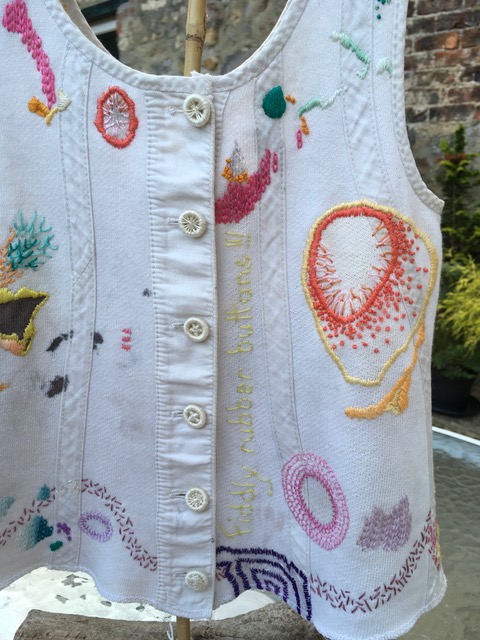
Many women of a certain age will remember ‘Liberty Bodices’. These were the vests of the day. At the age of 7 or 8 I was not a fashionista, not like so many children today. We had more serious things to do like play doctors and nurses with our dolls or build dens with bed sheets over washing lines etc. All I remember about them was that they kept me warm but more importantly they had EXTREMELY fiddly rubber buttons down the front. Some bodices even had them on the side.

As already mentioned I am of a certain age, but to my surprise one of my bodices resurfaced a couple of years ago when my late father asked if I remembered this ‘cloth’. He had been using it for decades as a shoe polishing cloth.  Although badly stained it was still complete and somehow it set my creative juices going….which meant dad had to find ‘another’ cloth! Sadly the rubber buttons totally dissolved when I laundered it.

Above I’ve started stitching, although I didn’t like it. Nearly two years later and the juices had found the right recipe. I’m sure I’m not alone in this regard. I started to stitch around the stains using different colours and types of stitch, but nothing tooooooo complicated. It helped me remember many happy times growing up.

From my avid explorations and research on (read that as addiction to!) Pinterest I gleaned some useful ideas, combined with input from my EPH (Ever Patient Husband – he is a brilliant hobby painter so has a good eye) and others, I finally completed my slow stitch piece. The last few days were not quite ‘slow’ stitch as I wanted to enter it into a village show. Then came the method of presentation problem.

Using a piece of polished driftwood, I roped my neighbour into helping me create the stand – the night before!

I titled the piece….Polished Childhood. I could say more about the colours and continuous line of stitches but I’ll leave that to your imagination. Unable to replace the original buttons I recreated them by making individually patterned ‘Dorset’ buttons and stitching a comment about the rubber ones as a reminder. Dad would have loved the result and we would both have laughed and giggled at all the memories. Writing this has just made me realize the bodice is a tribute to him (and my still active mum)….totally by chance.

EPH and I arrived at the show just at packing up time….WOOHOO……..a red ticket I will certainly treasure!

Thanks for the wonderful post Antje! I am sure it will bring smiles to the faces of those who remember wearing the same type of bodice.


More Stitches

More Stitches

I have now worked my way through the stitch dictionary at  http://www.embroidery.rocksea.org/reference/picture-dictionary/

It took a while but I worked my way through all the stitch families. I did get lazy near the end and I didn’t do all the wrapped stitches. It seems if you wrap another thread around through your stitching it gets a new name. If you weave it through it gets a new name. If you leave loops when you do it another new name.

I discovered that some stitches just didn’t work well with crochet cotton. I am using #8 mercerized and for some stitches it was to slippery and the stitch didn’t lie properly. I think it would have worked better with yarn. Some stitches were to small when pulled tight making it really hard to see the detail of the stitch. Some stitches looked messy when she did them and worse when I did them. Have a look at the top right sample.

These are the 2 pens I have been using to make lines. 

and the marks they make

They are both permanent. I like the silver one better. It is a liquid but it stays put and would be fine to use if the line will not show after. The gold one seemed to get wider after a while. I am going to keep an eye out for the washable and air erase pens. One of the books I got said the was a pen that disappeared when heat was applied. I will keep an eye out for that too. Next I think I will try drawing on some water-soluble fabric  and I might try some tear away. I think once I have an outline done I could fill it in ok.

And on another topic of my life; we had our first farmers market day of the year last week and it went well. I hope I can get back into the routine of baking (and then cleaning up) for the market so I have some time left for felting.


Learning to Hand Stitch

Learning to Hand Stitch

I really like the way stitching looks on felt. I like machine stitching and took Ruths on line class. Machine stitching class  It was very good. I need to do lots more practice. I am a little busy around home and farm at the moment for that so I thought I would work on expanding my stitching ability with a regular needle . I can take it with me and do it anywhere.

I do know a few stitches. I am quite good at french knots because I like to make sheep.  I did this little bag recently.

On the bottom half I did some flowers. I used french knots and a daisy stitch.

This is what it looks like closed. It still needs ironing to get it flat.

So then I went on to do some practice flowers on a piece of felt I had

and some close ups.

The first leaf, the one at the bottom didn’t work out so well. So for the second one I drew a leaf shape. I used ball point pen because it was what I had in my purse while I was waiting in the van for kids. What do you use that won’t disappear while stitching but will disappear easily after you are done.

At this point I thought I should be more systematic. I thought I would just go back through the Take a Stitch Tuesday challenge. We did It on the Forum a few years ago. feltandfiberstudio.proboards.com/board/16/challenges  unfortunately the links lead you to a new take a stitch Tuesday challenge that started in January. If you are interested follow the link in any of the posts. You can still see all our posts for the challenge we did.

So I went looking for another stitch dictionary to use. I found this one that groups the stitches in to families I like this Idea. stitch dictionary I learn the basic stitch and some interesting variations, so I started. First I drew a wavy pattern and then I clamped it in my new to me embroidery hoop stand and  started stitching. Then I took a picture, at least I hadn’t gotten far before I remembered to take a picture.

This is the finished stitching, it is just simple back stitch. I tried some different stitch lengths.

I had hoped to get further than this for you but life keeps interfering. I haven’t decided if I like the hoop stand. It’s a bit strange to use but it’s nice that I can just stick the needle in and walk away. I haven’t made it very far yet but so far I am enjoying it.

Samples from the Nuno Paper Lamination Class

Samples from the Nuno Paper Lamination Class

I just finished Ruth Lane’s online class.  Since I am also papermaker, I was excited to combine the two passions and see the results.

It was a fun experiment using a variety of papers, dyes, paints and fabrics.  Some worked, some didn’t, but that’s how we learn.

This first one is a paper napkin from one of my Grandson’s birthday party earlier this year on organza.  Since I was experimenting, I used some batts with unknown fibers in two colors, blue and green.

20160610_142733

I decided not to further embellish it since the “characters” were nicely defined.  I suppose I could add some greenery and clouds.  But I wanted to show the results this far.

The next one is also “finished.”  I used a tree stencil on organza with unryu paper which is very fibery.  Again it is on a batt of unknown fiber.

20160610_142530

I embellished around the stencil with silver silk hankies.  It felted very nicely.

20160515_143735_edited-1

Since these were experiments, I wasn’t concerned about perfect edges and left them organic.

Here’s a closeup of the center.  You can see how those fiber areas look like branches and connect the trees.

20160611_105442

I got great texture as you can see from this side view.

20160515_144009_edited-1

The one project I completed was a stenciled bird pic.

20160610_142635

I used a couple of paper and fabric types with this stencil, but chose this one to finish even though the colors faded.  It was a dyed paper towel on cotton voile.  You can’t see it in the pics, but the bumps from the towel can be seen in spots. I used it on a merino batt.

20160518_113953_edited-1

I forgot to cover the edges of the voile, so I used machine stitching to cover the edges.

I decided to hand stitch the rest. There is a lot of dimension in the paper, although it’s not too obvious in these pics.

20160609_121737

I wanted to keep it simple.  I used double rayon thread with threaded backstitches and some satin stitches to embellish it. The green is a variegated thread. I purposely just outlined because I wanted the birds to be the center of attention. Forgive my poor stitching. Here are some closeups.

20160609_122027 20160609_121810 20160609_121800

Now I have to decide whether to frame it or leave it organic.

Thanks Ruth!  It was a unique class. I need more practice. I’m still working on the final projects.

2nd Quarter Challenge Part 2

2nd Quarter Challenge Part 2

It seems as if everyone is anxious to reduce their UFO stash.  While I haven’t put a dent in mine, it does feel good to create something new out of scraps.

Sifting thru my scraps, I was having a hard time coming up with ideas.  But then one evening while watching the local news it hit me.  I grew up in Chicago and now live about 50 miles west of it in the middle of corn country.  I always loved seeing the city scape either driving in or flying over.

I didn’t want to copy a picture, but compile my own city scape made up of buildings I thought were unique.

My first attempt I used a purple for a sky color. And a teal for the water.  It was too dark and didn’t let the buildings pop.

20160506_160331

Not having enough blue scraps for the sky I felted a piece of prefelt.  Then added some fluffy wool clouds for dimension.

20160515_16514020160523_142336 20160523_142313

Of course a lot of buildings are gray or black, but as you can see I chose to use more of my wallet material for my centerpiece building — The Willis Tower (formerly known ans will always be The Sears Tower to me.) In reality it is black.

The red building on the right was a left over piece of a business card.  I thought it was just right for a real red CNA (Continental National America) building on the lake shore.

On the left is the Crain Communications building also known as the Diamond  building.

Once the pieces were pinned, I used a combination of hand stitching to keep everything in place, machine stitching for the windows and antennas  on the Willis building and details on the Crain building.

The Willis Tower is not leaning in real life, but we do live in the Windy City and buildings do sway. Actually, the sewing must have shifted it.  I debated pulling it out, but decided against it.

I also used free motion stitching in the foilage area at the lake front.  There was still something missing. What is a lake without boats?  If you look closely, the sails are blowing in the wind, again adding dimension.

20160519_122852


20160523_142144

20160523_142354

I tried a couple of mats, but decided on the black and white one.  I don’t have a frame yet, but probably basic black.

20160523_142107

Or I could use a 5 x 7″ frame by itself.  Sorry about the black background. It’s a metallic slate gray frame.

20160523_143942

What do you think?

Don’t forget to post your 2nd Quarter Challenge on the forum.


Free Contemporary Designs for Fiber Art

Free Contemporary Designs for Fiber Art

My friend Deb Stika and I are working up a book proposal using Deb’s designs. These are contemporary designs that Deb has drawn and that we both thought would work really well as designs for various types of fiber art including hand stitching, machine stitching, wet felting, needle felting, screen printing, surface design, silk painting, mixed media and more. The designs are in 5 categories including psychedelic, circles, nature, tapestry and graphic. The plan is to have 5-10 designs in each category and to have examples that have been completed in each design in a variety of media. You could also use these designs to print out and color with colored pencils or pens. There does seem to be a new fad of “adult coloring” books and these designs would be fun to color.

When you are writing a book proposal, you as an author need to be able to show to the publisher that there is interest in that type of book and that there will be an audience for the book. So Deb and I thought we would give away a few of the designs here to our readers and see what the response is. We would love your feedback and for you to spread the word on social media about the proposed book and the free designs. We would also love to see whatever you make using any of the designs. Perhaps, if the book proposal is accepted, your piece might even be included in the book.

The links to the PDF version of these designs will be included below. Please feel free to use the design in your own work. Please make sure to attribute the design to Deb Stika when showing your work. If you would like to sell items with these designs, please contact us before doing so.

Contemporary Designs by Deb Stika, copyright Deb Stika

This is the first design in the graphic category. The nice thing about these designs is that they could be used in so many ways. For example, you could enlarge the design if you wanted to use it in wet felting to make a wall hanging. Or if you wanted to use it in hand stitching, you could keep it at a smaller size.

Contemporary Designs by Deb Stika

Here is Deb’s interpretation of the design in hand stitching and then coloring in the background.

Contemporary Designs by Deb Stika

Here is my interpretation done with free motion machine stitching on dyed felt. How would you interpret this design? I could see this design being used for 2 dimensional needle felting in natural wool colors. Or even using a variety of hand stitches to fill in the colors once the outline was completed. I also think this would be cool if enlarged a bit and used as a design for a silk painting. I’m sure you can come up with other ideas on how to use the design.

Graphic 1

Just click on the link above to get the PDF version of this design.

Contemporary Designs by Deb Stika, copyright Deb Stika

This design is part of the nature series. Again, I can see many possibilities with this design. Applique, cut back applique, wet felting with prefelt pieces, screen printed on a t-shirt, or wet felted and machine stitched.

Contemporary Designs by Deb Stika

Here is Deb’s hand stitched interpretation. The background was actually printed by me during several of our local surface design sessions. I don’t actually remember what all I did to this piece of fabric. But it was sitting unloved in my stash and Deb liked it, so I gave it to her. I just love the end result! Deb has hand stitched hand dyed felt as well as including other hand stitches. Don’t forget that you can enlarge any of these photos by clicking on them.

Contemporary Designs by Deb Stika

And here is my machine stitched creation from Deb’s nature design. This is fused, hand dyed fabric applique pieces that I covered with sheer silk organza and then machine stitched. I really like how even though we used the same design, our pieces are very different. Have we got your mind whirling with ideas on how to use this design in your own way?

Nature 1

And again, here’s the free PDF at the link above for you to try your own piece with the nature design. So I will make this a mini challenge for everyone. Use one or both of these designs to make something in your own methods and media. Then let us know what you created either by showing it on the forum or sending it to me by e-mail at laneruthe at gmail.

Please let me know in the comments if this type of book would be something you would consider buying. Are you looking for fun designs to use in your work? Would you prefer to have just the examples and designs or would you prefer specific how to projects with the designs? We’d love to hear your thoughts and ideas!


Still Stitching Pomegranates

Still Stitching Pomegranates

I have stitched a little bit more on my pomegranate piece. I had time when we went on a quick road trip this past weekend. I’m still not sure what direction I am taking with this so it’s kind of just “free form” stitching at the moment.

Stitched Pomegranates

This is the entire piece. I mainly added more stem stitch around the various pomegranate shapes.

Stem Stitch

I like how the stem stitch really defines the shapes. It is my go-to stitch for curving lines.

Close Up Stem Stitch

Here’s  a little closer view.

Seed Stitches

I did add a few more seed stitches but not many.

Another Pomegranate

Now I need to decide if I am going to add more to the background. I was thinking about adding branches and leaves. What do you think?

For those of you in the northwest United States, Gail Harker from La Conner, Washington is coming to Kalispell, Montana at the end of June to give a Level 1 Experimental Hand Stitch course.

poster

Northwest Montana is a beautiful place to visit and you could combine the class with a vacation. Road trip anyone?

Level 1 Stitched Page