Browsed by
Tag: hand stitching on wool

Some Stitching, Some Felting and Some Growing Babies

Some Stitching, Some Felting and Some Growing Babies

I am slowly adding some stitching to the needle books. I did a small sheep book. It is about 2 x 3 3/4inches or 5 x 9.5 cm closed.

And a larger one,4 1/4 x 4 3/4 inches or 11 x 14 cm closed. I am not sure it’s done. I was thinking it needed another sheep down in front. I was thinking it should be a black sheep but I am not sure.

and I started my second quarter challenge.  I am not going to tell you what it is but you can guess if you want.

And here are the cute little chicks from a couple of weeks ago. They have grown a lot and no longer look alike. The chickens hardly even look at me, maybe they are sad they have reached the ugly stage. In another couple of weeks they will be pretty.


And here are the turkey babies. They are very interested. It was hard to get a picture I had to spook them so they ran away so I could get a picture as they came running back with curiosity. Turkeys are very funny.


And lastly one of my apple trees has started to bloom.

All in all, a good week. I hope yours was too.


Stitching Fossils Piece

Stitching Fossils Piece

The last time I posted, I showed you my piece that I started for the 4th Quarter Challenge that included twists, tubes and hand spun yarn.

Here’s what it looked like after felting. I started hand stitching and used some very simple stitches including stem stitch and straight stitches.

Here’s the piece after adding the dark stem stitch around the tubes. I also added some “white” marks across the “fossils”. The white is really a light almost peach color that is on the bottom right side of the photo. These are the various wool threads that I am using to embellish the piece.

Here’s a few more views, you click on the photos to see a larger version. I decided that the yellow-orange seemed a bit too much so I wanted to tone it down just a bit. I added blue-green stitching over the yellow-orange and added some of the yellow-orange to the background to move the color around in other places.

So here it is again after adding the yellow-orange and blue-green. I am now adding more colors into the background to give a mixture of the colors into the background. I enjoy hand stitching into felt and this has been a relaxing project. Do you like to hand stitch on felt? If so, what are your favorite stitches to add?

More Stitches

More Stitches

I have now worked my way through the stitch dictionary at  http://www.embroidery.rocksea.org/reference/picture-dictionary/

It took a while but I worked my way through all the stitch families. I did get lazy near the end and I didn’t do all the wrapped stitches. It seems if you wrap another thread around through your stitching it gets a new name. If you weave it through it gets a new name. If you leave loops when you do it another new name.

I discovered that some stitches just didn’t work well with crochet cotton. I am using #8 mercerized and for some stitches it was to slippery and the stitch didn’t lie properly. I think it would have worked better with yarn. Some stitches were to small when pulled tight making it really hard to see the detail of the stitch. Some stitches looked messy when she did them and worse when I did them. Have a look at the top right sample.

These are the 2 pens I have been using to make lines. 

and the marks they make

They are both permanent. I like the silver one better. It is a liquid but it stays put and would be fine to use if the line will not show after. The gold one seemed to get wider after a while. I am going to keep an eye out for the washable and air erase pens. One of the books I got said the was a pen that disappeared when heat was applied. I will keep an eye out for that too. Next I think I will try drawing on some water-soluble fabric  and I might try some tear away. I think once I have an outline done I could fill it in ok.

And on another topic of my life; we had our first farmers market day of the year last week and it went well. I hope I can get back into the routine of baking (and then cleaning up) for the market so I have some time left for felting.


Learning to Hand Stitch

Learning to Hand Stitch

I really like the way stitching looks on felt. I like machine stitching and took Ruths on line class. Machine stitching class  It was very good. I need to do lots more practice. I am a little busy around home and farm at the moment for that so I thought I would work on expanding my stitching ability with a regular needle . I can take it with me and do it anywhere.

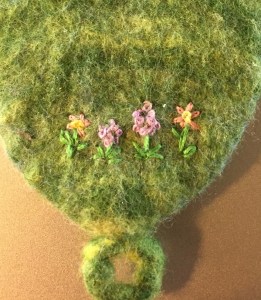
I do know a few stitches. I am quite good at french knots because I like to make sheep.  I did this little bag recently.

On the bottom half I did some flowers. I used french knots and a daisy stitch.

This is what it looks like closed. It still needs ironing to get it flat.

So then I went on to do some practice flowers on a piece of felt I had

and some close ups.

The first leaf, the one at the bottom didn’t work out so well. So for the second one I drew a leaf shape. I used ball point pen because it was what I had in my purse while I was waiting in the van for kids. What do you use that won’t disappear while stitching but will disappear easily after you are done.

At this point I thought I should be more systematic. I thought I would just go back through the Take a Stitch Tuesday challenge. We did It on the Forum a few years ago. feltandfiberstudio.proboards.com/board/16/challenges  unfortunately the links lead you to a new take a stitch Tuesday challenge that started in January. If you are interested follow the link in any of the posts. You can still see all our posts for the challenge we did.

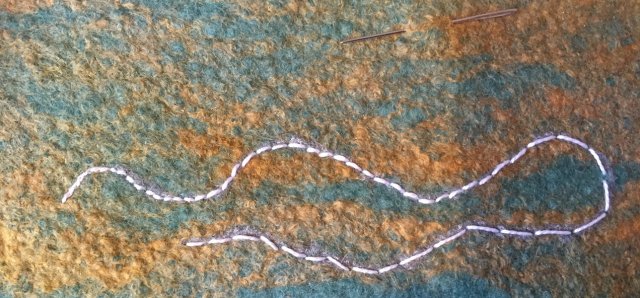
So I went looking for another stitch dictionary to use. I found this one that groups the stitches in to families I like this Idea. stitch dictionary I learn the basic stitch and some interesting variations, so I started. First I drew a wavy pattern and then I clamped it in my new to me embroidery hoop stand and  started stitching. Then I took a picture, at least I hadn’t gotten far before I remembered to take a picture.

This is the finished stitching, it is just simple back stitch. I tried some different stitch lengths.

I had hoped to get further than this for you but life keeps interfering. I haven’t decided if I like the hoop stand. It’s a bit strange to use but it’s nice that I can just stick the needle in and walk away. I haven’t made it very far yet but so far I am enjoying it.

4th Quarter Challenge

4th Quarter Challenge

I had never heard of the Suprematist art movement that Zed picked for the 4th Quarter Challenge. I looked it up right after the challenge was posted and got the basic idea. Then I got busy doing other things. But this weekend, I had some extra time and decided I would continue to try to use up scraps and UFO’s to create the challenge piece.

I started by looking through my felt scrap basket and found these white off cuts. I can’t even remember what these were originally.

I stitched them together with zig zag stitch on the sewing machine. I left the thread ends and uneven edges in case I wanted to have an uneven/organic type edge.

I then went through a bunch of my screen printed, stenciled, printed felt samples. I cut a few shapes and started playing around with placement. This was my final decision on placement. I pinned these all in place and then got a little kit together for hand stitching. We drove 2 hours to Missoula to a football game this past weekend, so I stitched in the car.

Here it is after I stitched it down. You can click on the photo to enlarge it. I just did a simple applique stitch with machine thread in colors close to the felt color. Now what to do with it. My friend suggested I could make a felt cuff out of it. It isn’t quite long enough but if I added some elastic it would work.

Or I could crop it and frame it. What else could I make out of it. It’s not very big, about 5″ x 7″ when cropped. Have you thought about joining in the challenge. It’s really easy, just find some felt shapes and put them together in a pleasing combination. You can show us your results here: http://feltandfiberstudio.proboards.com/thread/3496/2017-fourth-quarter-challenge


All Sewn Up

All Sewn Up

I showed you various stages of these pomegranates here and here. I had quite a bit of waiting time in the last couple of weeks so I finished stitching, adding some leaves and adding a bit more stitching to the pomegranates.

Tracing of Pomegranates

The first thing I had to do was figure out where I wanted the leaves to go. So I took a couple of pieces of tracing paper, traced the pomegranates and drew in some leaves. I did have a photo of what pomegranate leaves looked like to help me with my leaf shapes.

Printed and Stitched Pomegranates

And here is the finished piece. The piece is done mainly with stem stitch and all the thread is wool. I  stitched 3 times around some of the pomegranates to make them more prominent.

Hand Stitched Pomegranates by Ruth Lane

I didn’t add any more of the seed stitches in the middle.

Close Up of Pomegranate Stitching

You can see that the pomegranate on the left in the foreground has a thicker outline. That is actually 3 rows of stem stitch next to each other. The green wool thread was some that I dyed with natural dyes a couple of years ago. And I didn’t try to transfer the leaf design on to the wool, I just looked at my pattern and stitched it by eye. I have never found a really good way to transfer a pattern on to wool and it didn’t matter if the leaves were exactly the same as my sketch.

Now I just have to figure out how to finish the piece. The wool is cut unevenly on the left side and some of the sides were already blanket stitched. What do you think? How would you finish it?


%d bloggers like this: