While I was in class last week in La Conner, Washington, I was able to see the exhibition of The Red Dress at the Pacific Northwest Quilt and Fiber Arts Museum which runs through March 2nd. I actually hadn’t heard about this project before my fellow students suggested that we go and see it. The project was started by British artist Kirstie Macleod and took over 14 years to complete.
According to the Red Dress website:
“The intention of The Red Dress
Initially the project sought to generate a dialogue of identity through embroidery, uniting people around the world across borders and boundaries. However, over the 14 years it was created, The Red Dress also become a platform for self-expression and an opportunity for, often marginalised, voices to be amplified and heard, initiating vital dialogues on important and frequently uncomfortable issues.”
The embroideries were created by 380 people from 51 countries all over the world.
Each contributor was encouraged to create a piece in their own style reflecting traditions of stitching from their own region/country.
It’s amazing to me that the embroidered pieces flow so well together. Imagine the work it took to put all the pieces together as there were 87 panels to combine.
It was wonderful to be able to see this in person and see the embroidery closely.
You can see more of the Red Dress project at their website.
The Red Dress will be traveling to other locations and if you get the chance, it is well worth seeing in person. Here’s the schedule of the exhibitions. Scroll down to see the upcoming exhibitions.
There are more photos and information on the website. I hope you enjoyed this brief glimpse at a wonderful project.
The ‘Bachelor Buttons’ in the midst of setting up the exhibition. (Maureen couldn’t be there, but her beautiful work was.)
I recently completed Level 3 Advanced Studies in Experimental Stitch at the Gail Harker Creative Studies Center and we held an in-person and online exhibition. Gail’s courses are similar to City and Guilds in the UK. If you’re close to the Seattle area, there is a new session of Level 3 Stitch beginning in September. Just click on the link above for more information. (And you really don’t have to be that close, I live almost 600 miles away.)
Gail Harker’s Center
The Reception Area as You Enter the Exhibition
Ruth and Val Hanging Bobbie’s Artwork
Alana and Sheila Arranging Flowers
We had a busy few days setting up the exhibition and I thought you might like to see a few set up photos.
Photo by Gail Harker
During the Exhibition
During the Exhibition
And then it was the day of the exhibition. We had around 80 people attend over the two days in early July. It was wonderful to be able to see all the hard work accomplished by my fellow students and to share our work with other interested people.
I asked my fellow students if I could share their work and I’m happy that everyone agreed so that you can see some amazing fiber art. These are just a very few examples of their work produced in class.
Maureen Goldsmith
Maureen Goldsmith wasn’t able to come to the in-person exhibition but was able to send her wonderful work.
Covid Birds by Maureen is a framed wall hanging, you can see it in the first photo behind the group photo on the wall, to understand the size of the piece.
Bobbie’s lamp was created with machine and hand stitching and cut back applique. She found it interesting to work with light during this process as it changed the colors immensely when the light was turned on behind the fabric.
Alana Koehler was inspired by a row of bottles on her windowsill. As she worked through the process, she became intrigued with the difference between the hardness of glass and the translucent fabric that she ended up using in Ethereal Bottles.
And lastly, there is me. The Language of Trees is based on the concept that trees and other forest plants, have a vast communication network underground.
This wall hanging is mostly machine stitched on a dyed and painted background. The little bits of orange are words that I selected from tree poems to express the trees communicating with each other.
And because I have had a few people asking, I have also included my book about my dog Edgar. Here is “The Book of Edgar”.
Thanks to all my classmates for their camaraderie and support. Thanks to Gail and Penny for all your expert guidance and perseverance through a challenging three years of class.
I am slowly adding some stitching to the needle books. I did a small sheep book. It is about 2 x 3 3/4inches or 5 x 9.5 cm closed.
And a larger one,4 1/4 x 4 3/4 inches or 11 x 14 cm closed. I am not sure it’s done. I was thinking it needed another sheep down in front. I was thinking it should be a black sheep but I am not sure.
and I started my second quarter challenge. I am not going to tell you what it is but you can guess if you want.
And here are the cute little chicks from a couple of weeks ago. They have grown a lot and no longer look alike. The chickens hardly even look at me, maybe they are sad they have reached the ugly stage. In another couple of weeks they will be pretty.
And here are the turkey babies. They are very interested. It was hard to get a picture I had to spook them so they ran away so I could get a picture as they came running back with curiosity. Turkeys are very funny.
And lastly one of my apple trees has started to bloom.
I’m always amazed at what I accomplished at the end of year. This year I took a few classes in order to expand my creativity in addition to experimenting on my own. I also tried to use up more materials and finish some UFOs.
Here is a bedside case for odds and ends made with some merino inside and unknown fiber batt with silk embellishment.
Experimenting with different types of yarn to make a table runner.
Our First Quarter Challenge – Fauvism.
Weaving then felting.
A Valentine gift for granddaughter Lisa.
Teri Berry’s Snail hat class.
Finishing and hanging an eco print. Crochet around wire bowl.
Framing the felted weaving.
I did a lot of experimenting with crochet stitches.
Practicing for Ruth’s Free Motion Embroidery class.
Crochet hats for my granddaughter and her new premature brother Ken.
A dimensional potholder.
Learning more crochet stitches.
Making a crochet hook case from a crochet sample.
A bowl for the Second quarter Challenge – Celtic
Using yarn on a resist for a vase cover.
Adding dimension to the hummingbird/tiger lily picture.
Crocheting scrubbies.
Felt and crochet earrings.
Crochet beaded bowl with stiffener.
A Pumpkin for Ken.
The Third Quarter Challenge – Edo Period; felt and hand embroidery Sakura.
Ribbon embroidery and framing.
Playing with thickened dye for Ruth’s class on felt.
Finishing a case from UFO pile and FME Butterfly
Maneki-Neko for Third Quarter Challenge Edo Period.
Framing the Rooster.
More stencil play with acrylic and thickened dye.
The Fourth Quarter Challenge — Suprematist
Penguin’s Poinsettia Holiday card.
A couple of scarves for my daughter in laws parents in Japan where it’s as cold as Chicago.
I want to let everyone know I am taking a leave of absence to focus on my health and family. I will be around just not posting weekly. We have a lot of talented artists that will be filling in starting with Tracey Thompson next week.
I want to thank everyone for helping out to give me this time. If you or someone you know has something to share — it doesn’t have to be felt but anything fiber related including paper, please contact me or one of the other moderators on the forum and we’ll get you on the schedule.
I hope everyone has a Happy, Healthy and Prosperous New Year! Happy Creating in 2018!
Penquin (Anne Hickley) made me a beautiful Panda card for the holiday exchange. For some reason I was stuck on the idea of a Poinsettia. You may have already seen it on the Forum.
I made one for myself last year to hang as a decoration and wanted to do another. Of course, making a card became more complicated than I had anticipated. But I enjoyed making it.
I started out making thin red prefelt and cut out 5 or 6 layers of different sizes, putting plastic wrap between each layer leaving a hole in the center so they’d all felt together. I had some green for the leaves and laid those underneath. Unfortunately, I didn’t take pictures before I felted them. But here is the flower after felting with beads for the center.
I stitched each petal and leaf.
Then I felted a white background with some sparkly fabric for a snowy effect.
I did another without the sparkle to be the back. On the back I used Luminescent paint to write the words.
Now it was time to put it all together. I used stabilizer on the back of the sparkly piece and sewed the flower on by hand.
Then the fun part was putting them together using the blanket stitch.
I’m happy Penguin enjoyed it and hope everyone is ready for the holidays!
I had intended to use a combination of free motion and hand embroidery to add details to finish it. However, when I tried to use the sewing machine the felt was too thick and the stitches were just buried and I couldn’t control the machine. So, after an hour or more ripping out teeny stitches, I started the hand embroidery.
Embroidery is not my strong suit. My goal was to give an impression of ruffled petals and a hint of stamens. After looking at pictures of Sakura, I decided to keep it simple.
I made stars in the center of flowers with a knot in the middle on some. I didn’t want them to all look alike. Here I was getting started.
At first I tried using the stem stitch for the flower petal, but that proved to be hard to do in the felt and it really didn’t give it a ruffled look. so, I settled on a satin stitch. I varied the tightness depending on how close or far away it was. Then added some stem and back stitches to show differences.
Here are some closeups.
Another goal was to keep it subtle as if it was a 17th century scroll or painting that had faded over time. I originally had wanted to give it a scroll texture, but I had purposely didn’t felt it hard and it was thick so that wasn’t going to work. Best laid plans, right?
I also varied the color of the floss sometimes using white, pink or a strand of each to vary the depth. I also didn’t want all the flowers to look the same. I loved the dimension, colors and texture of the merino/silk scraps I used for the branches.
After I finished and wove in the threads, I steamed it to try to get the lumps out. I tried.
I know everyone had a an idea of how to position it. I liked Leonor’s idea to change it up occasionally so the same pictures looks different. Thanks Leonor!
I’ve been planning this picture for a while. It’s not the first time I’ve combined techniques, but this time I wanted to add more dimension to the picture.
It may seem like an odd choice of subject, but my sister Lorraine has loved elephants all her life and this is a little thank you for the Trunk Show I had at her Quilt Club a few months back.
I started by dyeing some silk and wool, then making batts. My original intent was to use the silk for texturing on the trunks, but the area was too small and since I wasn’t going to use it over all the elephants I let the idea go.
I built up the trunks, faces and foreground legs with coarser wool underneath, sewed them closed with wool thread and used resists under the ears. The eyes are garnets. I don’t know why the pics look brown, the prefelt was shades of gray.
The base was made beforehand with Corriedale. Before placing the elephants on I used batts for the water, sky, background and tree tops. The light beige ground is hand dyed silk gauze. I also used bits of Oussant fiber (from France) sent to me by forum member Aphee. They are the brown and beige areas in the foreground.
Of course, I had to add a little silk to the water and sky.
The tree trunks are silk/merino mix.
Once the background was all laid out, I added the elephants and needlefelted them down. This is before felting and fulling.
I did get some texture in the elephants, but the picture was a little flatter than I wanted so I added some needlefelting and fiber to the tree trunks and around the legs, hand embroidery on the toes and around the eyes, stitching and free motion stitching in the foreground grasses. Also the Oussant flattened losing it’s springy texture so I needlefelted more of it to give better dimension.
The treetops in the background were purposely left vague to let the elephants have center stage. More needlefelting and adding fiber for dimension and texture.
Some detail closeups.
Final hanging on the wall. I may have fulled it a little too much but I was worried about the thickness of the dimensional parts.
I had a request for further photos of my Kantha embroidery homework from my stitch class. Although my initial tries at Kantha weren’t all that enjoyable, I have really learned to appreciate the stitch. It takes a bit of practice but is well worth the effort.
This first two photos are NOT by me. The photo above is a stitched sari from Penny Peter’s collection that we got to study in class. I just wanted to remind you of what elaborate patterns Kantha can make.
This is another sari from Penny’s collection. I just love the endless possibilities of pattern that Kantha involves.
Here is one of my samples showing different ways to make a Kantha circle.
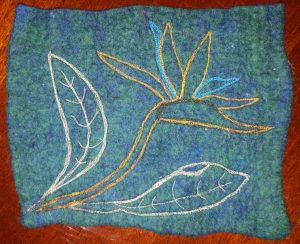
Here is a leaf pattern.
And this is bending stitch. I used a stencil pattern that I made several years ago in the shape of a nautilus.
This last sample is showing shisha stitch and flat stitches and is technically not Kantha but still based on Indian embroideries. I used Canadian pennies as I didn’t have any shisha mirrors. I’ve enjoyed learning how to use the Kantha stitch. If you have tried it, I’d love to see your samples.