Browsed by
Tag: cheesecloth

Finishing the Panels

Finishing the Panels

Last week I showed you two large panels I made using scraps.  Since then I created three more.

One long panel.

20161116_145808  20161118_122459

20161118_122511Two short ones.

20161116_145815 20161118_122422

20161118_12244120161116_145808

20161118_122349 20161118_122404

Here they are laid out on the floor.

20161201_214933-1


Here’s the final project.

20161204_142831 20161204_143117 20161204_143049 20161204_143029 20161204_143002 20161204_142938 20161204_142841


So, whats underneath?

My Simplicity Needle Felting Machine naked.  Sorry about the lighting, this was our first snow and kind of cloudy.

Now you see it.

20161204_142455Now you don’t.

20161204_143002

I was amazed that I got the sizes right.  I purposely left the edges organic.  Its a little lopsided but the top of the machine is narrower than the bottom.  Now I can change it around for a different look when the mood strikes.

Did you see that coming?

We have three spots left for sponsorship to keep our forum ad free, if you’re interested, please visit the forum and leave a response under 2017 Sponsorhips.  Thanks!

4th Quarter Challenge 2016

4th Quarter Challenge 2016

Like everyone else I have a ton of scraps, threads, cut offs, etc.  I finally got around to organizing them somewhat into like piles.  As you see I had a lot to choose form. The first pic is a tub full of scraps etc.

20161102_155352


I pulled out some and put them on the table to pick from.

20161102_155330

I decided I needed a store coupon case to keep in my purse.  I recently got a new purse and none of the pockets were sized large enough to hold some of these coupons.  I have a separate coupon holder for groceries that I only use when I grocery shop.  But I never know when I might pass by a department, fabric or specialty store that calls me in to shop.

I wanted it thin so I only used prefelt on both sides of the resist. With back problems, I don’t carry a big purse and try to keep it as light as possible.

I picked through the scraps and threw a little of this and that until I was satisfied with the look.  Then I topped off each side with some wisps of merino to help keep those rayon and cotton threads and silk bits to felt in adding merino over the sides to fold over. The yellow is silk selvedge.

20161105_155136 20161105_161012 20161105_161203

I spent a lot of time rubbing so as to not disturb the little bits and thread.

While still wet:

20161107_161500 20161107_161511

The purple fringe got a little wadded up in the felting process and the edges of the flap and sides of the holder needed to be straightened a bit.

20161107_161523

After drying I still had some wild threads so I needle felted some down and cut others.  I also straightened the fringe and needled it down. I think for my use it will be fine.  Here is the finished front:

20161107_163732 20161107_163607

Back closed:20161107_163746

Now I’m ready to shop.

20161107_164205

Here’s another piece I started as an experiment.  I don’t care for dots or the colors of this scarf, so I decided to cut off a piece and see how it felts because I have two more scarves I do like and didn’t want to experiment with them.  I used some silk scraps and angelina on one side and the scarf on the other.

20161012_160157

I liked the dot side after felting. It doesn’t look so dotty, but more textured.  I may do some stitching on it. The silk side I got carried away with the angelina and don’t care for that.  I’m not sure what I’ll do with it it’s fairly small.

20161014_115349 20161014_115356

It was fun experimenting with the scraps.  I’ll probably do more. Have you started your 4th Quarter Challenge?

Take One, Take Two and Roll

Take One, Take Two and Roll

While I was getting organized for our trip to Europe, I realized I could use something to keep my jewelry in other than little plastic bags like I have done previously for travel.

I devised a jewelry roll with netting inside to hang my earrings.  But my first attempt didn’t go well.  Even though I knew in my mind netting wouldn’t shrink, I proceeded anyway.

I used two layers of purple prefelt with a small pocket at the bottom.  I’m not sure what I was thinking then either. On the front side I used a strip of from a silky scarf down the middle then hand dyed cheesecloth on both sides for decoration.

On the inside I put the netting in and two panels of the scarf with a thin layer of plastic wrap so the panels wouldn’t felt to the inside.  I thought perhaps I could control the shrinkage so the netting would work, but I also wanted that texture the scarf and cheesecloth would provide. Hah!

2015-07-17 11.41.152015-07-17 11.40.54

I got my texture, but the netting just puffed out. I cut it out, but wasn’t happy with the way I could fix it.

2015-07-18 15.21.562015-07-18 15.21.08

So, on to the second try.  Same layout only without the netting and the small pocket at the bottom.  I put an extra narrow piece of felt along the edges of the panels to help them felt in straight and give it some extra strength.

2015-07-21 16.21.15

After I got the ruching I wanted and the felt was dry, I hand sewed the netting around the edges and a line through the middle to keep it from stretching out.  The panels were a little puffy, but their job was to hold in the earrings after being rolled so they wouldn’t fall out the sides.

20150827_101924

I hung the earrings from the netting.

2015-07-27 14.36.362015-07-27 14.35.23

Success! I sewed on a matching ribbon to tie the roll and I was done!

2015-07-27 14.34.38 2015-07-27 14.39.25Now I have to figure out what to do with the first piece of felt. Any suggestions?


Gone Fishing…

Gone Fishing…

I don’t know if its spring or summer or something in the creative cosmic atmosphere, but it seems fish have become a theme for art lately.

Cathy (Luvswool) and I got together before she went to her Colorado residency and I went to Florida a few weeks back.  We wanted to do something different together.  We remembered the cool fish Galina ( Felicity) did a while back on  her blog and decided to try that. (Thanks for the inspiration Galina!)

We each made our resists beforehand.  Of course, we were busy chatting while deciding on colors.  It took a bit before we got started.

Cathy chose yellow and blue.  I went with my teal (I have sooo much) and purple.

2015-06-24 13.32.28

We each used three layers (one layer of domestic 56 batt in between) and tried to get the fish mouth like Galina had hers not too successfully.  I guess we need practice. We also used gems for eyes.

I made separate prefelt for fins and tail.

When I got to the prefelt stage on my fish, I cut out and attached the tail and fins. I couldn’t find the resists for my gills when it came time to take the resists out.

2015-05-20 13.27.53 2015-05-20 13.28.20

We weren’t trying to make exact fish, but have fun coming up with our own fantasy fish.

IMG_1425 IMG_1424 IMG_1423

Cathy did get the gill resist out, but it ended up too wide, so she embroidered it to close it up.  She also added some roving around the eye and needlefelted it to get it to stay.

IMG_1426 IMG_1427

I decided to work on another fish that week and ended up with two more just experimenting with colors and embellishments. I managed to get gills on the second one. I also added bottom fins by needlefelting them on. The eyes were hard to get even on each side. I got a little better at the eyes, but they’re still not perfect.

2015-05-20 15.53.05

2015-05-20 15.51.32 2015-05-21 14.49.53

2015-05-21 14.41.21

2015-05-21 14.38.37

2015-06-24 13.27.29 2015-06-24 13.28.50

I’m not sure how I’ll display them.  I originally thought I hang them in the bathroom, but I don’t think my husband would approve of flying fish.

Have you done any summer or fish themed projects?


Cheesecloth Meets Merino Wool

Cheesecloth Meets Merino Wool

Today we have a guest post from Lyn.

***

I was lucky to win some of Ruth’s hand-dyed cheesecloth in a recent giveaway post – scrummy isn’t it?

hand dyed cheesecloth - Ruth Lane - small image

I really liked the pattern in the dark green piece, top left, so I cut a 27cm circle from it, then placed it on top of 2 layers of white merino wool fibres that had been laid out to form a rough, slightly larger circle.

I used white merino so that after the nuno process the colours of the cheesecloth would remain the same, although they would be slightly muted because of the migration of the white fibres.
To reduce the dulling effect of the white fibres,  I very carefully shaved the superfluous fibres from the top of the dry nuno felt. Shaving is a tricky process as the ruched fabric can easily be damaged.

shaving the felt - small image
I then messy-stitched the piece of flat felt into a rustic bowl.  I love this kind of stitching and it’s best described as stitching done with your eyes shut – different coloured threads, short stitches, long stitches and rows of stitches that meander wherever they choose.

rustic stitching - small image
I thought the centre of the bowl looked pretty without stitches, but it wanted to buckle a bit, so I cut a circle of stiff, iron-on interfacing – the exact same size as the centre of the bowl – then ironed it to the underneath of the bowl.  I used the base of an upturned tall glass tumbler as an ironing board.

The finished rustic bowl:

rustic nuno and stitch bowl - small image

Nuno felting is an easy way to add interest to a plain item.  This pod was made with a 20cm circular resist.

pod with cheesecloth - small image
I used four layers of merino wool on each side of the resist, then placed a circle of cheesecloth on the top of the side that would have the hole cut into it.

cheesecloth on last layer of pod - small image
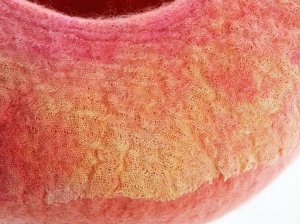
The cheesecloth added colour and texture to the top of the pod.

pod with cheesecloth close-up - small image
Thank you Ruth.  I’ve now got two lovely items and plenty of cheesecloth leftover for my stash.

Giveaway—Beyond Nuno PDF e-book

Giveaway—Beyond Nuno PDF e-book

coverAs a big Thank You for all the support I’ve had since I started felting and blogging, I’m giving away a copy of my new PDF e-book called Beyond Nuno. It’s all about using different fabrics in wet felting, why and how they felt the way they do, how different effects are achieved etc. I hope to show that there’s more to nuno felting than just ruffled silk scarves and that it is possible to control the outcome of nuno felting. For more details you can read the full blurb on Craftsy or my blog.

You don’t need to do anything special to enter, just leave a comment on this post. If you’d like to spread the word through your blog or facebook etc, it would be very much appreciated but it isn’t a requirement. I will randomly draw the winner 8 days from now on Monday 4th March 2013, so please check back to see if you’ve won and leave a comment on the announcement post so I can contact you with the download information.

compilation of pagesGood Luck!  🙂

This Giveaway is now closed, to see the winner, please click here.

Dyeing Cotton Fabrics

Dyeing Cotton Fabrics

A few weeks ago I decided to dye some of the cotton fabrics I was using in felting: Cotton Gauze, Cheesecloth, Muslin, a few lightweight cottons and some cotton/synthetic mixes. I started out using some Scarlet RIT dye and I was really pleased with how easy it was to use and how well the colours turned out. I used the ‘Hot Water in a bucket’ method. I weighed the amount of fabric I had and then ran some really hot water into a bucket and measured out how much I needed. I poured this into the dyeing bucket, saving a little in a jug to add to the dye I’d measured out  into an old glass jar. I added salt to the dyeing bucket, then poured the dye solution in, and gave it a stir around. The instructions had said to wet the fabric before adding to the dye bath, so I’d put the fabrics in the other bucket while I prepared the dye bath. The instructions said to stir constantly for about 30 minutes until the desired colour is reached, but I just stirred occasionally. I also added fabric at different stages or tied/scrunched to get different shades/effects. Using the instructions on the RIT packet, I made some calculations for dyeing smaller amounts of fabrics and used this as a guide for dyeing the fabric a medium shade.

The second dye brand I tried was Dylon, I bought the 50g hand dyeing pack. I used to buy the Dylon Multi purpose dyes years ago, they were meant for using in a pan on the stove, but gave excellent results just using hot water in a bucket, so I expected these Hand Dyes to be really good. The instructions were pretty much the same as for RIT except no laundry detergent was used. I bought a dark brown so that I could add fabrics at different stages and get lots of gorgeous natural looking shades. What I actually got was a load of fabrics all very much the same pale shade of beige 🙁  I think I would have got richer colours using tea or coffee. I made some calculations for dyeing smaller amounts of fabric for the Dylon too, though I’m not sure I’ll use it again.

The next time I dyed some cottons, I used a RIT dye again, Navy Blue. I was really pleased with the way those fabrics turned out too. I even dyed some egyptian cotton top, which turned out nice, the photos didn’t though 🙂

Do you have a favourite dye for cottons or maybe a favourite method? Do you have any hints or tips to share with us? We’d love to hear your opinions. Click on the pictures for bigger images.

Cotton Gauze

Cotton Gauze

I’ve been quite busy lately working on my project of ‘other’ fibres and fabrics used in felting. I’ve been making a lot of felt pieces using lightweight cotton fabrics like muslin and cheesecloth. Another fabric I’ve used is Cotton Gauze, this is sometimes called ‘Scrim’, and I’ve used a couple of different types. Here is a selection of some dyed pieces I have.

It’s really good for creating texture and effects. I’ve been making large bold pieces to use for bookcovers.

I’ve also made some smaller pieces with resists, using the gauze for texture. This piece was for making into a pouch.

and this became a textured sculptural vessel

I’m starting to have a huge pile of colourful, texturey felt pieces all waiting to be made into something once the weather gets too hot for felting. This is a close up of a large piece I made for making a purse and matching mirror case out of.

The lightweight cottons also work really well for using in scarves and wraps instead of the usual silk. Do you use scrim or cotton fabrics in felting, or fibre art? How do you find it to work with? Have you ever dyed your own? I’d love to hear about your experiences with it and see photos if you have links 🙂