Browsed by
Tag: 3D felting

Needle Felted “THING” first time running this workshop

Needle Felted “THING” first time running this workshop

The local Ottawa Guild had been optimistic in the latter part of 2022 and started to reschedule workshops, unbeknownst to us the evil covid was friends with 2 influenzas and invited them to drop by too. So we wound up with students and instructors out sick by the end of November into December. This was also the month my new workshop had been booked. I had offered to teach a chickadee or a tiny dragon but had been requested to make a Thing since Elizabeth, the workshop coordinator and I had not been able to decide on a definite thing. This is the description that was listed for the workshop.

Description:  Jan is paralyzed with too many possibilities for an item to use to teach needle felted sculpture, thus we announce a workshop in needle felted THING creation.  Jan will probably decide more or less what the THING will be before the workshop but it will be a surprise for students.  You will create your THING using three dimensional needle felting. By the end of the workshop, students will have the skills needed to go home and make a THING of their own choosing.  Previous felting experience is helpful but not necessary. Good eye hand coordination is very helpful (those needles are sharp).”

As soon as it was scheduled, I started to work on organizing a brand new workshop. I quickly figured out this scope is a bit broad, so making a small basket protecting thing would help. I had admired an amigurumi mix-and-match monster making book.  “Edward’s Crochet Imaginarium: Flip the pages to make over a million mix-and-match monsters” by Kerry Lord.  Using the simple shapes from crochet to inspire the students, should give absolute beginners an achievable target and those who have felted before the opportunity to try four different wire gauge hands or wings and a tail.

The notes covered wire and needle gauges, fibre, fibre preparations (carded vs Combed it can make a difference), then wrapping. I had gone through and followed a couple of my projects and showed how I had made and built the armature, as well as a few wire augmentations I have had to do over the years. Most of that last section is actually in the blog posts! I finished off the notes with a list of books they may want to investigate and three online sources of videos.

If the various flues and covid were not enough of a challenge we had our first big winter store about to hit. I think most of the worst went south of us. I wonder, what the states could have done to offend the weather? After some debate with Elizabeth it was decided that since the forecast was to have the storm ending by Saturday morning, we would see how the roads looked closer to the workshop.  The snow had momentarily stopped and the workshop was declared a go.  I had collected the supplies together and then pulled the bags of fibre to go from the basement. Glenn hauled and loaded it all into the car. He and our new neighbour also cleared out the end of the driveway and we made a brake for the Guild Studio on the other side of Ottawa.

Car is being loaded to go to the workshop with fiber and suplys, snow covered car, tree and drive way. the driveway is getting quite icy. Grey Kia hatchback still dusted with snow, with hatch back open showing it is Full of bags of fiber. snow covered branches above car hang low from the weight of the clinging snow. Inside my Gray kea soul. there are bags of fiber and suply filling the back of the car blocking direct vision out the back and getting quite close to the inside of the roof. 1-3 it’s impressive how much wool you can stuff in a Kia Soul!

The side streets were not the greatest, but the highway was fine and the parking lot had been cleared!!!

the snow covered and slippery walkway in front of Heartwood house (the Building the guild is in) snow covers the ground and is clinging to the trees, the front corner of my car is visible on the left of the pictures. Front Gallery just outside the Guild studio, 7 large bags of wool on one side and boxes and bags of suplys on the other side of the hall way. in the distance my walker also carying boxes. the gallary has tropical plants along the windoe and artwork (prints) on the walls. 4-5 Arriving at the Guild and dropping off the stuff

He carried in the bags of wool, the box of armature things and the couple boxes of supplies. Then went and found the missing tables.

4 large plastic folding tables and a smaller white one hold fiber and boxes of suplys for workshop within the OVWSG studio6 Tables found and now I can set up!

He set them up in a C or U pattern so I could sit in a rolling chair in the center and help any student without a lot of standing and bending over.

18 pages of notes, a colourfull foam nealing pad (originaly for gardening), a pice of pool noodle, 3 sizes of small wooden dowls, leather Finger cots, wooden single needle holder all sitting on grey folding table 7  18 pages of Notes, Foam kneeling pad, A piece of pool noodle, 2 sizes of dowels, finger cots, wooden single needle holder. Still to add will be the needles.

I had also had a few needles for them to see what difference a gauge will make. T32,T36,T38,Crown40,Revese40 and 42. all needles are in zip lock bags and in little pieces of pool noodle foam. 8 I also had a few needles for them to see what difference a gauge will make.

a book on comparitive anatomy and one on Anagarumi monsters both listed in the text below picture9 the books just past the needles

You may have spotted I brought a few possibly useful Books; Comparative Anatomy (Animals Vs. Human)  Cyclopedia Anatomicae: More than 1,500 Illustrations of the Human and Animal Figure for the Artist by Gyorgy Feher. I also had a book on Anagarumi to give the students some ideas.  Edward’s Crochet Imaginarium: Flip the pages to make over a million mix-and-match monsters by Kerry Lord. (Kerry Lord also has a book on crocheting sheep! Toft Sheep – 18 Crochet Sheep Patterns (uses UK terms))

a couple of my sculptural felting books. both books are listed in the text below the picture.10 a couple of my sculptural books.

Armature/Sculpture books I brought to show the students; A Masterclass in Needle Felting Dogs by Cindy-Lou Thompson, Needle Felted Kittens: How to Create Cute and Lifelike Cats from Wool by Hinali.

There are now quite a few good books on sculptural felting with or without an armature. I had a list of 14 that they may want to keep an eye out for.

plastic haloween skeliton of a dragon standing on pacagease of smartie candys (candiy coated chocholet)11   I also brought sustenance and plastic inspiration

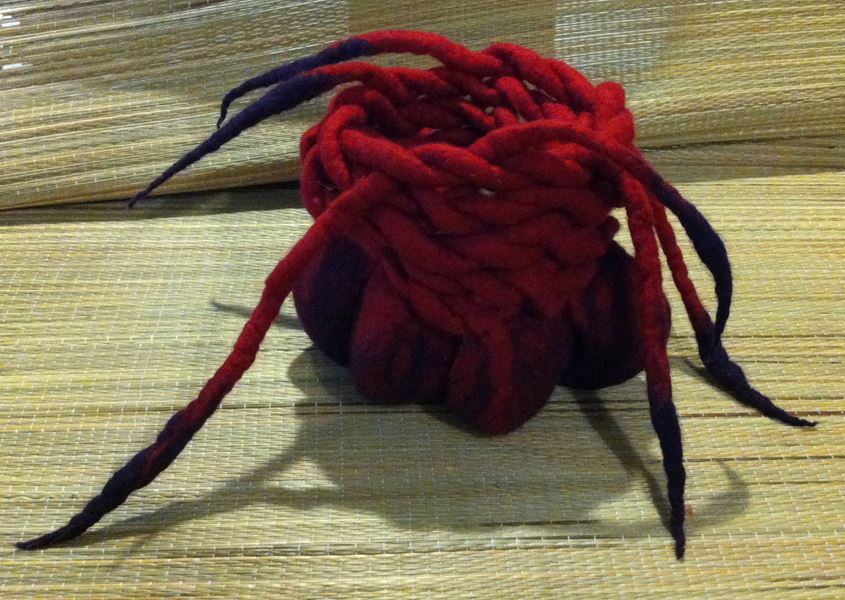
The Ottawa guild has always wanted to have small class sizes to insure good student-teacher ratios. Most workshops have a maximum of six students. With the first snow dump of the year and 2 types of flu plus covid, I was a bit worried that it may not run. In the end, we had one student driving over an hour to Ottawa and made it safely but one was sick and another with a sick child. So we ran with four students.  Three went for Anagarumi-based Things and one went with a Kraken/Octopus combo. They were a bit bigger than I had envisioned but they all still had their armatures in time to have lunch.

4 images of hands working on bending wire to make there armatures12  Armatures are underway

We had two Things with four arms and a tail, one with two arms a tail and wings, and the octopus creature used pipe cleaners (ok now there called Chanel stems since there are not a lot of pipes to clean anymore) to see how that would help with wrapping later.

After a lunch break, they started to wrap the fibre around their armatures.

wool aplication starts, 3 of the scupltures has the first bit of wool added. 13 wool wrapping begins

I brought a couple of types of fibre preparations. This would let them see the difference between carded (which makes a woollen yarn)  and combed (which makes a Worsted yarn). I am going to talk about this more in a future post.

This thing was being helpful by holding fiber for its creator, even when that was not as helpful as it sounds.14 This thing was being helpful by holding fibre for its creator, even when that was not as helpful as it sounds.

this thing is developing fabulous wings.15 this thing is developing fabulous wings.

Unlike my last octopus this one has 8 arms! The pipe cleaners were found easy to wrap over.
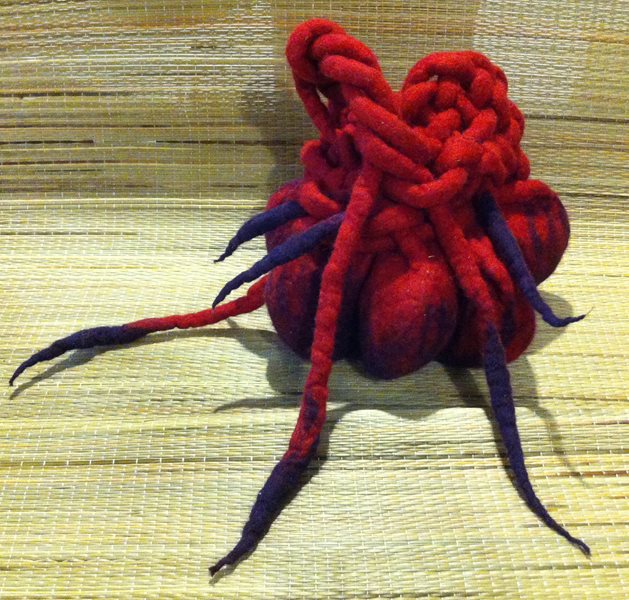
16 Unlike my last octopus this one has 8 arms! The pipe cleaners were found easy to wrap over.

A little way into wrapping, the students all realized it takes a bit of time to wrap, so instead of rushing and risking lots of punctured fingers, they decided they would like to add a second half to the workshop and focus on surface work. I did spend part of the time they were wrapping to show them a couple of options for adding fluffy furry surfaces.

two of this things arms were added to increase its head.17 two of these things arms were added to increase its head.

This one still has all four of his arms and is now standing on his own.18 This one still has all four of his arms and is now standing on his own.

By 4 pm we had good shapes developed and no major bloodletting due to rushing.

the octopus is starting to emerge. 2 legs are wrapped in white Top (Combed) and the rest are wrapped in Roving (Carded) wool.19 the octopus is starting to emerge

the thing with 4 arms has now received a head20  the thing with 4 arms has now received a head

the winged thing has temporary eyes and looks like he is looking forward to getting wings.21 the winged thing has temporary eyes and looks like he is looking forward to getting wings.

The class while not quite finished seems to have had fun to this point.  We will get a bit of time scheduled for part two to finish the outer layers in the new year. It’s always hard to estimate on time for a new workshop and the pace the students will progress at. Not pushing for speed, I think is the way to go for this one. Needle felting yourself is not conducive to creating more needle felters!

I hope you will get to take some time over the holidays to do a bit of needle felting. If you are at a loss for what to make you may want to peruse the Anagarumi Monsters for a bit of mix and match inspiration! Happy Hanukkah, Mary Christmas, Happy Solstice and Happy Holidays from the Mer Family, the Scott-Martin Family and the rest of my felted menagerie.

PS is it just my dyslexic brain or is this date really cool 12-22-2022 (if only we had 20 or 22 months it would be perfect! OK, the last few years have felt like years containing more than 12 months) but I hope you can enjoy such a fabulously numbered day! See you Next Year!!

Monstera

Monstera

Happy New Year to all!

At the Waltham Textile group we normally have a biannual exhibition of our work but, due to Covid, it was cancelled in 2020 rescheduled for 2021 and then had to be cancelled again. It’s now been confirmed for August but in the meantime I’ve sold my main “Leaf” themed piece so recently made this mixed media “Monstera” to replace it.

I’m also thinking of submitting this piece for the 2022 IFA online exhibition which has the theme of Flora & Fauna. I’m waiting to hear if a mixed media piece will be accepted. I can’t imagine it being a problem but, if it is, I can simply crop one of the images to show the felted leaf.

I bought a 40cm x 80cm canvas with the intention of painting Monstera leaves on it and then adding a 3D Felted leaf. After drawing a template onto paper and offering it up to plan the layout I changed my mind about painting onto the canvas. It’s not something I’ve done before and the surface appeared to be a bit too textured for the look I wanted to create. Instead I sketched the leaves onto a piece of white cotton fabric, outlined them with an Inktense pencil and added a little shading. The aim was for very simple, very smooth, perfectly formed leaves looking more like curved metal than the foliage on my cheese plant. I think this was influenced by the very smooth metallic looking Tyvek seed pods I’ve been making lately. The Monstera in our lounge has been a bit neglected, to the point that I couldn’t bring myself to photograph it for this post!

I don’t consider myself a painter but I do like painting on to fabric. If you need to paint precise lines a good tip is to use aloe vera (by far the cheapest) or acrylic medium instead of water when applying acrylics on fabric. This keeps the paint where you want it to be and avoids it bleeding into other areas. I managed to get a tiny bit of black paint on the lower section of the fabric but stopped short of starting all over again when I realised the felted leaf would cover it up!

My paper template for the painted leaves was 13” x 18” so to make the felted leaf I multiplied by 1.4 enlarging it to 18.5” x 24” to allow for shrinkage. Layer one was a very yellowish green Merino (might have been lichen but not certain). Layer two was a combination of various shades of grey with the yellowish green running down the centre. This was topped with a layer of dark green Merino and Ireland Viscose all around the edge and snippets of gold Viscose down the centre. These images don’t give a true representation of colours but you get the gist.

After wetting out I measured the fibres and found they had spread to approx 20” x 27”. At the fulling stage, every now and then, I put the original template on top to check for size and ensure I was keeping to the right shape.

Once it had shrunk to the correct size it was left to dry. The next stage was to add wires to the back of the leaf so it could be shaped. This could possibly have been done with directional laying of the fibres and lots of fulling but I wanted the option of posing the leaf once it was attached to the canvas and wires are a good way of doing this.

The wires were spaced out and attached on the reverse using a zigzag stitch which also formed the veins on the front side. You can see that bright yellowish green colour on the reverse of the leaf. Once that was done it was just a matter of cutting into the felt to form the individual leaves and the characteristic little holes of the cheese plant.

After attaching to the canvas with a few strategic stitches the leaf was given its final shaping. It’s now hanging in the lounge above my cheese plant where it will stay until the exhibition…..although if I do get the chance to sell it I suppose there is still time to make another!!

A Felt Solution for a Small Problem

A Felt Solution for a Small Problem

Black thumb drive and black thumb drive and black thumb drive? Which Identical looking thumb drive has the file I am looking for? Silly me I saw them on sale and bought them! Now I again have a handful of thumb drives that I have to open each one to find out what it might have on them…. Well, that’s annoying.

thumb drives Yes, I have a lot of black thumb drives!

I had to pass some files over to Ann and need some way to make this little black drive look different from the rest of them and so it won’t get lost with any that she also has.

Sitting here in front of the computer, with a pile of fibre and lots of needles, I wonder…… can you needle felt directly to an attachment point on the drive? These have particularly small attachment spots for a toggle so a ribbon or leather strip won’t fit. But I think I can get a felting needle in there!

I had bought a pink rose and grey batt from Christine which just happens to be sitting here.  What shall I do? What shall I make? I have no clue… No, I don’t think I want a fish. So I grabbed a bit of fibre and started to poke at it, poke, poke, flip, poke, hmmm, no, not a fish. But it is starting to look like it wants to be a mitt. One of those really big winter mitts gripping the end of the thumb drive. Ha! My thumb drive has a thumb attached to it (with the rest of the mitt!)

OOPS, I gave it to Ann before getting a photo of it.

thumb and palmfingers

thanks, Ann!  the top is the thumb holding on to the hole in the drive and the purple is the back of the mitt. it has a big fluffy cuff. I will have to work more on the palm and wrist when I get it back.

Ah, another day of rain, I guess my fleece washing and drying is now getting an extra rinse again. it’s raining too much to even sit out and felt undercover today.

I grabbed some more of the same batt of pinks, rose and grey and started randomly poking at the wool. After a bit I started feeling like footwear, yes that is definitely a short felt boot. I added a bright pink bit of fibre as the sole and started pulling bits of curls and added them along the rim of the boot and extended the backup and attached it to the thumb drive.

1234567     1-7

I got distracted working on the computer and looked up to see MORE RAIN…. The fleece gets another rinse.

The weekend was busy with getting Mom groceries and birthday cupcake (chocolate on chocolate with chocolate!) She is 89 this year!  I had a wonderful visit with friends, with social distancing and then on to the birthday party and belated birthday presents for my Niece for her 16th birthday (we gave her a starter selection of fibre, needles and an instruction book. She had never felted before and made a very nice strawberry between getting the book, eating dinner and before dessert!

For the next thumb drive, I really wanted to make a wire sheep. I had some of the combed blue locks sitting close to hand so blue sheep it would be! I divided the single piece of floral wire into loops for legs, tail and left the rest for the head. My tiny scrolling plyers had disappeared gain so Glenn stopped into Dollerama to pick up more. I don’t know what I would do without that store, it has most of my not originally meant for felting supplies. I had to wait on the plyers until he got back from work so I hand twisted the legs and used the tail loop at the attachment to the thumb drive. I will tighten that up and make hoof loops later.  I decided to make a nice round little body but leave the legs and neck wire. The head I added ears and a couple of tight curls. I think she turned out quite well.

1089   8-10

The attachment is easier to see with the wire rather than with the boot or mitt felting.

111211-12

Since the labelling of the boot’s drive as a Boot drive gives it other meanings in computer vocabulary I will call this the pink slipper drive, and the other will be the blue sheep drive.

That was a fun little project and has successfully made the on sale black identical thumb drives now look different! Have fun and keep felting (but it may be best not to do wet felting with this one!)

13 13

Influencing Shape with Prefelt Part 2

Influencing Shape with Prefelt Part 2

I finally got around to trying a different shaped pod using prefelt to influence the shape. My first post creating a seed pod is here. I created this pod in the same way but started with a different shape and cut the prefelt differently. I decided to use a bit brighter color for the inside layer.

I used the same green batt that I had used on my last pod but used a tear drop shaped resist. I covered the resist and felted until it was holding together to make a prefelt.

I then cut a little cap off the top and a diagonal type cut all the way down to the end. The photo on the left shows the “front” side and the photo on the right is the “back” side.

I then took the green prefelt off the resist and covered it with orange wool and wet the orange wool down. Then I put the green prefelt back over top of the orange wool. I wrapped the orange wool around the resist from side to side. Next time, I think I would wrap it from end to end to get a more defined shrinkage but it worked this way too. The orange layer is fairly thin compared to the thicker green prefelt.

I then began felting the two together. I carefully rubbed along all the green edges and worked on getting the edges to stick down to the orange underneath. Once everything was holding together, I removed the resist. Then I fulled the piece and rubbed along the orange lines to get the resulting shape. I fulled it very hard so it would hold its shape easily.

And here’s the result. It does look very much like a seashell but also could be a chili pod or some other sort of veggie pod. These are really fun to make, have you tried this technique yet? Please show us your results over on the forum.


First Quarter Challenge

First Quarter Challenge

They say great minds think alike. We all seem to have decided on a book resist. I started with 3 stacked circles. I had been going to cut 2 of them in half and attach them with duct tape but after reading Terries tutorial I grabbed a needle and thread and made a few stiches to hold it together.

The first thing I made was long snakes leaving the ends fluffy.

1 snakes

Then I made 6 fiber circles. I used about 2 grams of fiber in each of 3 layers for each circle.

2 circles

then I added them to the  stacked resist. I did remember what everyone said about having a hard time where the resists meet at the top and bottom and paid particular attention to that.

3 wrapping the stacks

next was the long snakes.

4 ready to felt

I put those on near the top of the circles.  The next part is not very interesting. rub, rub  rub,  roll, roll, roll. Then cut the hole in the top. I decided the inside wasn’t felted as much as I wanted so I left the resist in and went back to rolling.

5 cut open

after it was all dry I had planed to weave the long snakes around it in an artistic design. Unfortunately weaving really needs to have a odd number of so that didn’t work. I needed to find a solution.

I did these

solution 1 solution 3

or maybe turn it on its head?

solution 4

Last night I took it in to a guild meeting and challenged them to do something with it.

solution 5b solution 2solution 6

solution 7 solution 8

We had artistic twisting, plant hanger, a fancy bun cover, and a bag. We had a great time and lots of laughs, The conclusion was that had I made a great new party game.


Resist Shapes

Resist Shapes

Several people have asked me about what shape resists I use when making hats or vessels.  A resist is used in felting to make three dimensional objects from a flat pattern. The resist can be anything flat that will keep the two sides of felt from felting together, i.e. it “resists” the felting process. I usually use a thin foam as it is waterproof, inexpensive and can be used over and over again. The resist shown above is from floor underlayment. That is the stuff that is used under laminate flooring. It comes in huge rolls so unless you’re making large patterns for things such as clothing, you might want to use a craft foam or recycled packing materials. You can also use bubble wrap, plastic, cardboard or anything that will hold up to the felting process. The resist above made the orange hat in the next photo. The hat block shown in the middle gives you the idea of how much shrinkage occurred. I used merino with a shrinkage of about 30%. But if you’re going to be adding lots of folds in the felt, that takes lots of extra room in your original pattern.

For this hat, I wanted to have random folds but it could have been finished different ways. That is the fun thing about using a resist with lots of extra room in it. You can make small, subtle changes in the shaping of the hat and you’ll get a completely different look. This hat could have had uniform folds done concentrically and it would look like a completely different hat.

This is the resist shape that was used for the hat shown below.  All of the space at the top is used for the concentric folds that make the top of the hat.

This hat is made from a Stratta batt from New England Felting Supply. It felts very easily and is a quick and easy lay out as you don’t have to pull the wool all apart, just tear it to shape and you’re ready to go.

Here is the resist used for the Iris flower vessel shown below. I leave the top open so the edge is uneven, given it a more organic look. You could cover the entire resist with wool, cut it open and then have a straighter edge on the top of the vessel if that was the look that you wanted.

I made this vase for my sister as she loves iris. It is made with a variety of wool and silk.

This is the basic shape I use for making slippers. The resist shown here was for my husband’s slippers and I didn’t make as a big a cuff for him. The cuff is the connecting part between the two slippers. The more space in between the two foot shapes, the longer the cuff is. Or you could make it really long and make boots. Just remember to make them wide enough to get your feet in and out. You can see I’ve taped this resist back together again with duct tape. You cut the two slippers apart after you’ve gotten to the soft felt stage to remove the resist. But you can use the resist again, you just have to retape it each time.

Here are slippers made on a similar shape resist. I don’t wear these because they ended up just slightly too small. I’m going to need to make a new pair soon!

This is an experimental resist shape. If I was going to make this again, I would not leave the edges so pointy. Any pointy edge or really sharp angle is hard to cover in wool. I have found that the best resist is the most simple one. Just make the resist bigger for extra room if you want folds.

Here is the resultant felt vessel from the resist shape above. It’s kind of odd, isn’t it?

This is a vessel resist covered with wool and wet down. I used this same shape resist to make both of the vessels below. This shows that you can use the same shape resist but come up with a very different end product.

This taller vessel was made by stitching ridges lengthwise and then felting them together. You can see the thread at the top before it was removed. This formed a tall and slender vessel.

This vessel was made from the same resist as the tall vessel. However, I made concentric folds around the shape to make a short and squatty vessel.

As you can see, almost any shape can be used to make felt. The fun thing is that even if the same shape resist is used, the final shaping of the felt can change the end result. What shape resists do you use when felting? Or perhaps you haven’t tried felting with a resist? Give it a try and let us know how it worked out for you!

%d bloggers like this: