Browsed by
Tag: 2017 3rd Qtr Challenge

Maneki-Neko for 2017 3rd Quarter Challenge Part 2

Maneki-Neko for 2017 3rd Quarter Challenge Part 2

I never dreamed this project would take me almost two weeks to complete.  But it is finished.

If you missed part one, you can read about it here:

https://feltingandfiberstudio.com/2017/09/25/pandagirls-maneki-neko-for-2017-3rd-quarter-challenge-part-1/

It would seem adding the details to finish would be easy.  Not!

I needle felted blue roving around the eyes.  The gems underneath are actually blue, but because they were put over black it wasn’t obvious what color they were.

Then I spent time looking for a gold bell, but decided on using a wool ball instead.  When I added the ribbon I made a slit on both sides of the arm to pull it thru.

The nose and mouth are also needle felted.  But at one point, the nose fell off and had to be reattached.

I curled over the raised paw and secured it in order to show the paw and nails.

The nails proved to be a real challenge and after ripping them out at least a half dozen times, trying needle felting, then using floss and finally rayon thread.

I tried needle felting the arm in front and the tail in back to show the dimension, but it was negligible partly because of it being black. So, I stitched around them which helped.

Another challenge was the writing on the coin.  I made a gold prefelt and copied the characters I had translated from an app for Good Health and confirmed with my daughter in law, Mari. I transferred the characters to a stabilizer.

I thought using the satin stitch on my Pfaff machine would work, but its not a straight satin stitch, but the stitches varied.  So I decided to use a triple stitch which was fine until I reached curves.  I ended up finishing by hand. I’m hoping I haven’t butchered the characters too much.  After finishing the coin, I slip stitched it to the kitty.

The final addition were the whiskers.  They are a little funky and I had to use a little GAC to give them a little stiffness.

Now its time to find her place facing East in hopes of bringing Good Heath to my household.

What challenges have you had lately?


Pandagirl’s 2017 3rd Quarter Challenge Part 1

Pandagirl’s 2017 3rd Quarter Challenge Part 1

It took me a while to decide what I wanted to do for the challenge of the Edo period in Japan.  I was drawn to the simple scrolls with flowers and branches.

https://feltingandfiberstudio.com/2017/07/07/3rd-quarter-challenge-2017/

I scoured the museum sites and Pinterest.  I’ve been to Japan during Sakura (Cherry Blossom) season and particularly love the trees and flowers so it wasn’t too hard to narrow it down.

Since the scrolls seemed to be pale yellow, I made a batt backing then made another light batt using the Osage hand dyed merino and corriedale as a background. I added some darker fibers randomly to give the effect of lines in a scroll.

I had some left over merino/silk scraps from a scarf I had made for my son years ago.  They were supposed to be tassels, but I didn’t like them and cut them off and saved them.  But they make perfect tree branches.  Here is my first layout.

But something was off.  It didn’t feel right to me.  So, I rearranged the branches.

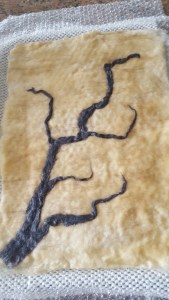
Next was to make white prefelt for the flowers (commercial wasn’t white enough) and cutting out the shapes in several sizes.  This was not an easy process. Here it is a wet look. The neat thing about the layout is that the branch can be down or up.

I didn’t want to felt it too hard.  But I may have to steam it before or after I add either hand or machine embroidery for details.

Actually the photo shows more texture than with the naked eye.

How do you like the branch, down or up?


3rd Qtr Challenge Part 3 – A Bit of a Disaster

3rd Qtr Challenge Part 3 – A Bit of a Disaster

I would like to throw this piece in the recycle bin and never show it to anyone. But since you’ve seen the prior steps, it seems unfair to not show you the ending. It is often the case when you follow someone’s posts that you only see wonderful, beautiful work. You don’t get to see the not so good work or the out and out failures. Most of the time around here, you get to see everything, warts and all. So here come the warts!

Last week I told you that I was planning on stitching my 3rd quarter challenge piece. I started with a heavy Perle cotton thread in either 3 or 5 size. I stitched with stem stitch around the circle and then started on the inner designs. I hated it. It seemed really bulky and just wasn’t what I had envisioned. So I un-stitched it.

Then I tried a thinner thread in a bit brighter green still in stem stitch. Yuck. Because of the way the interfacing had crumpled in the center of the felt, the shapes of the design were hard to follow and just weren’t looking like the original design.

So I decided I would try cutting the interfacing out like you do with the cracked mud technique as several followers had suggested. It took me over 30 minutes to get this quarter portion cut out. The interfacing was partially felted and it was difficult to find where to cut and to make the design even and as originally planned. I was getting really frustrated with the entire piece.

So I have decided to throw in the towel and start over. I am not sure how I will use my design, I’m keeping that, but will mull over a better way to showcase the design on felt. Perhaps screen printing. I know that I could continue with cutting it out and it would be OK. But I don’t like anything about it. I’m not sure why I chose yellow because I don’t really like a piece with that much yellow in it and I don’t think it’s worth my time to continue with a piece that I will be completely disappointed in the results.

What do you think? Do you abandon pieces or do you just keep working on them until you’re happy with the results?


Third Quarter Challenge Part Two

Third Quarter Challenge Part Two

I showed you my design development process on my last post for the 3rd Quarter Challenge. Now on to the felting portion.

Here is the design that I have traced on to a heavy interfacing. I was really thinking I would use a lighter interfacing but this is the first I found so I used it. The resist is to prevent wool migration in the area of the design using a darker color on the bottom and lighter color on the top of the resist.

I cut out the design with a sharp craft knife.

Here’s the design completely cut out. I really like how it looks and I’m excited to see how it will work when felted in between two layers of wool. I had originally planned on using black and grey wool but changed my mind as I didn’t have the black wool right at hand. I decided to use a mixed blue batt and yellow.

I laid out a couple of layers of blue but looking at this photo now, I realize that the blue was just not dark enough and not a big enough contrast to the yellow.

I added my resist on top of the blue.

Then I covered it with yellow.

Here it is ready to be wet down.

I worked the felt mainly from the back because I felt like I was shifting the blue fibers as they migrated through the yellow when I rubbed on the front. It felt like I was making a fiber pizza crust.

The result when it was wet.

And dry. A bit underwhelming to say the least and I was disappointed. I think a coarser wool on the bottom layer would have helped and a stronger contrast of colors might have made a difference. But all is not lost. I am planning on hand stitching around the design to bring it back to life. So more next week!