Connections: An Exhibition

Connections: An Exhibition

I’ve just taken down my work from a Made in Whitstable group exhibition at a local arts centre gallery so thought I’d tell you about the felt pieces I had in the exhibition.

Made in Whitstable is a loose affiliation of artists and makers who have a close connection to the town, on the coast in SE England.

With a diverse artistic group it’s not always easy to find a title that everyone is comfortable with. ‘Connections’ seemed to offer enough room for people to work with in their various styles and mediums.

This exhibition was postponed from Easter 2020 so it was great finally to get some work out there, and to catch up (albeit at a distance and in a mask) with people I haven’t seen for a long time.

As I’ve described in previous blogs, this year I’ve been learning from online workshops. I’ve long been interested in both seed heads and shells and these have both continued to feature in my recent work. Reflecting on this, I realise they are all forms of natural protective cases and although it’s not a snappy title, I decided it was a good ‘connections’ theme for me.

This is a picture I made specifically for the exhibition.

Recycling Oyster Shells: Turnstone at the Royal Native Oyster Stores, Whitstable

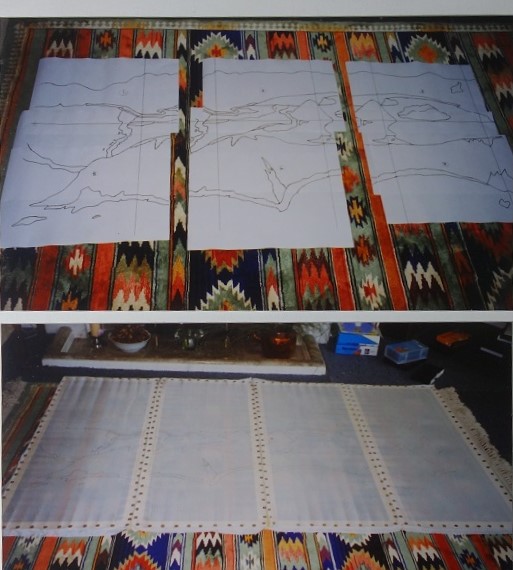
These photos show the oyster shells laid out, prefelt shells in a single sheet, then cut up and laid onto a background of white Norwegian batt (lower half) and tan Perendale batt (top half). There’s a recycled silk scarf laid over the tan batt layers to give the impression of a pebbled beach in the distance.

Layout for the turnstone, using a combination of merino wool and prefelt; fully felted turnstone and a trial with two birds. I decided to go for just one. I needle felted the turnstone into place then added the eye, beak, legs and a few feather details

I also made some smaller pictures along the shell & seed pod theme

Top left: mussel shell with recycled silk sea, cotton scrim wave foam and prefelt pebbles

Top right: Oyster shell with mixed wool and yarns and fabric barnacles on a recycled silk background

Bottom left: pink shell on a recycled silk beach with cotton scrim wave foam and mixed wool and silk fibre sea

Bottom centre: paper felt shell on recycled silk background

Bottom right: Corriedale, silk and yarn background with multiple-resist circles, hand stitching and a sycamore key

I also had various 3D shapes in the exhibition.

Left – based on a eucalyptus seed pod. I made this in a wonderful workshop by Gladys Paulus in November 2019. I covered that workshop in my first blog for the Felting and Fiber Forum. Various wool batts and mohair locks.

Top right – conker made in two parts (using the stem technique I learned from Gladys). Outer made from Perendale and Norwegian batts, inner is merino wool tops

Bottom right – based on a hazelnut, also made soon after Gladys’s workshop.

Here’s a poppy seed head I made this year after Fiona Duthie’s Fibre + Paper workshop. Mulberry paper is felted into the felt surface. The paper adds structure, folds and pleats well and can be drawn on / painted. I painted this with watercolours. I had to make the top separately so stitched it on. A local craftsman made the base; the pod is held on a piece of dowel attached to the base.

This nigella seed pod is also paper felt but made side-on with pre-felted ropes and thicker wool sections (not prefelted) to allow variable shrinkage (learned from Soosie Jobson). I had a reclaimed jarrah wood and dowel stand made for this.

Another paper felt shape, inspired by shells, with pleats and nobbles made as a result of Fiona Duthie’s workshop

And finally, I included a few plant holders and some earrings.

Here’s my display area – I did put the cards (bottom right) on a small table!

My display area

There were lots of good exhibitors. Here’s a small selection: top left fused glass by Irene Southon; middle left acrylics by Josephine Harvatt; bottom left watercolours by Sarah Louise Dunn showing local sites commissioned by Whitstable Museum to illustrate a map of the town; right, prints by Linda Karlsen. Work by Irene, Josephine, Sarah and Linda (Wearartworks) can all be found on social media like Instagram and Facebook. They and other exhibitors can also be found on Made in Whitstable’s Facebook and Instagram.

The footfall was rather disappointing and I would guess that sales were down on previous years, but it was really good to get some work out on show and to see what other people had been creating.

Conjuring up a tale from the past

Conjuring up a tale from the past

Thinking I would share with you something from my past – I went to search for various elements that I knew I had not thrown away and had just seen in the last few months. Suddenly, I was thrown into the midst of a magic trick….pooooof….they had completely vanished!

Much searching and wand waving resulted, some days later, with the completion of the magic trick….the big reveal….of that which was lost.

In deciding to share this ‘something’ from my past, I gave myself a shock….it was from 1997! Although off-piste re wool fibre, I think it might still hold some interest, so please ignore the date and 24 year gap.

To briefly explain the background – I had enjoyed upholstery and soft furnishing as a hobby for many years, then an opportunity presented itself for me to teach these skills. To demonstrate competence, I was ‘very-encouraged’ to get some ‘official’ qualifications, so set about studying upholstery. I managed to complete the two-year course in one year and won a significant award. Following this a few interesting opportunities came my way including an invite to be part of a calendar production, I agreed, and was then commissioned to make an upholstered item.

I was to be ‘April’….you can wipe away all images you might have conjured up of flower bouquets, artists’ palettes, extra-large buns or samples of fabric strategically placed. This was not to be a repeat of the Calendar Girls!

April….mmmm!

Upholstery……..April….mmmm!

A few ideas floated around, but fairly quickly I had the….Tadaa moment….an upholstered screen!

I then pontificated (this word really does describe the process I went through) over how to represent the month of April in the screen. The big dilemma here, was that I normally used purchased commercial fabrics, so I was in a quandary as to how I could manipulate them.

Much of my early thinking revolved around the months, year and particularly the seasons and the continuum or seasonal cycle. There are four seasons so the screen could have four parts. Colours could blend from spring through summer and autumn to typical wintery colours. This also implied an organic quality. Another factor I had to bear in mind was that once finished with, the screen would be mine to keep, so I also needed to create something that would ‘fit’ into my life.

I then started to think more specifically about April and the first thing that came to mind was the phrase built into our British psyche – ‘April showers’ (in the UK April was always a month dominated by showers although global warming seems to be changing things a bit since). Then came the idea of which flowers bloomed in April – Forget-me-not, viola, wallflower, honesty, iris, primula, grape hyacinth etc. From this list I distilled the colours – yellow, purple, rose and blue. Then of course April is the fourth month….decision made – the screen must definitely have four parts!

So far so good.

Research & idea gathering

More research (there was no Google or Pinterest back in the day!) and thinking (my thinking, even to this day, involves doodles on scraps of paper, lots of them) followed, particularly in terms of how I could translate water/rain into an upholstered work. The only way I was going to achieve any of my ideas was to create my own fabric. So then started another direction of thinking and decision making. Fortunately, I had dabbled previously with painting on silk, so this seemed the natural path forward.

By this time I had also honed my thoughts as to the construction, made complicated by the fact that a screen can be viewed from two sides which meant attaching the fabric would be fiddly. With most of my main thoughts galvanised I produced a detailed drawing (the easiest task as an architect) that I sent off for approval from the relevant calendar committee.

I couldn’t quite get the organic element I wanted then I struck lucky and saw an image in a National Geographic magazine that set the ball rolling for the final layout. Sadly, I cannot find that image today, but from memory it was one showing the broken circular rim of a volcano protruding through an ocean.

I often trace lines from magazine images, but these just didn’t cut the mustard.

A carpenter made 3 sets of frames – the main screen frame which I then dyed to the right colour and finished, the inner mounting frames for the fabrics and the frames for me to stretch and paint the silk.

I had the ironsmith create the post finials (normally found on iron railings) which I kept deliberately removable from the posts so that I would be able to transport the screen without injury either to person or vehicle!

Meanwhile I concentrated on getting the silk panels painted for which I trialled some coloured pencil alternatives. Missing ‘something’ I stamped a golden design over the top to create more texture using carved/scored pizza bases.

The photocopied enlarged design. The outline was traced with a clear gutta resist before applying heat-set silk paints

The silk was laid onto a strong supporting cotton fabric and bits of masking tape were used to plot where the raindrops should be. After some practice, these were then machine stitched using lustrous shiny threads. This was quite a nerve-wracking point as you can imagine. Realising that from a distance, the raindrops would need more impact against the colour, out came a variety of beads from yet another of my stashes!

Developing the raindrops idea.

My then seven-year-old son giving me a helping hand.

The silk panels were combined with the commercial fabric and the screen completed in sufficient time for the photo shoot.

Designed to fit into my ‘then’ house (floor to top of iron finial the screen measures 1.65m (5ft 5in)and taller than me!) which had 3m high ceilings. In my ‘now’ house I have just 28cm (11in) clearance above the screen!!!
24 years later!

The flip side

Continuing another side to the story….I’ll make it short!

The venue was set and to take place at the Keighley and Worth Valley Railway Museum in West Yorkshire. All the equipment was set up and my screen placed in position – complete with a free standing shower head!….April shower anyone? – Someone had some fun-thinking in the planning….all of which took hours as you can imagine.

Organised chaos and smoke screens!

Finally, after they had tested and rehearsed everything including a smoke bomb to represent the steam train, ‘the’ photo was captured.

The final museum photo with a museum railway guard doing the honors – I love how the colours echoed each other.

The published 1998 Calendar photo

Throughout the morning the crew and I had been laughing and joking….then came an unexpected question….would I be prepared to be tied up, and lie on the tracks in front of the train?….WHAT?!?!

Thus far the whole experience had been quite magical, and as I have a reasonably adventurous spirit….I agreed.

I won’t show you the photo where I was asked to ‘pretend’ to scream as if I was about to be run over by the train….I totally and utterly failed….it came out as a very real, loud, blood chilling, scream (definitely not a good photo)!

Waiting for them setting the camera up – thinking….“Did I really agree to this, it is soooo uncomfortable!”

What I haven’t mentioned is that all this took place on a Saturday and this popular museum was fully open to the general public….you might now be ahead of me….yes, we had built up quite an audience with our general activity behind the barriers….the ‘scream’ was the finale!

I will simply finish by saying – there was so much laughter all around, with folk bent over, much stomach holding and tears just rolling down.

Caught on camera, ages later, wiping away yet another round of laughter tears!

A long distant memory that continues to make me smile as I recount the tale 😊

Wooden handled 3-needle holders, part 2 one after another they have arived

Wooden handled 3-needle holders, part 2 one after another they have arived

When last we chatted, we looked at a few of the holders I have in my collection of felting needles while we weighted for the post to arrive from China.

After a wait for shipping, the 3 needle holders arrived, one after another. All arrived with needles intact but the packaging was dented and squished. A bit of bubble wrap may have been a good idea.

Remember I suspected that some of what is being sold are seconds and some are overruns of other people’s orders? Well, I think this line is seconds. The holders are not helped by the poor protection during shipping.

squished packaging of the first of the 3 needle holders

second package arrives even more beat up

The third package arrives not as badly dented, none had bubble wrap

21-23 the arrivals, packaging gave its life for the contents to be safe.

Out of the three I purchased only one was able to separate, which is important since it allows access to change needles.

24   1 of 3 opens.

The other two seem to be jammed against the edge of the inside of the handle. Even the one that opened does not have even spacing around the needle holding section. I think I can fix that!! I have a large file and a nail file that should help. I have some very fine sandpaper ….somewhere in the basement……well let’s start with the files.

Here is the one that opened but is sticky.

25-29 How the holder comes apart and goes back together

in the last picture, you can see the uneven spacing between the two parts of the holder. This could be from the wood swelling, the varnish is sticking or the screw joining the parts together may be bent.

With one of the two problematic holders, I was able to push the interior away from the sticking spot and get the parts apart.

30   Two open, one to go

half round rasp file used on the interior of handle portion

my weapons of sticking removal the rasp and the nail file

31-32  I used the rasp file on the interior of the handle which did remove a lot of roughness.

33  Ah yes, this one seems to have a slight tilt to the screw which may have caused the rubbing.

34 Putting the flat side of my rasp to work.

I then turned to filing the sticking spots on the interior of the needle holding part. I put the two parts back together just till they started to rub and marked the spot with a sharp fingernail. (Glenn says they are very sharp) if your nails are not quite as sharp I guess you could have used the awl or a mettle nail file.

35-39  I repeated the pattern of; sanding, checking, marking and then more sanding.

40 When I got it close, I switched to the nail file. (I promise I will go find the fine sandpaper later!!!)

That is two working and one to go! I couldn’t nudge the third one so I tried to get the nail file in and possibly file in place on either side of the sticking.

41-43 working the file into the spot that seemed most stuck

44 AH! Success!!

45  the spacing between the interior rim of the handle and exterior rim of the needle holder are not yet parallel, keep working at it.

I continued with more sanding and checking until it finally seems to be working.

46   Now I have 3 working handles! 

I will eventually find the really fine sandpaper (still somewhere “safe” in the basement)  to give it a final touch-up.  Overall If these go on sale again I would get a couple more. they are comfortable to my hand and the needle spacing is reasonable.

47-48 the Needle holders even come with “helpful” instructions!

Their helpful instructions are technically written in English but have some similarities to my spelling, while each might be considered an attempt at English, both will require a bit of interpretation for the meaning to be obtained.

Even with the need for a bit of work and adjustment, I think these will be a good addition to the options I have for holding needles. Just so you don’t think I only use needle holders I do also use the cheaper option of an elastic to hold two needles. I adjust the needle spacing if I need to by using my fingernail. (It’s a bit like using chopsticks but you’re are stabbing not picking something tasty up.)

49 the no-handle two needle option also works but is not as comfortable on the fingers

50  Here is another shot of a few of my needles and  holders

Since I started writing this I have spotted an aluminum 6 needle holder that looks intriguing, yes it’s on order and should be here within a month or so.

51 Aliexpress “Felting Needle Handle w/ 6 Needles”

Happy Felting and good luck on your needle holding quests!

Shearing Day

Shearing Day

Not long ago was shearing day. Before had we have to get pens and shoots set up to direct the sheep efficiently to the shearer. I had to go get wool bags, from the Wool Co-op I got half bags this time. The full-size ones are too hard to pack, they are taller than me. We also got my nephew to come and help out. Wrangling sheep is best done by young people, my son and nephew.

There is a crowding pen is at the far end of the shoot so the sheep can fairly easily be pushed into the shoot and past the one-way gates. You can see lambs on the right-hand side. They are small enough to pop through the fence and get out of the way. On the left are some late lambs from last year. They have been put there to be kept separate. They are too big to get back through the fence.

Despite taking many pictures most of them were terrible and I didn’t get any sheared sheep pictures because I had to grab the fleece out of the way as my husband handed the next sheep to the shearer. By the time I stuffed it into the appropriate bag, the sheep was long gone.
so here are the best of the bad shearing pictures. I am not sure that’s all the same black sheep but you get the idea. you can see how brown they look from being in the sun and weather and how black they are underneath.


I also have one lincoln sheep named Dolly. You can see how different her fleece is.

These are some of the wool sacks. I was sorting black wool I want to look at again and white wool I want to look at again and the stuff to go off to the co-op because I don’t want to look at it ever again. LOL

And some close-ups of some wool.

This one has so much lanolin the shine bounced the light and it looks grey.

It took about 4 hours to do 55 ish sheep. That’s about one sheep every 4.5 min. I know it’s no record but I still find it amazing. When it was all done we released the lambs to find their moms. There was a lot of noise while the lambs work out who mom is now she is sporting her new summer look. And the kids my 2 grandchildren and great-niece and nephew came in and gathered up all the little bits of stinky wool to play with. They had so much fun and smelled just like sheep in no time.


I wish I had better pictures for you. Maybe next year with no pandemic I can have Jan come play photographer.

Nuno Felted Backgrounds

Nuno Felted Backgrounds

I have been working on more nuno felt pieces to use as backgrounds for nuno felted landscapes. I usually create these and then decide how to move forward with stitching and embellishment.

Usually, I use white prefelt with dyed silk but I decided to use black prefelt with this one. I usually rotate and look at all possible ways to use the backgrounds. With the piece in this direction, I see pine trees. What do you see?

Here’s another background using black prefelt. I’m thinking about adding birch trees to this one but I haven’t made up my mind about any of these yet.

A lot of my landscapes end up being in the portrait orientation but this one is definitely in landscape orientation. It reminds me of the woods with pine trees and yellow flowers. The upper right hand corner looks like deciduous branches with leaves coming in from the side.

Green fields with flowers? Perhaps pine trees in the distance? What do you see?

Another floral landscape with bluebells and beargrass flowers? Perhaps the orange is bushes or trees with leaves turning colors in autumn? Or maybe it’s grasslands with flowers?

One way that I sometimes use to decide on a design is to put the background photo into Photoshop Elements and layer another photo on top of the background. This is the first background in this post with a photo of service berries and leaves layered over top.

And here’s the green background with a photo of a grass field with some white flowers in the foreground layered over top. I really like the “misty” feel of this one. But how to achieve this effect on the actual piece? Perhaps some layering of silk organza or sheer fabric?

So instead of my usual find a landscape in the background and enhance, this time I think I will try to use the layered photos as inspiration and work from that angle. It’s always good to try something new. I will show you my efforts in upcoming posts.

Auckland Fun Felters

Auckland Fun Felters

The last few months have been life-changing, first moving to New Zealand in March, two weeks in quarantine, buying a new home (complete with 12 chickens), starting a new job, adopting two kittens, finding Auckland Fun Felters (AFF) and the wonderful felting activities on the North Island.

Don’t be fooled by the cuteness, when they aren’t sleeping they are tiny little terrorists!
Aoifa (pron eee-fa) – giving us her sternest look
Floki
Aoifa “helping” to unpack the studio

AFF are affiliated with Creative Fibre, I first found Creative Fibre online before we left the UK and confess I was worried when I read their interests lean heavily towards spinning and weaving, having belonged to a Spinners Weavers and Dyers group in the UK where felting was a dirty word and the committee behaved like felt-makers were contaminating the purist application of spinning, weaving and dying I was a little hesitant about joining.

I am so glad I took the plunge and went along to my first meeting in May, AFF are true to their name and such a fun group of ladies, and everyone is obsessed with felting and the associated skills. I immediately felt like I had come home 🙂

Each meeting involves a show and tell and announcements of upcoming events we might be interested in, at my first meeting that was Woolfest in Kumeu (held annually north west of Auckland). I arrived after lunch and most of the crowds had already been and gone, it was rather lovely being able to get to all of the stands without having to fight my way through:

You can just about make out the AFF stand to the left of the door in this photo
Having been deprived of hugs and cuddles for so long during lockdown this stall naturally pulled on my heart-strings
I couldn’t resist buying a bag of Gotland locks from this stand

Back to the AFF show and tell, Lynn took us through a collection of gorgeous items our members had made:

Isn’t Lynn’s waistcoat stunning?
These eco-printed tiles were inspired by Fiona Duthie’s Creative Sparks video

These tiles will be crocheted together to make a blanket that will be raffled at next year’s Woolfest:

I managed to make one during our session on Saturday, the only rule is that that the design had to use just straight lines, I can’t tell you how desperate I was to add a red dot to the middle, some of my triangles became a little curved during fulling too:

After the show and tell, Lynn demonstrated how to make silk paper using spray starch:

These elegant little bags are an example of what can be made with the papers:

Another benefit of belonging to this group is the extensive library, including the back catalogue of my favourite magazine, I think I have died and gone to heaven!! 🙂

And just to show what a small world this is, I discovered Robyn (a fellow FFS member and a former student of my hat class) is also a member of AFF! Robyn is working on a blanket square for her own personal blanket.

That reminds me, lots of keen felters have been asking when the concertina hat class and the felt bags classes will start again, I am delighted to announce the next iteration of both classes will start on 19th August (registration will open a couple of weeks earlier on 4th August).

More information about these classes can be found here:

EYE’s Residential Weekend.

EYE’s Residential Weekend.

It’s been a long time coming but last weekend I taught my first face to face workshop of 2021 at Cober Hill near Scarborough. Originally booked for summer 2020, this residential workshop for the East Yorkshire Embroiderers had to be carried over to this year due to the Covid lockdown restrictions.

I did wonder if it was too soon for some and if numbers would be depleted but it turned out the ladies were very keen to get back to normal! Nineteen of the twenty ladies booked for the weekend retreat turned up, sixteen came to do the workshop and three came simply to chill.

Cober Hill was built in 1890 and was purchased by Arnold Rowntree, former Liberal Member of Parliament for York, and nephew of the chocolate manufacturer Joseph Rowntree, in March 1920. Rowntree had a vision for it “to be a place of joy and beauty, …a centre of refreshment and inspiration for many of those engaged in difficult public services… I hope experiments in Weekend Schools, Winter and Summer Schools of various kinds and of longer or shorter duration may also be tried there…” The venue, with its gardens, tennis court, croquet lawn, theatre and numerous other communal spaces, has an annual programme of craft workshops as well as hosting private groups, businesses and schools.

The theme for our weekend was “trees” and the aim was for the students to combine layers of fabric and paint with machine and hand stitching. The finished work could then either be backed as a quilt or mounted in a frame.

After dinner on the Friday evening the group were shown examples of my “tree themed” work and I talked through the techniques I had used to create them. The ladies then started to plan their designs based on images they had brought for inspiration. Not everyone wanted to do trees, one lady chose to use the techniques discussed to do a moon gazing hare while another went completely “off piste” with her abstract take on an owl!

Maggie went her own way with an Owl.
Dorothy and Debra painting their backgrounds.
Ann laying down the background for her tree silhouettes.
Melanie painting her background layer.
Rachel’s background is painted and now she’s working on her foreground layers.
Sandra adding detail to her foreground trees.

With the bulk of the painting completed and dried on Friday evening the ladies could concentrate on layering and stitching their fabrics on the Saturday.

Hilary’s background has been painted and now she is starting to layer fabrics to create her forest.
Rhona’s moon gazing hare is taking shape.
Dorothy’s forest is pinned and ready for stitching.
Evelyn’s work in progress.

I think the surprise of the weekend was Melanie who only came to Cober Hill to keep Ann, her grandma, company. This young lady doesn’t have the use of a sewing machine and had never done any free motion stitching before…..she borrowed Ann’s machine and took to it like a duck to water!

Melanie’s lone tree is starting to take form.
Rachel adding her gate and railings.
Ruth is beginning to add hand embroidery to her tree.
Debra used lots of free motion stitch on her version of a tree canopy.
Using the same image as Debra for inspiration, Carol chose to give her tree canopy autumnal colouring.
Judy’s version of my Walk in the Forest.
Hilary made good use of zig zag free motion stitch for trees in the distance.
Margaret’s version of my Three Tall Trees.
Dorothy added hand embroidery for foreground grasses and flowers.
Melanie’s finished work…..fantastic to think this was her first attempt at machine sewing and hand embroidery!
Rhona’s moon gazing hare…..what this image doesn’t show clearly is the addition of black beads which adds texture and sparkle when you see it close up.
Close up of Sandra’s finished trees.

What I hadn’t realised at the outset was that none of these lady’s had done anything like this before, so for some it had been a steep learning curve! It was great to see everyone throwing themselves into the task of painting, layering and stitching and the results speak for themselves! By the time we left Cober Hill on the Sunday there had been some terrific work created. I hope some of my students will continue to develop these techniques alongside their more traditional skills. At least one of them has since bought herself a soldering iron for doing more of this kind of work which was music to my ears!

I just want to say a huge thank you to the EYE’s group for inviting me back to teach their 2021 residential and for being such willing students and wonderful company. I shall look forward to working with you again at some point in the future.

The EYE’s class of 2021.
Wooden handled 3-needle holders, part 1 while i wait, consider needle holders

Wooden handled 3-needle holders, part 1 while i wait, consider needle holders

Wooden handled 3-needle holder  Part 1 while I wait lets consider needle holders (this may be of more interest to newer Needle felters)

For the armature study group, I wanted to find as many examples of different gauges of (mostly Aluminum) armature wire as I could. I found only a few gauges locally, so went online to find more.  I spotted a few on Etsy and a couple in US stores but found the widest selection from China.  The last option (China) had the best prices but had the longest shipping time.  Ann had shopped there for various small wet felting items and had some suggestions. Similar to E-Bay, check the sellers’ record, read the reviews, check for free shipping and similar listings by other sellers and watch for the price to drop. Similar to early E-Bay, some sellers at Ali-express are selling Overruns (working items) others are selling seconds (substandard, not all there or not working) so watch closely for the comments.

 1  a few of the wire gauge samples

While I was shopping, I spotted a wooden needle holder with 3 needles I had not seen before. The design looked good, the reviews were mostly good with the worst being that needles had broken in shipping (so poorly packaged). Seeing as I have a good supply of needles and would really like a couple of the 3-needle holders, this did not deter me so I put in 3 separate orders and then waited.

While we wait, let’s have a look at a couple of questions and look at a few of the needle holders I have collected.

Now, why would I want a 3-needle holder?  I have a similar wooden handed 8-needle version as well as the fake clover tool with the needle guard that holds 7 needles and the metal 20 needle holder from The Woolery.  Or you can use the lower-tech – elastic wrapped around 2 or 3 needles and skip the handle altogether. The holder is there to make the needles easier to handle and work in a hopefully ergonomic and comfortable way. Both the multi-needle wooden handles and the plastic fake clover tool are comfortable for me to hold. I have two types of single needle wooden holders that I have not used often because I find the off center placement of the needle disconcerting. (I know if I would only use it a bit more I would get used to it.) The single needle skinny handled one (Ann got a couple of those) is not comfortable but the single needle slightly thicker handle is a big improvement. I may try to add a foam collar to both of them to make the grip more comfortable.  Foam callers are used on pens or pencils to make arthritic fingers feel more comfortable when writing or for the very young learning to write. You can find them under a google search for “pencil grips” in case you got the skinny wooden holders (there are a couple of different sizes for primary and regular pencils).

2  This I spotted at <store.schoolspecialty.com>. Dollarama and Dollar Tree used to carry something similar so check there too.

I already have 2 types of plastic 3 needle holders that look similar to each other.  Both have a handle that is a bit bigger than a good quality pen and it is reasonably comfortable to hold. Unfortunately one has a design flaw. I should tell you quickly about it while we wait for the new wooden ones to arrive.

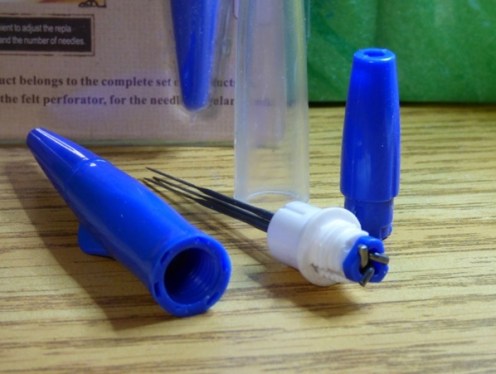
 3  Blue 3 needle holder (2 similar designs)

Since they are using the same packaging with a squirrel on it, let’s call the closer one with the see through arrow (A) and the one behind it with the Fin on the handle (F).

 4-5 A the hole in the handle

Option A.  I have bought a few of style A and have had poor results with them. Along with a few odd breaks (the cover broke off and now that one can’t be opened.) It is also very challenging to change needles with the small holes you need to fit the needles through at the end of the cover. The reason that I am running with 2 needles in both of these is because it is so hard to change the needles.

   6-9 F handle with a fin on it

Option F. this is the one with the fin on the handle. Other than a jammed-on needle cover (which I eventually got off) these have all worked. With the open end of the needle cover, it makes it much easier to change the needles.

      10-14 Fake Clover tool

I have purchased a number of the 7-needle fake clover tools.  Many have been assembled incorrectly or have been miss printed so the red dots that should indicate locked or unlocked guard position is backwards. Once you know that your holder is lying about being locked, you can just disbelieve it which makes it safer. After you safety check it,  it’s wonderful for picture felting in 2D and some 3D work too.

15       20 needle holder (the Weapon)

Let’s take a look at one more holder. This time the 20 needle holder from the Woolery. It’s made of aluminum which is more durable than the plastic ones. With aluminum, it’s important to not over tighten it or it may stick. I have 2 pieces of shelf liner stored with it just in case it is sticking. It is a bit heavier than the plastic or wooden ones but is not unreasonably weighty.

 16   the weapon unleashed!

All three of these tools have a maximum number of needles they can hold but as you can see I often load less. Again looking at the previous examples you can see the spacing of the needles varies between the holders too.

Why might this spacing matter to you?  Well, the spacing of the needle and the gauge chosen will affect the ease of penetration as the needles are impacting the fibre. There is an increase in resistance after a short amount of poking in the same spot when needles are closer together. If you need to still increase the density of the area then shifting to a finer gauge needle or switching to a wider spacing of the gauge you were using will let you keep working in that area.

17  20 holder with 12 needles loaded

As an example I have the 20-needle holder, It looks very scary when all needles are loaded. I was starting the background of a felted landscape and wanted to lay in a quick background. I usually use my 10-needle bar tool (also from the Woolery) but could not remember where I had put it. So I pulled out “the Weapon”! After a couple of pokes, there was too much resistance to continue. All 20 needles were trying to affect the wool beneath them and were quickly causing the entanglement to a point that it was difficult to push the needles into the fibre. Instead of swapping out needles to a finer gauge, I cut down the numbers of needles used going from 20 to 12, which worked very well. This allowed for more space between the needles and less likelihood of adjacent needles trying to work with the same fibre at the same time.

I started to review the mechanics, origins and variations available of felting needles.  This started looking a bit more like a book again.  (I am trying to be a bit less verbose, it’s not working.) So to review, the notches or barbs, on the edges of the needle will grab fibres as it enters the felt dragging the fibres with the needle as it continues into the felt. As you remove the needle, the fibre stays in the felt where it was pushed by the notches. The only exception is a reverse needle which pulls fibre from within the felt as the needle is removed (the notches are in the reverse direction).

After watching videos on the GroZ-Breckert (German felting needle manufacturer) website, I have a hypothesis for what my fingers are feeling (palpating) as the needle enters the fibre and makes the entanglement that is felt. We know a notch will catch fibre adjacent to it. With more notches, (3 per side rather than 1 or 2) or more sides, (a star rather than a triangle) you will affect more fibres in the adjacent area and create greater surface displacement (make a dent). Usually, you will reach a point where you feel resistance to the insertion of the needle. When you have adjacent needles working in one spot (affecting the same set of fibres) you also notice this resistance. The variables will be gauge of needles, style of needle and number of barbs per side as well as the length and type of fibre.  (I bet someone has a formula for that!)  As the adjacent needles are repeatedly inserted into a spot, you are likely to feel the resistance increase. This will be quicker with longer fibres, top, than with short disorganized fibres, roving or batts). My suspicion is that the adjacent needles are starting to try to interact with the same single strand of fibre. This will resist being pushed farther into the web of felting since you are pushing on 2 ends of the same fibre. Shorter fibre staple lengths will take a lot longer to get this effect than longer staple length fibre. NB: when working with dry short fibre, particularly wools, please wear a mask. No one wants to get wool lung. It’s kind of a career-ender. I wish I had a microscope to see if my hypothesis and what my fingers seem to be feeling is correct.

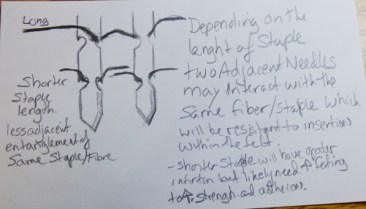
18-19 very poor sketch of the notches interacting with fibres (i am out of practice!)

I suspect my previous career and working with so many armatures made me sensitive to the feeling of the needle as it moves through the wool.  If you too have been noticing this feeling of resistance and tension in the wool but have not yet achieved the density you had desired in your felting project, there may be a few things to consider.

To counteract this resistance:

  • spreading the space between needles (having many different holders with different spacing’s is quicker to grab and keep working than taking needles out  to space them.)
  • working with fewer needles (just because the tool will hold 20 needles doesn’t mean it has to hold all 20),
  • shifting to finer needles as an increase in tension is noticed,
  • not working in one spot but trying to work across a larger section.
  • Using an ergonomically comfortable handle will keep you from using a killing grip on your needles and will hopefully let you enjoy felting longer (doesn’t solve the problem of resistance but it is helpful to consider). You can also use different handles for different gauges to make them easy to identify.


Over the years I have collected various styles, sizes and types of needle holders to have a variety of spacing and number of needles. As well as to show students what options are available.

My one cautionary tale is one of my oldest holders made from a wooden round cabinet doorknob and a small block of wood with holes for the needle to pass through. The screw that connects the two pieces is on the outside of the part that holds the needles.  You need a long screwdriver to undo it and your hand is just above the points of the needles. Don’t slip off the screw!! It is much more dangerous an arrangement than necessary!!! (Don’t buy one of those If you ever find one.  it’s not worth the danger changing needles will eventually be.

20   Some of my collection of needles and holders, there are quite a few more with my class stuff.

Now getting back to those wooden 3 needle holders I ordered from china… i will tell you that they have now all arrived (that’s the good news!) I will tell you about the bad news next post.

Have fun and Keep felting!!

My Wool Order Arrived Last Week.

My Wool Order Arrived Last Week.

I was excited to get my World of Wool order last week. As you can see they are taped, strapped and wrapped in plastic.


Box one is bulging. I wonder if sitting on boxes while they are taped closed is in someone’s Job description.

Despite the bulging, there are only 4 things in this box. This first is Batts. They are packed 5 /kg and take up more room because of that.

These bottom two are sari silk


On to the bigger box

All sorts of goodies. I bought some sample packs as you can see. I will keep one and sell the rest.

The second layer, some shetland for Jan, some peacock, to share with Jan and more sari silk


More sample packs


I took some pictures of the sample packs


Glitzy

And Constellation

The sari silk is what got me started ordering. They had it all back in stock so I could get the colours I wanted.


It is always exciting to see everything come out of the boxes. I sorted Jan’s wool. That’s the Peacock blend on top. It is very sparkly, we shared that one.

I am spinning the peacock right now. It looks really nice on my spindle.

And Bernadettes wool

Glitzy: merino colours (70%) with a touch of trilobal rainbow nylon (30%)


Merino wool tops (70%) and extra bleached tussah silk (30%)

And last but not least the sari silk blends, out of their bags.

This slideshow requires JavaScript.

I will divide all the silk up into 25gram and 50 gram balls to sell. The bag is what I will keep. I just have to work out a price.

Next is taking more pictures. I need to take the mixed bags out to get better pictures and I need to work out prices. I plan to take individual pictures of the silk balls and number them. They are all different. I hope to sell it all locally so I don’t have to work out shipping.

Natural Dyeing Session

Natural Dyeing Session

It has been wonderful to get back together with my local artist group. We have all been completely vaccinated and have started our monthly meetings again. It is good to get out of the house, share our work and try out a few new techniques.

We recently tried some natural dyeing. Paula had a bunch of natural dyes and some earth pigments. This post is definitely not meant to be a tutorial because we didn’t follow any instructions, didn’t use any mordants and really just winged it. So the thread that I dyed is definitely not wash fast, color fast, light fast etc. I’m sure that there are specific ways we should have used each dye but we were just playing around.

Paula mixed up the various powders with water as well as coffee, tea, beets and avocado pits and skins. No mordants were added and we didn’t soak the fabric or thread beforehand except to get it wet. Before we arrived, she put some small strips of cotton fabric and some cheesecloth in the dyes to show us what the colors should look like.

So here are Paula’s control samples. If you click on the photo, you should be able to read the headings to see which colors are what. As you can see, some of the dyes worked better than others. But it was good to see what we could expect. Thanks Paula!

Then we put our threads in the different colors and left it for several hours. After that, we removed the threads, squeezed them out and put them in baggies to take home.

I did rinse the threads lightly when I got home. Except the indigo ones which I rinsed and rinsed and rinsed with little success in getting rid of the fugitive dye. I was pretty impressed with the colors that we achieved with so little effort. This is the 6 stranded DMC cotton. I didn’t keep track of the different dyes as it didn’t really matter to me and I wasn’t planning on repeating the process. The light blue one is Butterfly Pea and any of the really dark blue ones are indigo.

Here’s 8 Perle cotton.

And 12 Perle Cotton.

These are crochet cottons. I decided to try these as they are a similar weight to the 12 Perle cotton but significantly less expensive. I haven’t tried stitching with them yet. The really light one on the bottom left is dyed in beet. It definitely doesn’t dye very well without any mordants.

I also had this cotton yarn meant for weaving on hand so I dyed some of it too. It’s good for couching or laid work.

Here is the lace weight wool. The green in the upper right is from Matcha tea. It’s a lovely soft green. I’m always surprised how the wool and the cotton dyes so differently. I know that it does as I have dyed loads of threads but somehow it surprises me every time. 😉

I did dye one piece of fabric which is hemp canvas. I dunked it in the indigo and pulled it straight out. The indigo was very strong as you can tell from the darkness of the thread dyed in the indigo. We had a great time and I ended up with some fun colors.

Happy Independence Day to those readers in the US.