Ideas for the F&FS Challenges

Ideas for the F&FS Challenges

A wonderful 4-week holiday in Australia, Christmas markets and hosting lots of family visitors mean I’ve done very little news-worthy felt-making since my last Felting & Fiber Studio blog.  ‘Production felting’ is my own term for making lots of similar things for shops and markets.  I did a fair bit of this in November and December: mostly printed tea light holders, printed wool ‘pebbles’ and Christmas cards. These were my 2022 cards: handmade felt with hand-printing. I extracted the tree from a larger, royalty-free, public-domain image and added the heart before printing onto fine flat felt.

Handmade Christmas card showing a black spruce tree outline with a red heart on the top by Lindsay Wilkinson Artwork
My 2022 handmade Christmas cards

I sold these through various outlets and sent a small number myself.

I’ve enjoyed making felt ‘pebbles’ for some years. Since learning to print on felt from Lindsey Tyson, I’ve been able to adapt photos of some of my Mum’s watercolour paintings to print onto the pebbles.

Here’s the link to a previous blog post, which shows the tea light holders and includes a link to Lindsey’s excellent course https://feltingandfiberstudio.com/2022/07/21/learning-to-print-on-wet-felt/

So, as I don’t have a lot of new stuff, I thought I’d contribute a few of my past makes and current thoughts as ideas for the first quarter and year-long challenges.

You can find the challenge details here

https://feltingandfiberstudio.com/2023/01/01/2023-first-quarter-challenges/

Thinking about the year-long tree challenge brought to mind a 3D tree stump I made 3 years ago.

The tree stump was part of a set of pieces I made to represent lifecycles.

More information here. https://feltingandfiberstudio.com/2020/03/01/3d-wet-felting-experiments-part-two/

Alas, I left the base alone for a long time during a pandemic lockdown and it was attacked by moths.  In a way, being eaten by moths was rather fitting: lifecycles in real life, but the moth holes meant I ended up cutting it up to make bookmarks (after some very hot washing). I did, however, recently sell the tree stump on its own and it now lives in Canada.

Pondering future projects for the tree challenge: I have a very tall, beautifully coloured ‘silver dollar’ eucalyptus tree in my garden.

eucalyptus tree top in a garden in Whitstable. Variety silver dollar
My eucalyptus ‘Silver Dollar’

I previously made a eucalyptus seed pod at a workshop with Gladys Paulus. Link here to find out more https://feltingandfiberstudio.com/2019/11/14/a-felting-adventure/

3D wet felted sculpture of a eucalyptus seed pod in grey and white wools with a surface of mohair locks

The eucalyptus tree has potential for lot of other projects, including maybe using the leaves for eco printing onto felt. Eco printing is something I’d like to try, though whether I will get round to it remains to be seen. I don’t recommend any breath-holding for this.

Contemplating Caterina’s quarter-one challenge of making something practical that you can’t buy: one of my favourites is this case I made for my iPad mini. Nuno-felted with sections of recycled sheer silk scarf.

I know you can buy iPad cases but I like that this one is unique and fits perfectly without any fasteners. Because it’s an exact fit, the iPad stays put until you need it, then slides out easily.  It’s getting rather battered now as I carry it around all the time so maybe it’s time to make a new one.

Felted vases and plant pots are also both unique and practical. Here are a few. I like that you can co-ordinate them to your décor, or to a specific plant or flower, or just go for colours and patterns you like.

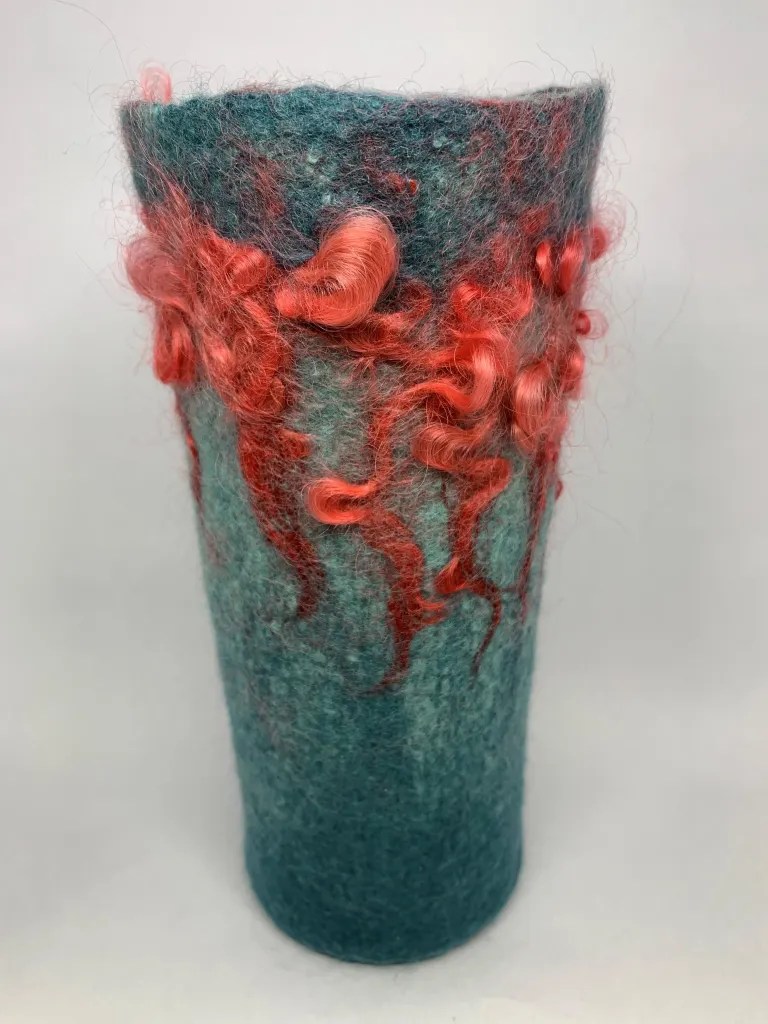
https://feltingandfiberstudio.com/2022/03/15/9-vases-a-plant-pot/ for more information on how I made these.

And finally, here’s something that meets both last year’s challenge to complete some UFOs (un-finished objects) and this quarter’s challenge to make something that you can’t buy.  

Here’s a pair of earrings that I started making a while ago using hand-dyed 14.5 micron Merino wool. I incorporated the earring post into the felt and some black sequin fabric inside using resists. These were inspired by the work of Aniko Boros and Judit Pocs.

two tear drop shaped wet felted 3D earrings in marbled greys. One smaller with tear drop cut in front revealing black sequins inside. One larger with no cut
The sequin section is more sparkly than in the photo

As you can see, I got quite a long way along, but while I finished fulling the one on the left, I stopped with the right-hand one in the pre-felt stage. I’m not completely sure why: probably it wasn’t quite what I had in mind. But it surely can’t take more than about an hour to finish that one, so I’m promising myself here that I will complete that second earring. The world will be minus one small UFO.

I hope I’ve given you a few ideas about different ways of taking on the challenges.  How are people getting on with them? If you make something in response to these or any of our previous challenges, please do post your photos on the forum. We all love to see and be inspired by what other people are making.

In the meantime, wishing everyone a very ……

PEACEFUL

JOYFUL and

HEALTHY

A cute sleeping koala
koala
An emu with its mouth very wide which looks like it is laughing
emu
An echidna eating smooshed insect liquid with its very long tongue
echidna

…….. New Year

Twining with a little help from my friends

Twining with a little help from my friends

Happy New Year!!

November and December were incredibly busy but I am glad to say things have calmed down a lot in the last 3 weeks. The Christmas markets have closed and I have nearly finished writing the first draft of the much requested tutorial on how to make vessels with feet and lids. The lidded vessel pictured below is the main example I will demonstrate how to make in the new tutorial (with a few others for alternative methods to make lids etc):

A purple and orange felted vessel with a flared foot and a lid with a handle

I just need to write one more section, then edit and proof-read it. I hope to make it available in my Etsy shop in a couple of weeks.

Other than this purple vessel I have only managed to complete one piece of work between the markets, fairs and writing the new tutorial….

Back in September I was core spinning with the intention of using the yarn to experiment with adding twining to ceramic pots, you can read the post about that here.

This is the ceramic pot I made, after drilling out the holes I unintentionally filled with glaze. Drilling the holes has made the edges a little untidy but at least I can now get my yarn through them 🙂

blue and green ceramic bowl with holes around its top edge

I used paper yarn for the warp by threading equal sized lengths through each hole. I really like working with this material for the warp, it is stiffer than wool yarns and you can open it out to decorative effect.

Ceramic bowl with lengths of paper yarn threaded through the holes

Once all of the holes contained a strip of paper yarn, I cut 2 metres (6 feet) of a pretty boucle yarn to use as my weft. I folded it in half with one side longer than the other, this is so that when the yarn runs out while you are twining it only runs out on one side making it easier to add a new length of yarn.

Before looping the yarn over the first warp strip, I twisted the bottom of each pair of paper yarns to help hold them in position for the first few laps with the weft yarn. For the next pot I will try tying a knot in each pair of warp strips to secure them as the twist tended to come undone while I was twining, I really needed an extra pair of hands to hold everything in place while laying down the first layer of yarn.

Floki was only too happy to “assist”….

Ragdoll kitten looking at camera
“What do you mean, that’s not really helping?”
Ragdoll kitten rolling on his back while pulling and chewing on the yarn
“Your tension is way off, let me help…”

Even with Floki’s assistance the boucle yarn proved to be too fine for the space between the holes in the pot. I could have used 3 or 4 threads to bulk it up but it had proved so fiddly trying to hold the warp strips in place while twining the first layer I couldn’t face the prospect of trying to do that with 8 strands in the weft so I had a rummage in my stash and found some chunky grey yarn to use instead.

Same pot but with 5 layers of chunky grey yarn woven between the blue warp uprights

At this point I introduced some of my hand spun yarns, starting with the grey core-spun yarn from September (they are the grey bulges you can see at the top of the woven section) and then a yarn with colourful pink and blue beehives.

Woven part has doubled in size and now has bulges of yarn at the top in pink, blue and grey

Happy with the height and shape of the weaving, I tied each pair of warp strips to secure the top of the weaving and opened up the paper yarn before trimming the ends.

Ceramic vase base with grey weaving above and topped with strips of blue paper protruding from the top of the yarn

It reminds me of a blue cornflower.

Same vase as above but photographed from the other side

How has the start of 2023 been for you?

Surface Design on Felt Online Class Registration Now Open

Surface Design on Felt Online Class Registration Now Open

The surface design on felt series of online courses are open for registration.  The registration for the 4 modules of Embellishing Felt with Surface Design Techniques – A Mixed Media Approach opens today, January 5 for a class start date of January, 20 2023. Click on any of the links about the courses to learn more. The courses are four weeks of PDF and video information and two extra weeks of instructor support for only $45.00 US for each module. You don’t have to be present at any certain time during the course.

Here is a video that I made about the first module of my online courses, Nuno Felting with Paper Fabric Lamination.

The second module is Experimental Screen Printing on Felt. Screen printing is loads of fun and you can obtain a huge variety of results with the techniques you will learn in this class.

Or you might want to try the third module which is Printing, Stenciling and Playing with Thickened Dye on Felt. You will learn how to make stencils and stamps as well as the use of thickened dye to decorate the surface of your felt and make your own unique designs.

The fourth module is Free Motion Machine Stitching on Felt. Have you always wanted to add machine stitching to your felt but didn’t know how? This course takes you through the basics of machine stitching on felt and works through to more complex techniques of using your sewing machine to embellish felt.

Want to start off 2023 learning something new? Then please click on the links above for further information about the classes and scroll down to the bottom of the page to register. You will also find the supply lists of what you will need for each class on the linked pages.

If you are interested in our other online classes, Felted Concertina Hats with Teri Berry, Felted Bags with Teri Berry or Hanging Felted Spiral with Helene Dooley, please fill out the contact us form here with the name of the class in the comments section.

Our Wet Felting for Beginners online class is available any time. You will have unlimited access with this class. So if you’d like to know more about the basics of felting including laying out the wool, embellishments, shrinkage and a variety of felting methods this is the class for you. You can sign up any time at the link above.

A little slow stitching

A little slow stitching

I like slow stitching. Just stitching for fun and to relax. No big purpose or major projects. Just do it as you feel like it. This suits me as I am not a great stitcher and I can pick it up and put it down without any guilt. I belong to a group on Facebook and some people are amazing artists and some just do random stitching on a piece of cloth and everything in between.

I decided I wanted t make some snowflakes and at least one tree. I had seen an interesting one in my Pinterest suggestions. To this end, I took the ripped-up sheet out of the donations box. You know what they say if you want to know what you intended for something just give it away and next week you will know what you needed it for. I was lucky that we are very slow with these things and they hadn’t made it to their destination. I am still not sure what the original idea was for these wide strips of sheet.

One piece was a little grubby looking so I chose it for the proof of concept (practice) piece. I have a nice small free-standing embroidery hoop I got at a garage sale (I think). It means it’s hands-free and can sit beside my chair and the hoop doesn’t go missing.


Snowflakes. I drew 3 stars onto the cloth to use as patterns. I used some thick gold polyester thread from Gutermann.

PATERN FOR SNOWFLAKES gold thread spokes for stitching snowflakes Finished gold stitched snowflake

That was easy enough so I moved on to some clean fabric

I drew the stars a little bigger and I did gold again

Patterns for snowflakes gold snowflake partially donegold snowflake finished

Then I moved on to what would be the problem thread. It is something I picked up because it was shiny but it has no markings it is just on a plane cardboard tube.  It’s a copper/bronze kind of colour and it is terrible to work with. it seems to be a wrapped thread and it kept breaking. There are a lot more knots in the back of this one. and there was a lot more cursing with the rethreading of the needle. I would have liked to add more to this but I was done with the thread.

bronze stitched snow flake


Next was some nice silvery embroidery thread. DMC rayon S712. I used 3 strands. It was very nice to use.

silver stitched snowflake


And here they are together

3 stitched snow flakes together

I switched back to the practice cloth to work on the tree. this is the trunk( obviously) I tried to do varying lengths of stitches to help it look more like bark. It is very hard to deliberately make random stitch lengths.

brown stitched tree trunk brown stitched treetrunk close up


This is what the back looks like where the backstitching is. I think I like it better for bark. The problem is I am having a hard time wrapping my head around doing backstitch upside down. It probably has another name with you do it that way.

back side of stitched tree trunk backside of stitched tree trunk, close up

Next is the evergreen bows. I will see how that goes. As I said it’s slow stitching.

2023 First Quarter Challenges

2023 First Quarter Challenges

Our best wishes to you all for a happy, creative new year!  And what better way to kick-start your creativity in 2023 than taking a challenge or two 🙂

The first challenge for this quarter is from a post by Caterina on the Felting and Fiber Forum after she had made some arm-warmers.

Quote: “Couldn’t we have a Quarter Challenge on felt things that are purpose made to address a need that we can’t find a way to address with store-bought stuff?
For instance, another thing that I would like to make is a sight-glasses holder with a belt, so that I can always have my other pair of glasses with me, but not dangling from my neck as I would have them with a store-bought glasses-holder, because I am forever banging them on some counter or getting them in a heated pan or dunking in the sink while I wash dishes with the normal necklace – type of holder. I keep saying that I need to make me one that will suit my life, but I have not gone round to it yet!” Unquote.

So could you make something, that you can’t buy in a shop, to make your life easier?

The second challenge is Jan’s idea and it will be carried through all four quarters of this year.

For this quarter’s challenge, find a tree that you like and depict it as it awakens in spring with buds/new leaves/blossom – it can be realistic or representational.

We would all like to see photos of challenge pieces and if you are unable to upload photos directly onto The Felting and Fiber Forum ‘studio challenges’ thread, then please use the link below.

https://feltingandfiberstudio.com/community-photo-submissions/

Thanks for All of our Community Entries

Thanks for All of our Community Entries

It’s that time of the year when I look back over the last year and think, “Whoa where did the time go and what have I gotten done this year?” While I was thinking about writing a round up post of what I had created this year, I remembered our new Community Gallery page. I thought it would be great to feature work from our readers and authors who have submitted photos for our community page. Anyone is welcome to submit a photo and tell us about their work. We will be creating a new page for each year from now on. So I thought if you hadn’t taken a look, you would like to see what others have created this year. If you want to read about how the pieces were made or get further information, you can find it here on our 2022 Challenges Gallery page. Just scroll down to see all the entries.

Cindy M. showed us her wonderful interpretation of a cactus. She also wrote a guest post about the process here.

Marie E.S. submitted her beautiful needle felted and stitched creation based on a moss covered stone in her garden.

Melissa O showed us her interpretation of paint chips on cement which morphed into a fabulous wall hanging.

Capi submitted her entry for the 2nd Quarter challenge with a felted stick. Which one is real? Read more about it here.

This wonderful felt vessel was created by Donna B. using multiple photos as inspiration.

These lovely felt flowers were on of Ann B’s submissions for the third quarter challenge. Visit the gallery page to see all of her submissions.

These flowers were inspired from a quilting technique of yo-yo flowers which were cleverly felted by Mireille G M.

This flowered felt hat was created by Penny E and submitted for the third quarter challenge. The flowers are appliqued with machine stitching which adds a wonderful texture to the surface.

Cindy M. submitted another take on cactus for her third quarter entry. She also created a second version of this piece seen here.

This felt piece was created with real lavender plants and wet felted by Helene D. and was perfect for the third quarter challenge.

Donna B. made program booklet covers for a local woman’s group and submitted these delightful entries for the third quarter challenge.

Karen L. created this vessel from bits from her stash and submitted it for the 4th quarter challenge. She created it for an exhibition “Making Waves” and looks just like a tide pool.

Ann B’s entry for the 4th quarter challenge were these fantastic crowns she created for a Panto in 2020. Ann also contributed more entries for the 4th quarter which you can see here.

These fab holiday trees were created by Susan W. who was inspired by Helene’s post from the prior year where she showed how to make these trees.

Caterina P. shared her colorful necklace/neck warmer that she made from items in her stash. She has found it quite warm to wear during the colder months.

This adorable gnome was created and shared by Jessika O. He brings a smile to my face and is perfect for the holidays.

I would like to extend my gratitude to all of our readers and everyone who submitted photos this year. I hope that all of you will consider submitting photos of your work and participating in our quarterly challenges. We love to see what you are creating.

Have a Happy New Year and here’s wishing you a creative 2023!


Exploring Natural Dyes

Exploring Natural Dyes

In my October blog post, I wrote about getting ready to start an online Natural Dye course through Maiwa. https://maiwa.com/. The photo of materials hanging on my clothesline was the first step of scouring and mordanting the fabrics that I was going to use.

Fabrics drying on a clothesline

Most of the dyes we used came right out of the jar, all ready for the dye pot. However, we did learn to make an extract from the cochineal bugs.

First you have to crush the little guys using either a mortar and pestle or a coffee grinder. I had given my coffee grinder away several years ago so I had to do it manually.

Then you add 1 ½”water to them and boil them for a minute, drain off the water into a glass jar, put the bugs back into the pan and repeat that process 5 or 6 times until the water turns pink. Then the water that was drained off goes into your dye pot.

Here is the cochineal dye pot with my white and grey colored wool yarns. At this point each skein is about 34 grams each.

After being dyed  in the cochineal pot, we then divided each skein into 3rds so we could shift the color on 2 of the yarns. In this photo the grey yarn is on the right and the white yarn is on the left.

The top yarn in this photo is after the yarn was shifted with indigo, the middle is straight out of the cochineal dye bath and the bottom yarn is after it was shifted with iron. Grey yarn on the left, white yarn on the right. Aren’t they just yummy colors??

Cochineal wool yarns

This next photo shows the results after dyeing with Marigold. More yummy colors. Same layout, indigo shift, straight Marigold bath, then the iron shift. Grey yarn on the left, white yarn on the right.

And these are from the banana indigo vat that Maiwa taught us to make. Maiwa teaches an in-depth Indigo course that I might be tempted to take one day in the future because the banana vat kind of stumped me. It was very hard to keep it balanced. Sometimes I would see the magic happen and sometimes it was a struggle to get there. It’s all quite scientific and chemistry was never my thing!

These yarns had two indigo dips. White yarn on top and grey on the bottom.

After over 50 hours or more of fairly constant stirring of the pot, one hour for each bath, I came away with some wonderful fabrics that I’ll be able to use for my stitching or my art quilts.

The following are laid out with the Indigo shift on top, original color in the middle and iron shift on the bottom.

Cotton

Wool

Linen (brown and white linen)

Silk

More silk (just cuz it’s so pretty!)

Hemp

I saved most of the exhaust baths and made these scrumptious pieces…and then I dipped them all into a weakened indigo vat for about 2 or 3 minutes. You can see the shifted fabrics hanging out of some of these on the right edge (1-2 inches peaking out). Subtle changes. But oh so many colors!

It was an amazing journey. I didn’t know that there are so many ways to shift the colors, whether you use over dyes, indigo, iron, different tannins and mordants. It’s endless and so much fun. But a lot of stirring…I did manage to get quite a bit of reading done while I stirred!

Once I finished the Maiwa course, I switched to Procion dyes so I could make some color gradations for my Gail Harker Level 3 Stitch color schemes. Quite a difference from the subtle natural colors! Lovely as well, though, in a different way.

Hope you’ve enjoyed all the color! Now I need to get busy and make something out of all these samples!

Best wishes to all of you and may 2023 be a wonderful year for you! Happy creating!
Tesi

Customs, Challenges and Creativity

Customs, Challenges and Creativity

Happy holidays everyone!  I hope you are all getting some well deserved R & R following the hectic run up to the holiday season.

Customs:

Here in Ireland, today (December 26th) is known as St Stephen’s day but in certain rural areas, traditionally it is Wren day,  a festival day when Mummers  take to the streets in their disguises.  In my area, the Mummers perform their play every St. Stephen’s day in pubs and clubs in the county.  This tradition originated within three local families and numbers participating have increased down through the years.

The costumes are generally a mix of rags together with woven straw.  The head pieces can be very intricate and beautiful.  Here is an example of a mummer’s headpiece. (Photo: Courtesy Museum of Ireland)


I checked the mumming origins for this time of year and it appears to be an ancient European tradition.  If you would like to find out more it is worth checking out these links https://en.wikipedia.org/wiki/Wren_Day  or, local to my area https://nationalinventoryich.chg.gov.ie/mummers-of-fingal/#:~:text=Mumming%20is%20a%20masking%20or,found%20in%20European%20carnival%20tradition.

Challenges

Project No: 1:

I want to extend a big thank you to Lyn and Annie whose current challenge has spurred me on to complete three unfinished projects in time for this post.  The first project is a crochet throw.  I have made a number of these, principally for family, and feedback is that they are really cosy.  So I thought it was time to make one for myself.  The problem was, that because it had no timeline for finish, it stayed on the hook!  So when I saw the challenge, the timeline materialized and I got it finished before the year end.  Happy days!

Please forgive the angle of the photograph, I was up on the ladder trying to get it!

The throw comprises of one very large granny square made with six large balls of fibre.  It fits on top of a kind sized bed and I think it will be staying there for the current cold spell!  Its making is pretty mindless and once I get into rhythm it can be made watching foreign crime series (complete with subtitles).  My favourite at the moment which has just finished is the French series Astrid.

Project No: 2:

My next  project was planted in my consciousness following a blog post by Ann in November 2021. Here is the link to her post https://feltingandfiberstudio.com/2021/11/15/an-international-project-by-line-defour/ .  This international project, which was titled “Fate, Destiny and Self-determination” intrigued me but it took me a while for the seeds to bear fruit.  I contacted the Artist/Co-ordinator, Line Dufour,  last September and she confirmed that she was still accepting pieces for the on-going exhibition.  She did mention any piece should not be a regular geometric shape (square, rectangle, circle etc).

So I got to work on my piece.  I started off by making a piece of pre-felt over a rectangular resist.  Then I started randomly stitching and gathering the prefelt, my idea here was to lose total control over the shape of the piece and let the random stitches determine this.  Finally I felted it up.  The final shape was anything but regular.  I hated it because while the shape was ‘interesting’ the colour was boring and it would be lost against a white backdrop.  So it sat there, and it waited patiently for Lyn and Annie to spur me into action with the challenge. It was time to start hand-stitching!

I decided that I wanted the piece to reflect my Irish origins and what it means to be Irish in contemporary society.  To paraphrase the actor Michael Caine,  not many people know this but Ireland is one of the largest countries in Europe when our seabed territory is taken into account.  People perceive Ireland as being that little quaint island off the west of Europe but our marine territory is ten times the size of the land mass and I decided to reflect this in the piece (bottom section).  Secondly, Ireland is renowned for its agriculture and food production which it exports worldwide; this is represented by the abstract depiction of a tree to the left of the piece.  Then, there are its people, their tolerance and acceptance; the central section celebrates the fact that in 2015, Ireland became the first country to legalize same sex marriage by popular vote. (I could have included many other aspects of what it means to be Irish but it is a small piece at 12cm x 13cm.)  I purposely left a section to the right of the piece empty – this represents the future, the unknown.  I will post (mail) this off to Line in the New Year.


Project No: 3:

I love rummaging in haberdashery departments when I am away on holidays (I also love fabric stores but that is another story!).  It is a real treat because it can be a challenge to find interesting ‘stuff’ locally.  I came across a small square weaving loom when I was in Paris a few years ago and it has been sitting at the back of my cupboard since then.  2022 was to be the year when I rediscovered it and started the project.  All the yarns were from my stash and and I rescued the boucle from my late mother in law’s house when we were clearing it.  The small piece of weaving has been waiting for me to get my act together and finish it off.  So, no time like the present challenge to make that happen!  The finished piece measures 9cm x 9cm.  I think I might just frame it.  Has anyone any other suggestions?


Creativity

Before I sign off for 2022 I would like to share with you some of my friends’ beautiful handmade items which they have gifted to me for my tree over the years.  I cherish them not only because they are beautiful items but because they were made with love – nothing will ever come close to handmade, especially when made by gifted friends.

Here is my friend Annelien’s work.  Annelien, who is from The Netherlands, and I first met during a week long textile recycling workshop in Finland back in 2013 and we have been firm friends since then (we have even managed to meet up in person twice since then).  (Apologies, I think the felted Angel is blurred.)


Next, Sara’s work.  Sara started crocheting a little while ago and recently gifted me one of her angels.  I love her! (actually I love both of them!)

Next up is Kate.  Kate loves working in glass and gifted me the trees many years ago (I have taken a photo of three of them).  More recently, she made me the little houses.  They are so delicate and pretty.


Thanks for reading this post and for reading and commenting on my various posts throughout the year!

Wishing you good health, happiness and peace during 2023.  Not forgetting a whole lot of creative spurs and fun!


Merry Christmas to All!

Merry Christmas to All!


This slideshow requires JavaScript.

All of us here at The Felting and Fiber Studio wish you all the best during the holiday season. These are a few of the holiday makes from over the years. Enjoy!

Needle Felted “THING” first time running this workshop

Needle Felted “THING” first time running this workshop

The local Ottawa Guild had been optimistic in the latter part of 2022 and started to reschedule workshops, unbeknownst to us the evil covid was friends with 2 influenzas and invited them to drop by too. So we wound up with students and instructors out sick by the end of November into December. This was also the month my new workshop had been booked. I had offered to teach a chickadee or a tiny dragon but had been requested to make a Thing since Elizabeth, the workshop coordinator and I had not been able to decide on a definite thing. This is the description that was listed for the workshop.

Description:  Jan is paralyzed with too many possibilities for an item to use to teach needle felted sculpture, thus we announce a workshop in needle felted THING creation.  Jan will probably decide more or less what the THING will be before the workshop but it will be a surprise for students.  You will create your THING using three dimensional needle felting. By the end of the workshop, students will have the skills needed to go home and make a THING of their own choosing.  Previous felting experience is helpful but not necessary. Good eye hand coordination is very helpful (those needles are sharp).”

As soon as it was scheduled, I started to work on organizing a brand new workshop. I quickly figured out this scope is a bit broad, so making a small basket protecting thing would help. I had admired an amigurumi mix-and-match monster making book.  “Edward’s Crochet Imaginarium: Flip the pages to make over a million mix-and-match monsters” by Kerry Lord.  Using the simple shapes from crochet to inspire the students, should give absolute beginners an achievable target and those who have felted before the opportunity to try four different wire gauge hands or wings and a tail.

The notes covered wire and needle gauges, fibre, fibre preparations (carded vs Combed it can make a difference), then wrapping. I had gone through and followed a couple of my projects and showed how I had made and built the armature, as well as a few wire augmentations I have had to do over the years. Most of that last section is actually in the blog posts! I finished off the notes with a list of books they may want to investigate and three online sources of videos.

If the various flues and covid were not enough of a challenge we had our first big winter store about to hit. I think most of the worst went south of us. I wonder, what the states could have done to offend the weather? After some debate with Elizabeth it was decided that since the forecast was to have the storm ending by Saturday morning, we would see how the roads looked closer to the workshop.  The snow had momentarily stopped and the workshop was declared a go.  I had collected the supplies together and then pulled the bags of fibre to go from the basement. Glenn hauled and loaded it all into the car. He and our new neighbour also cleared out the end of the driveway and we made a brake for the Guild Studio on the other side of Ottawa.

Car is being loaded to go to the workshop with fiber and suplys, snow covered car, tree and drive way. the driveway is getting quite icy. Grey Kia hatchback still dusted with snow, with hatch back open showing it is Full of bags of fiber. snow covered branches above car hang low from the weight of the clinging snow. Inside my Gray kea soul. there are bags of fiber and suply filling the back of the car blocking direct vision out the back and getting quite close to the inside of the roof. 1-3 it’s impressive how much wool you can stuff in a Kia Soul!

The side streets were not the greatest, but the highway was fine and the parking lot had been cleared!!!

the snow covered and slippery walkway in front of Heartwood house (the Building the guild is in) snow covers the ground and is clinging to the trees, the front corner of my car is visible on the left of the pictures. Front Gallery just outside the Guild studio, 7 large bags of wool on one side and boxes and bags of suplys on the other side of the hall way. in the distance my walker also carying boxes. the gallary has tropical plants along the windoe and artwork (prints) on the walls. 4-5 Arriving at the Guild and dropping off the stuff

He carried in the bags of wool, the box of armature things and the couple boxes of supplies. Then went and found the missing tables.

4 large plastic folding tables and a smaller white one hold fiber and boxes of suplys for workshop within the OVWSG studio6 Tables found and now I can set up!

He set them up in a C or U pattern so I could sit in a rolling chair in the center and help any student without a lot of standing and bending over.

18 pages of notes, a colourfull foam nealing pad (originaly for gardening), a pice of pool noodle, 3 sizes of small wooden dowls, leather Finger cots, wooden single needle holder all sitting on grey folding table 7  18 pages of Notes, Foam kneeling pad, A piece of pool noodle, 2 sizes of dowels, finger cots, wooden single needle holder. Still to add will be the needles.

I had also had a few needles for them to see what difference a gauge will make. T32,T36,T38,Crown40,Revese40 and 42. all needles are in zip lock bags and in little pieces of pool noodle foam. 8 I also had a few needles for them to see what difference a gauge will make.

a book on comparitive anatomy and one on Anagarumi monsters both listed in the text below picture9 the books just past the needles

You may have spotted I brought a few possibly useful Books; Comparative Anatomy (Animals Vs. Human)  Cyclopedia Anatomicae: More than 1,500 Illustrations of the Human and Animal Figure for the Artist by Gyorgy Feher. I also had a book on Anagarumi to give the students some ideas.  Edward’s Crochet Imaginarium: Flip the pages to make over a million mix-and-match monsters by Kerry Lord. (Kerry Lord also has a book on crocheting sheep! Toft Sheep – 18 Crochet Sheep Patterns (uses UK terms))

a couple of my sculptural felting books. both books are listed in the text below the picture.10 a couple of my sculptural books.

Armature/Sculpture books I brought to show the students; A Masterclass in Needle Felting Dogs by Cindy-Lou Thompson, Needle Felted Kittens: How to Create Cute and Lifelike Cats from Wool by Hinali.

There are now quite a few good books on sculptural felting with or without an armature. I had a list of 14 that they may want to keep an eye out for.

plastic haloween skeliton of a dragon standing on pacagease of smartie candys (candiy coated chocholet)11   I also brought sustenance and plastic inspiration

The Ottawa guild has always wanted to have small class sizes to insure good student-teacher ratios. Most workshops have a maximum of six students. With the first snow dump of the year and 2 types of flu plus covid, I was a bit worried that it may not run. In the end, we had one student driving over an hour to Ottawa and made it safely but one was sick and another with a sick child. So we ran with four students.  Three went for Anagarumi-based Things and one went with a Kraken/Octopus combo. They were a bit bigger than I had envisioned but they all still had their armatures in time to have lunch.

4 images of hands working on bending wire to make there armatures12  Armatures are underway

We had two Things with four arms and a tail, one with two arms a tail and wings, and the octopus creature used pipe cleaners (ok now there called Chanel stems since there are not a lot of pipes to clean anymore) to see how that would help with wrapping later.

After a lunch break, they started to wrap the fibre around their armatures.

wool aplication starts, 3 of the scupltures has the first bit of wool added. 13 wool wrapping begins

I brought a couple of types of fibre preparations. This would let them see the difference between carded (which makes a woollen yarn)  and combed (which makes a Worsted yarn). I am going to talk about this more in a future post.

This thing was being helpful by holding fiber for its creator, even when that was not as helpful as it sounds.14 This thing was being helpful by holding fibre for its creator, even when that was not as helpful as it sounds.

this thing is developing fabulous wings.15 this thing is developing fabulous wings.

Unlike my last octopus this one has 8 arms! The pipe cleaners were found easy to wrap over.16 Unlike my last octopus this one has 8 arms! The pipe cleaners were found easy to wrap over.

A little way into wrapping, the students all realized it takes a bit of time to wrap, so instead of rushing and risking lots of punctured fingers, they decided they would like to add a second half to the workshop and focus on surface work. I did spend part of the time they were wrapping to show them a couple of options for adding fluffy furry surfaces.

two of this things arms were added to increase its head.17 two of these things arms were added to increase its head.

This one still has all four of his arms and is now standing on his own.18 This one still has all four of his arms and is now standing on his own.

By 4 pm we had good shapes developed and no major bloodletting due to rushing.

the octopus is starting to emerge. 2 legs are wrapped in white Top (Combed) and the rest are wrapped in Roving (Carded) wool.19 the octopus is starting to emerge

the thing with 4 arms has now received a head20  the thing with 4 arms has now received a head

the winged thing has temporary eyes and looks like he is looking forward to getting wings.21 the winged thing has temporary eyes and looks like he is looking forward to getting wings.

The class while not quite finished seems to have had fun to this point.  We will get a bit of time scheduled for part two to finish the outer layers in the new year. It’s always hard to estimate on time for a new workshop and the pace the students will progress at. Not pushing for speed, I think is the way to go for this one. Needle felting yourself is not conducive to creating more needle felters!

I hope you will get to take some time over the holidays to do a bit of needle felting. If you are at a loss for what to make you may want to peruse the Anagarumi Monsters for a bit of mix and match inspiration! Happy Hanukkah, Mary Christmas, Happy Solstice and Happy Holidays from the Mer Family, the Scott-Martin Family and the rest of my felted menagerie.

PS is it just my dyslexic brain or is this date really cool 12-22-2022 (if only we had 20 or 22 months it would be perfect! OK, the last few years have felt like years containing more than 12 months) but I hope you can enjoy such a fabulously numbered day! See you Next Year!!