The next step to do for my summer tree is to get it some leaves. I decided I wanted some texture so thought I would use some silk fabric to make some needle felted nuno felt.
I found some of my boxes of fabric and had a rummage for some green I found mostly silk and some stuff labelled nylon which is a very good imitation of silk.
The green and brown was my first thought but best to try them all.
I pulled out my sampling tree. The one that looks like a peg having a bad hair day. 😉
I then thought maybe I could put the dark fabric down and then add some other fibre on top. the dark fabric is the nylon. It’s a very loose weave so it pulls threads when you poke it.
I tried adding some loose threads but they just looked messy. I think they would make great vines in a swampy picture
I decided it was a waste of fabric to put the dark green down first It would be too hard to leave some showing properly and it would prevent any of the branches from showing.
On to the real tree, I did fiddled with the branches in the middle and it does look better naked. Not that much of it will show but still, it was good practice.
I tried adding it all as one piece but I couldn’t scrunch it properly. So I pulled it off.
I added the silk in small amounts
and all done, I left a few holes for the sky and a few branches peek through. I left the edged raggy to add to the texture.
And here’s the finished overall look. I like the overall look. I am going to have to fiddle with the roots. Combined with the slant of the land, they are making the tree look like it’s leaning over. I think a little poking in on one side and poking out on the other should fix it. I am going to have a look for the wool I used for the grass portion of the background to maybe put a little over the roots. I will have to do some googling for pictures of roots.
Next, I think I will add some rocks around the roots and maybe a few around the field in the thin spots. Then maybe some tufts of grass with stitching. I may fiddle with the cloud too. I am still thinking.
I have been continuing to make progress with my large autumn landscape.
I began by looking for silk fabric in the correct colors. I found a yellow orange and a yellow green. But I needed a lighter mid yellow. I didn’t have that in silk fabric but I remembered some rice paper that I had painted yellow and coated with matte medium. I could use that for leaves too. To prevent the silk leaves from fraying as much, I ironed a light weight fusible to the back side of the fabric. Then I cut out a variety of leaf shapes. The secret to making leaves look more natural is just cut them out freely by hand. The shapes will be all different and the sizes won’t be exactly the same but that is what you want. I found a photo online to give me an idea on how the leaves should look and used that for inspiration.
When I was stitching the leaves down, I wanted some movement and the feeling of the leaves about to fall. Therefore, I only stitched them down with one or two straight stitches. This allowed the fabric leaf to come out from the background and be more three dimensional.
Cutting and stitching individual leaves takes a bit of time but I liked the result.
Here’s the piece after adding leaves. I may add a few more in a couple of places but I am evaluating now to see what else the piece might need. I haven’t cut off the bottom edge but I will be doing that shortly. I could add fallen leaves at the base of the background trees. Or I could add a bit of grass here and there. Or I could leave it alone. What’s your vote?
My idea for a name for this one is “Calling Down from the Branches”.
This is a guest post from Diane Coe, one of our readers, who recently submitted a photo for our 3rd Quarter Challenge. Thanks for sharing Diane!
My name is Diane Coe and I live in Featherston, New Zealand. I started being creative at a young age. Drawing, painting, and learning to knit from my Granny. I used to make tiny felt mice and exhibit them at a local annual art show as a young teen. Later on in life, in the 80s, I discovered Leadlight and produced for markets and made windows for houses. Then I progressed to Mosaics which I enjoyed for a while. I discovered a local felting group in 2014, and have been hooked ever since. Mainly I use wet felting with some needlefelt.
I was inspired to create Te Karanga Whakamutunga Ote Ruru (The Last Call of the Ruru (Morepork) from Maori Folklore, in which the Ruru is regarded as a guardian. With much of our planet being endangered, I wanted to portray the Ruru guarding the NZ Bush as a last call, as time is running out unless there is a change and more protection.
I wet felted the background and then needle felted, adding wool roving and balls of wool recycling from Op shops. The Kiwi is a scrap of possum fur. I spread out all my colours and fibres and picked up pieces to needlefelt as I went along, choosing what would work best for what I wanted to portray in each piece of the picture.
This close up photo shows more details of the intricate work.
There is hidden in the picture a Powelliphanta (native NZ giant snail). The piece took months to complete and is framed in native Totora farm posts.
This is the photo that I submitted of the piece for the Third Quarter Challenge. You can click on the photo to enlarge it.
Here I am in my studio, creating another landscape.
I have created other pictures like the portrait of my friends dog.
I have also entered recently a national competition in NZ called WoolOn, in which you can enter anything wool. It will be on the Catwalk and judged later in August 2003. Felting is a beautiful artform and a wonderful natural product. There is always so much to learn and create with.
Thanks so much Diane for telling us about your felting journey.
If you would like to submit a photo for one of our challenges, you can do so here. If you are interested in telling us more about yourself and your fiber art, we would love for you to write a guest post. Just fill out the Contact Us form to let us know of your interest.
De-stashing is going to be a permanent condition I fear. While trying to purge unwanted and excess fleeces I found a lovely, soft lambswool with gorgeous crimp. The colour is a slight dusty rose and the handle is so soft it’s nearly like cashmere.
This fleece had been washed and then stored in very good conditions. It was not damaged in any way. Once I started to process it I discovered a load of problems that made me question the wisdom of proceeding with processing the fleece for spinning.
The first problem was that it was a lambs fleece. Amniotic fluid can damage the tips of the fleece and make them extremely brittle. Ann McElroy told me that when she is birthing her lambs the fluid dries out her hands to the point they start cracking. I don’t doubt her for a second.
The staple is very long, but those tips, so sad to learn how easily they snap off.
Tippy fleece when the length is this long is a fairly easy fix. Just cut the tips off, and process as you would for any normal fleece, either use carders or combs.
However, there was another problem and it is much more daunting and that is scurf. Scurf is sheep dandruff. It is caused, usually, from mites, but I’m sure it has other causes. I’m mostly interested in the results which are flakes of lanolin mixed with sloughed skin cells. These harden and are extremely difficult to remove from the fleece. Since this was a lamb fleece the little critter also played in the field and got into all sorts of mischief with bits of vegetation and dust. I was two seconds away from throwing this in the trash or compost, but I gave it a deep comb, just to see what results I could get.
There are nebs in there, so I put it through the comb a second time and removed them. The wastage was massive, nearly 50%. This wastage is from cut tips, scurf, vegetable matter, dust, tiny bits of straw etc. When I combed the wool I used a spray of water with hair conditioner mixed in to keep the stress on the wool to a minimum; it really helped.
This is residue from the first combing,
And this is residue from the second combing.
I freely admit the work involved in salvaging this fleece was NOT worth it. I learned more than I ever wanted to know about sheep dandruff. This is an exercise not to be repeated – ever!!
That said, the final result is rather lovely, nearly cashmere soft, grey lambs wool skeins. The yield is an astonishing 12 skeins of gorgeous two ply, that I’m really pleased with. Not at all sure what I’ll do with it, but someone will have a suggestion, I’m certain of that.
I had another little oops on Friday. I was sitting and bent forward…and felt a little pop, froze to assess what I might have done. Decided it didn’t seem too bad until I tried to straighten up. That did not go as well as I hoped, but I got myself back to the computer and tried to keep working on a comparison of needle felting safety devices notes I had been working on. That didn’t last long and I wobbled off to lie down. If I had got the memo that bending foreword was forbidden on Fridays I would have abstained from that offensiveness movement.
Instead, I had to accept my back’s indication/insistence that I should wait on the article I was writing and get back to focusing on another short chat about Mega-Stega-bag-blog. So let’s see if I am up to transferring photos and giving you a progress report. (Lucky you, a less verbose me! Since this is the first day, Sunday, that I can type (leaning forward and sitting seems to offend whoever I ticked off greatly, while lying down was the only acceptable orientation the last few days). so to appease my demanding back it’s back to the bag:
A week ago Monday I was back in at the guild studio working on the library, dispersing fleeces and continuing the calculations for the resist for my new phone holder.
1)From 12 bags to 4 bags, with 2 spoken for that should leave 2 left to find homes.
2) This is the modified Dewey architecture we are using for the OVWSG library’s collection.
I went with a process format for classification, if you are curious I can tell you about that sometime. I will try not to get too distracted today or I will not get this blog done. I will give you the topic headings in case the photo is not as clear as I hope. (I have the OK drugs for my back, not the really good ones from the last time.)
000’s Programs, publishing and people (biography)
100’s Law and Business
200’s Studio and Guilds
300’s Fiber Sources and Preparation
400’s Colour and Dyeing
500’s Felt
600’s Spinning and Post Spinning
700’s Fine art/ Design and Weaving
800’s Post Weaving
900’s History of Textiles
I added a few more books to the OVWSG guild library collection. I need to add the new donations to the database before updating the subject, author and title lists on the guild website. Then it was time to take a break and I got started on the stegosaurus expansion to create the purse resist. (It was one of the few days I did not do library work through the social.) See I did get back on topic!
3) Vertical lines have been expanded.
4) You can see how well-folded the paper under the pencil has become.
Now I am ready to work on the horizontal lines.
I used the same technique as the vertical lines; measure the distance along the line inside the Stego-blob on the piece of paper. Fold the paper in half and then fold the half in half again. Take that length and add it to each end of the line on the outside of the blob.
5) Measuring from the edge, where the line and outline meet to add the amount of shrinkage to the shape.
I had to add a bit more paper to my graph to get the head and tail horizontal expansion plotted, but eventually had a spot where the plotting overlapped. If I had wanted to be exact in my expansion I would have added I diagonal element to fix these troublesome transitions. Instead of adding another step, I went with Ann’s suggestion of just estimating, and drawing a line.
7-8) After estimating the line in the two areas where the horizontal and verticals did not agree, I was ready to cut out the new larger shape of Mega-Stega-blob!
9) Remember to use your paper scissors, not your sewing or fibre scissors!!
Ann was very curious to see the difference in size and shape between the original side panel of the giant Stego-bag and the new Mego-Stego-Blob, so we checked.
10) The new shape should make a bit more diminutive purse.
I will add the legs in four extra resist pieces (oh drat I will have to scale that up too), but I did leave the original attachment sites marked on the template. I also have the plate locations marked too. The plan is to add the legs to the body resist to be felted at the same time as the bag. The spines and plates I want to pre-felt partly leaving a fluffy attachment end so I can make them very firm. I had considered wire augmentation for the spines, but have not decided whether to include it yet.
My next step will be to consider the colour so I can lay out the wool. Unfortunately, that will not be this Monday. My goal for the day will be getting to the guild, which I am hoping I will be up to. Possibly adding a few more books, and then getting myself back home! But for now, I think it’s time to go lie down again.
I was looking through some of the simpler backgrounds I had on hand to jump-start my summer tree. I did this agt our guild social so I was too busy chatting to get you a picture before I started.
I decided to use some more of the pencil roving I have. It is sold as Buffilo roving or Brigs and Little Country Roving. It comes as 5 strands of thin pencil roving wound into a cake. It looks to me like it has been prepared to go through a spinning frame and then be plied into usable yarn. Why else wind 5 strands together? https://briggsandlittle.com/product/country-roving/
This is the brown I am using but not a solid colour so it has more depth. I wound off 2 strands to pop into my felting bag.
When I am not sure of my artistic ability ( most of the time), I tend to go small. If it’s little it is harder to see it’s not very good. However, trying to make a small tree in the distance did not go well. It looks more like some sort of demented scarecrow. You can see it’s quite a nice background though.
So I ripped it off and started a much bigger tree in the foreground. You can see how using the pencil roving makes it easier to make branches as you lay them in for the trunk.
I tidied that up top and bottom and that is as far as I have made it.
I like the way the pencil roving forms the tree but I think I need to add a little lighter ( and maybe darker) colour to help define it more. I am not happy with the blob in the top middle of the trunk. I think I will have to open it into the branches more. I will have to do some searching for pictures of winter trees to see how that part looks. It may not matter once I add the leaves. Isn’t it funny how you know exactly how a tree looks until you come to make one? I also have to work out what I want for the rest of the picture. Maybe some rocks, sheep are always popular, a fence?
The only other thing I did this week was to make some felted balls for my goddaughter, for her cats. Again, too much talking and not enough picture taking. they are small styrofoam balls with a bell pushed into them.
I have been continuing work on my large autumn landscape. I added the large tree trunk and branches and was planning on adding leaves to complete the piece.
However, I decided it need darker branches on the larger, foreground tree. I had some black wool yarn that I decided to use for machine cords. I twisted three pieces of black yarn together and then zigzagged over them by machine with a near black thread. Some of the yarn pieces I left apart so that there were narrowing branches of either two or one yarn diameters.
Then to start stitching them in place. I didn’t have a specific plan as to where they would go, I was just winging it. I couched the cords in place and in the thicker areas, I used two machined cords couched side by side.
Here’s the piece after I had couched all the machined cords in place. You might also notice that I have folded the bottom of the piece up to see what it would look like without the bottom four inches or so. I liked the look of it better. It feels like a better scale to me. I haven’t cut it off yet, but I think I will soon.
Then I decided that I needed thinner branches coming off the thicker foreground branches. So I used the same almost black thread in size 12 (Sulky cotton machine thread) and stem stitched the other branches. Click on the photo to see the branches in more detail.
Next up is leaves for the foreground tree. I will be cutting those out of yellow, yellow orange and yellow green silk. My plan is to add fusible web to the backside of the leaves so that they will not ravel at the edges. Then I will probably add a bit of grassiness at the base of the backgrounds trees and call it good. But you never know, I will evaluate to see if it needs anything else when I get to that point.
Going around here in West London and in England, I have come across some textile-based community projects that maybe you will find interesting.
They are crocheting and knitting public projects that use those skills creatively to raise awareness and educate the public, and also inject beauty and fun in our lives of course! Maybe something similar is done in your own neighbourhood and community: it would be nice if you could share other similar projects in the comments.
The first couple of projects that I want to show you are projects that I came across to inside the Royal Botanics Gardens Kew or Kew Gardens.
This is a UNESCO World Heritage site that holds a collection of more than 28,000 taxa of living plants and around seven million of dried specimens in its herbarium, not counting the lovely historical buildings and surroundings that make for an enchanting visit: it is definitely a picnic favourite of Londoners and tourists alike, although the ticket is a bit expensive. I personally always try to go for the Orchids Festival, as I am a fan of orchids, but my kids like the yearly Children Science Festival!
In a small and quiet separate greenhouse very close to the famous historical Temperate House we found two textile pieces: one horizontal artwork about Food Security, and the other a vertical artwork about natural life classification for plants or the Plant Tree of Life.
Both were created as community projects by people coming together to express what the themes meant to them through knitting: the Community Learning group of Kew Gardens is aimed at people who may have difficulty in accessing the Gardens and would like to know more about plants and be involved.
The explanation of the Community Projects at Kew in general, and of the one on Food Security in particular.Here is a closer look at those photos on the signs: a group photo of the participants and a photo of their works!Here is the work on Food Security: quite colourful!This sign explained the Tree of Life project in Kew Gardens.Here is a close up of the two photos of the sign about the Tree of Life project: those ladies seem to be enjoying themselves!This is the knitted artwork itself, Plant Tree of Life.A detail from the Plant Tree of Life, three knitted water lilies.The bees were quite cute, but the skeleton sure was a bit scary!The Rosids understandably had some more bees going around.It seemed quite interesting how they managed to make the Monocots as well. Most monocots are grasses, but this group sees orchids as well: I kind of wish they made some knitted orchids, just to add a bit more colour to this group.The Gymnosperm group was represented by a DNA chain as well.Those knitted dinosaurs on the Ferns group were quite cute.I have no idea why they put a lot of fishes on the Lycopods group, as those plants used to grow as tall as trees, before becoming almost extinct (probably because of drought conditions). They are similar to moss today.Those Magnoliids sure attract a lot of ladybirds!
If you would like to try your hand at knitting nature, as those ladies did, here is a link to some free patterns on the Community Learning Kew website that you might try. The Community Learning group is the one who created those two beautiful works and it is made up of people who face some barriers to accessing the Gardens and are part of an organisation who applied for a Community Learning Access. Barriers to access may be such as some physical, mental or psychological impairment or social and financial barriers.
The other project is way more informal, has been going on in my Ealing neighbourhood for a while and I recently saw another one in Norfolk, and realised that it is something widespread in England, UK: all British crocheters and knitters, please, let us know about something that you can see around your neighbourhood as well.
So, now that I have created a bit of suspence, here it is, a Pillar Box Topper: a crocheted or knitted shape is fitted on the top of the iconic red Royal Mail pillar boxes, and on top of that layer there are different clever crocheted or knitted shapes representing a theme, to raise awareness on charity associations or local features or something that takes the fancy of the artist. I gather that it is not usually something that you need to plan with the approval of Royal Mail, as long as you keep well off the critical bits of the post box, and do not cover the hole or the signs.
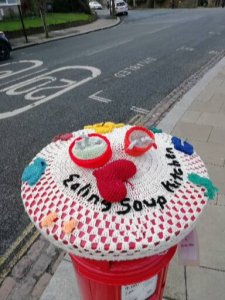
Here is one that I love, it’s close to where I live.As you can see it has been knitted in proud and creative support to Ealing Soup Kitchen and it features warm items of clothing (mittens, scarf, jumpers and the like) and of course a cup of tea and a bowl of soup.This tiny yellow coat with hood is quite lovely.Here is the sign for this Topper: on the other side it has a QR Code that you can scan to support the Ealing Soup Kitchen.This one had building works around it, so I could come at it only from one side, unfortunately. It says “When I’m Driving in my car” and it has been made just for fun.That is the best detail photo that I managed to take of it: the cars are knitted, whereas the topper itself is crocheted.I came back once the building works were finished and took a couple better photos.Here is the view from the other side! Clearly an enthusiastic driver.This is one that I have seen close to Cromer, Norfolk, on the Jurassic Coast, while I was holidaying there. There was a lot of glare, so I did not quite manage to take good photos and also not have my shadow show.Here is another view of it. The Pterodactyl is attached to the Mammoth top quite cleverly.Maybe you can catch other details here.Here is another crocheted one that is close to where I live: it is simpler, with plenty of colour!Here is a closer view.And another view, from a slightly different angle.I like the smiling daisies!Most of the flowers seem not overly difficult to make, but impressive on the topper, like this rose in bright pink.We had some quite simple ones for Coronation Day where I live: I guess our neighbours were not overly enthusiastic but made the cheering effort anyway.Another quite simple one in the colours of the Union Jack for Coronation Day in my area.
There definitely are various charity associations doing this, but it is also used just for a bit of fun and to commemorate events as you see. It is quite popular here: check out its history here on Wikipedia, and here you can find a blog with the list (unfortunately around 2 years old, sorry) of the places where you can find them in UK and links relating to groups of Post Box Toppers enthusiasts.
And, if you wish to try, here is a link to free crochet and knitting patterns for Post Box Topper by the Townswomen’s Guild: of course, those are only the basic Post Box covers, without all the knitted and crocheted embellishments. There are other free patterns online, if you wish to try your hand at one.
This title made me chuckle. 🤭 It sounds like I’m going to lecture, about good hygiene. But no, my post is about felting soaps, as take-away gifts, for my niece Lauren’s bridal shower. The shower was in Phoenix, this past weekend. I declined my invitation, knowing I would surely melt in July’s hot temperatures – never dreaming there would be a triple digit heatwave. However, as her only aunt, I wanted to send something special, to help with the shower. Felted soaps are always appreciated, by any recipient I give them to…so I asked her mother what she thought? I explained they are lovely, and useful, pieces of hand made art. With a few questions, about colors and theme, I was ready to tackle the job.
The theme: Petals and Prosecco.
The first 21 bars felted, using assorted carded batts.
I taught soap felting classes, at a fiber show, and a couple fiber retreats. In doing so, I developed a descriptive narrative, to help people understand the process. I experienced many pitfalls, in my learning process. I like to share my mistakes, to prevent my students from experiencing the fate. Felting soap, while not hard to do, can humble any experienced Felter. [Truthfully I had 2 bars fail this time.] Sometimes it just happens!
Generally, the following method works pretty well for beginners. This recitation, is close to what I usually say to my students, as we felt our soap together. I have inserted photos as illustration, where necessary.
1. Use wool that felts well! – For my batts, I try to blend dyed merino, with another easily feltable wool. Add fancy fibers, like silks and angelina, sparingly. I tend to add those fibers to the top of my batts; that allows me to pull small amounts of the add-ins, as decoration. Always try to add a thin web of wool fiber, on top of your silks and fancy fibers. It helps them felt in better.
Photo #2 demonstrates peeling all sharp edges from soap, with a vegetable peeler. Remaining photos, all #3, demonstrates amount of fiber, and wrapping technique.
2. Use a vegetable peeler to remove all 90 degree, or pointy edges of your soap.My best advice – use less wool than you think. Lay out 3 very thin layers of fiber; only enough to cover the area of your bar of soap, with a small overlap. (Photos)
3. Wrap bar of soap, being mindful to cover corners of the bar. This is where you can add wool yarn embellishments, if you choose.
I wrapped this bar with boucle yarn, and what I thought was wool yarn. It didn’t felt, so must’ve been super wash wool. So I pulled it off and kept right on going.
4. Carefully wrap in a nylon knee high stocking. Better yet, use cheap nylon footies – ones you use to try on shoes with. [Amazon sells them – $8 for 144.] Grab the wool wrapped bar, with your socked hand, and carefully pull it over.
5. Add luke warm water to a 2 quart bowl. Wet wrapped bar – dipping quickly. Pull wrapped bar out of water, and begin pressing air out of the wool. (You will hear the air leaving the wool – sounding like little farts.) Press sides, press edges, press ends…keep pressing as the air continues to bubble out. Do this for a minute or two. As you press, soap suds begin to form. Some soaps foam more than others.
6. Quick dip in water again, begin pressing the fiber as before. Keep pressing. You should be able to feel all of the contours of the bar of soap. The wool should feel so tight, on the bar, you almost don’t feel it present.
*Only after about 5 minutes of pressing and pressing, around the bar…should you attempt to start rubbing. ***This is where the felting problems happen. Ask me how I know this?? When I am in a hurry, and rush the process, the wool says “No, no, no!”
7. When you do rub, imagine your bar of soap is a new-born baby. You wouldn’t rub your baby roughly…start by rubbing very very gently. After a minute or two, your baby is 1-2 months old, so add a little more rubbing for a minute. Rub all the edges and ends too. Now, your baby is older and you can begin building up the rubbing. [Wipe your soapy hands off with a towel – don’t add more water unless you absolutely have to. Trust me!]
8. You can peel your stocking/footie back, to make sure the wool is tight to the soap, and not sticking to the nylon. If still sticking, you need more rubbing, so wrap it back up and rub some more. Otherwise, remove the stocking, and rub all over some more.
9. Here if you feel the need to felt a bit more, you can rub the soap bar on bubble wrap, or something with a little texture. Make sure every edge is tight to the bar, and you’re pretty much done.
10. Start running some warm water, in your kitchen sink. Rinse your hands off, and quickly like before rinse the bar. Press all the water out, dry outside of bar with paper towel, then set aside to dry.
I generally stop at this point feeling satisfied with the beauty of this simple look. But for the shower, I planned to try something different. I decided to use bits of fiber and felted scraps, to needle felt a loose flower shape. I didn’t take pictures of that process, but I did think to photograph my leaf process:
I dug in my bin of felted pieces and off cuts. I found a lightly felted bit of prefelt, in various shades green. Perfect for leaves.
Leaf shape cut from a piece of lightly felted green piece.I placed the cut shape in one hand, and rolled it back and forth, to round and felt the cut edges a bit.
I placed my rough flower shape on the bar of soap. For this example, imagine a round piece of felt/fiber. I divided the round shape by eye into petals. Then at a petals edge, I grabbed it with my felting needle tip, and pushed toward the center of said flower. I did this 2 or 3 times around the flower. As shown in the photos above, I cut leaf shapes from the green prefelt and rolled it between my hands a couple times. Whenever my leaf rolled on itself, I flattened it out, and kept on going. (Note: that could work well for another project) For the stems, I used a US-E hook and green yarn to crochet a chain of about 10 stitches. Each of these flowers, stems, and leaves were totally different. I let the colors and fibers determine their own destiny.
This photo shows the best way I found to needle felt (applique) pieces to the felted bar surface. Catching the edge and running it between the felt and soap
This close up shows how this blob of wool and silk reminded me of a flower. I simply added some tucks from the edges to make petals
I broke 4 felting needles, on this project, before I figured out my mistake. I watched a YouTube video that said to “needle felt directly into the soap.” I beg to differ with them, unless they have an endless supply of felting needles. I found keeping my felting needle between the felt and the bar of soap worked fine. (See the edge of the leaf, photo above.)
While I am sharing tips with you, I should warn you, these soaps took a good bit of time. For these, I chose to use organic, specialty bars of soap, because they were for my niece’s family and friends. If you ever try selling them, as I have in the past, don’t bother using good soap. While purchasers enjoy, good quality soap, they rarely believe you have used it. I did a fiber show in Mississippi, and used “free” 2oz soaps, we got when traveling. I sold them for $5 ea, and they were gone in 40 minutes. I used a better quality, organic soap in my next batch, and couldn’t get people to part with $7.50. As I sit here writing this up, I don’t see these as money makers at all! But, if you have the supplies, and a bunch of soaps hanging around, they make pretty nice gifts, or stocking stuffers. And…they look so pretty on the tables at a shower.
This will be just a wee tiny post compared to my regular verbose discussions. I have been a bit run off my feet with fun layouts and drafts for various proposals for the upcoming 75th anniversary of the Ottawa Valley Weavers’ and Spinners’ Guild. I am also involved with the monthly summer library days and the guild got a gift of 10 sheep and 2 alpaca fleeces, my car is still a bit aromatic. Since I am sure more changes on layouts are awaiting in my email, I better tell you about the continuation of the Dino bag quickly and then get back to work.
When we last chatted about the Stegosaurus, I had just been dealt a crushing blow by numbers, evil uncaring numbers who thwart my want of a phone-carrying device!!!
From my misinterpretation of Ann’s suggestion, I had wound up with a much bigger carrying device than originally intended. What do you mean you did not mean 50% added to each side?
1) scaling up, a bit over-enthusiastically
A quick review:
I had created the shape I wanted and then added gussets for the top and bottom. (This is how you can make a sewing pattern. But unlike sewing patterns felt patterns need a lot more “seem allowance” for shrinkage. Figuring how much was where I derailed.)
After a bit of Consoling from Ann (it was such a cute dinosaur and I had been so careful in the measuring and redrawing!) Ann reviewed the math (ick) half of the distance, then half that again and put the halved half on each side. Ok, I think I can’t screw that up twice (don’t tempt fate but really I think I got it this time. <mutter mutter stupid dyscalculia>)
Next, we considered how to add the gussets to the side section.
2) Adding the belly gusset to the body shape
Ann suggested lifting up the legs (to be added separately, which I had considered as an option as well) and then drawing in half the belly gusset.
3) talking about adding the back gusset
Again take off the plates and add half of the back gusset.
The plate can be made separately. Which will allow them to be heavily/ stiffly felted. If I then leave a fuzzy end, I can attach them to the body partway through felting.
4) side panel of Stegosaurus with legs and plates folded up, ready to be traced to make a new template.
Now to create the new pattern.
5) drawing half the width of the belly and back gussets onto the side pattern
I traced the stegosaurs then added the half belly and back gussets to the body shape. I marked where the legs and plate went for reference. I have now achieved Stego-Blob!!
Ok, let’s try again on expanding the pattern:
When I weave, I usually measure my warp length with a string with knots marking the loom waste and the halfway point in it. When I made tamari balls, I used a folded paper band with pins. I am going to avoid the ruler I used last time with those untrustworthy misleading numbers and resort to a reliable piece of paper I can fold in half and then half the half.
6) Drew a grid over the new shape and found a scrap paper to use as a measuring tool.
I did use the ruler to make the graphed lines but carefully ignored most of the numbers.
7) graph overlayed on the blobby shape made by adding the belly and back gussets to the body.
On each vertical line, I took my scrap paper and matched the distance from one side of the stego-blob to the other along the line. I folded that distance in half on the paper then folded it in half again. That distance was then added to the top and bottom of the line and a point was plotted.
As I got closer to the head and tail you can see (in picture #6) that the increase is greatly lessened. By the time I had all the vertical lines plotted, Ann was looking a bit concerned by the curvature around the nose and tail.
I explained this was only step one in the expansion plan. Step two would be to plot the horizontal lines next. Then as step 3 would be to average the two plotted dots and figure out the new outline. Ann said she would just estimate and go from there.
Oh no, time to stop!! A tornado warning just went off on my phone. No wind outside but that may literally be the calm before the storm. When we chat again, I will let you know how the horizontal lines go and then average the points to make the new MEGA-Stego-Blog!! (only 6 pages in Word, It is a tiny blog today.)
Update: looks like there was a tornado in Barhaven, it’s a suburb in the southwest end of Ottawa and North of Ann, it’s located between us. There is another band of the storm system coming later this afternoon but most of it should be south of both Ann and me, just in case it is more aggressive than it looks on the weather map I better get this posted!!! yep, the tornado alert just went off again but there is sunshine coming in my office window, so I will keep working on this rather than hide in the basement, but I will keep an eye on what’s happening out the window, just in case the weather changes its mind. (There is lots of comfy soft wool to keep me safe in the basement, but just not the specific wool I need for projects I am working on!!)


 I added the silk in small amounts


 1)From 12 bags to 4 bags, with 2 spoken for that should leave 2 left to find homes.
 2) This is the modified Dewey architecture we are using for the OVWSG library’s collection.
 3) Vertical lines have been expanded.
 4) You can see how well-folded the paper under the pencil has become.
 5) Measuring from the edge, where the line and outline meet to add the amount of shrinkage to the shape.
 7-8) After estimating the line in the two areas where the horizontal and verticals did not agree, I was ready to cut out the new larger shape of Mega-Stega-blob!
 9) Remember to use your paper scissors, not your sewing or fibre scissors!!
 10) The new shape should make a bit more diminutive purse.


 1) scaling up, a bit over-enthusiastically
 2) Adding the belly gusset to the body shape
 3) talking about adding the back gusset
 4) side panel of Stegosaurus with legs and plates folded up, ready to be traced to make a new template.
 5) drawing half the width of the belly and back gussets onto the side pattern
 6) Drew a grid over the new shape and found a scrap paper to use as a measuring tool.
 7) graph overlayed on the blobby shape made by adding the belly and back gussets to the body.