Beneath the Surface Challenge

Beneath the Surface Challenge

I posted about creating a sample for the 3rd Quarter Challenge in July. I decided to add some free motion machine stitching. Once I got into the studio, I found a piece that I thought would work well in combination with my sample.

This was a sample that I created for my free motion machine stitching on felt online class.

I found a thread that I thought would work with the gold colors above and stitched around the circles.

I then added more stitching to the background in a “quilting” pattern. This was the same kind of stitching I used on the gold piece and I thought it would help coordinate the two.

Then I took a deep breath and cut the two pieces up. This was the plan for arranging the pieces and then stitching together with a zig zag stitch.

As you can see, the stitching made the felt a bit wonky and I didn’t take the time to baste the pieces together or add a stabilizer to the back. So wonky it is!

Here’s the back and it could be reversible. Now what to do with it? I kind of like the shape but I guess I could cut it into a long rectangle. Or perhaps it could be a book wrap? I’ll have to think about what other 3D things I might could create with it.

Starting out Wet Felting

Starting out Wet Felting

Hello everyone, I know a lot of the readers of this forum may be experienced felters, but some of you may be turning to us after deciding to experience felting for the first time.

I thought I would provide a simple blog (so that also may mean short!!)  to show that one of the many joys of felting is that the basic equipment does not need to break the bank when you are setting out for the first time.

There are many tutorials online to explain the process of wet felting, here is one you can subscribe to through the forum https://feltingandfiberstudio.com/classes/wet-felting-for-beginners-online-course/   I will concentrate here on the tools of our trade.

As with everything in life, you can purchase things cheaply or you can pay much more.  So let’s provide you with a list.

Protective cover for your table – if your table needs to be protected from water, you will need some kind of cover.  I have a vinyl table cover sourced from a charity (thrift) shop.  I have just bought a very good and cheap builders rubble floor protector from a trade supply merchant, the cost was just under £6 for 3m x 4m! – huge.

Bubble wrap – small bubbles, not the large ones.  This is what you lay your work on prior to wetting down, bubble side up everyone!!, (to create agitation from underneath) and it is very cheap.

Tulle/netting – this is the material that you lay over your work prior to adding water and soap, you can also use curtain netting if you have any, but like bubble wrap, tulle is very cheap.  People buy it to make fancy dress costumes.  Sometimes one colour is cheaper than another colour, so buy the cheapest.   The colour will not matter and it will not bleed onto your work.  My tulle is a very fetching teal colour, and it wasn’t one of the more expensive colours.

Soap – I personally use Olivia Olive Oil soap, it is what I started with and so it is what I am used to.  I do know that some felters use hand wash liquid, or dish washing liquid,  I tried the hand wash once and found my work felted too ‘soft’, but please do experiment and find what works for you.  At the minute I am paying £1.69 for 125g of soap, so not a huge amount, and it lasts a long time.

20180817_110308

Water container – you can spend your hard earned money on a ball browser to sprinkle little droplets of moisture onto your work or you can buy a liquid laundry bottle.  Use up the liquid to wash your clothes,  rinse it out thoroughly with water,  jab five small holes in the top with a knife, and voila! you have a water sprinkler.  I find this works well even when I have very fine, flyaway work to wet down, put the tulle over and sprinkle away, my work rarely moves, maybe it dare not!!

20180817_110554


Hand Carders/blenders – here is a fantastic saving, you can throw your money at a couple of fancy hand carders that do actually look lovely.  I have seen them for sale up to £44 for the pair, WOW! or like me, you can buy two dog slicker brushes £3 each, (yes from a pet store!) and do you know what?, they blend the colours!!  Ok they are smaller than the expensive carders, but it just means you have to blend a few times, not a great problem!

20180817_110356

Sushi mat/Roller Blind – if you are wanting to shrink your work for whatever reason, maybe to fit into a certain picture frame or canvas you may need to roll it.  I have a small sushi mat for small projects.

20180820_143319


I bought this large window blind for shrinking the larger pieces, and cut off all the extra hanging cords, again, not at all expensive.  I actually picked up another one in a charity shop the same.  I was thinking ahead to a time I may run my own classes, to have a spare.

20180820_143347


Wool – I am afraid this is where I cannot recommend cheaper alternatives, but that does not mean you cannot shop around for the best prices.   I will list a few sites for you to look at, they all deliver worldwide.

https://www.worldofwool.co.uk/

https://www.adelaidewalker.co.uk/

https://www.winghamwoolwork.co.uk/

Before I go I would like to share this great ‘cheaper alternative’ that my husband came up with.  I started presenting my work in mount and backboards (mat and frame), so I thought I would have to buy a print browser stand to display them at craft fairs.  I looked on line and the wooden cradle type ones seemed to be around £30.  I explained to my hubby what I wanted one for and he said you need a magazine rack……well take a look at this thing of simple beauty…..

MAGAZINE RACK


Not only was it less than half the cost, but it is far better, in my opinion, than a wooden cradle type because as it is acrylic you can see all of the piece you are displaying, I love it!  It is a table top item rather than floor standing.  It is sturdy too, check them out if you ever need something for this purpose, you won’t be disappointed.

I hope I have helped a little with my cost saving suggestions, of course any savings you do make means you can spend more on lovely wools, a win-win situation!

Please share your cost saving tips with us all.

Happy Felting!

Pieces For Greetings Cards

Pieces For Greetings Cards

It seems like we’ve not had any well-being centre felting sessions for ages. We meet up on a Monday so we lose days when we have a bank holiday; the reception had a bit of a weekend make-over too so was closed one Monday after and August being popular for gigs and festivals has meant less attendance and cancellations too. So, I was feeling a bit impatient to be creative this week. I could have made something with the strips I pieced together last week, but I wanted something a bit more ‘instant’! I need to make some more greetings cards, so thought making pieces for those would be a good way to be productive. This is the first one:

I stuck to Blues and Greens because it’s so messy and fibres/threads get everywhere. This is the 2nd one:

These next two are two halves of one piece I made. I thought it made sense to make a longer one and cut in half. I also made these more green:

I like the blue offcut with cotton nepps on this piece, it was left over from the piece I turned into a notebook cover not too long ago:

They all look very similar when they’re all togther. So, for something a bit different, here’s a piece of nuno I made earlier this year. I used a piece from a silk scarf I got at a charity shop. I think I planned to make a coin purse out of it:

Close Up:

Do you have any ‘quick + easy’ projects for when you want to feel productive and accomplish something?

Scarves all done, well almost

Scarves all done, well almost

The felting part of the scarves is all done. I have moved to adding buttons. A friend helped me pick out all the buttons at our guild social On Monday night. At one point we had lots of buttons out of the bags on the table as we poked through them in search of just the right button. Unfortunately no picture of that. Jan got a great close up of this button we were trying on this scarf. Actually all these pictures were taken by Jan Scott except the 2 of her and her new wheel.

Here is a picture of part of the social. There was spinning and weaving and knitting and wheel adjusting, probably other stuff too.

And Jan brought her new wheel. It is an electric spinner and it fits in a small plastic container. It is as portable as a spindle. There were lots of oos and ahhs as she showed it off.

And lastly 3 great pictures of my scarves, thanks to Jan.

I hope you like all the pictures. Now I have to get on with the finishing, the hardest part.


Completed Tree Fragment Series

Completed Tree Fragment Series

I promised that I would show you when I completed the Tree Fragment Birch piece that I showed you last week. I stretched the background fabric around a canvas and fused a piece of brown paper to the back to cover the fabric edges and staples. I ended up gluing the birch tree down with soft gel medium. I liked the idea of using stitches but I thought the silk fabric tree was just too fragile and I was afraid the stitching would tear it apart.

Here you can see the finished birch tree and the backing.

These are the two other pieces in this series. I was really rushing to get these all done because I am putting them into the Uncommon Threads exhibition at the Bigfork Cultural Center in September. 

Here are all three pieces together. I photographed them on the floor but you get the idea. So if you’re in the Bigfork, Montana area in September, make sure to stop by to see the exhibit.

Painting with wool

Painting with wool

For today’s blog post, I am sharing with you a workshop I went to, where Dani Ives was teaching how to paint with wool. If you haven’t heard of Dani’s work, I highly recommend you check out her website.

Dani+Ives_Luna+Portrait
Portrait of Luna, copyright Dani Ives (taken with permission from the author)

Before we get started, what exactly is “painting with wool?” It is a 2D needle felting process whereby you pick a theme, copy the design onto flat wool sheets or another type of fabric, and then proceed to “paint” it with different colour wools using felting needles.
This term was coined by Dani Ives when she realised she was essentially using wool the same way painters use paint to represent an object.

IMG_3267
My “classmates” before we started

I was asked to bring an image to reproduce. My main goal with this workshop was to learn how to do 2D pet portraits, so I decided to be ambitious and chose a photo of my cat Marshmallow.

Marshmallow png
I’m being ambitious but not overly so – her eyes are closed

After transferring the image onto the felt fabric with an ordinary pen, it was time to pick the appropriate colours to use. I confess this is the part I have the most trouble with, because you have to think of the colour not only “as is” but also have a little sense of how it will look after it’s been blended with the others around it.

IMG_3268

We then proceeded to apply the wool onto the surface and needle felting it in place. You need to keep the reference photo at hand and look at it often, as it’s very easy to get carried away and start using artistic licence – you don’t want to do that when you’re going for a faithful reproduction!

IMG_3273
There’s more hours put into this than I want to admit

This is a slow, laborious process. Obviously you will get quicker as you become better but I sure took long to reach the above phase.

IMG_3315

This is my current progress. It’s slowly coming together. I can’t wait to see this finished.

Finally, I had to share my fangirl moment, a picture of me with Dani Ives herself!

IMG_3270

Have you ever done any 2D needle felting? Let me know how it went for you in the comments section. Thanks for reading!

Works In Progress

Works In Progress

A while ago when I was making a bookcover from felt strips, I made an extra piece for a future inside piece/sleeve. I usually save my plainer/flatter offcuts for this so they’re not too bulky:

It got me thinking about making another cover. I’ve had some longer offcut strips recently, so I got a few out to see how they looked together and see if they were long enough for the width of a cover:

Which then led to getting out some of the smaller offcuts I’ve saved from Nuno smaples recently, and playing around to see which ones work together. I thought these might be good for 1 side of a small bag or maybe case:

And for the other side:

How durable they are will probably help me decide if they’re suitable for a bag or case. One of our wet felting group members has a nice piece of silk she wants to use for nuno scarves, so a couple of weeks ago when there was only the two of us, we made a couple of samples using 18.5 micron Merino. I know it’s early to be thinking about making scarves for winter, and it was about 32C the day we made them, but we took the opportunity while we had a quiet day! This was my sample piece:

I used a bluey green blend for the white end, and an orange/pink/red blend for the patterned end:

This is the patterned end:

And the texture:

I forgot about the piece and left it in my bag, so it dried with a few creases in! I’ll re-wet it to get them out 🙂 One thing I finished recently is a little case ‘thingie’ made from some old jeans. I wanted to make use of the pocket so thought I’d make a little bag/case with a zip at the top:

I haven’t decided on a use for it yet though!

Small Felt Pouches

Small Felt Pouches

First I wanted to let people know the discount code for lables is now up, it is at the bottom of the post. sew-on-labels

I am almost finished the sewing of the small felt pouches. I still have to add the hardware. You can click on any of the pictures to get a larger view.

These are finished except for the grommet and carabiner. I may add some flowers to the 3 without but I am not sure if I will have time.

These ones are done but now I am thinking maybe the pink and blue ones should maybe have somthing on the back.

I haven’t washed the stabiliser away on these. I thought I would use 2 small black seed beads for the cats eyes. and when I was taking the picture I noticed I hadn’t put the x for the fishes eye on the green one. I am not sure if the red one need somthing at the bottom front or not. I like the motif on the red one, the weaver and spinner were on a bronze age pot someone posted in the Evangelical Church of Distaff Spinning  group on Facebook.


These last ones I like quite a bit. The bright colours on the black felt look particularly good to me. The bee and thistle pouch still needs its stabiliser washed away. The 3D flowers I think need something on the lower half but it’s tricky with the tail and I don’t know what to put.

The first few pouches I sewed on some snaps. For the others I ordered a plastic snap kit. The snaps come in lots of different colours so I should be able to match them pretty well.

I forgot to take a picture so here is the one form Amazon, where I bought it. I paid the shipping and I ordered it on Saterday and it was here on Tuesday. That is fast delivery.


Tree Fragments

Tree Fragments

I posted about felting in silk paper with real leaves here. Now the question was, what to do with it? I decided to create another fiber collage similar to this one.  I still had more of the green background material and another piece of silk paper so I decided to combine those elements.

Here’s the silk paper. It was made with natural silk color and you can see the silk still had some vegetable matter in it. No worries, I had plans to make it more spotty!

I found the green background fabric and here is the felt on top of the fabric. I like that there is some of the orange color in the green background to tie it together. I then decided to cut the grey edge away from the felt and just have the silk showing on top.

I sketched a tree on to tracing paper and made sure that it was the right size for the piece. I wanted the tree to overlap the leaf piece. Sorry about the quality of the photos but tracing paper doesn’t like to have its picture taken.

I then painted the silk paper with acrylic paint and let it dry.

Then I hand stitched the felt down to the background fabric. You can see how it looks here with the edge of the felt cut away.

Then I cut out the tree and glued the branches on that needed to be glued down. So the tree is in one piece but hasn’t been attached yet. I am trying to decide how to attach the tree. I am leaning toward gluing it on at the moment. I think stitching it will be difficult but I could hand stitch it down. What do you think? How would you attach the tree? I could fuse it down with fusible too but if I was going to do that I should have already added the fusible before cutting the tree out. Hmmmmm….


Book Review – Pastel Innovations by Dawn Emerson

Book Review – Pastel Innovations by Dawn Emerson

I confess, I am not really one for writing book reviews, it is rare that a book excites me enough to give it a star rating on Amazon but this one is in a class of its own….

Following a very enjoyable workshop with Mark Cazalet a few weeks ago I was looking to broaden my pastel drawing skills so trotted off to my local library to see what they had, the front cover of the book immediately grabbed my attention and flicking through the vibrantly colourful photos in the book had me hooked.

Return to product information

The title, Pastel Innovations, 60+ techniques and exercises for painting with pastels is a little misleading because this is really a mixed media book with pastels as a recurring theme, but in my opinion the mixed media element really enhances the book rather than detracts from it.

Dawn starts with a materials list but I like her pragmatic, “use what you already have” approach, she makes a very sensible comment that you are more likely to experiment and take risks when working on cheapo newsprint paper and the art materials you were given as a child but never found a use for. An opportunity to use some 20+ year old materials that I couldn’t bring myself to throw away? I like her already! 🙂

She then takes you on a journey through some basic art theory: line, shape colour etc but she compares each element with her own twist and provides lots of examples and drawings along the way. This section culminates in how to self-critique your work against each of these elements.

At the end of each chapter there are exercises to practice what you have learned, I thought these were the best part of the book and if you learn best by doing, I think they are what sets it apart from so many art theory books.

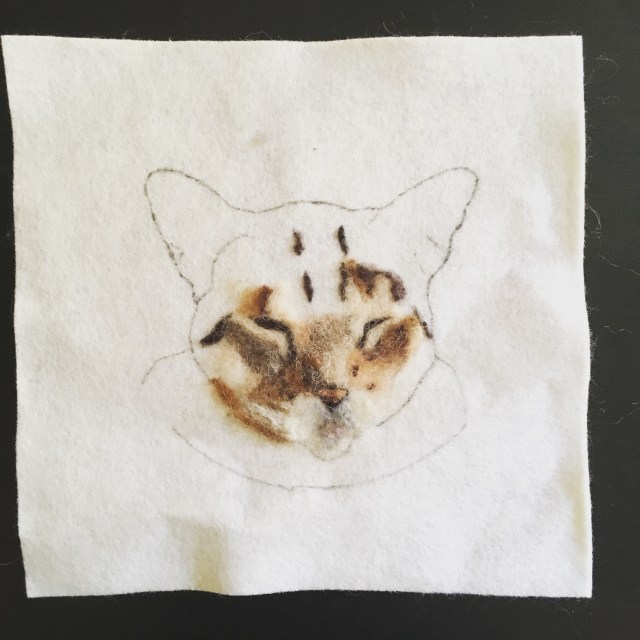
This is my interpretation of the exercises from chapter 1…. Dawn provides a detailed still life photo to work from by I preferred a black and white photo of some pears on a window sill that she provided for an exercise later in the book.

Line:

Shape:

Value:

Texture:

Colour:

Translating this into textiles…

Working with pastels and charcoal is all very lovely but I was itching to put this into practice with felt.

I “cheated” and use some commercial prefelts as a support for my painting with a few wisps of wool between 2 prefelts. Bearing in mind that these fibres will migrate as the felt is fulled I laid out an “underpainting” of tones roughly where I wanted lights and darks to come through between the two layers of prefelt. These fibres will also help the two commercial prefelts glue together
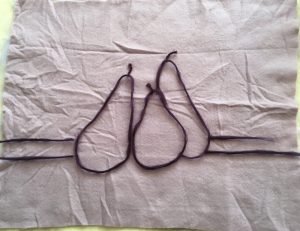
Line

I laid out some purple fibres to suggest the outlines of the pears and windowsill, I used wool tops rolled between my hands with some wool yarns for different line weights and some variety.


Adding white highlights:

Using yarn and Kap merino.

Adding shadows:

I used some low-immersion dyed Kap merino provide some extra depth but you could also blend 2 or 3 different colours / shades to get the same effect.

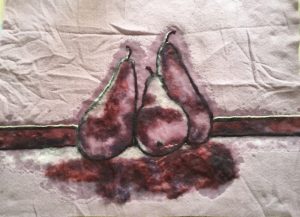
Adding a light complimentary colour

The compliment of purple / mauve is yellow… unfortunately the only yellow I have is quite a dark, orangey yellow, not ideal but blended with some white, it will have to do.

Adding some interest to the background:

Looking at the photo, there’s still something missing….

I think it is green! Green and purple, always a good combination in my mind, and the reddish pinks in the background really throw the greens (their complement) forward, although I am running the risk of ending up with khaki brown once the picture is fulled.


Then I brought touches of the bright pink from the background and used it for mid tone highlights on the pears to try to visually link it all together.

Once it reached the firm prefelt stage (fibres holding together but no shrinkage) I let it dry out so I could assess the colour and needlefelt in some details this is dried prefelt. Wetting the fibres reduces the contrast between the light and dark colours so it is best to let your painting dry out before fulling:

And after adding some more details and dark blue shadows:

To mimic the texture element from the first exercise I screen-printed some blue and purple patterns over the background and a small area of the foreground before fulling it ready to be stretched over a frame:


My tips for wool paintings:

  • Layout your wool directly onto your felting set up, trying to move it once you have starting arranging the fibres could lead to disaster. I like to work on a sheet of plastic over a bamboo mat as the mat gives to wool some extra support, especially in the early stages of felting
  • Use only enough soapy water to anchor each layer of fibres down, it it is too wet it will be difficult to place the next layer of fibres where you want them
  • Check and rearrange your fibres as necessary every time you add water
  • Kap merino is very versatile for wool painting, the short fibres make it very easy to blend and feather the edges of a colour, it is available from Woolknoll in Germany
  • Spend at least 10 minutes gently massaging the front of your painting to ensure the surface fibres are knitting together before flipping it over and checking the back is evenly wet before starting to roll.
  • Roll up your work, at least to begin with, with the painting facing down, this will minimise the folds and distortion forming in the face (the outside of the roll is slightly stretched while the inside of the roll is slightly compressed when it is rolled up).


Chapter 2 covers various monoprinting, stencilling, embossing and brayer printing techniques, most of which I haven’t tried yet.

Dawn is clearly a fan of frottage (rubbings), I am sad to say some of the exercises I did for my City and Guilds course put me off this technique but I really like Dawn’s approach. For the most part she seems to use it as an accent in her own work but she also advocated using it to build up an entire image in what she called a “drubbing”. I found this a useful for pushing me away from trying to be to representational and literal in my interpretation and was a lot of fun to boot, this was my attempt at a “drubbing” of a calf using various textured wallpaper samples and charcoal:


Chapter 3 concerns itself with backdrops and under-paintings, among the options presented are, abstracted brayer paintings, watercolour and charcoal value drawings. The exercises at the end of this chapter felt a little disengaged from the chapter content, they predominantly focussed on the effect of different colour combinations but were still very enjoyable and informative in their own right.

Mass drawing with compressed charcoal:

Monochrome:

Complementary colours:

Adding analogous colours:


Towards the back of the book there are more mono-printing techniques, how to take a print from a pastel drawing and how to paint with pastels by mixing with a painting medium and using as paint. I confess I simply haven’t had time to work through those exercises yet but am really looking forward to having a play with them.

I was particularly smitten with a photo of a fancy chicken that Dawn shared to illustrate the inspiration behind one of her paintings, he was so funny I just couldn’t resist… 🙂

I can see him as a wool painting with his feathers made from coloured yarns and perhaps the occasional wool lock but that will have to wait for a later post….