Browsed by
Category: Wet Felting

Felt Saguaro

Felt Saguaro

This is a guest post by Cindy, our first reader to submit a photo for the 2nd Quarter Challenge. If you would like to submit a photo, you can do so here.

Hi everyone, my name is Cindy and I love playing with fibers – all the wonderful colors and textures. I sat down in the evening to relax and opened up Felting and Fiber Studio to enjoy the new posts. It is always like picking up a good book to read.

I was delighted that the 2nd quarter challenge was about noticing the little things – the details in everyday life. The project I just finished surprisingly enough was exactly that – a close up piece to resemble the ribs on a saguaro cactus. I decided to post the picture on the site for the challenge. Ruth reached out to ask more about it and would I share my process with the group – I happily agreed to do so – hope you enjoy.

I had been admiring the way the light and the shadows play on the saguaro cacti in my yard and surroundings. I started examining them – really paying close attention. I decided to make a few saguaro sculptures working on form and trying to get some texture as well. I had a shibori piece that I made on my desk and my thoughts meandered (as they often do -LOL) – wondering if this method would work to make the texture and ribs for a saguaro. I did not know if I would be able to keep the lines fairly straight to get the look I wanted or if they would scrunch up and be more of a zig zag like my other piece, which I love but not for this project. I thought it was worth a try. Here are a couple of my inspiration photos of saguaros in my yard that I was watching the play of light and shadows.

The inspiration photo on the right is a close up of the ribs of a cactus that I took a few years ago when we had snow in our area – which is a rare occurrence and that I enjoy immensely.

I set out to lay out fiber to wet felt – knowing that I would be pleating the piece for the ribs – I laid out the piece approx. 22” long x 9” high. I wet felt my pieces between a lightweight tightly woven fabric – assuming a polyester or such as it does not felt. I call it “slip” material because that is what I originally bought it for. You can see it under the fibers in the photo below.

The first layer is black core fiber. I knew I was going to have a few layers of colors, so I laid out each color pretty thin as I did not want the finished piece too thick. The picture shows the initial black core layer followed by the start of the 2nd layer – copper colored fiber.

Here you can see the 2nd layer of copper finished with all the fiber going in the same direction.

Next, I added some wisps of a tan core fiber as a 3rd layer. You can see that I did not cover it entirely – just wanted some lighter color for emphasis.

It was time to add a 4th layer of green, which was maori wool fiber.

I wanted more hues of green to add light and depth – so the next step was to add fine wisps of lima bean colored Corriedale wool fiber. I also added fine wisps of other greens – lime, Christmas, evergreen and olive – again to get light and depth in the piece. I decided to cut up some wool yarns in light, medium and dark browns to make the “spots” that I noticed on the close-up photo. Note: I would say that all of these blended in and I did not get the spots as intended, but they did add to the overall look of the piece. At this time, you can add any other embellishments that you might like. I enjoy color, so I added some purple and dark blue strands.

Next, I folded over my piece of “slip” material to cover the fiber and started the wet felting process – wetting with soap and water and rubbing and rolling the piece 30-50 times each side and direction to obtain to a prefelt material. My best description of prefelt is a soft material in which all the fibers and embellishments (if any) are interlocked together and are not moving loosely – it is basically a piece of soft fabric. When it reached that stage, I rung the soap and water out of the piece and gently rolled it in a towel to get out most of the moisture. I was impatient to start the next step and did not want to wait for it to dry.

It looks bumpy, but that is because the photo was taken just after I squeezed out the soapy water. Note: the blue shelf liner material, in the next photos, was under the bamboo mat for grip. Starting on the left side, I went in approx. 3⁄4” and made an upwards fold (1/2” – 3⁄4”) in the prefelt, I hand sewed a medium long basting running stitch at the base of this fold with black heavy-duty thread to make a “rib”. Note: at the beginning of the stitch, I knotted the thread at the back of the piece. When I finished top of each row, I left the thread long (approx. 3”) and loose. My theory was if it was loose, it would not pull, since I wanted the rows fairly straight. I sewed ribs all along the piece leaving space between each rib. I added a few “Y” ribs with my stitching. If you look closely at a saguaro, you see that where it changes shape from wide to narrow, the ribs form a Y. You may be able to make this out at the top of the close-up photo. In the spaces between the ribs, I decided to sew a running stitch. I left the thread approx. 3” long and loose on both edges. This was an attempt to get more dots that I was seeing in the close-up photograph.

In the photo below all the hand sewing completed and the piece full of ribs, it was ready for the felting/fulling process. I sandwiched the piece between the white poly/slip material. Added soapy water to the piece and began the fulling process by rolling it in a bamboo mat. I was always mindful of the ribs. I would open periodically to pinch the ribs to make sure that they were not felting together, and to keep them upright.

Once the piece was firmer and holding its shape, I rolled it up on itself with the ribs inside and then with them outside, alternating between both directions, and continued to roll it. I continued until I was happy with the size, texture and firmness of the piece. I then took a small pair of sharp pointed scissors and began to snip small lines and indents on the top of each of the ribs so that the tan, copper and black colors would be exposed to mimic the spines on the ribs of the saguaro. I was mindful of how deep I cut
with the scissors to expose the color I was after.

The stitched lines between the ribs had all but disappeared in the felting process so I carefully sliced off a very thin layer of felt at these areas to expose the stitches and my fun dots appeared! I decided to expose more of the colors underneath, so I carefully snipped away little areas here and there. I am happy to say the ribs stayed straight without the zig zag look I was afraid I might get when I made the cuts to expose the colors underneath. I believe that is because the thread remained loose, not tight, as it felted. I like all the colors and how they look together and the many hues of greens help with the light and shadow on the ribs. In fact, the right side looks brighter to me as if the sun is shining on it. I am very pleased with how this piece turned out.

Below is a photo of the finished piece on a white background with the lighting from above, so that you can see the colors and the fun black threads. Notice I cut all the way through the felt to expose the background color in just a few of areas.


I may trim a few of the long black threads. I plan to keep the threads exposed as they represent a continuation of sorts of the ribs on the background.

The final photo shows how it would look framed. I placed it on a copper felt background with a rustic wood frame with the strings tucked behind. As you can see, the light is coming from the right and happily playing light and shadows across the ribs.


Hope you enjoyed and hope it inspires you to try felting if you haven’t already. Thank you, Ruth, for letting me share my fun project. 🙂 cindy


We Need a New Door Stop

We Need a New Door Stop

Recently we have acquired a new bookcase for our living room.  It was actually made to fit in the space between the front wall and the door of the room.  However it has a sort of lip around the top, the corner of which was banged by the glass of the open door if we were not careful.

2 Views of the book case against the glass (with some of my menagerie in view on the book case)

Obviously we needed something to stop the door before it fully opened. After some thought I decided that it needed to be tall (so that we didn’t have to bend down too far to move it – the floor gets further away the older you get), but it needed to be thin too otherwise the door wouldn’t open far enough to let one of us safely into the room, especially with drinks in hand.

I wanted it to go with the colour of the carpet and I knew that I had somewhere in my stash a blue wool sweater that I had felted (on purpose) by putting it through the washing machine. I finally rooted it out and decided that I would use one of the sleeves, which had a pattern knitted into it.

The Other Sleeve – what’s left of it – the pattern looks a bit hazy but hang in there, you’ll see it later.

Initially I thought that I would make a tall thin pyramid shape to fit in the gap between the side of the book case and the door. I sewed up the cuff of the sleeve and, to make sure it didn’t keep falling over, I begged a piece of flat lead sheet from my husband which I fitted into the bottom of the stuffed sleeve, and then sewed up what had been the shoulder to make the base. 

Well it was ok, but I thought it needed a bit more interest and decided to turn the door stop into a cat.

Out came the felting needles and my scoured merino, which I use as core fibres. Then for the “top coat” I sorted through the blues in my stash – normally jealously guarded because I don’t have a lot now as I use them for sky in my pictures – and found some which almost matched the main blue of the sleeve. Obviously he wasn’t going to be a realistic cat so I tried to “cartoonise” his features, and rather than give him needle felted eyes as I might normally do I fished out some bright orange glass eyes from another stash which would go well with his dark blue face. I used some of the blue to make a wet felt sheet, out of which I cut his ears.

Having made his head, I attached it to the tall thin pyramid. It’s sewn as well as needled on, but even so I was concerned that if he was picked up by his head it might come off. I made a piece of blue cord and attached that as a loop behind his head so that he might be moved safely. And here we have him.

Smiley Door Cat

Not long after this, we acquired a new pinky-grey bathroom carpet and also new pink and grey towels to replace very tired old red ones. Until then we had been using the bathroom scales as a door stop – that door will slam very hard if the wind gets up when the window is open. So now I decided that we would need another door cat.

When we got the new carpet we did not change the basic colour scheme as we didn’t want the hassle of changing the suite (vintage Pampas) or the tiles. The colour scheme is essentially derived from the tiles, which are pink and grey with some crimson detailing. Originally we had a red-ish carpet and red and dark grey towels, but when I bought those towels I could not get a bath mat to match, so I made one by stitching two red hand towels back to back.

Bathroom Tile

As the new carpet shed fibres quite a lot to begin with I thought of making the new door cat out of that fibre, but after a little more thought I realised that that would not be a good idea. We would keep falling over a camouflaged cat in the gloom of a late night visit!

So I thought I might find another felted sleeve, but couldn’t come up with something the right colour. Then, because we still had touches of red in the room, I decided that I would deconstruct the old red bath mat and use one of the pieces for the cat’s body. I had already given away the rest of the old towels to my friend for her dogs.

I felt that a “loaf cat” pose would be best, less likely to tip over if the wind caught the door, but I’d need too much lead sheet to make it a suitable weight. So I visited the garden and found a triangular(ish) shaped piece of rock, washed it and wrapped it in a couple of layers of non-woven cotton towels, secured with masking (painter’s) tape. I made myself a paper pattern of the body and cut out two body sides and a gusset for the base and chest. I cut out the pattern pieces from the towel and stitched it all up (first inserting the wrapped rock and stuffing it with polyester stuffing.

I had seen a cartoon of a smiling cat, which had enormous ears, which looked really cheeky. I thought I’d have a go at making one like that. I started with the core fibre again and got the head substantially how I’d like it and then thought about fibres for the coating.

Head ready to be covered in “Top Coat” (for some reason enlarged umpteen sizes)

I did not have exactly the right red, so had to blend a couple of pieces of pre-dyed merino tops which seemed to work ok. I did the same to make a pinky-grey blend for the chest, face and inside of the ears. I had decided that I would make the cat’s chest a similar colour to the carpet which meant that I had to make a wet felted sheet of the pinky-grey batt to cover the original red towelling. I cut the felt into the shape of the chest gusset, leaving enough for a pair of large ears.

I needled some of the red onto the back of the ears, and this resulted in a darker pink on the inside where the needles had pushed fibres right through, which was actually a benefit I think. I needled the blended red on to the back of the cat’s head and neck, and the pinky-grey onto the face, attached the ears and gave him a darker pink nose. I “shadowed” the smile and blinking eyes and I also gave him some laughter lines.

Nearly finished head, along with my felting cushion and a trapped needle holder

Then I stitched the head onto the neck, and the chest piece over his front, catching in the head at the neck.  I covered the join with more needled fibres and, using another piece of towel, attached a handle to the back of his neck so that he could be moved without his head coming off.

Loving Blinks from the new Door Ward

My husband has already named him Yoda.  We each confessed the other day that we both chat to him (in fact I pick him up and cuddle him too – he just fits into one arm)

What about the poor tatty sheep at the beginning of this post? Well, many years ago now, when I was a fairly new needle felter, I decided that I’d like to make myself a door stop for my bedroom door. I had acquired from our Guild a Jacob fleece, which, as it turned out, was ideal for needle felting. It certainly wasn’t a lot of good for wet felting – it wouldn’t, whatever I did to it. I suppose I must have had an old ram’s coarse and kempy fleece palmed off on me, when I was too naïve to know what I was getting – no wonder it was cheap!

Anyway, I got a body shaped pebble out of the garden, and washed it, wrapped it in some of the un- wetfelted fleece and started in with a No.36 felting needle (I only had 36 triangle and 38 star needles in those days- oh and a No.19 which was so thick it wouldn’t really go through anything I had with any ease). I bust quite a few needles before the pebble was covered. I added a neck to one end and then decided that my sheep would need eyes and a pair of horns. At that time I did not know that Jacob sheep often have 4 horns and wear them as if they had put them on in a hurry in the morning whilst still half asleep!

I made the horns and eyeballs using pipe cleaners and white Fimo polymer clay, baked and painted with acrylic paints. At that stage in my career I had not thought of using PVA glue on needled fleece to make horns. I needled a head shape around the horns and eyes, and then attached it to the neck. It did not occur to me to strengthen the neck with the ends of the pipe cleaners, I had cut these short and just put the horns on either end, and did the same with the eyes.

Well it all worked and for years he sat by my door, getting moved when necessary with my foot.  Now he’s a sad old thing, but being sentimental I can’t bear to get rid of him, even though he’s lost a horn and is definitely the worse for wear.  Perhaps I’ll give him a “makeover” sometime.

Poor Old Jacob, grown old and infirm in service


An interesting felt sample

An interesting felt sample

I’ve been running a felt study group and I wanted to share one of the more interesting samples I did in the group.  I had some white welsh mountain sheep wool. I have no idea where I got it it was raw and I have had it for years because I didn’t know what to do with it.

By Vertigogen – woolly sheep, CC BY-SA 2.0, https://commons.wikimedia.org/w/index.php?curid=4875408

This is the description from Wikipedia with them giving credit to Morris, Jan (2014). Wales: Epic Views of a Small Country. Penguin Books Limited. pp. 53–57. ISBN 978-0-241-97024-9.

The Welsh Mountain sheep is usually white with a white face with no wool on forehead or cheeks and white legs with no wool below the joint. Females are polled but rams usually have curved horns, although some are polled. The fleece is thick and moderately long and the tails are not normally docked.

Breeders give a high priority to hardiness, milking ability, mothering quality and lamb survival. (Lambing percentage can be 130%, which rises to 180% under favourable conditions on improved pastures.[2]) It was not always thus; the 18th-century English agriculturist Arthur Young described the Welsh Mountain sheep as “the most despicable of all types” and a judge at an agricultural show in the 1880s described it as “a diminutive ill-shapen animal with its shaggy coat more reminiscent of hair than of wool”

I had a shoebox sized amount. As you can see not the nicest looking stuff, a bit like a horse’s mane.

I washed it in a laundry bag with some dish soap.

It took 2 washes but it came out a lovely white, white horse but white.

The locks average about 10 inches long.


I weighed out 25 grams and divided it into 4 and carded it into little batts. Each batt would be one layer of the sample.

The samples were all laid out 10×10 inches for easy calculation of shrinkage. At this point, I was skeptical that it would felt at all, it is so much like stong, straight hair

The piece was rubbed and rolled to felt and then rolled on a textured mat and scrunched for the fulling. Throwing doesn’t work well with such a small piece.

Much to my surprise, this is the final result. It’s a bit wonky but that’s down to my hand carding

It’s about 40% shrinkage and it is rock solid.  The most I got of any of my samples. It is rock solid. I tried to felt it more but it wouldn’t budge.  All the samples were made with 25grams of wool. It makes me wonder about people that say they get 50% shrinkage on their felt protects. Are they measuring differently or are they using very thin layouts?  I could see this felting more if I used half the amount of wool. so if I made a sample 20inches by 20 inches with the same wool I would get a higher shrinkage rate. What do you think?

Concertina Hat and Felted Bags Classes – Registration Now Open

Concertina Hat and Felted Bags Classes – Registration Now Open

I always look forward to each new iteration of these classes, its always exciting to see how each new group of felt-makers will interpret the weekly tutorials, looking back at the photos in the class galleries it is hard to imagine they were all following the same instructions! 🙂

These are just a few of my favourite creations made by students from previous classes.

If these photos have whetted your appetite and you would like to see more the full galleries are here:

Hats

Bags

Key dates for both classes:

15th March – registration closes
17th March – first tutorial will be posted
24th March – second tutorial will be posted
31st March – third tutorial will be posted
We will have use of the forum pages until 28th April so you can carry on making and sharing your creations with everyone or catch up if you need to take a week or two off during the course.

The tutorials for both classes contain step by step instructions and lots of colour photographs illustrating each steps. They will be pdfs for you to download and keep for future reference.

For more details and the contact form to sign up for these classes please follow these links:

Concertina Hat Class

Felted Bags Class

Thinking of joining in the fun but have questions about these classes? Please post them in the comments below or use the contact forms on the class pages above.

Love to Teach Workshops

Love to Teach Workshops

Today I have posted pictures with workshops that I have taught. I love to teach and have workshops every week. I think that when I teach , I have a different connection with each participant as we speak the same “language “. Its easy to create beautiful felted products with this rapport.

  •  
First Quarter Challenge – Repurposing Sample

First Quarter Challenge – Repurposing Sample

For the First Quarter Challenge, I was intrigued by one of Lyn and Annie’s samples. It was chopped up bits of felt from an old piece added to a new one. Their piece was very colorful bits of felt on white wool but I was thinking in terms of florals in a landscape. I could try a small sample before I did a larger landscape that might not work as planned.

Here is the sample that I planned on repurposing. I made this several years ago and I can’t remember why I thought I should try this but it is wool with layers/ruffles of dyed cheesecloth. It worked but I didn’t really have any kind of plan on how I would use this method and it’s just been in a bin since then. But it had good California poppy colors so I thought I could chop it up into small bits to represent poppies in a landscape.

I only used a very small amount of the sample to chop into bits with my trusty rotary cutter. I have loads left if I decide to create a larger landscape with this technique.

Next I laid down a piece of green prefelt, covered it with a variety of small green bits of wool in a variety of locks, breeds etc. Whatever I had laying around, another way to recycle little bits of wool. Then I sprinkled the orange bits over the bottom portion for the poppies. Sorry for the poor photo quality, I took the photos in the kitchen where the light is poor. The sample size is about 6″ x 8″ or so. I was going for a small sample but one that I could perhaps use as a mini landscape if it turned out well. (You can always use these small samples for greeting cards or small framed pieces.)

Then I wet down the sample and felted as usual. I did lose quite a few of the small orange bits but I didn’t worry about that. I had lots on there and I thought it would still work with the majority of “flowers” that did adhere. This process reminded me of working with wool nepps which have given me some problems sticking to the felt in the past. I could have added a bit more fiber over the top of the orange bits but I wanted to see how they attached without it. Most of what fell off was cheesecloth.

Here is the final sample after felting and fulling. I am deciding whether I want to add any stitching or just frame this small piece as is. I like the “Van Gogh” look of the trees in the background and the orange stayed very bright and true to color without any wool on the surface. I feel confident that I could make a larger landscape with this technique and I can repurpose more samples this way. Thanks for the challenge Annie and Lyn!

Recycled Fabric Samples – Quarter 1 Challenge 2022

Recycled Fabric Samples – Quarter 1 Challenge 2022

Lyn and Annie have set us a lovely Q1 challenge of sampling ways of recycling fabric.  They showed a great variety of fabulous techniques in their blog

In this post I will show you some wet felted samples I’ve made in response to the challenge, and my thoughts so far on what I might do next.

The quarterly challenges are supposed to push our boundaries.  At first glimpse, I do this all the time. I rarely write a blog without using charity-shop bought fabric and bashing on about how much I love using recycled materials, so maybe it’s a bit of a cheat for me? Well, maybe.  But while I scour the local charity shops for silk scarves or old lace for nuno felting, I also pick up some second-hand fabrics asking myself – ‘what would happen if I tried to felt that?’ Although my intentions are good, I often don’t get round to trying out the more unusual fabrics. So, I decided I’d use the Q1 challenge to dig out a few second-hand fabrics I’ve bought in the past but not used and make some samples.

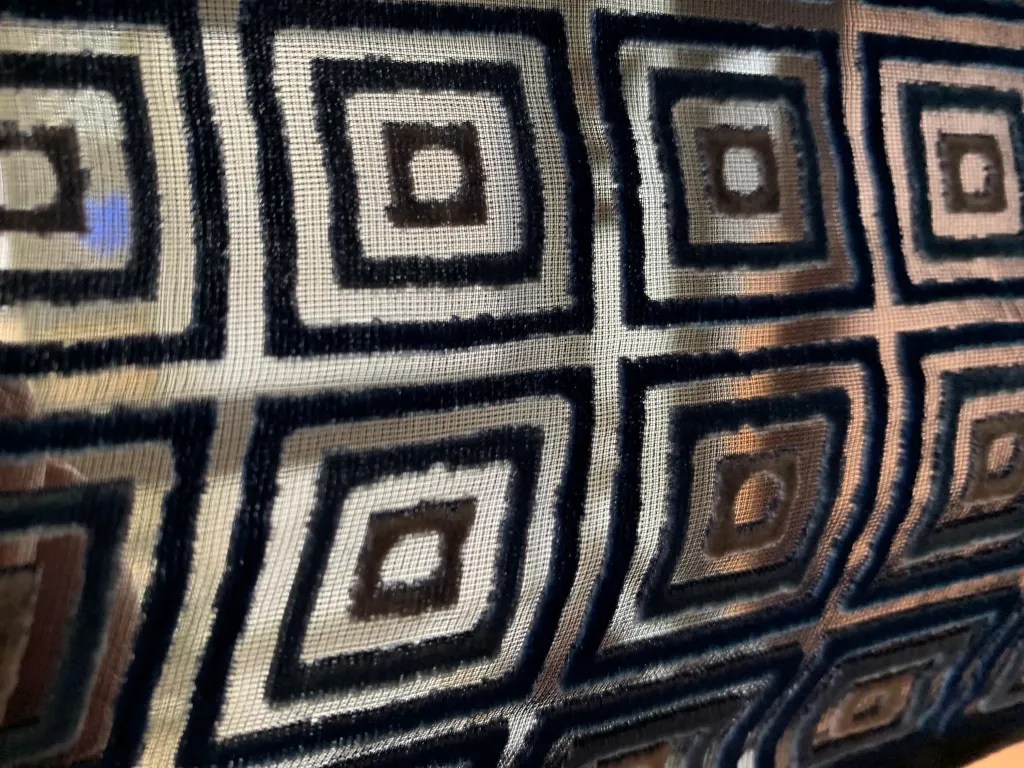
I like the colours and am interested to see what happens to the texture.  As you can see, the background is quite sheer.

First I cut a square, based on the width of the scarf. I laid out 2 fairly thick, even layers of midnight blue merino at right angles on the back.

Here’s the final sample. Shrinkage was about 50%

It’s interesting how much the velvet has been integrated into the felt.  I’d expected more texture. I like the result but immediately wonder how it would look with a lighter colour wool behind it. Maybe I would be able to see more of the original velvet’s pattern? Ideas for a future sample.

Next up is a black and silver sequin dress. I bought this because I like the way the sequins are distributed on the backing fabric: not packed very tightly and not widely spaced. Also, I like the way the black and silver sort of drip into each other.

Sequin dress bought in a charity shop

I cut a 20 x 20 cm square: I like this size as it’s big enough to see what happens and small enough to felt reasonably quickly.  It also leaves enough of the original fabric if you decide you want to make something from it. I laid 2 fairly thick but even layers of black merino on the back and wet felted.

I achieved about 45% shrinkage. I liked the result and started to think about how I could use this fabric – more of which later.

Here’s a second velvet scarf I wanted to have a go with

Unlike my first velvet sample, the background didn’t integrate so readily into the wool, so sat more on the surface. Maybe that was predictable as the background was less sheer but for me it highlights the value of making samples – you can’t really be sure what you’re going to get until you try it. Especially as my charity shop fabrics rarely have labels telling me what they’re made of. I like the texture: maybe this would work well to represent an animal. Shrinkage was about 45%

Sample 4 was a light pink fade-dyed silk scarf with lurex stripes.  I used 2 thin, even layers of natural white merino on the back.

Final sample: from square to rectangle

One of the most striking things was how much more it shrank in one direction than the other (about 45% in one direction, 30% in the other). The ripple of the lurex also gave great texture.

I could have fulled this harder but decided to stop. I wondered whether the uneven shrinkage was just because of the lurex stripes, but looking again at the original fabric I saw that the silk was much more densely woven in the direction of the stripes rather than at right angles to them. When wet felting, the more dense things are, the less they tend to shrink. I think this would make some fabulous fairy wings maybe. Alas I have no call for fairy wings at the moment. Put that on the back burner for a future venture.

Sample 5 is a section of a loosely woven silk fabric with a distinctive pattern.  I wondered what would happen to the motifs.

Shrinkage was 40%. Given it is loosely woven, I was surprised by the amount of ruching. The fibres retained a nice sheen.  I regretted my choice of natural white wool for this one.  I wished I’d used a turquoise blue or maybe tried 2 different colours to test how to show up the silk’s colours. I’ll put this in the samples box and maybe I’ll come back to this another time.

Sample 6 – I found this scarf particularly intriguing. Clearly a woven fabric but no information about the materials.  The weave made the fabric very stretchy but the threads themselves had almost no stretch in them. I thought maybe cotton or linen. Using the same method I went for 2 fairly thin layers of undyed white merino on the back. 

It was a bit tricky to decide how much to stretch out the fabric when laying it out so I ended up with a slightly larger sample than the others. Also, I don’t have an iron in the studio so I wet the particularly creased sections to help flatten them.

Blue woven scarf final sample

Shrinkage was 45%. I really like the texture here.  Maybe I will use this when creating waves / sea water in a future wet felted coastal picture. I could lay it out in wavy lines with dark blue or pewter-coloured wool.

A small aside.  Why do I keep talking about shrinkage? I’ve been felting for over 10 years now but it took me a long time to understand how to full felt properly.  It’s very tempting to stop fulling when you get to about 25% or 30% shrinkage. And for some things, like pictures behind glass, that may be OK. But in my experience, the more you full things the better the quality, strength, appearance and durability of felt.  And the best way of checking how well you’ve fulled or felted something is to aim for a high shrinkage rate. 

Sample 7 – a silk scarf with a dense feather pattern.  I was interested to see what would happen to the pattern when felted. I put silk on both sides, with wool sandwiched in between.

I wasn’t sure about the white wool but think the silk has potential to represent something like lichen in a felt picture or sculpture – maybe using sage green wool. Or maybe marble? I cut this sample into strips to make bookmarks.

OK.  These are the seven samples I made specifically for the Q1 challenge.  The next question for me is ‘so what?’

I’ve included some thoughts on what I could make next with these fabrics. I decided to investigate further the potential of the sequin fabric.  I tried some 3D drop-shaped pieces, using a resist with the sequin fabric inside.  The first has potential for earrings, though I need to think about the earring fixings.  Or maybe part of a neck piece.

The second is a prototype for 2022 Christmas decorations. I think this has potential but I would include more colour and maybe texture in the outside. Also, I must remember to mark the front as I couldn’t tell which side to cut into. It’s difficult to see the scale in the photos – the earrings are 7cm top to bottom and the decoration 11cm.

Here are a couple of fabrics I’ve sampled in the past and how I’ve learned from the samples to make things – in this case plant holders.

This was a loosely knitted shawl.  I made a sample and loved the mossy look of it. In the sample-making process I cut off the ribbed edge and included it in this plant pot holder, to give a textured band.

Here’s another charity shop scarf that I incorporate into plant holders

Final thoughts:

  • re-using, recycling or up-cycling are not just good, eco-friendly ideas but can be really fun and give unique results.
  • small samples are fairly quick to make but give you loads of information about how fabrics will felt or work with other processes
  • making samples is a great way of sparking ideas about future projects
  • make sure you full wet felting really well
  • keep your samples as you never know when the learning and ideas might come in useful

The Q1 challenge is not just about felt-making: it’s about different ways of recycling fabric.  There isn’t a right or wrong answer with samples – just lots of things to learn. Do join in by posting your recycled fabric samples on the forum.

Christmas Gifts

Christmas Gifts

I keep telling myself that I won’t “make” any Christmas gifts this year. It always takes more time than I expect but somehow, here I am again, making gifts. This post has very little fiber in it but there is some, I promise. As a maker, I know that I often venture into trying new things including new media outside of fiber art. I find that trying out a new media gives a new perspective to what I usually create.

My friend Deb is moving to Wisconsin and has been clearing out “stuff” in preparation for a spring move. She had boxes and boxes of driftwood that she had collected over the years and was going to take to the dump. Of course, I couldn’t let that happen so all the boxes of driftwood came home with me. And there I was looking at a source of free material with which to create gifts!

The first thought was to make trees out of the driftwood. All I needed to do was layout the right size pieces, drill holes in the center and thread a piece of heavy duty string through the holes. This is the layout for the first tree I created. You can see a couple of the boxes of the driftwood but that hardly gives you an idea of how much wood I had.

Here’s  how the first tree turned out. I liked the look of it and so I decided to  make more.

Here’s a few more that I got photos of. I ended up making nine trees total, five of which were mini trees. I still had tons more wood left.

My sister had requested a yard art armadillo, so that was next on my list. I looked through all the pieces and found what looked like parts of an armadillo. It’s amazing what the wood pieces start to look like in your mind’s eye once you start thinking of a variety of animals. So the photos above show the base that I glued and screwed together. I could have left him like that but I decided he needed some birch bark skin. I took a quick walk and found pieces of birch bark in the woods.

The birch bark was quite scrunched up and dirty. So I soaked it in water and then tied it around buckets to get it to be more circular. Sorry for the poor photo but hopefully, you get the idea.

I added the birch bark with a combination of glue and staples. It was pretty tricky and some cursing might have occurred.

Edgar was not sure about the new creature in my studio. Who is this? The only issue with this gift is that my sister lives thousands of miles from me and I didn’t want to try and ship this guy. I was sure that he would be “killed” by the shipping companies. Luckily, my sister is patient and we will take the armadillo to her on our next cross country trip.

And finally some fiber. I found this piece of driftwood that looked like a hat shape. I added a nose with glue and painted the wood. Then I glued down locks for the beard and pieces of felt for the brim and pompom on the hat. And there you have it, a Christmas gnome.

I made a total of three Christmas gnomes. I love how they each have their own personality. Do you make Christmas gifts? If so, we’d love to see what you have created. You can share with us over on the free forum.

I want to thank you all for being loyal readers and wish each of you a wonderful holiday season and a happy, creative new year in 2022.


Felted slippers with leather soles

Felted slippers with leather soles

Hi, I want to show you my favourite slippers made for custom orders. They where made with a lot of work, the leather sole was sewed by hand.

I made slippers for my family, we love them, they are warm and comfortable.

If you are interested, I have a tutorial with slippers, (with cost), has no text, just video, but I can tell you that everyone managed to make slippers after they watched this. This link is to a YouTube trailer with Ildi’s contact information at the end if you would like to contact her about the tutorial. 

Merry Christmas to all of you!

A Wool and Felting Study Group

A Wool and Felting Study Group

My weavers’ and spinners’ (and felters) guild has had to move online during the pandemic. One way we have been interacting is with Study Groups. For those who don’t know a study group is a bit like a workshop but not. There is a leader, and they facilitate the learning and do the organizing. It is an interactive learning experience with everyone participating and sharing information.

To that end, I will be running a Wool and Felting Study Group. It is open to anyone anywhere around the world, but be aware of the time difference.  Here’s the link. https://www.ovwsg.com/events/event/2200-wet-felted-fibre-study-group/


The group runs for 5 Zoom sessions over 10 weeks and has a dedicated space to share pictures, information and ask questions between sessions. The space will be available for 3 weeks after the last session.

Dates:

  • Wednesday, January 12, 2022, 7:30 pm – 8:30 pm(EST)
  • Wednesday, January 26, 2022, 7:30 pm – 8:30 pm(EST)
  • Wednesday, February 9, 2022, 7:30 pm – 8:30 pm(EST)
  • Wednesday, February 23, 2022, 7:30 pm – 8:30 pm(EST)
  • Wednesday, March 9, 2022, 7:30 pm – 8:30 pm(EST)

Time Zone: North American Eastern Standard Time(EST)= GMT-5

We will be sampling wool and how it felts. We will sample as many kinds of wool as possible and share results online and using a standard form and pictures, so we are all getting the information the same way. We will discuss possible uses for the different wools and outcomes.

We will share pictures (taking and sharing pictures is a requirement) and if everyone agrees to the extra work and expense(fibre and shipping), I will collect and distribute real samples to everyone in the group. If time and resources permit, we will try some non-wool fibres and possibly how adding non-felting fibre affects the felting outcome

The prerequisite for the study group is to be able to layout a simple 10×10 square and feel it and take and share pictures. We will discuss techniques and how they affect the outcome. This study group requires you to participate so everyone can learn and grow, it is all about sharing.


I hope some of you can join us for this fun way to find out about different wools and share with a group of like-minded people.

It would be a great Christmas or whatever you may or may not be celebrating (Happy Friday works for me) present for yourself or a friend. And no shipping fee.  Adding some unusual wool would make it even better.