Browsed by
Category: Wet Felting

Throw back Thursday Christmas Tree.

Throw back Thursday Christmas Tree.

There is a throwback Thursday post for you. These are the Christmas trees I made in 2014. This is my last week of crazy baking for the Christmas Farmers’ Market. I hope to have something new for my next post.

We have been trying to decide where we can put our Christmas tree this year. Even if we use only half of it and put it on a table it is still too big to put anywhere. So time to make one that will fit on the small table available.

I carded several greens together

green wool green wool blended

Then I made a template. It is 4 feet tall, the width of the table. I had a really hard time getting a picture of it. I made a smaller one too about 2 feet tall.

tree layout

This is rubbing on the plastic cover.

tree rubbing

Then it was roll and roll and roll some more. I kneaded and dropped and threw and heated it and did it some more. This is the shrinkage on the smaller one. The tip I made solid out past the tip of the template.

small tree shrinkage

While I was making the trees I was trying to figure out what I would use as a structure for the inside. For the smaller one, I was thinking a countertop paper towel holder would work. It was too short but while at the dollar store I saw a tinsel tree on a frame. I bought it and removed the tinsel garland that was wrapped around it. It was a little too tall but a son with some bolt cutters fixed that.

small tree on stand

It looks like a green witch’s hat. For the large one, I ended up using an upside-down tomato cage. The tree looks like a Whoville tree. I ran out of light to take a picture of the big one so you will have to wait for my next blog post to see it. It will be decorated by then too. What have you used for a tree?

Here is a link to the post with the finished trees, I hope you like them.  https://wp.me/p1WEqk-2GH

Happy Turkey Day to all our American readers

Don’t forget to enter to win on Tuesday’s Post.

‘Tis the season to … make a Christmas tree

‘Tis the season to … make a Christmas tree

Given that it is already nearly the end of November, I thought I would finally indulge myself with thoughts of the festive season.  As I am sitting here writing, a few thoughts came to mind including how advertising for Christmas seems to get earlier each year.  Here in Ireland I have seen ads in August which, like the vampire seeing sunrise, causes me to turn quickly away, run in the opposite direction, and bury my head.

That said, we have a local and, until recently, privately owned supermarket who sells Easter eggs on Christmas Eve.  What started as a joke one year became a tradition locally.  The supermarket owner, sadly now gone to his reward, would hold an annual Christmas dinner for his elderly customers.  Every year each customer was gifted a shopping trolley load full of groceries which they got to wheel home from the party.  This kindness was not advertised.  It was not used as a form of promotion.  This is what made it so special.  I suspect this story is not unique.  There are a lot of kind folk in our world.  If you can lighten our hearts with a story like this one please feel free to share it in the comments section.

In the spirit of sharing I thought it might be fun to make and share a felted Christmas tree with you all.  It is made around a very simple book resist (only three pages) and takes less than 50g of merino wool.  I am including full instructions for anyone new to felting or to the concept of using book resists so if you would like to give it a try, here is what you need:

  • Your usual felting equipment (bubble wrap or equivalent, soap, warm water, vinegar, your hands, towel etc)
  • 50g Merino wool
  • Enhancements (eg silk viscose etc) – optional
  • Bandage cotton (or a piece of cotton with a really loose weave)
  • Heavy plastic for resist (I use under floor insulation material) also decorator’s plastic which will act as a protector between the pages of the book resist.
  • Ruler, marker
  • Pins, needle, thread, scissors
  • Kitchen roll holder (optional but good for popping the tree on to shape and dry)

Step 1 – making the book resist:

Using the floor underlay (resist material) draw an Isosceles triangle – draw a 40cm line and mark at 20cm.  Now draw a 60cm line up from that point.  Join the top to both sides of the 40cm line as in the photo:

Now cut out two of these triangles from the resist material and join them together along the central line using a needle and thread.  Also put a little stitch through the two resists (see the arrow in the picture).  This will create a three page book resist:

Step 2 the layout:

Next, cut out three triangles, the same size as the resist, from the bandage cotton.  Place the first one on the first page of the resist.  Since it is white on white it is hard to see in the photo.   Spray it with water to keep it in place.

Weigh out 3 x 15g of the merino wool.  Using approximately 10g, lay down the first layer of the fibre in a “criss cross” manner.  Now lay out the additional 5g and then add on embellishments.


Wet down and cover with a sheet of light plastic protector.  Wet the protector and rub the fibre through the protector:

Once the fibre is wet through, lift up the bottom of the protector.  Place a thin roll of fibre along the fibre just at the base of the resist.  Now fold over the excess of the laid out fibre over this roll.  Wet down and add a little embellishment to the base.  This will tidy off the base.  Cover with the protector.

Then turn the page to page 2 of the resist:

Next lay out the second triangle of bandage cotton and spray it to keep it in place.  Then, fold over the edge of the fibre onto the second page of the resist (see arrows):

Repeat the laying out process in the same manner as before.  Once this is complete, cover with another sheet of the protector and continue on to page three of the book resist.  Tidy in all the loose fibres around the edges:

Step 3 felting and fulling the tree:

Start the felting process, gently rubbing the fibres through the protector.  Take special care of the edges of the pages.  Once the fibres are secure, it’s time to roll.  Using the bubble wrap pool noodle and towel  and leaving the protectors in place roll approximately 60 times in each direction (north, south, east and west) on each page:

Once the tree has started to shrink, set aside the pool noodle and the bubble wrap and roll using the protector (leave the resist in place) 60 times in each direction on each page:

Then remove the book resist and the protectors:

Turn the tree inside out and continue fulling with the bandage cotton on the outside.  Check every now and again to make sure the tree surface is not felting together:

Work the bottom edge by rolling the edges (see arrow in photo):

Keep shrinking the tree until there’s 40% shrinkage (the tree’s height reduces from 60cm to about 36cm.  During this process, I warmed the felt up in the microwave (40 to 50 seconds on high each time being watchful not to burn the wool):


Step 4 – Getting scissor happy and finishing off:

Measure out spaces for slits and cut into each space at an angle so that the flaps are shaped like a V.  I graded these so that the bottom layer is 3cm deep, next layer up is 2.5cm etc.  In total there are 6 columns of flaps.  (Just be aware that the first and third photos here  show just one of three sides of the tree – I still have it shaped like the book resist is inside). Tidy up the bottom of the tree and seal all the cuts.


Rinse using some vinegar in the final rinse and roll in a towel to remove excess water.  Shape the tree pulling out the flaps along the way.  Leave to dry:


Looking slightly wonky when wet!

Here’s a view from the top of the tree to show how I chose to shape mine.

Here is the finished tree.  The 40% shrinkage has helped with stability despite its height.  I popped a set of fairy lights inside it to finish it off.  With the benefit of hindsight, I should have added contrasting embellishment to the tree as I found the ‘green viscose on green merino quite flat, especially when the light is turned off.  Examining the surface closely the sheen of the viscose has been lost, especially given the amount I used.  I think white would have been a lot more impressive.  Having said that, this will give me the opportunity to take fabric paint to the piece.  Gold or silver, what do you think?

Here are alternatives I made a few years ago.  These little trees were felted on ordinary resists using small, medium and large triangles.  Sorry the photos are not better but the trees are still in storage.  I embroidered silver stars on the red tree, inserted lights in the green one and sewed little baubles onto the white one:

I love hand made Christmas decorations.  It doesn’t really matter what they are made of – it could be fabric or felt or perhaps paper. Maybe crochet or knit.  I believe that the one thing they all share is that they are made out of love.  What do you think?  Do you have some favourite pieces that you would like to share?  Or perhaps this piece has spurred you on to making something – perhaps even a Christmas tree.  I would love for you to share them here.

Wishing you joy, peace, health and happiness this Christmas!

sending a virtual hug to each and every one of you,

Helene

Recycling, upcycling…..and how one thing leads to another

Recycling, upcycling…..and how one thing leads to another

It’s that time of year when there are lots of Christmas fairs coming up & I need to make some festive items. 

Recently, I picked up some Christmas-themed small wooden blanks (for tree decorations, or maybe gift tags) very cheaply in a charity shop. I started doodling on them with acrylic pens and found I was enjoying myself – it made me think about the recent popularity of adult colouring books.  Good for mindfulness.

Some examples of the painted blanks – there was quite a variety of shapes.

I know these aren’t fibre-related but it set me off thinking about doing something similar with felt. I bought some bauble-shaped wooden blanks online and after colouring a few in (colouring in is a little addictive) …..

 Some of the painted baubles

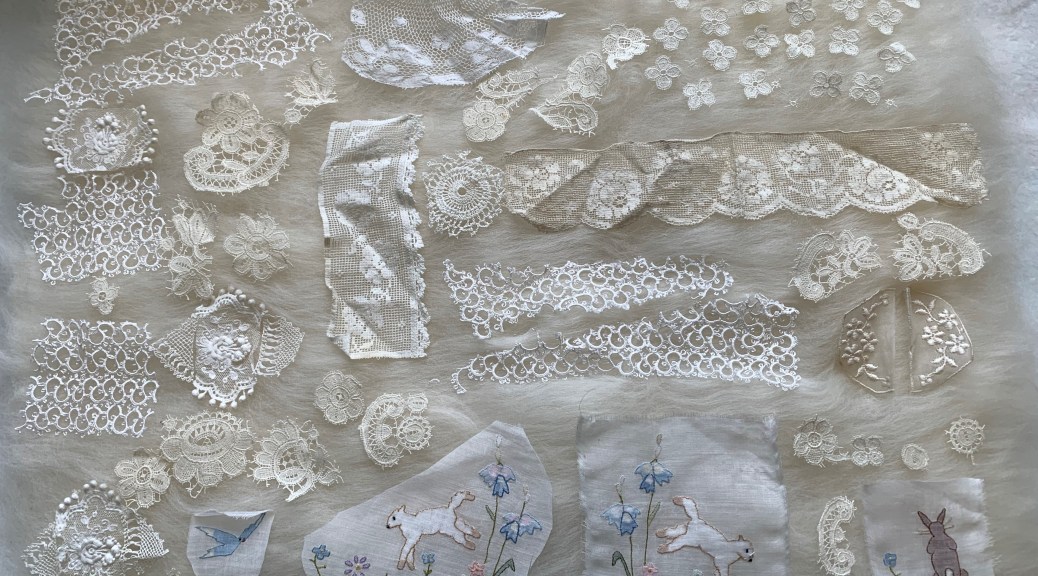
….. I decided to make a sheet of white felt, decorated with bits of vintage lace, old tatting and shadow-work embroidery, all bought in charity shops. I have a box full of old strips of hand and machine made ‘lace’, old dressing table doilies, bits of fine crochet….anything I think might felt. I thought this was an ideal opportunity to do some creative up-cycling. 


As I was making the felt it struck me that I have lots of handmade felt off-cuts, test pieces and samples that I could use in a similar way. A good opportunity to recycle work and release a little studio space. To continue my recycling theme, I even used charity-shop-bought crochet cotton for the hanging strings. 

These were cut from square samples I made during Fiona Duthie’s Ink + Felt class


Left, some more ink + cloth samples. Right, samples I made for my ‘hippie’ bag earlier this year

Left photo: Top left a nuno sample I made using recycled linen; the others were off-cuts from other projects

Right photo – the yellow was a coaster I made with coloured yarn; the green and pink are nuno samples, the blue is an example of paper felt with some acrylic pen

Finally, I painted some of the wooden bauble-shapes white, and married them with a broad strip of black vintage lace. 

So, the chance purchase of second-hand wooden blanks led me to upcycling vintage textiles and recycling some of my own felt off-cuts and samples. I love seeking out and using second-hand materials, especially small hand made things, usually made by women, that tend to be disregarded by many people. Often they are from something that has worn out, like a pillow case, or is rarely now used, like dressing table sets or antimacassars.

I have one particular piece of embroidery on fine silk that I couldn’t bring myself to use. The work is so fine I endlessly marvel at the skills of the woman who made it. It’s so intricate and beautiful with such tiny stitches it makes me feel slightly sad.  I bought it in a charity shop for £2. To me it’s a disregarded masterpiece.

Silk and embroidery (hand / finger included for scale)

The silk is starting to disintegrate and I’m really not sure what to do with it. Any suggestions? 

You can never have too much felt art

You can never have too much felt art

Since we moved to our new home in May we have been steadily adorning the walls with the pieces of art that moved with us, as we were deciding what to hang where, Mr TB pointed out that more than half of the art work on our walls is made from wool. I couldn’t disagree but still felt compelled to make a new piece to hang in the hallway, opposite the front door. Something colourful and cheery to greet any visitors. Much to my surprise, instead of complaining that we have too much wool on the walls, Mr TB helped me hang it…

I really wanted to play with a piece of silk purchased at Fibretron (a fibre festival in Hamilton, NZ), it has this wonderful wavy texture and can be peeled into fine sheets a little like silk hankies. I used some to decorate a large sheet of felt, layering and blending different colours as I went.

Once felted, I cut up the sheet into large petal shapes and continued felting them while shaping and blocking them, before laying them out to find an appealing arrangement.

At this stage I felt like the centre really needed something, a complimentary colour perhaps? So I had a play with some different colours…

But they didn’t quite feel right.

I have recently been playing with making different sculptural flower shapes and had one sitting on my bench. This looked much better, this is the piece after I had started gluing and sewing the petals together:

I tried making another central flower in the same blues as the large petals but it didn’t look half as good, it’s funny how some, unplanned, random elements just work together isn’t it? More on the blue flower at the end of this post…

Here is the final piece assembled and hanging on the wall:

It had been hanging on the wall less than a week before one the fluffy terrorists discovered that, if he jumped really high (4 feet off the ground), he could rip the petals off and add to his collection of toys. So far the hanging has lost 2 petals….

Floki with his “prizes” – if you look closely you can also see muddy paw prints on the wall

There were quite a few pieces of felt left over after making this hanging so I re-purposed them to enlarge the small blue flower I made with the intention of it becoming the centre:

Now I feel inspired to make a whole bunch of these to create an artificial flower bouquet….

Summer has finally arrived here in Auckland, I hope the weather is being kind wherever you are.

Fourth Quarter Challenge Or How Felt Doesn’t Like To Be Rushed

Fourth Quarter Challenge Or How Felt Doesn’t Like To Be Rushed

I was in a bit of a hurry to come up with something to post about today. I decided I would go ahead and try out another glass cover in the style of a 60’s artist. Last quarter, I created a similar piece based on Mark Rothko. 


Photo Courtesy of 1stDibs

I searched for artists painting in the 1960’s and found this photo of Stanley Bate’s Year of the Dragon. This looked interesting and I thought it would work in felt.

I kept the photo handy during layout and the first layer was all about values. I wanted to use the black and white prefelt to achieve the correct values once covered with a variety of colors. I laid out the prefelt on each side of a rectangular resist. And this is where the rushing felt problem really began. The two types of prefelt were different thicknesses. I should have done a light layer of fiber underneath the prefelt first but didn’t think of that until later.

I wet down the prefelt and then covered with a variety of yellow to red colors with pops of blue. I made this layer pretty thin. Also, not thinking ahead and trying to get done in a hurry.

I started felting and noticed several areas that were already developing holes. Sigh… So I did add more wool on to the thin areas and moved forward. But the hole problem continued and finally, I just ignored the holes and moved forward with fulling.

The shrinkage was totally different than the Mark Rothko inspired piece due to the use of prefelt. I had thought that perhaps the prefelt would add an interesting textural aspect but it just seemed to develop weak spots between the various pieces. More sighing…

And here’s the result. I ended up not getting enough shrinkage around to fit over the jar I used last time. Instead, I used a large tea tin. If you enlarge the photo, you might be able to see some holes.

I turned it inside out and decided I might like that side better than the original outside. It even looks more sixties to me. You can definitely see the holes here. I guess I can make the holes a design feature and turn it into a light.

How many years have I been making felt? A long time. Do I still try to rush things sometimes? Of course. Will I ever learn? Doubtful. Perhaps it’s just human nature or the world we now live in, that causes me to be hurried when I really should take my time. How about you? Do you get in a hurry sometimes when creating? I’m not sure why I do it when I am rarely satisfied with felt that has been rushed. Taking a deep breath and slowing down.


Moving along a bit.

Moving along a bit.

I did finish the felting part of the 3 pieces I started last time.

First the lantern cover. I am not entirely happy with the way it felted. I was hoping it would be more solid. However, there was so much non-wool fibre it ended up very soft and holey.

It will still work for this application but it wouldn’t stand up to being a scarf.  It looks cool just not what I planned. Sometimes that is the way it goes.

The first one is just on the vase the second is the lights turned on and the last is with the lights on in the dark.


The first picture felted up nicely. I used the thicker mostly felted prefelt I have and it is nice and firm after felting. It shrank a little but I was able to pull it back out to 5×7. I am not sure which way up it should go is it land and sea/stormy sky?


Or is it land and sunset sky? what do you think? I haven’t decided on what I will add to the picture now. Maybe some needle felting or some stitching or both.


The next one that wasn’t wet yet in the last blog also worked out very well. I felted it onto a piece from a fulled, woven wool coat. The fabric didn’t shink but the wool attached pretty well.

The embellishments are attached but look to be floating rather than part of it.   I think I may rewet it and felt it some more. The embellishment fibres are not very well attached. I like it though.


After writing this I decided the wool was well felted so I would needle felt the embellishments in rather than rewetting it. They lost some of the brightness but I still like it.


I have an experiment to show you next time and maybe if I figure it out, some idea of what I will do with these pieces.


Do you take commissions?

Do you take commissions?

This question sends a chilled shiver through my heart. 


My first felt picture commission was about 4 years ago for a friend who wanted a view of a mountain in France for her husband’s 60th birthday. They have a house there and love the views. I really didn’t know what to do. It was very different from the pictures I had made to date and not somewhere I know or have ever been. After some soul searching I agreed to do it. I think I let the flattery get the better of me. 


The request was to do something similar to this but ‘a bit snowier’.   

Things really did not go at all as I’d hoped. Firstly, the time I’d set aside to do it was taken up when my parents, who were staying with me, both became ill. Fortunately everyone recovered but I had to do lots of hospital visiting and home caring so wasn’t able to do any work on the commission. 


Then I realised as I was working on it that I really didn’t understand the mountain from the photographs I had. Which bits were shadows and which bits ravines? Normally I felt local birds and seascapes that I know and love.  I struggled. To cut a long story short I delivered the picture but so close to the deadline I don’t even have a final photo of it. This was it nearing completion ……

I really didn’t enjoy the process & I wasn’t that happy with the result. Fortunately my friend liked it & her husband loved it but I vowed never, ever again to take a commission…….I had learned my lesson…. hadn’t  I?, 


A little while later another friend who was travelling sent me a photo she’d taken of a pair of African penguins and asked if I could make a felt picture as a birthday gift for her partner. “OK”, I thought, “birds and a beach, I should be ok with this.” 


Learning from my first experience, I allowed loads of time. I made samples and did lots of planning. I looked at a lot of penguin pictures online as the penguin on the right was at an odd angle and I felt it needed a clearer head. I made lots of prefelt. It took a long time but I enjoyed it and was pleased with the result: I thought it was true to the photograph.  I was there when the gift was presented. There were happy tears; probably some of them were mine. 


Then came an email. My friend’s husband, who’d been so happy with the French mountain he’d been given: it’s now her birthday one year on and he’d like to commission a companion picture for her of the local valley view in France. “Noooo” I thought. “I vowed never, ever to do another commission after that one”.  I tried diplomatically to explain that I wasn’t sure I could do it justice but agreed to look at the photos and let him know. 


More soul searching and much wringing of hands. I really didn’t want to refuse, but I really didn’t want to go through the same thing again. On balance, I decided I probably could and should do it, so I said yes.  


I was happy with the outcome and my friend, and her husband, loved it. So, maybe commissions were ok. 


Next, someone locally saw a picture of a little egret I’d made for my mother’s 80th birthday and wanted something ‘similar’. 


My Mum’s picture was based on a bird she and I had enjoyed watching together at a Yorkshire nature reserve. I didn’t want to copy it. The commission would be based on another little egret I’d seen just up the coast from where we live. I quizzed the woman in great detail about what she liked about my Mum’s picture and what she wanted her picture to include. I described what I was going to do. But it made me realise how difficult it is to understand what someone else sees in a picture and whether I can understand it enough to translate into something I can make. Previously I at least had reference photos but there was no photo for this one. 


I decided to give this client the option of not buying the picture if she didn’t like the finished image. It was, after all, a picture I would readily have done anyway. It was the best way I could think of of getting round the struggle of making what I can and want to do and meeting someone else’s expectations. 


The client seemed very happy with it and did buy it though I’ve really no idea if it’s what she had in mind. 


Another local woman saw at an exhibition a more abstract sea picture I’d made.  She’d like something similar but smaller. Surely I could do that? 


Well, you would have thought so but I guess I took my eye off the ball. I’d been thinking a lot about how small waves break and although I used similar materials, it really didn’t come out very similar at all: the original being semi-abstract, the second being more realistic.  I’d allowed my own interests to take over and really hadn’t met the brief. I decided to show her the second picture anyway, explaining it wasn’t that similar to the first one, but I’d be happy have another go if she wanted. 


She thought the new picture was ok but preferred the original and decided just to buy that one instead. A fortunate outcome and I’ve since sold the waves one but it all felt a bit precarious. For me, commissions are tricky. I’m flattered by the request but not necessarily comfortable in the execution! 


I’ve asked three painters if they take commissions.  One absolutely does not on the grounds that she wants to pursue her own creativity and doesn’t want to be influenced by others’ ideas. She does give the potential client an early view of her new work but that’s as far as she will go.  Fair enough.


The second  said, “I do, but I don’t really like it. It’s so difficult to understand what’s in someone else’s head.”  I’m with her on that.

The third does take commissions but he charges more for the work, to reflect the fact that he’s working to their brief. He takes a deposit and, when pressed, said if someone decided they didn’t like the outcome he’d keep the deposit but not insist they buy the picture. Fortunately that has never happened. 


For me commissions raise a lot of issues. Does the client have to buy what they’ve commissioned? Would I want anyone to buy a picture they’re not happy with? How do I know what they are imagining? Do I enjoy making them? Does it matter? 


So, do I take commissions? Um, sort of. I’m still not sure. I’ve realised that when I watch my local sea birds and look at the sea, water and beaches there’s a lot going on. I look at where the birds are, how they stand and move, what they’re doing.  I try to capture the colour, light and movement of sea water and waves.  As I create the felt I have images, sounds, smells and feelings about the scene that I hope in some way influence the picture. I do work from photographs but I rarely copy them. So, if someone wants a particular view, location or bird that I know and can experience then probably, yes. Otherwise, I’d like to think I’d say no.  But then I don’t have a very good track record of saying no, do I?! 


What do you think? Would or do you take commissions? If so, how do or would you manage them?

Felted Hat Wedding Shower.

Felted Hat Wedding Shower.

Last weekend I got to teach a workshop for the first time since covid hit. I have really missed teaching. I was contacted to teach a wet felted hat class for a bride-to-be. She wanted to do something different than the traditional bridal shower.  Everyone was vaccinated and we all wore our masks. It was a lot of fun.

Everyone picked their colours from The Olive Sparrow (https://www.etsy.com/ca/market/the_olive_sparrow) and I ordered them in. I have to say the wool arrived quickly and nicely packaged with labels. I point this out because I have ordered from other places and received a mixed bag of fibres and I was left to sort out what the colours were and prep it for class.  All the embellishment fibres were from my own stash.

Everyone picked the style they wanted from the hat samples I brought. Then they grabbed their wool and we started. I like to do 3 layers for hats. With the most shrinkage being around and with the resist we used it leaves room at the top for shaping.

once the first side was laid out it was time to embellish. picking out the fibres and seeing how they look is always lots of fun.

Don’t forget to take a picture so you can embellish the other side.

Then the hard work begins rubbing and rolling.

After much rubbing and rolling, it was time to remove the resist.

and now they try them on and wonder how they are ever going to make them fit.

Much more rolling and fulling later the hats are shaped and ready to take home and dry. Sorry I got no pictures of that part.

All in all, it was good to teach again and the ladies were great to work with. I think we all had a lot of fun. I need to thank Sabrina( the gracious hostess) for her pictures of the day or they would be sparse. I think she is happy with her hat. 🙂


Theatre Textiles Part 1

Theatre Textiles Part 1

After I had retired from full time work in 2006 I was finally able to join SNADS – our local amateur dramatic society. I live in a small market town in Dorset and SNADS was the main source of entertainment for our area at that time (as it had been since 1930, although newspaper archives indicate that it was around at least as early as 1883). I had seen most of the productions which they had put on since we moved there in 1999 and longed to join in, not only on stage, but behind the scenes. During any one year there are at least 4 productions – Pantomime in February, Spring Play in May, a Variety Show/Revue in the summer and the Autumn play in early October, and as soon as that was over, the round started again with preparations for the following year’s Panto.

We had a fantastic wardrobe mistress, but she needed help with costumes, especially at Panto time as there was so much to do.

My first foray into costume was to make a full head cat mask for the summer review. Two of our members were to sing Rossini’s Cat Duet and the director decided that it would be fun to have a disreputable tom cat watching them from the side-lines. I had recently learned to wet felt 3D items using a resist, so I made the mask from wet felted pieces and needle felted details. I didn’t want the actor’s eyes to show through and anyway, I needed to give the cat it’s proper “slit” irises. So I stitched into the eye holes a piece of doubled yellow organza and just painted the vertical slit. (It is quite possible to see what’s going on through organza if it is held close to your face.) How to give him a proper nose? I needled the correct shaped nose on the mask, then I painted on some artist’s gesso, let it dry and added some more. Gesso is textured so it was necessary to file the nose to make it a bit smoother, also the gesso is white, so I painted the nose with black enamel paint which I nicked from my husband’s paint store (he’s a model maker). After a couple of coats of that, Tom had a shiny(ish) black nose. Add some “bitten” ears and “wonky” whiskers and he was nearly done. The cat’s mouth was open – it allowed the actor to breathe and gave Tom naughty grin. Finally I gave him a pink tongue and white tips to his ears.

Disreputable Tom Cat

The next production that I was involved in was the pantomime Cinderella, written and directed by one of our members. I was asked by the wardrobe mistress if I would dress both the Fairy (“Fairy Nuff”) and Buttons’ dog, Beau. The director wasn’t quite clear about what kind of dog Beau should be, except that he was to be comic. So I did a sort of 3D needle felt sketch of the dog’s head as I saw it – black and white with one ear cocked.

“Sketch” for Buttons’ Dog

However I’d got it wrong – Beau was to be a black poodle. 

After some discussion with the wardrobe mistress, we decided that the actor would wear a black polo necked top, thick black tights and black gloves. I managed to find a piece of curly black faux fur to make a short jacket, with enough left over to make pompon for the top of the head and the end of the tail, the long dangly ears and wrist and ankle rings to simulate the correct style poodle cut. I was to make a full head mask. For this I made a wet felt hood using a resist and a further piece of flat felt incorporating some of the curly faux fur trimmed from the bought fabric. A lot of that moulted out though because it was nylon or polyester and very slippery. Enough was fixed in however to give the right effect.

I made a needle felted muzzle – again with the mouth open to reveal the red tongue and white teeth, and to allow the actor to breathe.  The nose I made in the same way as for the tom cat – shaped with the felting needle, gessoed and painted.  The muzzle was attached to the hood/face with stitching and felting needles.  Some of the flat felt was cut to represent the dog’s lips and attached by stitching and needle felting to the muzzle.  The “Disney-esque” eyes were again painted organza and were stitched on the inside of the mask. 

The ears and head pompon were also stitched on.  I added a piece of brown fabric and a belt buckle around the dog’s throat to simulate a collar and allow the mask to be firmly secured over the actor’s polo necked top.  I have worn this costume myself a couple of times in subsequent Carnival processions – great fun.

Beau

Since the actress cast for the part of Fairy Nuff had a figure which could easily cope with a glamourous costume, for the base I was given a basque that fitted her. She was to appear out of a compost heap at the edge of the stage, so I set to and made lots of autumn coloured leaf shapes – mainly oak – out of different brown bronze and gold metallic organzas. I sandwiched sparkly bits between layers of organza. I machined stitched around the edges and along the veins of each leaf and then cut out the shapes with a soldering iron. This sealed the edges and prevented fraying. Then, with the basque on a dressmaker’s dummy I attached large pieces of bronze organza for the tail, and then added the strategically placed leaves.

The wings were made from two lengths of flat wire (originally from a pop-up fabric laundry container) covered with more organza, this time creamy white but with sparkles and sequins added. These were attached to the back of the costume by stitching the wire to the shoulder straps of the basque and covering the join with some dark bronze/gold chiffon.

The crown was made from bronze Christmas decorations (that year bronze was in fashion over here – UK). I used bronze plastic icicles, some foil stars and some more organza leaves attached to a head band. I can’t remember what the wand tip was made from – possibly a bunch of tinsel.

I actually got a speaking part in this Panto – only a couple of lines but a step up from what I’d had before.
I don’t have a proper photo, this was before my husband had a digital camera, however I’ve managed to extract a clip from the video we had made of the show. It’s a bit fuzzy if enlarged but I think you can get the gist. I’m in the gold dress with my exclusive “Toilet Duck” perfume, and my punchline? “It drives the men Quackers!”

Guests at the Ball with “perfume”!

After this show, we had one final “adult” Revue and then we moved to where we are now based. Try this link it should show you the hall we left, Sturminster Hall, and eventually the Community and Arts building, The Exchange, which is now our home. https://stur-exchange.co.uk/about/
Unfortunately it seems that a second link, on the above page, may not yet be working – this is a new website in the process of being fully set up so here’s the brochure which was produced the year after it opened.

The Exchange Brochure 2008

The staircase balustrade is wrought iron made by a local craftsman and represents the river Stour which runs through our town. All the Rooms in The Exchange are named after rivers and streams running close by, and it is just beginning to open again to live theatre as well as community groups.

We at SNADS started off our return with an Adult Cabaret a couple of weeks ago, for once without a male Balloon Dance or a ladies Fan Dance, but there was a Pole Dance!

More about my exploits with SNADS (including an explanation of the picture of the wicked queen) later. Watch this space.

Tree of life

Tree of life

This a wet felting work, one of my favourites, it was made for customer order. I loved to combine the natural colours. All of these colours are hand-dyed.

First I made the design with wool pencil roving and then filled it in with wet wool. After that, I covered it with 3 layers of wool and with the rolling technique finished the wallhanging.

This tree is reflecting our “road” in life, how we evolve and how we manage to handle challenges, day by day…

It was a great project, with a lot of work but it was a lot of fun, with exciting minutes during the felting progress.