Today I have posted pictures with workshops that I have taught. I love to teach and have workshops every week. I think that when I teach , I have a different connection with each participant as we speak the same “language “. Its easy to create beautiful felted products with this rapport.
For the First Quarter Challenge, I was intrigued by one of Lyn and Annie’s samples. It was chopped up bits of felt from an old piece added to a new one. Their piece was very colorful bits of felt on white wool but I was thinking in terms of florals in a landscape. I could try a small sample before I did a larger landscape that might not work as planned.
Here is the sample that I planned on repurposing. I made this several years ago and I can’t remember why I thought I should try this but it is wool with layers/ruffles of dyed cheesecloth. It worked but I didn’t really have any kind of plan on how I would use this method and it’s just been in a bin since then. But it had good California poppy colors so I thought I could chop it up into small bits to represent poppies in a landscape.
I only used a very small amount of the sample to chop into bits with my trusty rotary cutter. I have loads left if I decide to create a larger landscape with this technique.
Next I laid down a piece of green prefelt, covered it with a variety of small green bits of wool in a variety of locks, breeds etc. Whatever I had laying around, another way to recycle little bits of wool. Then I sprinkled the orange bits over the bottom portion for the poppies. Sorry for the poor photo quality, I took the photos in the kitchen where the light is poor. The sample size is about 6″ x 8″ or so. I was going for a small sample but one that I could perhaps use as a mini landscape if it turned out well. (You can always use these small samples for greeting cards or small framed pieces.)
Then I wet down the sample and felted as usual. I did lose quite a few of the small orange bits but I didn’t worry about that. I had lots on there and I thought it would still work with the majority of “flowers” that did adhere. This process reminded me of working with wool nepps which have given me some problems sticking to the felt in the past. I could have added a bit more fiber over the top of the orange bits but I wanted to see how they attached without it. Most of what fell off was cheesecloth.
Here is the final sample after felting and fulling. I am deciding whether I want to add any stitching or just frame this small piece as is. I like the “Van Gogh” look of the trees in the background and the orange stayed very bright and true to color without any wool on the surface. I feel confident that I could make a larger landscape with this technique and I can repurpose more samples this way. Thanks for the challenge Annie and Lyn!
In this post I will show you some wet felted samples I’ve made in response to the challenge, and my thoughts so far on what I might do next.
The quarterly challenges are supposed to push our boundaries. At first glimpse, I do this all the time. I rarely write a blog without using charity-shop bought fabric and bashing on about how much I love using recycled materials, so maybe it’s a bit of a cheat for me? Well, maybe. But while I scour the local charity shops for silk scarves or old lace for nuno felting, I also pick up some second-hand fabrics asking myself – ‘what would happen if I tried to felt that?’ Although my intentions are good, I often don’t get round to trying out the more unusual fabrics. So, I decided I’d use the Q1 challenge to dig out a few second-hand fabrics I’ve bought in the past but not used and make some samples.
I like the colours and am interested to see what happens to the texture. As you can see, the background is quite sheer.
First I cut a square, based on the width of the scarf. I laid out 2 fairly thick, even layers of midnight blue merino at right angles on the back.
Velvet scarf sample: cut square and back layout
Here’s the final sample. Shrinkage was about 50%
Final velvet sample
It’s interesting how much the velvet has been integrated into the felt. I’d expected more texture. I like the result but immediately wonder how it would look with a lighter colour wool behind it. Maybe I would be able to see more of the original velvet’s pattern? Ideas for a future sample.
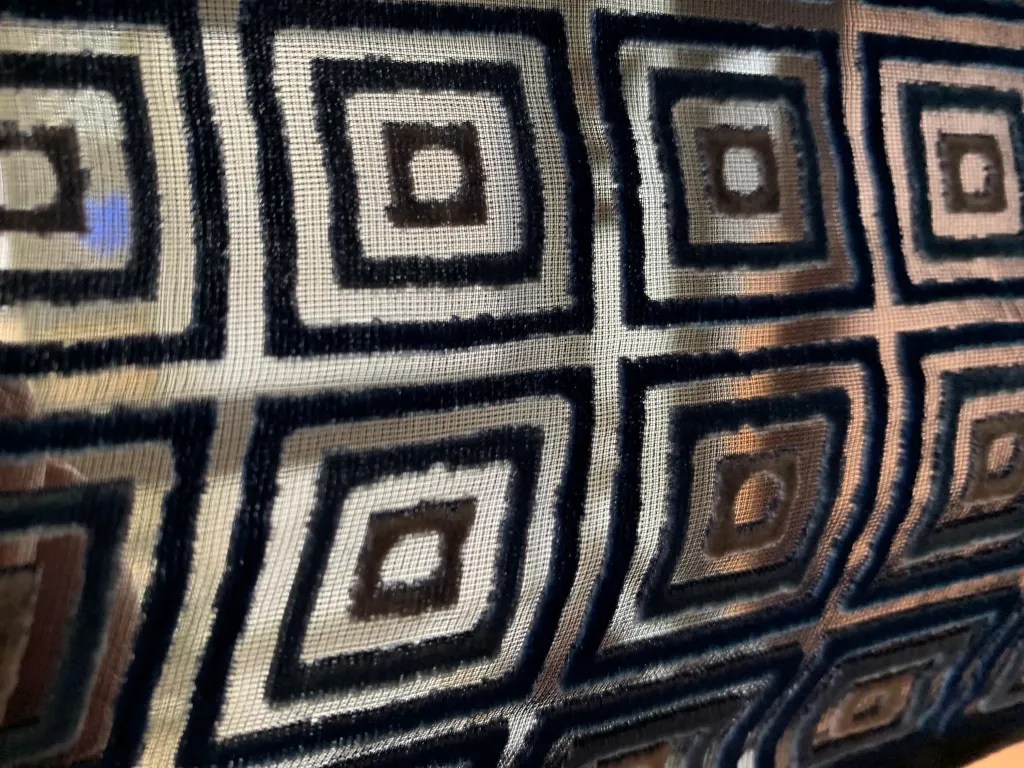
Next up is a black and silver sequin dress. I bought this because I like the way the sequins are distributed on the backing fabric: not packed very tightly and not widely spaced. Also, I like the way the black and silver sort of drip into each other.
Sequin dress bought in a charity shop
I cut a 20 x 20 cm square: I like this size as it’s big enough to see what happens and small enough to felt reasonably quickly. It also leaves enough of the original fabric if you decide you want to make something from it. I laid 2 fairly thick but even layers of black merino on the back and wet felted.
20 x 20 cm square cut out and back layout
Shrinkage and final sequin sample
I achieved about 45% shrinkage. I liked the result and started to think about how I could use this fabric – more of which later.
Here’s a second velvet scarf I wanted to have a go with
Gold and black velvet scarf sample
Unlike my first velvet sample, the background didn’t integrate so readily into the wool, so sat more on the surface. Maybe that was predictable as the background was less sheer but for me it highlights the value of making samples – you can’t really be sure what you’re going to get until you try it. Especially as my charity shop fabrics rarely have labels telling me what they’re made of. I like the texture: maybe this would work well to represent an animal. Shrinkage was about 45%
Sample 4 was a light pink fade-dyed silk scarf with lurex stripes. I used 2 thin, even layers of natural white merino on the back.
pink silk scarf with lurex stripesFinal sample: from square to rectangle
One of the most striking things was how much more it shrank in one direction than the other (about 45% in one direction, 30% in the other). The ripple of the lurex also gave great texture.
I could have fulled this harder but decided to stop. I wondered whether the uneven shrinkage was just because of the lurex stripes, but looking again at the original fabric I saw that the silk was much more densely woven in the direction of the stripes rather than at right angles to them. When wet felting, the more dense things are, the less they tend to shrink. I think this would make some fabulous fairy wings maybe. Alas I have no call for fairy wings at the moment. Put that on the back burner for a future venture.
Sample 5 is a section of a loosely woven silk fabric with a distinctive pattern. I wondered what would happen to the motifs.
Shrinkage was 40%. Given it is loosely woven, I was surprised by the amount of ruching. The fibres retained a nice sheen. I regretted my choice of natural white wool for this one. I wished I’d used a turquoise blue or maybe tried 2 different colours to test how to show up the silk’s colours. I’ll put this in the samples box and maybe I’ll come back to this another time.
Sample 6 – I found this scarf particularly intriguing. Clearly a woven fabric but no information about the materials. The weave made the fabric very stretchy but the threads themselves had almost no stretch in them. I thought maybe cotton or linen. Using the same method I went for 2 fairly thin layers of undyed white merino on the back.
Blue woven scarf of unknown fibres
It was a bit tricky to decide how much to stretch out the fabric when laying it out so I ended up with a slightly larger sample than the others. Also, I don’t have an iron in the studio so I wet the particularly creased sections to help flatten them.
Blue woven scarf final sample
Shrinkage was 45%. I really like the texture here. Maybe I will use this when creating waves / sea water in a future wet felted coastal picture. I could lay it out in wavy lines with dark blue or pewter-coloured wool.
A small aside. Why do I keep talking about shrinkage? I’ve been felting for over 10 years now but it took me a long time to understand how to full felt properly. It’s very tempting to stop fulling when you get to about 25% or 30% shrinkage. And for some things, like pictures behind glass, that may be OK. But in my experience, the more you full things the better the quality, strength, appearance and durability of felt. And the best way of checking how well you’ve fulled or felted something is to aim for a high shrinkage rate.
Sample 7 – a silk scarf with a dense feather pattern. I was interested to see what would happen to the pattern when felted. I put silk on both sides, with wool sandwiched in between.
Feather pattern silk scarf – made into double-sided book marks
I wasn’t sure about the white wool but think the silk has potential to represent something like lichen in a felt picture or sculpture – maybe using sage green wool. Or maybe marble? I cut this sample into strips to make bookmarks.
OK. These are the seven samples I made specifically for the Q1 challenge. The next question for me is ‘so what?’
I’ve included some thoughts on what I could make next with these fabrics. I decided to investigate further the potential of the sequin fabric. I tried some 3D drop-shaped pieces, using a resist with the sequin fabric inside. The first has potential for earrings, though I need to think about the earring fixings. Or maybe part of a neck piece.
The second is a prototype for 2022 Christmas decorations. I think this has potential but I would include more colour and maybe texture in the outside. Also, I must remember to mark the front as I couldn’t tell which side to cut into. It’s difficult to see the scale in the photos – the earrings are 7cm top to bottom and the decoration 11cm.
Developing sequin sample: prototype earrings and a Christmas decoration
Here are a couple of fabrics I’ve sampled in the past and how I’ve learned from the samples to make things – in this case plant holders.
This was a loosely knitted shawl. I made a sample and loved the mossy look of it. In the sample-making process I cut off the ribbed edge and included it in this plant pot holder, to give a textured band.
Felting a knitted mohair shawl
Here’s another charity shop scarf that I incorporate into plant holders
Felting an open-weave silk scarf
Final thoughts:
re-using, recycling or up-cycling are not just good, eco-friendly ideas but can be really fun and give unique results.
small samples are fairly quick to make but give you loads of information about how fabrics will felt or work with other processes
making samples is a great way of sparking ideas about future projects
make sure you full wet felting really well
keep your samples as you never know when the learning and ideas might come in useful
The Q1 challenge is not just about felt-making: it’s about different ways of recycling fabric. There isn’t a right or wrong answer with samples – just lots of things to learn. Do join in by posting your recycled fabric samples on the forum.
I keep telling myself that I won’t “make” any Christmas gifts this year. It always takes more time than I expect but somehow, here I am again, making gifts. This post has very little fiber in it but there is some, I promise. As a maker, I know that I often venture into trying new things including new media outside of fiber art. I find that trying out a new media gives a new perspective to what I usually create.
My friend Deb is moving to Wisconsin and has been clearing out “stuff” in preparation for a spring move. She had boxes and boxes of driftwood that she had collected over the years and was going to take to the dump. Of course, I couldn’t let that happen so all the boxes of driftwood came home with me. And there I was looking at a source of free material with which to create gifts!
The first thought was to make trees out of the driftwood. All I needed to do was layout the right size pieces, drill holes in the center and thread a piece of heavy duty string through the holes. This is the layout for the first tree I created. You can see a couple of the boxes of the driftwood but that hardly gives you an idea of how much wood I had.
Here’s how the first tree turned out. I liked the look of it and so I decided to make more.
Here’s a few more that I got photos of. I ended up making nine trees total, five of which were mini trees. I still had tons more wood left.
My sister had requested a yard art armadillo, so that was next on my list. I looked through all the pieces and found what looked like parts of an armadillo. It’s amazing what the wood pieces start to look like in your mind’s eye once you start thinking of a variety of animals. So the photos above show the base that I glued and screwed together. I could have left him like that but I decided he needed some birch bark skin. I took a quick walk and found pieces of birch bark in the woods.
The birch bark was quite scrunched up and dirty. So I soaked it in water and then tied it around buckets to get it to be more circular. Sorry for the poor photo but hopefully, you get the idea.
I added the birch bark with a combination of glue and staples. It was pretty tricky and some cursing might have occurred.
Edgar was not sure about the new creature in my studio. Who is this? The only issue with this gift is that my sister lives thousands of miles from me and I didn’t want to try and ship this guy. I was sure that he would be “killed” by the shipping companies. Luckily, my sister is patient and we will take the armadillo to her on our next cross country trip.
And finally some fiber. I found this piece of driftwood that looked like a hat shape. I added a nose with glue and painted the wood. Then I glued down locks for the beard and pieces of felt for the brim and pompom on the hat. And there you have it, a Christmas gnome.
I made a total of three Christmas gnomes. I love how they each have their own personality. Do you make Christmas gifts? If so, we’d love to see what you have created. You can share with us over on the free forum.
I want to thank you all for being loyal readers and wish each of you a wonderful holiday season and a happy, creative new year in 2022.
My weavers’ and spinners’ (and felters) guild has had to move online during the pandemic. One way we have been interacting is with Study Groups. For those who don’t know a study group is a bit like a workshop but not. There is a leader, and they facilitate the learning and do the organizing. It is an interactive learning experience with everyone participating and sharing information.
The group runs for 5 Zoom sessions over 10 weeks and has a dedicated space to share pictures, information and ask questions between sessions. The space will be available for 3 weeks after the last session.
Dates:
Wednesday, January 12, 2022, 7:30 pm – 8:30 pm(EST)
Wednesday, January 26, 2022, 7:30 pm – 8:30 pm(EST)
Wednesday, February 9, 2022, 7:30 pm – 8:30 pm(EST)
Wednesday, February 23, 2022, 7:30 pm – 8:30 pm(EST)
Wednesday, March 9, 2022, 7:30 pm – 8:30 pm(EST)
Time Zone: North American Eastern Standard Time(EST)= GMT-5
We will be sampling wool and how it felts. We will sample as many kinds of wool as possible and share results online and using a standard form and pictures, so we are all getting the information the same way. We will discuss possible uses for the different wools and outcomes.
We will share pictures (taking and sharing pictures is a requirement) and if everyone agrees to the extra work and expense(fibre and shipping), I will collect and distribute real samples to everyone in the group. If time and resources permit, we will try some non-wool fibres and possibly how adding non-felting fibre affects the felting outcome
The prerequisite for the study group is to be able to layout a simple 10×10 square and feel it and take and share pictures. We will discuss techniques and how they affect the outcome. This study group requires you to participate so everyone can learn and grow, it is all about sharing.
I hope some of you can join us for this fun way to find out about different wools and share with a group of like-minded people.
It would be a great Christmas or whatever you may or may not be celebrating (Happy Friday works for me) present for yourself or a friend. And no shipping fee. Adding some unusual wool would make it even better.
There is a throwback Thursday post for you. These are the Christmas trees I made in 2014. This is my last week of crazy baking for the Christmas Farmers’ Market. I hope to have something new for my next post.
We have been trying to decide where we can put our Christmas tree this year. Even if we use only half of it and put it on a table it is still too big to put anywhere. So time to make one that will fit on the small table available.
I carded several greens together
Then I made a template. It is 4 feet tall, the width of the table. I had a really hard time getting a picture of it. I made a smaller one too about 2 feet tall.
This is rubbing on the plastic cover.
Then it was roll and roll and roll some more. I kneaded and dropped and threw and heated it and did it some more. This is the shrinkage on the smaller one. The tip I made solid out past the tip of the template.
While I was making the trees I was trying to figure out what I would use as a structure for the inside. For the smaller one, I was thinking a countertop paper towel holder would work. It was too short but while at the dollar store I saw a tinsel tree on a frame. I bought it and removed the tinsel garland that was wrapped around it. It was a little too tall but a son with some bolt cutters fixed that.
It looks like a green witch’s hat. For the large one, I ended up using an upside-down tomato cage. The tree looks like a Whoville tree. I ran out of light to take a picture of the big one so you will have to wait for my next blog post to see it. It will be decorated by then too. What have you used for a tree?
Here is a link to the post with the finished trees, I hope you like them. https://wp.me/p1WEqk-2GH
Given that it is already nearly the end of November, I thought I would finally indulge myself with thoughts of the festive season. As I am sitting here writing, a few thoughts came to mind including how advertising for Christmas seems to get earlier each year. Here in Ireland I have seen ads in August which, like the vampire seeing sunrise, causes me to turn quickly away, run in the opposite direction, and bury my head.
That said, we have a local and, until recently, privately owned supermarket who sells Easter eggs on Christmas Eve. What started as a joke one year became a tradition locally. The supermarket owner, sadly now gone to his reward, would hold an annual Christmas dinner for his elderly customers. Every year each customer was gifted a shopping trolley load full of groceries which they got to wheel home from the party. This kindness was not advertised. It was not used as a form of promotion. This is what made it so special. I suspect this story is not unique. There are a lot of kind folk in our world. If you can lighten our hearts with a story like this one please feel free to share it in the comments section.
In the spirit of sharing I thought it might be fun to make and share a felted Christmas tree with you all. It is made around a very simple book resist (only three pages) and takes less than 50g of merino wool. I am including full instructions for anyone new to felting or to the concept of using book resists so if you would like to give it a try, here is what you need:
Your usual felting equipment (bubble wrap or equivalent, soap, warm water, vinegar, your hands, towel etc)
50g Merino wool
Enhancements (eg silk viscose etc) – optional
Bandage cotton (or a piece of cotton with a really loose weave)
Heavy plastic for resist (I use under floor insulation material) also decorator’s plastic which will act as a protector between the pages of the book resist.
Ruler, marker
Pins, needle, thread, scissors
Kitchen roll holder (optional but good for popping the tree on to shape and dry)
Step 1 – making the book resist:
Using the floor underlay (resist material) draw an Isosceles triangle – draw a 40cm line and mark at 20cm. Now draw a 60cm line up from that point. Join the top to both sides of the 40cm line as in the photo:
Now cut out two of these triangles from the resist material and join them together along the central line using a needle and thread. Also put a little stitch through the two resists (see the arrow in the picture). This will create a three page book resist:
Step 2 the layout:
Next, cut out three triangles, the same size as the resist, from the bandage cotton. Place the first one on the first page of the resist. Since it is white on white it is hard to see in the photo. Spray it with water to keep it in place.
Weigh out 3 x 15g of the merino wool. Using approximately 10g, lay down the first layer of the fibre in a “criss cross” manner. Now lay out the additional 5g and then add on embellishments.
Wet down and cover with a sheet of light plastic protector. Wet the protector and rub the fibre through the protector:
Once the fibre is wet through, lift up the bottom of the protector. Place a thin roll of fibre along the fibre just at the base of the resist. Now fold over the excess of the laid out fibre over this roll. Wet down and add a little embellishment to the base. This will tidy off the base. Cover with the protector.
Then turn the page to page 2 of the resist:
Next lay out the second triangle of bandage cotton and spray it to keep it in place. Then, fold over the edge of the fibre onto the second page of the resist (see arrows):
Repeat the laying out process in the same manner as before. Once this is complete, cover with another sheet of the protector and continue on to page three of the book resist. Tidy in all the loose fibres around the edges:
Step 3 felting and fulling the tree:
Start the felting process, gently rubbing the fibres through the protector. Take special care of the edges of the pages. Once the fibres are secure, it’s time to roll. Using the bubble wrap pool noodle and towel and leaving the protectors in place roll approximately 60 times in each direction (north, south, east and west) on each page:
Once the tree has started to shrink, set aside the pool noodle and the bubble wrap and roll using the protector (leave the resist in place) 60 times in each direction on each page:
Then remove the book resist and the protectors:
Turn the tree inside out and continue fulling with the bandage cotton on the outside. Check every now and again to make sure the tree surface is not felting together:
Work the bottom edge by rolling the edges (see arrow in photo):
Keep shrinking the tree until there’s 40% shrinkage (the tree’s height reduces from 60cm to about 36cm. During this process, I warmed the felt up in the microwave (40 to 50 seconds on high each time being watchful not to burn the wool):
Step 4 – Getting scissor happy and finishing off:
Measure out spaces for slits and cut into each space at an angle so that the flaps are shaped like a V. I graded these so that the bottom layer is 3cm deep, next layer up is 2.5cm etc. In total there are 6 columns of flaps. (Just be aware that the first and third photos here show just one of three sides of the tree – I still have it shaped like the book resist is inside). Tidy up the bottom of the tree and seal all the cuts.
Rinse using some vinegar in the final rinse and roll in a towel to remove excess water. Shape the tree pulling out the flaps along the way. Leave to dry:
Looking slightly wonky when wet!
Here’s a view from the top of the tree to show how I chose to shape mine.
Here is the finished tree. The 40% shrinkage has helped with stability despite its height. I popped a set of fairy lights inside it to finish it off. With the benefit of hindsight, I should have added contrasting embellishment to the tree as I found the ‘green viscose on green merino quite flat, especially when the light is turned off. Examining the surface closely the sheen of the viscose has been lost, especially given the amount I used. I think white would have been a lot more impressive. Having said that, this will give me the opportunity to take fabric paint to the piece. Gold or silver, what do you think?
Here are alternatives I made a few years ago. These little trees were felted on ordinary resists using small, medium and large triangles. Sorry the photos are not better but the trees are still in storage. I embroidered silver stars on the red tree, inserted lights in the green one and sewed little baubles onto the white one:
I love hand made Christmas decorations. It doesn’t really matter what they are made of – it could be fabric or felt or perhaps paper. Maybe crochet or knit. I believe that the one thing they all share is that they are made out of love. What do you think? Do you have some favourite pieces that you would like to share? Or perhaps this piece has spurred you on to making something – perhaps even a Christmas tree. I would love for you to share them here.
Wishing you joy, peace, health and happiness this Christmas!
sending a virtual hug to each and every one of you,
It’s that time of year when there are lots of Christmas fairs coming up & I need to make some festive items.
Recently, I picked up some Christmas-themed small wooden blanks (for tree decorations, or maybe gift tags) very cheaply in a charity shop. I started doodling on them with acrylic pens and found I was enjoying myself – it made me think about the recent popularity of adult colouring books. Good for mindfulness.
Some examples of the painted blanks – there was quite a variety of shapes.
I know these aren’t fibre-related but it set me off thinking about doing something similar with felt. I bought some bauble-shaped wooden blanks online and after colouring a few in (colouring in is a little addictive) …..
Some of the painted baubles
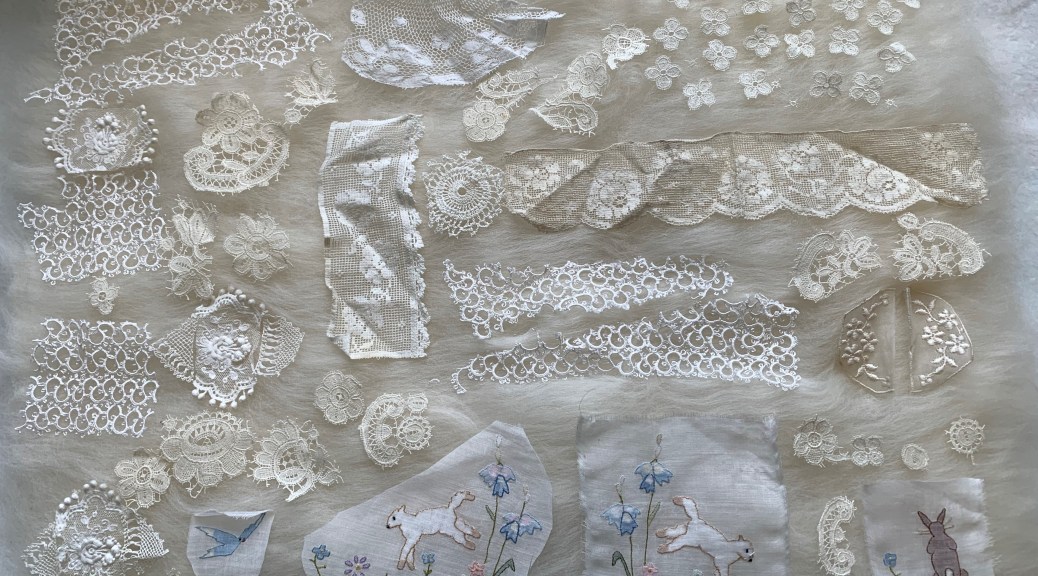
….. I decided to make a sheet of white felt, decorated with bits of vintage lace, old tatting and shadow-work embroidery, all bought in charity shops. I have a box full of old strips of hand and machine made ‘lace’, old dressing table doilies, bits of fine crochet….anything I think might felt. I thought this was an ideal opportunity to do some creative up-cycling.
As I was making the felt it struck me that I have lots of handmade felt off-cuts, test pieces and samples that I could use in a similar way. A good opportunity to recycle work and release a little studio space. To continue my recycling theme, I even used charity-shop-bought crochet cotton for the hanging strings.
These were cut from square samples I made during Fiona Duthie’s Ink + Felt class
Left, some more ink + cloth samples. Right, samples I made for my ‘hippie’ bag earlier this year
Left photo: Top left a nuno sample I made using recycled linen; the others were off-cuts from other projects
Right photo – the yellow was a coaster I made with coloured yarn; the green and pink are nuno samples, the blue is an example of paper felt with some acrylic pen
Finally, I painted some of the wooden bauble-shapes white, and married them with a broad strip of black vintage lace.
So, the chance purchase of second-hand wooden blanks led me to upcycling vintage textiles and recycling some of my own felt off-cuts and samples. I love seeking out and using second-hand materials, especially small hand made things, usually made by women, that tend to be disregarded by many people. Often they are from something that has worn out, like a pillow case, or is rarely now used, like dressing table sets or antimacassars.
I have one particular piece of embroidery on fine silk that I couldn’t bring myself to use. The work is so fine I endlessly marvel at the skills of the woman who made it. It’s so intricate and beautiful with such tiny stitches it makes me feel slightly sad. I bought it in a charity shop for £2. To me it’s a disregarded masterpiece.
Silk and embroidery (hand / finger included for scale)
The silk is starting to disintegrate and I’m really not sure what to do with it. Any suggestions?
Since we moved to our new home in May we have been steadily adorning the walls with the pieces of art that moved with us, as we were deciding what to hang where, Mr TB pointed out that more than half of the art work on our walls is made from wool. I couldn’t disagree but still felt compelled to make a new piece to hang in the hallway, opposite the front door. Something colourful and cheery to greet any visitors. Much to my surprise, instead of complaining that we have too much wool on the walls, Mr TB helped me hang it…
I really wanted to play with a piece of silk purchased at Fibretron (a fibre festival in Hamilton, NZ), it has this wonderful wavy texture and can be peeled into fine sheets a little like silk hankies. I used some to decorate a large sheet of felt, layering and blending different colours as I went.
Once felted, I cut up the sheet into large petal shapes and continued felting them while shaping and blocking them, before laying them out to find an appealing arrangement.
At this stage I felt like the centre really needed something, a complimentary colour perhaps? So I had a play with some different colours…
But they didn’t quite feel right.
I have recently been playing with making different sculptural flower shapes and had one sitting on my bench. This looked much better, this is the piece after I had started gluing and sewing the petals together:
I tried making another central flower in the same blues as the large petals but it didn’t look half as good, it’s funny how some, unplanned, random elements just work together isn’t it? More on the blue flower at the end of this post…
Here is the final piece assembled and hanging on the wall:
It had been hanging on the wall less than a week before one the fluffy terrorists discovered that, if he jumped really high (4 feet off the ground), he could rip the petals off and add to his collection of toys. So far the hanging has lost 2 petals….
Floki with his “prizes” – if you look closely you can also see muddy paw prints on the wall
There were quite a few pieces of felt left over after making this hanging so I re-purposed them to enlarge the small blue flower I made with the intention of it becoming the centre:
Now I feel inspired to make a whole bunch of these to create an artificial flower bouquet….
Summer has finally arrived here in Auckland, I hope the weather is being kind wherever you are.