Browsed by
Category: Surface Design

Update on the small picture and the studio

Update on the small picture and the studio

Where did the time go? I looked at the posting schedule and thought I have lots of time to get my post ready but here I am down to the wire,….. again.

I did manage this week to make some progress on my small picture. I started by adding some grass/stems/leaves/. Starting with a very Christmas green.

Then adding other shades

It looks ok but it’s way too short. What am I going to do with the other 2/3 of the picture? So, remembering Ruth’s advice on the last stitch project when I wasn’t very happy with it, she said  “just keep adding more”,  I decided I was not taking the stitches out. I would just keep going. The next batch of grass was longer.

At this point, I notice the bottom edge was starting to curl a little. This is because I was stitching into the bottom edge. I didn’t want the bottom of the stitches to show entry points on the top side of the bottom edge. I noticed some of the threads were a little loose too. To remedy this I ironed it with steam. I think it helped.

The next step is the flowers. I was originally thinking stitched flowers, then thought maybe seed needs would be good. I asked opinions at my guild social and everyone seemed to think I should do both. I probably will.

And now the Studio Progress.

The walls and floor have been painted. The place that hasn’t been painted is where the ductwork will go for the heating. It will then get drywall put over it and it will be painted. Notice one of my favourite things about this space. It has a center floor drain. The electrical box will get a cupboard built to hide it.


Yes, the floor is covered in blue speckles, for non-slip and to hide the floor repairs.

Next are the sinks, the ductwork, painting my selves, bookcase and small table. They will be boring white, once the books and wool are on them they will be colourful enough. The table gets the microwave so it will not be seen much either.

That’s it for now. I plan on doing the flowers for the next post but I am not sure what else. I am sure I will find something to keep me busy and out of too much trouble.


Experimenting with Paste Resists on Fabric

Experimenting with Paste Resists on Fabric

I have tried flour paste resist before and even wrote a tutorial about how to use the resist on silk scarves. My local group decided we wanted to try some experiments again with flour paste resists. If you are wondering how you could use this technique, it would work great for making patterns on silk fabric used in nuno felting. If you want to learn the full process, click on the link above.

Because we were going to try this in one afternoon, I had to do some prep work. It takes at least 24 hours x 2 for this process to dry. I started with hand dyed fabric and used a variety of colors and a variety of types of fabric. I started out trying to document the process but the documentation fell apart in the middle of the process. So, I can’t tell you exactly which pastes were used on which fabric. But I did figure out what works and what doesn’t work so well.

So I pinned the fabric down and applied different pastes. Instead of just using wheat flour (which I know works), I also tried potato starch, amaranth flour, corn meal, and coconut flour. I could tell after applying some of these, especially the potato starch, that some of the pastes were not going to work as wheat flour does. After you apply the paste, you let it dry and then crackle the surface. The corn meal pretty much fell off the fabric and didn’t stick at all. The only alternative flour that worked well was the amaranth flour.

After the surface of the paste resist is cracked, then paint or thickened dye is applied. I used black textile paint. You can see that I left some of the pieces unpainted, as these would be used by my group during our afternoon get together.

If it’s working, you can see on the back side of the fabric, the paint comes through the cracks on to the fabric. This example is wheat flour resist and overall, it definitely works the best. I think if I had mixed wheat flour with some of the other alternative flours, it might have worked better and still given different crackle results.

Here are some of the results of the pastes that didn’t work so well. The fabric is still useable as the results were still very organic but it was not the crackle look expected from this technique.

Here are the two that worked the best. The one on the right is from wheat flour paste and the one on the right is from amaranth flour paste. It is really interesting how different the crackles look between the two. I’m not sure what I will do with these samples yet but I’m sure eventually, they will get used in some project.

If you try flour paste resist, we would love to see the results. You can upload your photos here.

Small felt

Small felt

As some of you know I am moving my studio. I am not moving far, just from one end of the building to the other. I will gain some storage space, another room and a direct entrance. And importantly I will be closer to the bathroom.

I have packed 90% of my studio into boxes and they are piled up in the extra room. Consequently, I do not have a lot to work with. I did make a box with a blob of each colour of merino I have. and collected a bag of prefelts etc.

So there I was on Monday, wondering what on earth I would post about today. I was looking at my inspiration file and going through e bags of prefelt and I found this small odd-shaped one.

This is the back of it because I forgot to take a picture before adding wool to the front.


I added some sky

A blue sky is pretty much one colour. light at the bottom but not a mix of colours. The grass on the other hand is not one colour. so I mixed some up using my dog brushes.


this is the finished background. the needle is to give you an idea of the size. Jan thought it looked knife-shaped I thought it looked like a bullet train.


I want to add some flowers along the bottom. I wasn’t sure what thread to use. I hat unpicking so I grabbed a piece of fulled sweater off cut and covered it in green to try out some different threads.


the dark pink is Filtex. these are very old spools they are shiny rayon, like fake silk.  the orange is 1,2 and 3 strands of embroidery thread., the blue is an embroidery cord and the green is a different kind of silk or fake silk embroidery yarn.


Here’s a picture of the back. You can see what each thread looks like a little better.

Next is doing the stitching. I think I will use the green to add a few bigger leaf shapes. the orange and blue worked well. I will try using 2 and 3 threads of the pink to see if they show up better. stitching on felt is odd. you have to make your stitch about twice as long as you want it to get it to show up the size you want. It must be because of how soft the surface is. Does anyone else also find this to be true?


Update on Mr. Mer part 1

Update on Mr. Mer part 1

For those of you who have not met Mr. Mer, here he is last year as I was working on his anatomy.

This slideshow requires JavaScript.

1-2 Mr. Mer 2021

Mr. Mer was underwhelmed with how I had left his basic under-structure of his fishy bits.  I agreed with him that he was not quite as pike-like as I would like. The fish part of the body needed to be thicker and more muscular when compared to my photo reference. How can you fight snapping turtles with such a scrawny lower body?  I still liked the vestigial knees but felt the idea had not yet coalesced into a good integration between man and fish.  I will think more on this as I add bulk to his fishiness.

3 parts of the green fibre collection.

I dug through the greens I had been using, I was almost out of one of the colours I had blended and will have to blend more of it! I was using the large ball of “Olive” Corriedale as the base and adding other greens to mottle and create the colour for the under-structure.  The darker top that I was blending with the olive I am pretty sure some was the Superwash I had bought from the Black lamb.

This slideshow requires JavaScript.

4-5 blending wool to build up Mr. Mer’s fish body and tail.

Since I needed a reasonable amount of fibre to build up his fish end I used the hand carders to partly blend the colours. (Nature tends not to have flat colours.) Although I usually hand blend small amounts for details, using the handcards or even dog brushes is easier on the hands and wrists than working with the same amount of fibre hand blending.  When I take the fibre off the cards, it is still quite a long staple. For the under layer and blocking in the basic shape this will work. However, as I get closer to the final shape I tend to tear the fibre into pieces from half an inch to an inch long.

Although I started with the armature and adding shapes build-up of fibre as per Sara’s instructions I have deviated well away from her original Mer-Maid design. She tends to work by adding formed shapes, but for this one, she added a wet felted skin layer to put over her under-structure. I have had more fun using a more blended approach of both additive and subtractive sculpture.  (Adding pre-formed shapes and felting them into place is a lot faster than what I tend to do with using layers and small amounts of loose fibre to sculpt into the desired shape).

You can see I have moved from legs with a tail shape Mer-Man to the beginnings of a more human-fish hybrid.

This slideshow requires JavaScript.

6-8 upgrading Fishy-bits underway

I like the direction but need to increase the height and a bit more width of the fish section. I am investigating the popliteal space (the area behind the knees).  I like the angle of the intersection but want to raise the fish spine a bit higher.

This slideshow requires JavaScript.

9-10  Needs a bit more

Oh no,  he is not going to like the way that tail looks, it’s a bit bear. I over fanned the armature of the tail and then added wisps of full-length staple. I added a bit to each side using a variety of needles and finally the punch tool (fake clover tool). so when I adjust the tail to the correct position the webbing should ripple like partly closing a fan.

This slideshow requires JavaScript.

11-12 Working on the tail

That seems a bit better so I switched back to the body again.

13 elevating the top line of the fish body

I have made both the top line higher and am investigating the angle of integrating behind the knees. Tomorrow Is Library Day for the guild and I will ask Ann what she thinks. So it’s time for Mr. Mer to get into his project bag (not that I expect to have any time to work on him tomorrow) but I am sure he will enjoy getting out of the house and Ann will like seeing how he is coming along.

14  On Library Day, Ann Checked out  Mr. Mer’s Progress, she had a few suggestions.

This slideshow requires JavaScript.

15-17 Ann critiques him

As we got the library ready for book pick up, Mr. Mer took up position on top of a small 8 harness loom to watch for guild members wanting their requested books.

This slideshow requires JavaScript.

18-20  Mr. Mer is watching for Library patrons

 I noticed he was having trouble bending and has to maintain a push-up to allow him to look out the window.  I have to see what I can do to help him. I will start with an assessment of his ROM (Range of Motion) particularly at his waist but that will be in my next post.

I will hope you are not getting bored with the fishiness of my posts and promise to try to work on something different, but the next post will be part 2. There may be surgery involved!

Have fun and keep felting!!

I am running behind so…..

I am running behind so…..

I declare throwback Tuesday. I seem to have run out of time this week so I thought you might like to see this post from 2017. Jan posted some pictures in our guild group and it reminded me and I thought it was worth another look. I hope it and the links to the other 2 posts about it will give you lots of inspiration for your own work.

Ann


This is the 3rd and final set of pictures from this exhibit. http://mvtm.ca/?exhibition=colour-unboxed the first is here: https://feltingandfiberstudio.com/2017/01/18/colour-unboxed-by-out-of-the-box/ and the second here: https://feltingandfiberstudio.com/2017/01/26/out-of-the-box-part-2/ Again I apologize for some of the odd angles as it was very crowded with people enjoying the exhibit. In the last picture, you may find it hard to see but there is a very long weaving draped across the ceiling.

This slideshow requires JavaScript.


Recycling, upcycling…..and how one thing leads to another

Recycling, upcycling…..and how one thing leads to another

It’s that time of year when there are lots of Christmas fairs coming up & I need to make some festive items. 

Recently, I picked up some Christmas-themed small wooden blanks (for tree decorations, or maybe gift tags) very cheaply in a charity shop. I started doodling on them with acrylic pens and found I was enjoying myself – it made me think about the recent popularity of adult colouring books.  Good for mindfulness.

Some examples of the painted blanks – there was quite a variety of shapes.

I know these aren’t fibre-related but it set me off thinking about doing something similar with felt. I bought some bauble-shaped wooden blanks online and after colouring a few in (colouring in is a little addictive) …..

 Some of the painted baubles

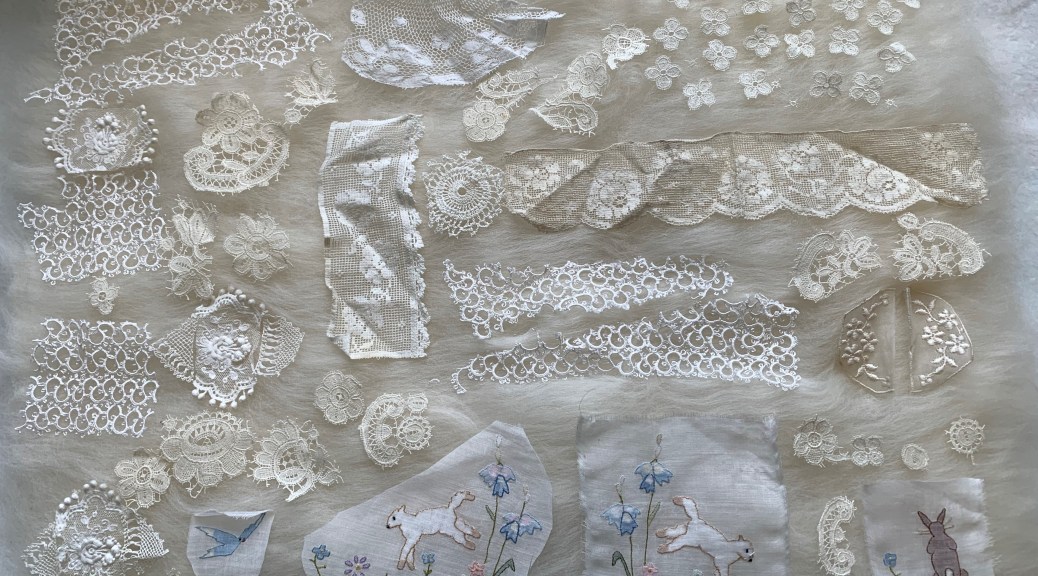
….. I decided to make a sheet of white felt, decorated with bits of vintage lace, old tatting and shadow-work embroidery, all bought in charity shops. I have a box full of old strips of hand and machine made ‘lace’, old dressing table doilies, bits of fine crochet….anything I think might felt. I thought this was an ideal opportunity to do some creative up-cycling. 


As I was making the felt it struck me that I have lots of handmade felt off-cuts, test pieces and samples that I could use in a similar way. A good opportunity to recycle work and release a little studio space. To continue my recycling theme, I even used charity-shop-bought crochet cotton for the hanging strings. 

These were cut from square samples I made during Fiona Duthie’s Ink + Felt class


Left, some more ink + cloth samples. Right, samples I made for my ‘hippie’ bag earlier this year

Left photo: Top left a nuno sample I made using recycled linen; the others were off-cuts from other projects

Right photo – the yellow was a coaster I made with coloured yarn; the green and pink are nuno samples, the blue is an example of paper felt with some acrylic pen

Finally, I painted some of the wooden bauble-shapes white, and married them with a broad strip of black vintage lace. 

So, the chance purchase of second-hand wooden blanks led me to upcycling vintage textiles and recycling some of my own felt off-cuts and samples. I love seeking out and using second-hand materials, especially small hand made things, usually made by women, that tend to be disregarded by many people. Often they are from something that has worn out, like a pillow case, or is rarely now used, like dressing table sets or antimacassars.

I have one particular piece of embroidery on fine silk that I couldn’t bring myself to use. The work is so fine I endlessly marvel at the skills of the woman who made it. It’s so intricate and beautiful with such tiny stitches it makes me feel slightly sad.  I bought it in a charity shop for £2. To me it’s a disregarded masterpiece.

Silk and embroidery (hand / finger included for scale)

The silk is starting to disintegrate and I’m really not sure what to do with it. Any suggestions? 

An International Project by Line Dufour

An International Project by Line Dufour

Line Dufour has been a practicing textile artist and tapestry weaver for the last 35 years. She is a graduate of the Ontario College of Art in Toronto Ontario and has always had her own studio. She taught weaving to adults for about twenty years, while at the same time doing art/craft shows and exhibitions. She is currently retired from teaching but continues her studio practice. At the moment, Line does not have a gallery that represents her, and if someone wants to purchase one of her pieces they contact her through her website or social media or other channels. Line’s website www.linedufour.com. You can find her cv on there as well. She is currently enrolled at the University of Gloucestershire in the UK and working on obtaining her Master’s in Creative Writing and Critical Thinking.

And now the project


Fundacion Pablo Achtugarry, Punta del Este, Uruguay 2017


Fate, Destiny and Self Determination [] Le Sort, Destin, et l’auto-determination [] Suerte, Destino y Auto-determinación [] Los, Przeznaczenie i Wola [] Das Schicksal, das Geschick und das Selbstbestimmungsrecht

[] 운명, 숙명 그리고 자기가 결정한 팔자. 팔자  []  Usud, sudbina i samoodređenje [] Sorte,Destino,Auto Determinação [] Öde, mål och självbestämmande [] Fato, Destino e Autodeterminazione


Written by Line Dufour.

Fate is defined as a force, energy, principle, element or power that prescribes to each person a set of limits, boundaries and confines. In Islam it is called Kismet. The Greeks called Fate, Moira. Greek Mythology speaks of the three Fates: Clotho, Lachesis and Atropos who supposedly controlled each person’s fate. The youngest, Clotho,  is a spinner and she determines the time of birth and spins the thread of life on her distaff. Lachesis measures the length of the thread to determine the length of one’s life; the time of death is decided by Atropos, who cuts the thread. Inherent in the idea of Fate, is that one has no influence over events and outcomes. Mythology and psychology distinguish between Fate and Destiny. Destiny is considered an expanding field of possibilities alluding to our potential to influence our Fate. This makes Destiny kinetic. “The lives we construct are an inextricably woven fabric of influences, possibilities and accumulated consequences of choices made.” (James Hollis)

The development of the COVID-19 has made all of us more aware of the impact of isolation on our well being. This sense of isolation forms the underpinnings of this installation launched in 2016.  Fate, Destiny and Self Determination was created as social media driven initiative to reduce the isolation artists experienced in their artistic process through co-creating the installation, providing planned hands-on events and gathering them together to exhibit their collective efforts. Inclusiveness is the weft that weaves the installation together.

Fate, Destiny and Self-Determination is composed of three sections. The main tapestry woven panel (on the left) was created by Line Dufour, referencing the contemporary practice of tapestry where artist and weaver are one. The second panel on the right, was woven by visiting participants ranging from the inexperienced and amateur to the professional. This referenced traditional tapestry conventions in that many weavers work(ed) on the tapestry at the same time or at various stages and did not contribute to creating the tapestry designs.

The final section is composed of irregular shapes positioned at varying heights, between the 2 main panels, floating freely in space, as though the tapestry is pulling apart or coming together.  As each shape arrives, Dufour photographs/documents it, posts it to the Facebook page for the project https://www.facebook.com/Fate-Destiny-and-Self-Determination-An-international-tapestry-project-194385150700425 as well as on Instagram@tapestryline and Twitter@tapestry_line. She also includes information about the participants such as their website if they have one, and other comments they have made about the project or about their work and/or life. Thus far, 864  shapes have been received from 43 countries, and a total of about 519 people have participated. The installation continues to expand as it accepts shapes on an ongoing basis. Part of the exhibition includes a list of all participant names. If a label cannot be displayed in the gallery, a QR code label is available so that the gallery viewer can access the web page with the names of all participants.

Each time Fate, Destiny and Self-Determination is installed the shapes are never placed in the same positions, making it interactive and spontaneous, and permits the curator(s) to be part of its creation. Conversely, the curator could also invite the gallery guest to position shapes on the wall between the two panels, having them re-create the installation.

The installation welcomes invitations to be exhibited around the world, and to that effect has been exhibited in the following venues:

  • Craft Ontario in Toronto, Canada
  • The Montreal Centre for Contemporary Textiles, Montreal, Quebec, Canada
  • The Doyle and Margaret Hartman Gallery, Regis University, Denver, Colorado USA
  • Craft Council of British Columbia, Canada
  • The San Jose Museum of Quilts and Textiles as part of the American Tapestry Alliance Biennial 11
  • Guan Shan Yue Art Museum, Shenzen, China. 9th From Lausanne To Beijing
  • The Centre D’Action Culturelle de la MLC de Papineau in Québec
  • World Textile Art Biennial at the Fundacion Pablo Achtugarry in Punta del Este Uruguay
  • World of Threads, Oakville, Ontario, Canada
  • Rosccommon County Council, Roscommon Ireland
  • Tuchmacher Museum, Bramsche, Germany
  • Tuch & Technik Textilmuseum, Neumunster, Germany


Anyone who wishes to do so, can create a shape using a textile/fibre related technique (tapestry, rug, weaving, felt, basketry, etc) or create a piece that references textiles with whatever materials they like. Any hue from the colour wheel is suggested. You can use more than one colour. There is no minimum or maximum size, but the average size is 10cm (4”) . There is no maximum on the number of pieces you can submit. A person can also weave (create) a shape of their country, state or province or any shape except not a square or rectangle.  You can look at the Instagram @tapestryline page for the project to see how other people have created their shapes.

Moving along a bit.

Moving along a bit.

I did finish the felting part of the 3 pieces I started last time.

First the lantern cover. I am not entirely happy with the way it felted. I was hoping it would be more solid. However, there was so much non-wool fibre it ended up very soft and holey.

It will still work for this application but it wouldn’t stand up to being a scarf.  It looks cool just not what I planned. Sometimes that is the way it goes.

The first one is just on the vase the second is the lights turned on and the last is with the lights on in the dark.


The first picture felted up nicely. I used the thicker mostly felted prefelt I have and it is nice and firm after felting. It shrank a little but I was able to pull it back out to 5×7. I am not sure which way up it should go is it land and sea/stormy sky?


Or is it land and sunset sky? what do you think? I haven’t decided on what I will add to the picture now. Maybe some needle felting or some stitching or both.


The next one that wasn’t wet yet in the last blog also worked out very well. I felted it onto a piece from a fulled, woven wool coat. The fabric didn’t shink but the wool attached pretty well.

The embellishments are attached but look to be floating rather than part of it.   I think I may rewet it and felt it some more. The embellishment fibres are not very well attached. I like it though.


After writing this I decided the wool was well felted so I would needle felt the embellishments in rather than rewetting it. They lost some of the brightness but I still like it.


I have an experiment to show you next time and maybe if I figure it out, some idea of what I will do with these pieces.


Mark Making and Bear

Mark Making and Bear

My local group has an art retreat every year and it’s coming up soon. (We’ve all been vaccinated.) This year we are planning on creating some abstract art and I wanted to create some of my own mark making tools. I have been collecting feathers around my house for years and since we have a lot of wild turkeys, I find a lot of larger feathers. I also, collected some goose feathers when walking by my sister’s house.

The turkey feathers are on the left and the goose feathers (right) are from Canada geese. Now all I had to do was figure out how to make a brush from a feather. So Youtube is the answer. You can learn just about anything on Youtube. I found two videos and decided I would try both methods.

First method found on Youtube

The first method involved cutting the turkey feather in a specific way to get a “sharp” point. I had a bit of trouble with the hollow shaft cracking on this one. I’m not sure if that was because it was old and had dried out more or not. But I used some tape and attached it to a chopstick that had already been used for mark making in my studio.

Second method found on Youtube

The second method uses almost all of the shaft of the goose feather and you pulled the vanes of the feather off to just leave the top portion for the brush. This seemed to work a little bit better for me and this shaft didn’t crack. It was definitely a newer feather and wasn’t as dried out.

Then because I had a large piece of goose feather left over from the second method, I decided to use that to create a brush by using double stick tape, masking tape and a skewer. It actually gave me the “sharpest” point on all three of the brushes.

The last brush I created by making a tassel from black #5 Perle Cotton on a chopstick. You can use any kind of stick for the handle and next time I plan on using some natural found sticks which will be more interesting. With this method, I created the tassel and then wrapped it tightly around the end of the chopstick. It seems to be very sturdy and won’t pull off too easily. I left the tassel ends long but you could cut them to any length that you prefer. Or you could cut them very raggedly so that would produce a different type of mark.

Then I tried the brushes with a bit of black paint to make some marks. I need to play a bit more and try some different types of movements with the brushes but I was happy with the start of making my own brushes. More to come!

This is Bear, my friend Nanci’s dog who has since passed away. Nanci has been so kind to collect our mail and papers while we travel. So I wanted to create a gift for her that was meaningful. I have been doing paint and stitch portraits of my dog Edgar for my class homework so I thought I would try one of Nanci’s dog Bear. Luckily, I had a photo of Bear on the computer because Nanci used to work for me and we used various pet photos in our social media campaigns. The photo was really dark but I was able to put it into Photoshop Elements and add in more light so that I could see the outline of the dog. I then traced the outline on to lightweight cotton muslin with a pencil. Now on to painting.

Here is Bear after painting. I used guar gum and watercolor pencils/crayons to paint. The guar gum is a thickener that keeps the paint from spreading too much on the fabric. I was happy with the result and almost left it like that. But I decided a bit of free motion machine stitching would highlight the furriness of the dog more.

I added a tear away stabilizer and did some stitching in black and darker red brown threads. Bear is complete. I gave the portrait to Nanci recently and she loved it. Come to find out, she loves this photo of Bear as it is the last photo ever taken of her. I had no idea that this particular photo meant so much to Nanci but it was what I had on my computer. Serendipity, I guess.

My Second Poker Challenge: Felting.

My Second Poker Challenge: Felting.

Last time I showed you my spinning poker challenge. https://feltingandfiberstudio.com/2021/07/26/spinning-poker-challenge/ This time it’s the felting poker challenge

In case you didn’t see it the idea is you pick a card from felting four different category card decks. With felting wool is a given.

My picks are:

Fibre: use thread or fine yarn

Colour: use cool colours

Structure/Technique: needle felting

Other: No Larger Than An Index Card ( 3inches by 5inches, 7.5cm by 12.5 cm)

This one took me a while to figure out. I kept thinking of a cold picture even though I do know cool colours doesn’t mean a cold picture. I don’t usually do needle-felt pictures I usually wet felt and then do a little needling and stitching. I am glad it’s only a small piece.

To start I cut the right size piece of prefelt for the base. I got this to try out From Monica of The Olive Sparrow. I have to say so far it is very nice to use. It’s quite thick and nice to needle into, not too hard and not too soft. Just like baby bears bed.


Next, I picked my colours for a nice scene. Most of it is merino except the two-tone green. It is corriedale.


Laying it out. and tacking it all down. I wanted sky and water and a clifftop.


The sky and sea are blending together. I went online and had a look at some sea and sky pictures. There seems to be a definite dark line where they meet but when I added it to the picture, it looked odd. I decided to pop an island in.

That looks better but it looks lonely so I added another one and greyed them out a bit to make them look a little farther away.

That is where it stands now. You will notice there are no threads or fine yarns. That will be next. I will probably add some grasses and flowers to the foreground with stitching and maybe a tiny lighthouse on the rock. I am not sure yet what I want to do.