Browsed by
Category: Prefelt

Felt Pictures Ready

Felt Pictures Ready

My felt pictures that will go on display next week are framed and mounted now. They look so much better Framed.  I had them proficiently done.  he covered the back in paper, put the hangers on and even little clear feet on the bottom corners so they will hang strait.  You will have to excuse the quality of the pictures. My husband had to hold them up for me to take the pictures.

This is the biggest one. I used wide extra strong Velcro along the top and small Velcro squares on the bottom corners and half way along the sides and bottom.

cityscape


The two smaller ones that are much lighter and brighter I gave the mottles silver and gold frames that look much nicer in person. They match the summery feel of the 2 pictures. I used Velcro the same way for these pictures as well. They end up looking like they are hovering just in front of the canvas.

summer fun beach hotel

I will get better pictures when they are hung at the gallery.


Some Felt Pictures for Summer

Some Felt Pictures for Summer

A while ago I saw some fused glass pictures and was inspired to make some summer beach pictures. I like the simple style of this type if picture. I spent a few evenings drawing and colouring pictures. I always forget how relaxing and fun colouring is.

coloured picture 1 coloured picture 2 coloured picture 3 coloured picture 4 coloured picture 5

I decided to do a seaside picture first as summer has just started. I used

seaside 1 before

I used all prefelt except for a little silk for the waves. I split the prefelt and cut it so it wouldn’t be too thick where they overlap. I tacked everything down lightly with a felting needle.

spliting prefelt

This is how it looked after felting once.

seaside 1 after firs felting

I forgot to take one after it was finished but I all became flat and slightly blurred. I decided to add some stitching

seaside 1 after sewing

It gives it much more definition. you can see how flat and blurred the house and boat edges are. I was thinking of going around the house pieces and the boats. Maybe add some little grass tuffs. and underline the waves in white. What do you think, should I add more stitching?


Second Quarter Challenge Finally Done.

Second Quarter Challenge Finally Done.

That’s right I have it done and with days to spare. 12 whole days at that! Here are the details of the challenge if you missed them.  Challenge

I have know what I was going to do for ages I just hadn’t done it. I like Stephenson’s mirror pieces but I also liked the flower pieces so I decided to combine them.

stevenson 1  stevenson 2

I used a thin piece of black prefelt I had and doubled it up for the back ground. I then used my own handspun for the stems. I added silk throwers waste for the flowers and then more hand spun for the spirals. I wasn’t sure how everything would stick. There was not a lot of fuzzy about any of it. It worked out fine though.

I forgot to take a picture of it before felting but here it is finished. I like it a lot more than I thought I was going to.

stepnenson picture

I found this frame on my front porch ( have no idea why it was there) and laid it over the picture and I like it even more.

stepnenson picture frame

If you haven’t done a piece, go ahead and give it a try, you still have time.

Don’t for get to visit the Forum to see how others have interpreted the theme.  Challenge

Trying Commercial Prefelt

Trying Commercial Prefelt

A couple of weeks ago, Zoe from Heidi Feathers kindly sent me some prefelt samples to try out. I don’t have a massive amount of experience with prefelt, I’ve made my own a few times for specific projects, and have tried a couple of thicknesses of plain white Merino prefelt as a base for a few things. We’ve talked about commercial prefelt on the forum a few times, wondering things like whether it keeps its shape well, is it thick enough to use for surface design, etc. I had no idea so I was looking forward to trying it out.
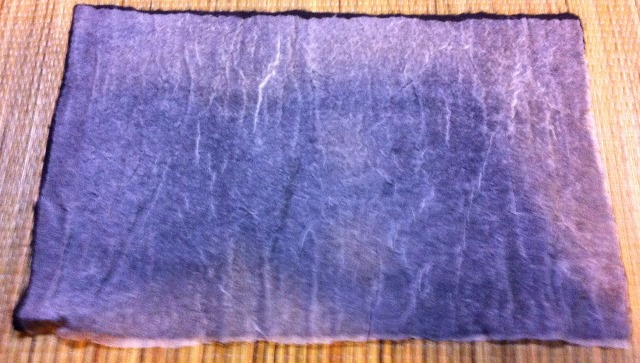
For the first piece I made, I used a couple of layers of Merino tops, then did a very basic ‘weave’ using strips of prefelt, silk  and cotton gauze:

OLYMPUS DIGITAL CAMERAI didn’t do anything to the prefelt pieces, just laid them out. As you can see, the silk didn’t attach to the prefelt in a couple of places because it is quite firm and there aren’t any visible loose fibres.

OLYMPUS DIGITAL CAMERAIn my opinion this is definitely a good thing, I’d much prefer a prefelt to be firm with definition, and when using with fabrics which might not attach easily, you can rough up the prefelt where you need it, using an old toothbrush or wire dog brush. For the next piece I tried out, I used the same ‘mirror’ idea from the Studio Challenge and repeated patterns either side of an imaginary line across the centre of the piece. I started with two layers of Merino for this too, then just cut a variety of oblongs, triangles and squares in matching pairs and added them to the top in a random reflective design.

OLYMPUS DIGITAL CAMERAI really liked the way this turned out. It gave me confidence that a more complicated pattern would work well, keep the defined edges and shapes without distorting.

OLYMPUS DIGITAL CAMERAThe last piece I tried was just a little test using some scrap pieces. Left to right: Some geometric shapes; a piece that I rolled between wet hands; a piece I dampened slightly and coiled; a piece I twisted with some Merino top; a piece I twisted on its own; some very thin off cuts I laid out or twisted and another prefelt/Merino top twist.

OLYMPUS DIGITAL CAMERAI took this on an angle so you can see  there is some thickness to the shapes while still firmly attached.

OLYMPUS DIGITAL CAMERAThanks a lot to Heidi Feathers for the prefelt, who are also doing a generous giveaway and a Meet The Supplier in a couple of days, so please check back on the 28th for that 🙂

Felting with friends: scarves, dying and more bags.

Felting with friends: scarves, dying and more bags.

On our felting week end Maureen decided to do scarves. She wanted to try out some 50/50 merino silk that she had.  She laid out the wool quite thin and rubbed it into prefelt.

maureen felting thin scarf

Once it was prefelt  she spun the water out of it and started cutting it. She made slits that she then stretched out and started fulling.  You stretch and full, stretch and full and end up with great holes.

maureens cut scarf 2

Next was into the dye pot. Although the scarf turned out great, it did not show off the silk. Usually the silk and wool take the dye a little differently, with this blend I was all one. We decided that it was because the it was to well blended.

maureens cut scarf

Maureen did 2 more scarves one in the same style and one solid. Sorry the pictures of them did not turn out.

Diane hasn’t done a lot of dying so Diane and Maureen dyed some silk chiffon.  The silk was twisted and dyed with several colors.

dyed fiber dyed fiber.

On the last afternoon I decided to make a bag for my mothers birthday.

moms bag startThe inside of the bag will have a red stripe. I used a combination of commercial prefelt and top. I also added some Blue Faced Lester wool to add some strength and stiffen it.

moms bag ready to felt  This is the outside. There is black next to the resist and the white on top. I wanted the black to migrate through the white and make a light gray. This is the finished bag. its reversible.

gray felt bag gray felt bag reversed

Diane decided she wanted a new shopping bag. She started out huge and did many layers of prefelt and wool.

dianes giant bag

Here she is fulling it

dianes giant bag fulling dianes giant bag fulling more

You can see it did shrink but just after this she gave up and said she will put it in the washer at home to see if she can shrink it more. At this point it is a large sturdy basket.

This is our group shot. We were very busy. You can see Maureen’s two scarves on the left.

fruits of our labour

The one on the right was one Maureen had made recently, added just the balance the picture. And finally that was the end of the weekend. We needed to go home and rest.


A felting Weekend

A felting Weekend

Last week end a friend Dianne Lemire and I went down to our friends Maureen Harding’s place for a felters weekend. Another friend Susan came on Friday to felt with us. It is so much fun to spend a week end with other people that love to felt.

I wanted to make a new little purse to use at shows. First I did a black one with a nice blue silk inside and a pocket. For the design on the flap I balled up some peices of orange silk and wound them up with thread to keep them in a ball.

silk balls on bag

I used a piece of black prefelt to cover them.  Then some silk roving to make them look more like a swirl. I used a scrap of commercial prefelt but you could make a piece of your own. Once it was dry I cut the tops off the raised  peices to reveal the bright colour underneath.

black bag finnished

This is the inside with the pocket and you can see I added an orange nuno swirl that is hidden by the front flap.

black bag finnished inside

Black is great but I decided I needed something brighter as well so I went with a multi coloured roving in orange.

orange bag layout

I added a pocket to this one too. Here you can see I forgot to add soap to the water and  it sits on the wool in beads. I think its a cool picture.

water on bag pocket

I used the flat glass “marbles” that they sell for decorating instead of silk balls this time. You can really see the out line of the marbles on the inside of the flap

orange bag inside orange bag finished uncut

I made a long snake to use as a strap. It is long enough to wrap around my waist or use as a shoulder bad depending on what I am wearing. I will put some grommets in the ends and 2 on the back to thread the rope through.

orange bag with snake  The holes I cut to reveal the marbles are not very big. I think I will probably enlarge them.  I will post a picture when the grommets are in and the holes are bigger.

I will show you more form our felting weekend in my next post.

Jackson Pollock Piece Finally Finished.

Jackson Pollock Piece Finally Finished.

I started my first quarter challenge back at the beginning of February. I made a piece of nuno felt using black wool prefelt and white silk to make a canvas.

beginning beginning felted

Finally the other day I decided to try out my idea on how to paint the canvas. I thickened some die with arrowroot powder. I was aiming for a paint like texture. I had never thickened dye before and I didn’t want to spend any money ordering something special. I looked up thickeners and arrowroot was the one recommended for acidic things.  It is a very fine powder.

thickened dye

I added a little to each small batch of acid dye and heated it a little. The first one I heated too much and it was like vulcanised rubber in the bottom of the cup. lesson learned less powder and less heat.

I started with yellow.It wasn’t dribbling how I wanted so I thinned it down. I didn’t like that either it  spread out too much. For the next 3 colours I poured it from the cups and moved them across the canvas quickly. That worked really well. Then I heated it in the microwave.

dye applied 1 into the microwave 1

While I was doing this I realised I had not put any vinegar in the dye. I heated up some water and put it in a basin and when the canvas come out of the microwave I put it into the acidified water and heated it in the microwave a bit and let it cool. having to put it in the water bath blurred the lines a bit but the arrowroot made it stay put for the most part. as you can see the thickened yellow is what moved in to the water the most.

after microwave vinigar bath 1

When I rinsed it and it felt really slimy. I thought I rinsed it well but it was harsh and stiff feeling when dry so I gave it a good wash with some shampoo. This is the finished piece. I think its very Pollock like.

finished pollock

I haven’t ironed it yet but I think I will and use the heat and steam to square it up.

Finished Necklace, now Bracelet

Finished Necklace, now Bracelet

Last time I showed you my necklace with the balls inside. http://wp.me/p1WEqk-1WL Next was cutting some of the ball out.

bubble bracelet 1

At this point I still like the idea of a necklace but have no idea how to sting it. To me it needs a chunky chain or something to go with it. I suppose I could make some felt snakes for it but I like necklaces to sit fairly high so It would need a clasp and I don’t know how to do that. I decided to make it into a bracelet. I added a nice button that matches the inside of the bubbles. I did a blanket stitch around the buttonhole to stabilise it.

bubble bracelet closebubble bracelet button hole

While I was in the mood I finished up 2 samples for a class I am teaching in May. This is a 2 hour class so it had to be small and fast. This is  a class I don’t get paid to do so I am sort of testing out an idea too. I am thinking of proposing it as a class at an upcoming fiber event. I am writing instructions for it and thinking maybe I would make up some kits to sell.

nuno braclets 2

The one a the top is an older one and the other 2 are the new ones. I don’t much like the pink and blue flower on but everyone I show it to likes it so I guess it’s just me. I think  it’s because I don’t much like the fabric and it doesn’t have much texture and that’s what I like about nuno felt.

A Busy Week and an Half

A Busy Week and an Half

I went to a small sale the other weekend. It was at a small pioneer village. http://www.langpioneervillage.ca/

I demonstrated spinning with a drop spindle and sold 10 drop spindle kits. I think I could have sold 10 more if I had had them.

lang museum

The museum is also working on getting an old Jacquard loom working. This is the one that will stay as just a static display.

lang jaquard loom

If you are old enough you will probably think the cards look like computer punch cards but these pre date computers by quite a bit. The cards are the pattern, they are sewn together. I will post more pictures of the loom over on the forum. http://feltandfiberstudio.proboards.com/thread/1059/jacquard-loom

After the show I stayed wit my friend Maureen who owns Dreamspin Fibres,  http://www.dreamspinfibres.ca/ (shameless plug for a friend) I made a hat using prefelt. I hadn’t done that before.

pink and green hat

The green stuff is some of that strange yarn everyone is knitting and crocheting the spiral scarves with. It is a tube so I cut the tube up one side and opened it out. It came out great.

Then this Monday I taught a bobble cuff workshop for the first time. The ladies in the class where a lot of fun. Audrey’s granddaughter was there and very interested so I gave her some wool and she made a small picture in a plastic bag and I showed her how to make a tube bead with some pencils.

cuff class

By the end of the class they had the marbles in the cuffs. The cuffs have to dry before you can cut them to get the marbles out. They will do that today. I made everyone a sample with marbles in them so they could try cutting the felt while I was still there.

cuff class finished

That’s been my very busy week and a half. I almost forgot to do my post today as I was busy making hats and scarves for a sale I have on September 7 and 8 in Almonte. http://mvtm.ca/museum/?page_id=2675 If you are in the area come out and say hi.

Finished Cuffs

Finished Cuffs

This week has been a snatch a little felting here and there week. The cuffs dried out twice before they where ready to have the marbles added.

I use elastics for doing braids in horse manes and tales to put the marbles into the felt.

cuffs with marbles 1 cuffs with marbles 2

After they are dry its time to cut the tops off and pop out the marbles.

cuffs with marbles 3cuffs finished 2

 
After I cut the marbles out of this one with the silk on the back it didn’t look right. You cant see the silk inside.

cuffs finished

So I cut the blobs down farther to open them up more and now you can see the silk

cuffs finished 4

Here are all three finished.

cuffs finished 3

They are quit big.

cuffs on 1 cuffs on 2

I pulled the corners on one side of each end to make it cover a lot of area, mostly to see what it would look like. I like it.