Browsed by
Category: Giveaways

My turn for a Giveaway

My turn for a Giveaway

I am going to give away some fiber. The winner will get approximately 100gr of one of these multicoloured Merino batts.  I couldn’t decide which one to give away so the winner will get to pick the one they want. All but the last are textured. They are good for felting or spinning.

Brown
Brown/orange
orange
Orange/yellow
pale green
Pastel greens
pink
Pink/purple
purple
Purple/pink

I will announce  the winner on January 24th. To enter just leave a comment on this blog post.  Good luck.

Winner of the Screen Printing Class Giveaway

Winner of the Screen Printing Class Giveaway

Thanks to everyone who entered into the giveaway for a free class spot for Experimental Screen Printing on Felt.  I appreciate those of you who posted on other social media as well.

Online Screen Printing on Felt Class

The winner of the free class spot is: Willi

Drawing for Class Winner


Congratulations and I will contact you soon to give you more information about the class. If I don’t hear back from you by January 20th, I will pick another winner so please respond right away.

If you didn’t win, there is still time to sign up. You need to sign up before January 20th and the class begins on January 22nd. The class is a real bargain at only $45 for tons of video and a PDF with all the information and instructions each week. So if you’d like to learn many different screen printing techniques on felt, this is the class for you. Sign up here. 


In case you didn’t see this scarf on my personal blog, this is a nuno felted scarf that I recently made for my sister. I will be giving it to her soon and I hope she likes it. You can read more about it on my blog here.

Learn to Screen Print on Felt for Free – Give Away

Learn to Screen Print on Felt for Free – Give Away

As I announced last month, I am teaching an online class Experimental Screen Printing on Felt beginning January 22nd. You can sign up for the class here. But I am also giving away a free spot in the class for one lucky winner!

Online Screen Printing on Felt Class

To enter the give away for a free class spot leave a comment below. You can get additional entries by sharing this post on social media. Just share on Facebook, your own blog, Twitter, Instagram or wherever you like to socialize online. Then come back here and leave another comment about where you shared the post. You will get one extra entry for every different place you share the give away post. For those of you that have signed up already, if you win, I will refund your payment for the class so just jump right in and try to win. So spread the word and you get more entries! The winner will be announced here on January 14th – post your comment and shares by January 13th on this post only to enter.

Screen Printed Felt Journals by Ruth Lane

I thought you might also like to see what I have made from some of my screen printed felt samples. I made eight different notebooks.

These are all of the different journals. The left column is the front and the right column is the back. But the nice thing about these journals is that you can use either side for front or back. All of the covers are made from felt that has been silk screened with a variety of different methods. You can learn all these methods by taking the online course.

If you are interested in purchasing any of these journals from me, they are $45 US each. You can e-mail me at laneruthe at gmail.com. I can invoice you by Paypal or if you’re in the US, you can call and order one by phone from The Purple Pomegranate on our toll free number 1-866-406-7227.

Screen Printed Felt Journal by Ruth Lane

Here is what the inside of all the notebooks look like. The books inside are blank sketchbooks. The size of the notebook is approximately 6″ x 9″.

Remember to comment on this post to win a free class spot and share it for additional entries. Good Luck!

And the Winner is… Plus a Few Small Projects

And the Winner is… Plus a Few Small Projects

Drum roll please…… the winner of the December Green dyes and Silk Scarves is Maureen number 28!

Congratulations Maureen!

Please PM on the forum or send me an email to feltandfiberstudio@gmail.com with your full name and mailing address.  I will have your prize in the mail asap.


When you have an opportunity to use the dyes and scarves, please share your results with us on the forum or write a blog about it. Just let us know you’d like to do that. We hope you enjoy using them!

Thanks to everyone who participated!

Before I had surgery I felted a couple of small things.  The first was using the roving I had dyed for the 3rd Quarter Challenge to make a pod with cuts showing other colors underneath. I had used a lot of coarse fibers and decided I liked the rugged look so I didn’t shave it.

20150716_152736 20150716_153335 20150716_152805 20150716_15275520151210_110954

The next was a gift for a friend for her 70th birthday.  Another pod, but slightly larger.  I made some batts first. I used sparkly yarn as well as silk and milk protein for embellishments.

20151003_13023120151007_145056 20151007_145047

If you look closely you can see the sparkly yarn inside.

20151007_145109

Then to get into the holiday spirit I made a poinsettia flower with the intention of embellishing it later.

I used very thin prefelt, cut out the leaf shapes and used layers of saran wrap to separate them.

20151030_165533 20151112_113028

While I’ve been recuperating from surgery, I’ve been working on some small projects.  I finished the poinsettia by adding beads and adding stitching to the leaves and petals.

20151115_130411 20151114_141015_edited-1It’s now hanging on a wall to add a little holiday cheer to the house.

What have you been doing for the holidays?

December Giveaway

December Giveaway

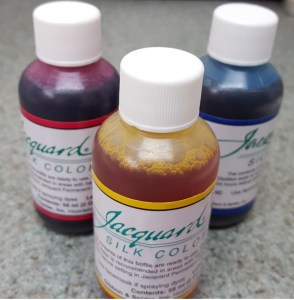
Since we’ve been talking a lot about color this year, I thought it would be fun to do a giveaway of two silk scarves and three Jacquard Green Label dyes.

I’ve used these dyes on both silk and wool.  They are premixed liquids so there is no messy preparation.  They are great for playing with different effects like watercolor, salt and alcohol effects, tie dyeing, silk painting and more. Included in the giveaway is the permanent dyeset fixative so it’s not necessary to to steam either.  Although steaming usually gives richer colors.  There are three primary colors (yellow, scarlet and cyan) in  2 oz. (60 ml)  bottles (they last much longer than you’d expect) and you can mix to your heart’s content.  The fixative is 8 oz. (250 ml).  You can learn more about these products at http://www.jacquardproducts.com/silk-colors.html

Just remember that any utensils or containers you use can not be used for food afterwards.  I usually use saran wrap with this method.  You can learn more about these techniques here:  http://www.dharmatrading.com/jacquard-silk-colors-green-label.html


20151127_152139

20151128_140141

One scarf is Habotai 8 mm hand rolled 11″ x 60″;  the other is chiffon 8 mm the same length. The habotai is shiny and the chiffon is matte.

20151127_153626

Here are a couple of scarves I have used the dyes on.  This is the habotai I used a watercolor and salt effects on.  The salt effect is not very obvious, this was my first attempt.

20151127_153352

The other is what I call my 4th of July scarf.  I used the watercolor effect, then nuno felted it after it was rinsed and dry.  This was plain chiffon and not hemmed.  If you look closely, you can see where the red and blue mixed to make purple.  It was a lot less subtle than I expected.

20151127_152752

In order to enter the drawing, please leave a comment below.  The winner will be announced next week on December 11 after a random computer generated pick.

Good luck!


Giveaway Winners and New Things

Giveaway Winners and New Things

Thanks to everyone who entered the Wet Felting Class giveaway, and thanks for the nice comments. The winners are:  Lucette and Jan (comment at 2.38 am). We’ll contact you later today on the email you used to comment, with all the details.

I thought I’d get my sewing machine out this week and make a few things with offcuts, samples and test pieces. The first thing I made was a large notebook/diary cover. The main part only took a couple of hours, but then all the little fiddly bits, straps, flaps, attaching them and sleeves etc all seemed to take about another 4 once it was all added up. I got through quite a few cd albums making it anyway! This is the front with the clip closed:

OLYMPUS DIGITAL CAMERAThis is the front opened:

OLYMPUS DIGITAL CAMERAThis is the back:

OLYMPUS DIGITAL CAMERAAnd the inside sleeve:

OLYMPUS DIGITAL CAMERAI don’t know if you remember this piece I made earlier this year, testing out a piece of viscose scarf:

OLYMPUS DIGITAL CAMERAI thought it would make a perfect coin purse. I measured it, cut out the parts and then chose some embroidery threads:

blue green nunoAnother felt piece I cut up for a purse was a flowery sample I made years ago for Beyond Nuno:

OLYMPUS DIGITAL CAMERAChoosing More threads:

OLYMPUS DIGITAL CAMERAIt all started getting a bit hectic once I got the buttons out too 🙂

OLYMPUS DIGITAL CAMERAHopefully, I won’t be able to show you the finished ones because I’m taking them to the Christmas Fair at the well being centre today 🙂

Notebook Winner and Another Free Design

Notebook Winner and Another Free Design

The winner of the felt notebook is Rhonda Lynn! Rhonda Lynn please contact me with your snail mail address at laneruthe at gmail dot com and I will send you the notebook. I used a random number generator to pick the winner and the number was 11. So congratulations to Rhonda Lynn.

Back in October, I told you about a project I am working on with Deb Stika using her contemporary and modern designs. So I am posting another free design today in PDF format that you are welcome to use in your work. I would love to see if you make anything. Last time, Teri Berry made a beautiful nuno felted creation from one of the designs. You can see her piece here.

Psychedelic 1

This next design is in the Psychedelic category.

Psychedelic 1 - Hand Stitch

This is Deb’s hand stitched representation of the design. The background fabric is a piece of screen printed fabric that I made several years ago.

Cut Back Felt Machine Applique - Psychedelic Design 1

And this is my machine stitched cut back applique made with two layers of felt. Since several people thought it would be a good idea to have some tutorial aspects in the proposed book, I did a short tutorial to show you how I made this.

Water Soluble Taped to Paper Design

I started with the printed design on paper. I then taped down water soluble fabric over the design and traced it. Use a regular pencil, not a colored pencil. Colored pencils have wax that gum up your sewing machine needle.

Two Layers of Felt

I then chose a couple of pieces of screen printed felt in different colors. It helps if the colors are different either in value or hue.

Water Soluble with Design on Felt

I placed the design over the felt and then…

Water Soluble Fabric Pinned to Two Layers of Felt

pinned it down. It would probably be better to baste all the layers together but I was being lazy and it actually didn’t shift that much with stitching.

Stitching Outer Edge

I then began free motion stitching the outer edge. With free motion stitching you need to use a darning foot, lower the feed dogs and set your stitch length to zero. I stitched all the lines at least twice over.

Close Up Free Motion Machine Stitching

Here’s a little bit closer view of the stitching.

Stitching Inner Lines

Then I started working on the inner lines. I made sure to stitch in place at the end of each inner design to lock the thread and then just moved the needle to the next spot. At the end, you have to trim off all the threads that are between the stitched designs.

Still Stitching

And then I stitched, stitched and stitched some more. It took a while.

Ready to Start Cutting Back

I cut off the excess threads and trimmed off the extra water soluble fabric from around the edges.

Water Soluble Dissolved

Then I soaked the piece in warm water to dissolve the water soluble fabric. Then I let the piece dry completely. I forgot to take any photos of the cut back process. While carefully looking at the paper design, I decided which areas to cut out. Use a sharp pair of embroidery type scissors and cut inside your stitched lines. Only cut the first layer of fabric or felt as close to the stitched line as possible. But don’t cut through your stitching.

Cut Back Complete

And here you can see the green beneath showing where I cut out portion of the upper blue felt.

Dense Free Motion Stitching

I then did some really dense stitching on the “black” part of the original design.

Cut Back Felt Machine Applique - Psychedelic Design 1

And this is the result. I think if I was going to mount this piece, I might cut around the outside of the design to give it more definition. But I am leaving it how it is for right now. So here’s another mini challenge, use this design in your own work with whatever media you choose. You can increase the size of the design if you’d like or leave it as it is. Have fun!

Psychedelic 1 with copyright


Wet Felting for Beginners Online Course and Giveaway

Wet Felting for Beginners Online Course and Giveaway

As Ruth mentioned last week, we’ve changed the format of our Wet Felting for Beginners online course. We had lots of enquiries about it between courses, and even with the extra weeks of support some people found it difficult to fit it in, or dates still clashed. So we’ve changed it to a ‘3 part course’ with unlimited access to the coursework, videos and class forum and continuous tutor support.

aa wet felting FOR BEGINNERS 3 PART COURSEFor anyone not familiar with the course, it covers all the ‘basics’ over the 3 parts, including wool lay out; how to get neat edges; the wet-felting process; exercises to learn about shrinkage and what affects it, and how to measure shrinkage and use this to calculate your layout size for future projects;  a whole load of information about different wools, felting methods and techniques to help you try out different things to find what suits you.

There are more details on the class information page, and we’ve included a detailed supplies list and what you’ll need for your wet felting ‘equipment’ : http://feltingandfiberstudio.com/classes/wet-felting-for-beginners-online-course/

Registration is open now, just use the contact form at the bottom of the class info page, and you can start the course as soon as payment is cleared.

But we also have 2 chances to win a free place in our giveaway! All you have to do is leave a comment on this post (make sure you use a valid email address, it won’t be shown, but we’ll need to contact you).

The winners will be announced on December the first and you’ll be contacted with all the details. Please feel free to share this on social media. Good Luck!

Three Months of Giveaways!

Three Months of Giveaways!

In celebration of the winter holidays and our fourth year anniversary, we are going to giveaway a bunch of fun stuff. Marilyn, Ann, Zed and I will each give something away over the next 3 months and we will also giveaway a few spots in our online classes. Just to let everyone know, we did change the format of the Wet Felting for Beginners online class so you can take the class at any time, at your convenience and have unlimited access to the course material. So keep your eyes peeled for all the giveaways and let the excitement begin!

For my giveaway, I created a sketchbook or notebook cover that fits a 5 1/2″ x 8″ book. It is removable so once you fill up the sketchbook, you can use it for another book. This includes a sketchbook that is perfect for drawing, making lists, taking notes or whatever you would like to record in it.

Front of Sketchbook Cover

It is a felt cover that I screen printed with the deconstructed screen printing method. (I am almost finished creating my online screen printing class if you’d like to learn this method.) I then added some silk paper for flowers and green silk sari ribbons. These were stitched down by machine.

Back of Felt Sketchbook Cover

This is the back of the cover.

Inside Front Cover

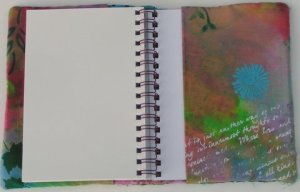
For the inside flaps, I used cotton fabric that my surface design group painted, stamped, stenciled etc.

Inside Back Cover

And here is the back flap.

Felt Sketchbook Cover

So if you would like to win this felt sketchbook cover, leave a comment here on this post. I would really appreciate it if you would share this on Facebook and other social media. The last day you can sign up to win is November 26 (which is Thanksgiving here in the US). I will announce the winner on November 27th. Please make sure that you don’t leave an anonymous comment or I won’t be able to contact you.

Happy Holidays from all of us here at The Felting and Fiber Studio. We really appreciate all of you who comment, participate on the forum, write guest posts and support us in our little venture. We never would have dreamed four years ago that our community of felt and fiber artists would have grown so big with so many countries in the world represented. We are grateful and humbled by your response and support. Thank You!

Yarn Happy – Book Review and Giveaway

Yarn Happy – Book Review and Giveaway

Here’s the second book from Seller’s Publishing that we will giveaway to one lucky reader. Yarn Happy is from Norwegian author, Turid Lindeland. We were given the book to review but have no other connection to Seller’s Publishing. Again, since I am not a knitter, my knitting friends, Sally and Paula, helped with the review.

Here’s what the publishers have to say about the book:

Yarn Happy, (978-1-4162-4563-6) offers readers 30 knit and crochet projects that represent the simple and clean design style that Scandinavia is known for. The designs are photographed in the dramatic Northwest region of Norway that inspired them, and include pattern charts and detailed instructions. Projects in the book include modern takes on traditional Norwegian knit designs, including socks, blankets, chair covers, crochet throws, and more. Yarn Happy is designed for both for intermediate and experienced knitters, as well as fans of colorwork. Patterns include both US standard and metric measurements, and alternative yarns are included for each pattern. Turid Lindeland’s inspiration for Yarn Happy came from an old sock she found in a crumbling hotel in Rosendal, Norway. Inspired by that old sock, and the neighboring glaciers called Folgefonna, with their dramatic icy colors and shapes, she has given these classic patterns an updated twist by employing modern color palettes. Some patterns are informed by the cool shades of ice and others by the summertime landscapes with their vibrant colors.

Yarn Happy_3D

From my knitting friends:

Both Sally and Paula agreed that this is not a beginners book and you need familiarity with Norwegian design or similar colorwork. There are no basic directions about Norwegian design, following a chart in general, or a key for the charts. Patterns were not rated for level of difficulty. But the book has absolutely gorgeous photography and if you’re an experienced knitter, it is a great resource for updated Norwegian designs.

YarnHappy-1

Patterns range from a blanket to a small phone case giving the less experienced  knitter a less daunting “first” project. Included in the book is a resource guide for finding comparable yarns that can be found in the US, a yarn weight chart, and a color chart for the Rauma Yarn that is the author’s yarn of choice. There are also crochet patterns included in the book and these are written well and easy to follow.

So if you are looking for a bit more advanced knitting patterns with a clean Scandinavian style, this book is perfect for you. Again, the photography in this book is absolutely gorgeous and it’s a pleasure to look through even for a non-knitter like me.

Leave a comment and you could win a free copy of this wonderful book. The giveaway is open until October 17th. I will be announcing the winners of both of the books on October 18th. Please make sure to have an e-mail attached to your comment. I won’t be able to contact anyone who comments anonymously. Then Sellers Publishing will send the book to you directly anywhere in the world.