Browsed by
Month: April 2023

A cushion cover

A cushion cover

I feel that you can never have too many cushion covers for cushions. They are such useful items of soft furnishings, and they can help brighten a room in no time.

My offering this month is a mixture of felt, thread and fabric waste, and free motion stitching to make a cushion cover. I wanted to give the impression of looking into a puddle with leaves floating on top.


This is the front and rear, before cushion cover making.


I used a variety of left over threads, pieces of felt, and fabric trimmings. I placed all of these on a piece of white fabric, and covered everything up with a piece of tulle. This was stitched down very securely, and it did begin to look as if it was a watery puddle.


I had some pieces of felt, left over from another project, and I cut some leaf shapes from this, and placed them over the stitched down tulle. I added some leaf veining as I arranged and stitched them down, in a fairly random placement on the surface.

I do think it turned out quite nicely. Then I had to choose some fabric to complete the cushion cover, in a colour to complement the orange leaves. I had found some purple fabric with a oil slick type pattern, in a charity shop last year, and as soon as I placed them side by side I knew it was a perfect match.


When I was in hospital, there was a good view of some trees from the window of my ward. This is a tree that I became fascinated with. I am still convinced that I can see Mr Mer sitting in the branches! Maybe it is just me!!


Bad “art”

Bad “art”

If you’re anything like me, you’ll find it very hard to stick to one hobby alone. After all, there are too many temptations out there, and each creative endeavour fuels the brain differently – it’s fun to discover new materials to play and interact with, and see what comes out of the experimentations.

I rediscovered the love of journaling last October, and have since then filled two notebooks of ramblings, ideas, memories and opinions. As I progressed in my writing however, I noticed I was also very attracted by the notion of doing something visually creative with paper and stationery.

Now, I must add a disclaimer here: I don’t think the pages I filled are special. They’re not particularly beautiful or unusual, and that’s definitely not a negative thing – I started doing collages simply for the joy of playing with images and colours, and these were the space for me to have some non-commercial, creative fun. It was my way of relaxing and letting go of expectations, of “what will others think of this,” of any idea that one’s creative endeavours must always be amazing. I just wanted to get messy with glue and glitter.

A closed notebook on a white wooden surface

This is the cover of my A5 size notebook. It’s decorated with some leftover fabric (featuring cats, obviously) and the artwork from a tin of… Sardines? Cod? I might add more stuff to it as I go along, since I don’t consider any of the pages here “finished.”

Side view of my notebook, with all the wavy and textured pages

This notebook came with different types of paper, so I play with it depending on the “canvas” I want. As you can see, the middle pages have been used the most, and apparently I’ve not much love for plain white paper.

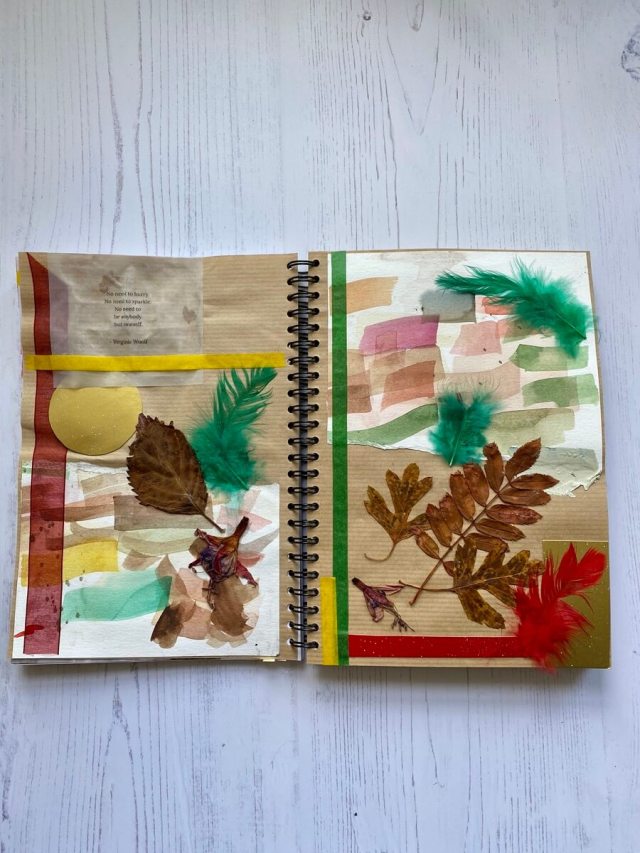
Open notebook, showing two pages of a collage

I tend to go by colour and texture, more than whether the things make sense together. My brain seems to enjoy adding stuff to paper until it looks filled enough and has things to make the eye wander.

Another two pages of my collage notebook, on a white wooden surface

Fabric scraps and teabags are game. See the eye on the lower left corner? I stole that from my husband’s studio, he’d removed it from one of his paintings – does this count as artistic appropriation?

Two unrelated pages of my collage notebook open

Collages made using medical information leaflets and other bits and bobs

If you can’t read the weird Balzac quote above, it is as follows: “No man should marry until he has studied anatomy and dissected at least one woman.” What a weird fellow he was (and I hope no one followed his advice!)

Collage using glitter, ink and paper

Collage in oranges, yellows and reds

I say this again proudly: none of these collages are groundbreaking or particularly good. What they are, is FUN. I loved making them with no end game in mind, no agenda and, until I decided to share them here, I was perfectly convinced none would ever see the light of day. It’s very liberating to create with full freedom from our inner critic and, if you’ve never tried, I urge you to give it a go. It might even fuel your creativity for the more “serious” stuff you make.

How many hobbies do you have? Are they all fibre- or textile-related? Let me know what’s tickling your crafty mojo lately in the comments section.


First Tests of Ann’s and Jan’s New Felting Machines Part 3

First Tests of Ann’s and Jan’s New Felting Machines Part 3

Part 3:

This will be a “short post” since we have had a third machine to add to our investigation (which I hope will continue on next Monday).  Ann has received a package from Georgia, hopefully containing the Solar Bee she ordered. It is vary similar to the design of handle and motor placement of the Orange fly but instead of a single needle it can have up to 4 needles. We will let you know what we find out about it soon.

The continuing investigation into the first 2 electric felting machines (China and Ukraine)

A quick look at trying detail work on pre-felt:

I tried fine detail work on pre-felt with merino, first with the Orange Fly (Ukraine). I did not have trouble working along the edge of main branches but found that it felted much faster than I am use to. the increased speed of felting is especially noticeable when we tried felting the tiny branches. Although it worked well, I did not feel as confident in my control of wool moving, I suspect I just need more practice.

1- dry felting on dry pre-felt. creem prefelt, black winter bare tree, orange fly needle felting machene on foam mat with a cuple needles and a bit of black merino wool 1- dry felting on dry pre-felt.

Next I wanted to try a piece of pre-felt that had been wet felted by Ann. This was one of her tree prototypes that she did not use as her finished tree.

2-3 pre-felt with one of Ann’s wet felting tree tries. - During wet felting. 2-3 pre-felt with one of Ann’s wet felting tree tries.2-3 pre-felt with one of Ann’s wet felting tree tries.

   4-6  I wanted to try adding little cardinals (red birds) to the tree. adding red dots to tree branches to indicate cardnels (red birds) black tree branches on prefet with red dots, adding a bit more fiber suddenly got a lot bigger dot. 4-6  I wanted to try adding little cardinals (red birds) to the tree.

I found that the machine grabbed the fiber and pushed it with enthusiasm into the pre-felt. A bit more than I had expected.  Again I think more practice would improve the bird-ish-ness of my red blobs!

back of prefelt showing red wool penitration 7 the back of the pre-felt showing the red fibers pushed to the back.

 I also tried on the orange Fly on 2 more wet felted bases with good results and not as good results.

Our next test base was a felt Ann had made in two colours of brown.

It was about the thickness for a wet felted hat but could be a good surface for a picture.

The single needle of the orange fly did not have trouble embedding fiber into the felt.

adding blue fiber to solid wet felted wool on a wool pad back of wet felted wool pad showing penitration of fiber. adding blue fiber to solid wet felted wool on a wool pad adding blue fiber to solid wet felted wool on a wool pad. using orange felting machine on an angle.8-11 working on solid wool felt.

I found that I felt more fiber movement when I angled the needle insertion. This would allow more barbs to engage fiber without having to imbed the needle into the wool felting mat.  (Angling the needle reduces the depth of insertion while still allowing more barbs to grab and entangle fiber.)

Having only one needle should be slower when laying in a general background colour. But, it is still quite quick, and there was no stress on my wrists, fingers, elbow or shoulder.  Ann and I should try a race between the felting machines vs. the 10 needle bar tool, which I find very fast for laying in backgrounds. But speed is not the only factor that the machines address.

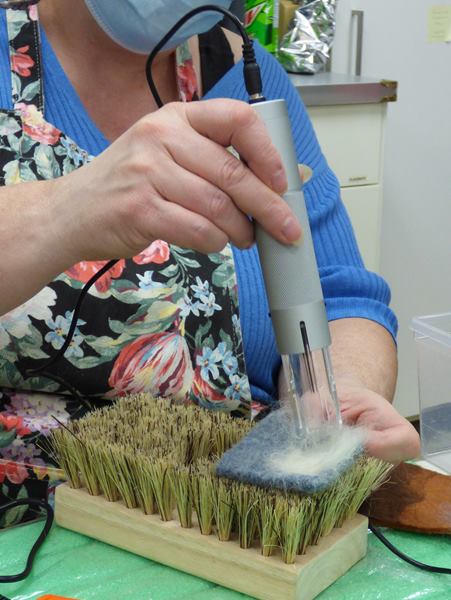
We also considered the mettle machine from china. As you remember the mettle machine did not like most of the felting surfaces as much as the orange fly did. We used the fake clover brush (driveway asphalt painting bush from the hardware store) which is what seemed to be its favorite surface so far in our investigations.

mettle machine felting into wet felted wool on bristal brush 12 Mettle machine felting into wet felted wool on the driveway brush

Wet felted (Fulled) knitting as a felting surface.

Ann had fulled a piece of knit sweater and brought a piece to try felting into. the orange fly did transfer the white fiber through the knitting successfully but it was a bit more resistant than the firm felt.  (It is quite firmly fulled knitting.)

felting into fulled knitting on wool pad back of fulled sweater showing wool penitration 13-14 Orange Fly felting fulled wool knitting on a wool pad

Next I tried the mettle machine on the same surface. I noticed one of the screws loosening so stopped and tightened it. I suspect that you may want to check all the screws occasionally just so you do not lose one.

  15 mettle machine felting into fulled sweater on wool mat, 16 one of the tiny screws had started to loosen.15-16  mettle machine felting into fulled sweater on wool mat, one of the tiny screws had started to loosen.

There is less resistance when using the driveway brush  as a work pad but there was still the most resistance when we were felting on the fulled sweeter. Running with 2 needles was also less resistance than running the machine with 4.

  17-19 checking work angle and comfort holding mettle machine

I again tried holding the machine vertically and on an angle.  Both were comfortable to hold and there was less vibration/resistance when using the brush with this machine.

I have been making a chart for the 3 machines so next we will investigate the machine from Georgia and fill in the rest of the chart. We will open the package and put it through its paces next Monday (which is a holiday) and hope to have some test results ready for the next blog post!

For working on wet felting the orange fly seems to be a bit more enthusiastic towards embedding fiber into the felt/fulled 2D picture ground .  I will not give up on the mettle machine, I suspect we have not found its forte yet. I want to look further at 3-D sculpture. i am a bit concerned with the machines hitting armature wires (I may have to find some safety goggles before I try that!)

Until we can find out what’s in Ann’s mysterious package, Have fun and keep felting!

20 the mysterious package arrives at Ann’s

Nuno Felt Scarf Class + Sheep

Nuno Felt Scarf Class + Sheep

I had another wonderful day teaching some ladies to nuno felt scarves.

I was busy ( talking) and didn’t take as many pictures as I would have liked at the beginning. So no pictures of the starting silk. I dye the blanks myself using the scrunch method of low-immersion MX dying. I learned how to form Paula Burches All about hand dyeing site. It is an amazing site. Don’t go unless you have some time to explore, there is so much information.  http://www.pburch.net/dyeing.shtml 

If you click any of the pictures they should open up larger in a new tab.

Back to the class, here are the layouts just before we wet them down.

pink and purple wool in the shape of a scarf, with an orange silk flower pink and purple wool in the shape of a scarf, with an orange silk flower. close up

Dark grey wool with silk hankies in various colours. In the shape of a scarf. Dark grey wool with silk hankies in various colours. In the shape of a scarf, close up

blue, grey and brown wool and silk in the shape of a scarf. blue, grey and brown wool and silk in the shape of a scarf, close up

pink and orange wool and silk in the shape of a scarf. pink and orange wool and silk in the shape of a scarf, close up

and then everyone got rubbing. This is the time it’s great to have a chatty group. It makes the work go faster. And I don’t have to do all the talking.

woman rubbing a wool scarf layout to make a felt scarfwoman rubbing a wool scarf layout to make a felt scarf

woman rubbing a wool scarf layout to make a felt scarfwoman rubbing a wool scarf layout to make a felt scarf


Sorry, no rolling pictures. The problem with a chatty group is I love to chat too and forget to take pictures.

But I do have some pictures of the finished scarves once all the fulling was done.

Finished pink and purple nuno felt scarf with an orange flowerFinished pink and purple nuno felt scarf with an orange flower. close up of flower end.

Finished grey, brown and beige nuno felt scarf with colourful accents.

Finished blue grey and brown nuno felt scarf Finished blue grey and brown nuno felt scarf up close

finished Pink and orange nuno felt scarf. finished Pink and orange nuno felt scarf close up

here’s a nice group shot from the end of the class.

Group of women holding nuno felt scarves


One of the ladies went home and dried her scarf so she could wear it right away. Doesn’t Kim look great? The colours really suit her.

Kim taking a selfie with her new scarf.

Denice also sent me a picture of hers when it was dry. I love the silk flowers.

nuno felts scrf on a hanger, dry

It was a fun day for everyone.

I taught a short sheep class the other day. They were young people so just one picture of the finished sheep.

4 multicoloured felted sheep

2023 SECOND QUARTER CHALLENGE

2023 SECOND QUARTER CHALLENGE

Calling all fibre lovers – knitters, weavers, stitchers, crocheters and felters – challenge yourself to make a table runner or mat.

Here are a few that we’ve made in the past 😊

This starry felt mat not only protects the hall table but it looks good too …

Felt Table Mat white stars on dark background

…and it looks just as pretty on the reverse!

reverse of felt table mat

Here’s a cobweb felt (merino wool and silk top) table runner that we nicknamed ‘Miss Havisham’ …

cobweb felt white merino and silk table runner

… and a 3D felt decorative table runner ‘Spring Flowers in the Snow’.

white felt table runner with 3d spring flowers in the snow

This plant pot mat, in the style of Clarice Cliff, was made for a previous challenge.

Felt pot plant mat in the style of Clarice Cliff

In the first quarter challenge, it was suggested that you find a tree you like and depict it as it awakens in spring with buds/new leaves/blossom – it could be realistic or representational.

If you’d like to continue with the tree challenge, then please do so!  Depict your tree in its next season.

Please post your entries in Studio Challenges here:

https://feltandfiberstudio.proboards.com/board/18/studio-challenges

Or if you are unable to upload a photo, use this link to post your photo

https://feltingandfiberstudio.com/community-photo-submissions/

then please tell us about your make in Studio Challenges on The Felting and Fiber Forum.