Browsed by
Month: December 2022

Thanks for All of our Community Entries

Thanks for All of our Community Entries

It’s that time of the year when I look back over the last year and think, “Whoa where did the time go and what have I gotten done this year?” While I was thinking about writing a round up post of what I had created this year, I remembered our new Community Gallery page. I thought it would be great to feature work from our readers and authors who have submitted photos for our community page. Anyone is welcome to submit a photo and tell us about their work. We will be creating a new page for each year from now on. So I thought if you hadn’t taken a look, you would like to see what others have created this year. If you want to read about how the pieces were made or get further information, you can find it here on our 2022 Challenges Gallery page. Just scroll down to see all the entries.

Cindy M. showed us her wonderful interpretation of a cactus. She also wrote a guest post about the process here.

Marie E.S. submitted her beautiful needle felted and stitched creation based on a moss covered stone in her garden.

Melissa O showed us her interpretation of paint chips on cement which morphed into a fabulous wall hanging.

Capi submitted her entry for the 2nd Quarter challenge with a felted stick. Which one is real? Read more about it here.

This wonderful felt vessel was created by Donna B. using multiple photos as inspiration.

These lovely felt flowers were on of Ann B’s submissions for the third quarter challenge. Visit the gallery page to see all of her submissions.

These flowers were inspired from a quilting technique of yo-yo flowers which were cleverly felted by Mireille G M.

This flowered felt hat was created by Penny E and submitted for the third quarter challenge. The flowers are appliqued with machine stitching which adds a wonderful texture to the surface.

Cindy M. submitted another take on cactus for her third quarter entry. She also created a second version of this piece seen here.

This felt piece was created with real lavender plants and wet felted by Helene D. and was perfect for the third quarter challenge.

Donna B. made program booklet covers for a local woman’s group and submitted these delightful entries for the third quarter challenge.

Karen L. created this vessel from bits from her stash and submitted it for the 4th quarter challenge. She created it for an exhibition “Making Waves” and looks just like a tide pool.

Ann B’s entry for the 4th quarter challenge were these fantastic crowns she created for a Panto in 2020. Ann also contributed more entries for the 4th quarter which you can see here.

These fab holiday trees were created by Susan W. who was inspired by Helene’s post from the prior year where she showed how to make these trees.

Caterina P. shared her colorful necklace/neck warmer that she made from items in her stash. She has found it quite warm to wear during the colder months.

This adorable gnome was created and shared by Jessika O. He brings a smile to my face and is perfect for the holidays.

I would like to extend my gratitude to all of our readers and everyone who submitted photos this year. I hope that all of you will consider submitting photos of your work and participating in our quarterly challenges. We love to see what you are creating.

Have a Happy New Year and here’s wishing you a creative 2023!


Exploring Natural Dyes

Exploring Natural Dyes

In my October blog post, I wrote about getting ready to start an online Natural Dye course through Maiwa. https://maiwa.com/. The photo of materials hanging on my clothesline was the first step of scouring and mordanting the fabrics that I was going to use.

Fabrics drying on a clothesline

Most of the dyes we used came right out of the jar, all ready for the dye pot. However, we did learn to make an extract from the cochineal bugs.

First you have to crush the little guys using either a mortar and pestle or a coffee grinder. I had given my coffee grinder away several years ago so I had to do it manually.

Then you add 1 ½”water to them and boil them for a minute, drain off the water into a glass jar, put the bugs back into the pan and repeat that process 5 or 6 times until the water turns pink. Then the water that was drained off goes into your dye pot.

Here is the cochineal dye pot with my white and grey colored wool yarns. At this point each skein is about 34 grams each.

After being dyed  in the cochineal pot, we then divided each skein into 3rds so we could shift the color on 2 of the yarns. In this photo the grey yarn is on the right and the white yarn is on the left.

The top yarn in this photo is after the yarn was shifted with indigo, the middle is straight out of the cochineal dye bath and the bottom yarn is after it was shifted with iron. Grey yarn on the left, white yarn on the right. Aren’t they just yummy colors??

Cochineal wool yarns

This next photo shows the results after dyeing with Marigold. More yummy colors. Same layout, indigo shift, straight Marigold bath, then the iron shift. Grey yarn on the left, white yarn on the right.

And these are from the banana indigo vat that Maiwa taught us to make. Maiwa teaches an in-depth Indigo course that I might be tempted to take one day in the future because the banana vat kind of stumped me. It was very hard to keep it balanced. Sometimes I would see the magic happen and sometimes it was a struggle to get there. It’s all quite scientific and chemistry was never my thing!

These yarns had two indigo dips. White yarn on top and grey on the bottom.

After over 50 hours or more of fairly constant stirring of the pot, one hour for each bath, I came away with some wonderful fabrics that I’ll be able to use for my stitching or my art quilts.

The following are laid out with the Indigo shift on top, original color in the middle and iron shift on the bottom.

Cotton

Wool

Linen (brown and white linen)

Silk

More silk (just cuz it’s so pretty!)

Hemp

I saved most of the exhaust baths and made these scrumptious pieces…and then I dipped them all into a weakened indigo vat for about 2 or 3 minutes. You can see the shifted fabrics hanging out of some of these on the right edge (1-2 inches peaking out). Subtle changes. But oh so many colors!

It was an amazing journey. I didn’t know that there are so many ways to shift the colors, whether you use over dyes, indigo, iron, different tannins and mordants. It’s endless and so much fun. But a lot of stirring…I did manage to get quite a bit of reading done while I stirred!

Once I finished the Maiwa course, I switched to Procion dyes so I could make some color gradations for my Gail Harker Level 3 Stitch color schemes. Quite a difference from the subtle natural colors! Lovely as well, though, in a different way.

Hope you’ve enjoyed all the color! Now I need to get busy and make something out of all these samples!

Best wishes to all of you and may 2023 be a wonderful year for you! Happy creating!
Tesi

Customs, Challenges and Creativity

Customs, Challenges and Creativity

Happy holidays everyone!  I hope you are all getting some well deserved R & R following the hectic run up to the holiday season.

Customs:

Here in Ireland, today (December 26th) is known as St Stephen’s day but in certain rural areas, traditionally it is Wren day,  a festival day when Mummers  take to the streets in their disguises.  In my area, the Mummers perform their play every St. Stephen’s day in pubs and clubs in the county.  This tradition originated within three local families and numbers participating have increased down through the years.

The costumes are generally a mix of rags together with woven straw.  The head pieces can be very intricate and beautiful.  Here is an example of a mummer’s headpiece. (Photo: Courtesy Museum of Ireland)


I checked the mumming origins for this time of year and it appears to be an ancient European tradition.  If you would like to find out more it is worth checking out these links https://en.wikipedia.org/wiki/Wren_Day  or, local to my area https://nationalinventoryich.chg.gov.ie/mummers-of-fingal/#:~:text=Mumming%20is%20a%20masking%20or,found%20in%20European%20carnival%20tradition.

Challenges

Project No: 1:

I want to extend a big thank you to Lyn and Annie whose current challenge has spurred me on to complete three unfinished projects in time for this post.  The first project is a crochet throw.  I have made a number of these, principally for family, and feedback is that they are really cosy.  So I thought it was time to make one for myself.  The problem was, that because it had no timeline for finish, it stayed on the hook!  So when I saw the challenge, the timeline materialized and I got it finished before the year end.  Happy days!

Please forgive the angle of the photograph, I was up on the ladder trying to get it!

The throw comprises of one very large granny square made with six large balls of fibre.  It fits on top of a kind sized bed and I think it will be staying there for the current cold spell!  Its making is pretty mindless and once I get into rhythm it can be made watching foreign crime series (complete with subtitles).  My favourite at the moment which has just finished is the French series Astrid.

Project No: 2:

My next  project was planted in my consciousness following a blog post by Ann in November 2021. Here is the link to her post https://feltingandfiberstudio.com/2021/11/15/an-international-project-by-line-defour/ .  This international project, which was titled “Fate, Destiny and Self-determination” intrigued me but it took me a while for the seeds to bear fruit.  I contacted the Artist/Co-ordinator, Line Dufour,  last September and she confirmed that she was still accepting pieces for the on-going exhibition.  She did mention any piece should not be a regular geometric shape (square, rectangle, circle etc).

So I got to work on my piece.  I started off by making a piece of pre-felt over a rectangular resist.  Then I started randomly stitching and gathering the prefelt, my idea here was to lose total control over the shape of the piece and let the random stitches determine this.  Finally I felted it up.  The final shape was anything but regular.  I hated it because while the shape was ‘interesting’ the colour was boring and it would be lost against a white backdrop.  So it sat there, and it waited patiently for Lyn and Annie to spur me into action with the challenge. It was time to start hand-stitching!

I decided that I wanted the piece to reflect my Irish origins and what it means to be Irish in contemporary society.  To paraphrase the actor Michael Caine,  not many people know this but Ireland is one of the largest countries in Europe when our seabed territory is taken into account.  People perceive Ireland as being that little quaint island off the west of Europe but our marine territory is ten times the size of the land mass and I decided to reflect this in the piece (bottom section).  Secondly, Ireland is renowned for its agriculture and food production which it exports worldwide; this is represented by the abstract depiction of a tree to the left of the piece.  Then, there are its people, their tolerance and acceptance; the central section celebrates the fact that in 2015, Ireland became the first country to legalize same sex marriage by popular vote. (I could have included many other aspects of what it means to be Irish but it is a small piece at 12cm x 13cm.)  I purposely left a section to the right of the piece empty – this represents the future, the unknown.  I will post (mail) this off to Line in the New Year.


Project No: 3:

I love rummaging in haberdashery departments when I am away on holidays (I also love fabric stores but that is another story!).  It is a real treat because it can be a challenge to find interesting ‘stuff’ locally.  I came across a small square weaving loom when I was in Paris a few years ago and it has been sitting at the back of my cupboard since then.  2022 was to be the year when I rediscovered it and started the project.  All the yarns were from my stash and and I rescued the boucle from my late mother in law’s house when we were clearing it.  The small piece of weaving has been waiting for me to get my act together and finish it off.  So, no time like the present challenge to make that happen!  The finished piece measures 9cm x 9cm.  I think I might just frame it.  Has anyone any other suggestions?


Creativity

Before I sign off for 2022 I would like to share with you some of my friends’ beautiful handmade items which they have gifted to me for my tree over the years.  I cherish them not only because they are beautiful items but because they were made with love – nothing will ever come close to handmade, especially when made by gifted friends.

Here is my friend Annelien’s work.  Annelien, who is from The Netherlands, and I first met during a week long textile recycling workshop in Finland back in 2013 and we have been firm friends since then (we have even managed to meet up in person twice since then).  (Apologies, I think the felted Angel is blurred.)


Next, Sara’s work.  Sara started crocheting a little while ago and recently gifted me one of her angels.  I love her! (actually I love both of them!)

Next up is Kate.  Kate loves working in glass and gifted me the trees many years ago (I have taken a photo of three of them).  More recently, she made me the little houses.  They are so delicate and pretty.


Thanks for reading this post and for reading and commenting on my various posts throughout the year!

Wishing you good health, happiness and peace during 2023.  Not forgetting a whole lot of creative spurs and fun!


Merry Christmas to All!

Merry Christmas to All!


This slideshow requires JavaScript.

All of us here at The Felting and Fiber Studio wish you all the best during the holiday season. These are a few of the holiday makes from over the years. Enjoy!

Needle Felted “THING” first time running this workshop

Needle Felted “THING” first time running this workshop

The local Ottawa Guild had been optimistic in the latter part of 2022 and started to reschedule workshops, unbeknownst to us the evil covid was friends with 2 influenzas and invited them to drop by too. So we wound up with students and instructors out sick by the end of November into December. This was also the month my new workshop had been booked. I had offered to teach a chickadee or a tiny dragon but had been requested to make a Thing since Elizabeth, the workshop coordinator and I had not been able to decide on a definite thing. This is the description that was listed for the workshop.

Description:  Jan is paralyzed with too many possibilities for an item to use to teach needle felted sculpture, thus we announce a workshop in needle felted THING creation.  Jan will probably decide more or less what the THING will be before the workshop but it will be a surprise for students.  You will create your THING using three dimensional needle felting. By the end of the workshop, students will have the skills needed to go home and make a THING of their own choosing.  Previous felting experience is helpful but not necessary. Good eye hand coordination is very helpful (those needles are sharp).”

As soon as it was scheduled, I started to work on organizing a brand new workshop. I quickly figured out this scope is a bit broad, so making a small basket protecting thing would help. I had admired an amigurumi mix-and-match monster making book.  “Edward’s Crochet Imaginarium: Flip the pages to make over a million mix-and-match monsters” by Kerry Lord.  Using the simple shapes from crochet to inspire the students, should give absolute beginners an achievable target and those who have felted before the opportunity to try four different wire gauge hands or wings and a tail.

The notes covered wire and needle gauges, fibre, fibre preparations (carded vs Combed it can make a difference), then wrapping. I had gone through and followed a couple of my projects and showed how I had made and built the armature, as well as a few wire augmentations I have had to do over the years. Most of that last section is actually in the blog posts! I finished off the notes with a list of books they may want to investigate and three online sources of videos.

If the various flues and covid were not enough of a challenge we had our first big winter store about to hit. I think most of the worst went south of us. I wonder, what the states could have done to offend the weather? After some debate with Elizabeth it was decided that since the forecast was to have the storm ending by Saturday morning, we would see how the roads looked closer to the workshop.  The snow had momentarily stopped and the workshop was declared a go.  I had collected the supplies together and then pulled the bags of fibre to go from the basement. Glenn hauled and loaded it all into the car. He and our new neighbour also cleared out the end of the driveway and we made a brake for the Guild Studio on the other side of Ottawa.

Car is being loaded to go to the workshop with fiber and suplys, snow covered car, tree and drive way. the driveway is getting quite icy. Grey Kia hatchback still dusted with snow, with hatch back open showing it is Full of bags of fiber. snow covered branches above car hang low from the weight of the clinging snow. Inside my Gray kea soul. there are bags of fiber and suply filling the back of the car blocking direct vision out the back and getting quite close to the inside of the roof. 1-3 it’s impressive how much wool you can stuff in a Kia Soul!

The side streets were not the greatest, but the highway was fine and the parking lot had been cleared!!!

the snow covered and slippery walkway in front of Heartwood house (the Building the guild is in) snow covers the ground and is clinging to the trees, the front corner of my car is visible on the left of the pictures. Front Gallery just outside the Guild studio, 7 large bags of wool on one side and boxes and bags of suplys on the other side of the hall way. in the distance my walker also carying boxes. the gallary has tropical plants along the windoe and artwork (prints) on the walls. 4-5 Arriving at the Guild and dropping off the stuff

He carried in the bags of wool, the box of armature things and the couple boxes of supplies. Then went and found the missing tables.

4 large plastic folding tables and a smaller white one hold fiber and boxes of suplys for workshop within the OVWSG studio6 Tables found and now I can set up!

He set them up in a C or U pattern so I could sit in a rolling chair in the center and help any student without a lot of standing and bending over.

18 pages of notes, a colourfull foam nealing pad (originaly for gardening), a pice of pool noodle, 3 sizes of small wooden dowls, leather Finger cots, wooden single needle holder all sitting on grey folding table 7  18 pages of Notes, Foam kneeling pad, A piece of pool noodle, 2 sizes of dowels, finger cots, wooden single needle holder. Still to add will be the needles.

I had also had a few needles for them to see what difference a gauge will make. T32,T36,T38,Crown40,Revese40 and 42. all needles are in zip lock bags and in little pieces of pool noodle foam. 8 I also had a few needles for them to see what difference a gauge will make.

a book on comparitive anatomy and one on Anagarumi monsters both listed in the text below picture9 the books just past the needles

You may have spotted I brought a few possibly useful Books; Comparative Anatomy (Animals Vs. Human)  Cyclopedia Anatomicae: More than 1,500 Illustrations of the Human and Animal Figure for the Artist by Gyorgy Feher. I also had a book on Anagarumi to give the students some ideas.  Edward’s Crochet Imaginarium: Flip the pages to make over a million mix-and-match monsters by Kerry Lord. (Kerry Lord also has a book on crocheting sheep! Toft Sheep – 18 Crochet Sheep Patterns (uses UK terms))

a couple of my sculptural felting books. both books are listed in the text below the picture.10 a couple of my sculptural books.

Armature/Sculpture books I brought to show the students; A Masterclass in Needle Felting Dogs by Cindy-Lou Thompson, Needle Felted Kittens: How to Create Cute and Lifelike Cats from Wool by Hinali.

There are now quite a few good books on sculptural felting with or without an armature. I had a list of 14 that they may want to keep an eye out for.

plastic haloween skeliton of a dragon standing on pacagease of smartie candys (candiy coated chocholet)11   I also brought sustenance and plastic inspiration

The Ottawa guild has always wanted to have small class sizes to insure good student-teacher ratios. Most workshops have a maximum of six students. With the first snow dump of the year and 2 types of flu plus covid, I was a bit worried that it may not run. In the end, we had one student driving over an hour to Ottawa and made it safely but one was sick and another with a sick child. So we ran with four students.  Three went for Anagarumi-based Things and one went with a Kraken/Octopus combo. They were a bit bigger than I had envisioned but they all still had their armatures in time to have lunch.

4 images of hands working on bending wire to make there armatures12  Armatures are underway

We had two Things with four arms and a tail, one with two arms a tail and wings, and the octopus creature used pipe cleaners (ok now there called Chanel stems since there are not a lot of pipes to clean anymore) to see how that would help with wrapping later.

After a lunch break, they started to wrap the fibre around their armatures.

wool aplication starts, 3 of the scupltures has the first bit of wool added. 13 wool wrapping begins

I brought a couple of types of fibre preparations. This would let them see the difference between carded (which makes a woollen yarn)  and combed (which makes a Worsted yarn). I am going to talk about this more in a future post.

This thing was being helpful by holding fiber for its creator, even when that was not as helpful as it sounds.14 This thing was being helpful by holding fibre for its creator, even when that was not as helpful as it sounds.

this thing is developing fabulous wings.15 this thing is developing fabulous wings.

Unlike my last octopus this one has 8 arms! The pipe cleaners were found easy to wrap over.16 Unlike my last octopus this one has 8 arms! The pipe cleaners were found easy to wrap over.

A little way into wrapping, the students all realized it takes a bit of time to wrap, so instead of rushing and risking lots of punctured fingers, they decided they would like to add a second half to the workshop and focus on surface work. I did spend part of the time they were wrapping to show them a couple of options for adding fluffy furry surfaces.

two of this things arms were added to increase its head.17 two of these things arms were added to increase its head.

This one still has all four of his arms and is now standing on his own.18 This one still has all four of his arms and is now standing on his own.

By 4 pm we had good shapes developed and no major bloodletting due to rushing.

the octopus is starting to emerge. 2 legs are wrapped in white Top (Combed) and the rest are wrapped in Roving (Carded) wool.19 the octopus is starting to emerge

the thing with 4 arms has now received a head20  the thing with 4 arms has now received a head

the winged thing has temporary eyes and looks like he is looking forward to getting wings.21 the winged thing has temporary eyes and looks like he is looking forward to getting wings.

The class while not quite finished seems to have had fun to this point.  We will get a bit of time scheduled for part two to finish the outer layers in the new year. It’s always hard to estimate on time for a new workshop and the pace the students will progress at. Not pushing for speed, I think is the way to go for this one. Needle felting yourself is not conducive to creating more needle felters!

I hope you will get to take some time over the holidays to do a bit of needle felting. If you are at a loss for what to make you may want to peruse the Anagarumi Monsters for a bit of mix and match inspiration! Happy Hanukkah, Mary Christmas, Happy Solstice and Happy Holidays from the Mer Family, the Scott-Martin Family and the rest of my felted menagerie.

PS is it just my dyslexic brain or is this date really cool 12-22-2022 (if only we had 20 or 22 months it would be perfect! OK, the last few years have felt like years containing more than 12 months) but I hope you can enjoy such a fabulously numbered day! See you Next Year!!

Weaving a Cowl for a Christmas present

Weaving a Cowl for a Christmas present

Hello!  I am Carlene and a new poster here on the Felting and Fiber Studio blog.  I live in Carp which is part of Ottawa Canada. I am a member of the Ottawa Valley Weavers and Spinners Guild; the same guild that Jan Scott, Ann McElroy and Bernadette Quade belong to.

I am interested in a number of fiber arts including: crochet, knitting, spinning, felting and weaving.  I will admit that spinning is my biggest passion and where I spend most of my time.  I have been dabbling in weaving for a bit, using rigid heddle looms and taking some classes at the Ottawa Valley Weavers and Spinners Guild.

In June 2022 I managed to purchase a used Saori CH50 loom and since then my weaving has really taken off.  I love the Saori philosophy and how well designed the loom is.  Saori weaving is a free form style of weaving developed in Japan.  You can learn more about the history of Saori online from Saori Global.

Here is my Saori loom.  It is a cute little 2 harness loom with a small footprint similar to a card table.  The official specs are as follows: Width: 69cm (26″), Depth: 61cm (24″), Height: 98cm (38″), Weight: 15.7kg (34.5lb), Weaving Width: 60cm (23″).

One of the neat innovations of the Saori looms is using a square back beam that allows you to slide a pre-wound warp onto the loom and speed up the warping process.  You can buy pre-wound warps in a number of different thread counts (50, 100, 150, 200, 250 and 300 threads), lengths (3m, 6m, 12m and 30m) and fibre types (cotton, wool, or mixed fibers such as wool, cashmere, silk).  The most affordable warps are plain black warps in either wool or cotton.  This is a 100 end cotton warp that I recently put on my loom.  The warp threads are taped to the square tube, then wound on under light tension with spacers inserted occasionally.  At the end of the warp the ends are again taped down.

After putting the warp onto the back beam, I lifted the reed and beater out of the loom and set it aside.  Then I untaped the warp threads from the roll and lifted them up over the back beam, over the middle castle of the loom and taped the threads to the loom shelf using green painters tape.


Next I did some quick counting and inserted some chip clips as markers.  I wanted to thread from the middle outwards so that I could easily position the warp threads in the middle of the reed and the heddles on the shaft.  After counting out the threads I carefully snipped a single thread from the tape, then threaded it through the inserted eye heddle on the rear shaft.  I repeated this process with the the next thread and then threaded it through the inserted eye heddle on the front shaft.  I then skipped a heddle in each shaft and then repeated this process to thread the next thread, all the way across the loom.

In this next picture you can see all the black warp threads have been inserted through the heddles.  I have used chip clips to keep the threads neat and tidy.  There is a spare empty heddle between each of the threads.

I decided to add some supplementary warp threads to experiment with adding a bit of colour to my warp.  I bought these Kumihimo bobbins to try.  I wound cotton thread in various colours onto the bobbins.

Then I positioned the bobbins at the back of the loom and slowly threaded them into some of the empty heddles between warp threads.  The placement of these threads was somewhat random.  After adding in the supplementary warp threads I was ready to thread the reed.  So I put the beater bar and reed back into the loom.

I used my threading hook to thread the reed and I did groups of 4 threads, then one empty space in the reed, then the next set of 4 threads.  Chip clips were again used to keep the threads tidy.

After completing the threading it was time to tie onto the front beam and then start weaving.  The warp threads are knotted onto the front beam.  The blue yarn you see is a bit of scrap yarn at the beginning of the project to help space out the warp threads.  The weft threads (the back and forth weaving threads) is some self striping wool/acrylic sock yarn (Kroy Socks Stripes in the colour Burnished Sierra).  When you look at the back of the loom the Kumihimo bobbins with the supplementary warp threads are hanging off the back.

I wove a piece that was about 64″ on the loom.  After taking it off the loom the piece measured 60.5″ x 20.5″.  After washing the dimensions will shift again and there will be a bit more shrinkage.

After removing the blue waste yarn I trimmed the warp ends, knotted them together, then twisted the fringe.  The result is a cowl for my Christmas gift pile.  I still have one last step to do though.  The fabric still needs to be washed to set the cloth and after washing it’ll need a quick press with the iron to make it look beautiful again.  I have a stack of Christmas weaving waiting for washing and ironing.  Luckily there is still a bit of time before Christmas to get it all done.

I got the stack weaving washed and realized that I had forgotten the step of sewing on labels.  So today I sat down with the pile and sewed on tags.  I have these nice vegan leather tags that I purchased off ETSY from FractalFocusStudios and I carefully sewed one on each item.


After putting the tag on I did a quick try on.  Love it!  My stack of scarves and cowls are now sitting in the pile of Christmas gifts.  Soon they will all be adopted by new owners.


Adding Dried Leaves to Mossy Driftwood

Adding Dried Leaves to Mossy Driftwood

I have been continuing to add more stitching and other bits to my mossy driftwood. You can see the progression from just felt to adding stitch in these two posts:

Moss on a Piece of Driftwood

Mossy Driftwood Continued

Driftwood covered with green felt and hand and machine stitched areas of moss.

The moss has been getting filled in by hand stitching and adding the machine stitched moss I created. I am trying to decide how much more hand stitched moss to add. I think it needs more “trailing” knots in the “bare” felted areas. But I also need to add lichen in places but I haven’t created the lichen yet. I’m thinking I will try Tyvek lichen.

Leaf shapes created out of tea bags and machine stitching.

The next step was to create dead, desiccated leaves. I found a tutorial for making them out of tea leaves on Youtube.  I had made them out of Lutradur before but not tea bags so I thought I would give it a go. I drink tea every morning so I started saving the old tea bags for this project. In the video, she used some type of stabilizer but I decided to try without one. I layered two flattened tea bags together and just started free motion machine stitching the veins. As you can see, you don’t want to stitch the outer edge of the leaf as it looks more natural without it. Then I cut them to shape with scissors.

Tea bag leaves, machine stitched veins and burned holes/edges.

The next step was to burn the edges and the holes. I found it was easier to get a more natural look when I was looking at photos of dead leaves. That way the leaves don’t all turn out the same. I used a wood burning tool for this operation (the video uses an incense stick). Obviously, you need to be careful when you’re burning things and it is pretty stinky too, you need ventilation. So I took mine to the stove and turned on the overhead fan to draw away the fumes. Plus the stove top is heat proof and won’t be burned or damaged.

Fiber art moss on piece of driftwood with three tea bag dead leaves.

So here’s the full piece with the leaves just placed on it. I will be stitching them down at some point to hold them in place.

Here’s a couple of close ups. You can click on the photos for a bigger view. I am happy with the progress and it is definitely looking very “forest floor”.


Fleece Preparation System

Fleece Preparation System

Many moons ago, when I was an avid spinner (before I had properly discovered felt) I had read various articles in magazines and journals about the preparation of raw fleece for spinning. I had obtained a very fine fleece (I can’t now remember what it was though) and wanted to be careful how it was readied for spinning so that I didn’t mange to felt the fibres in the process. So I set about making myself a system for the preparation of locks of fibre ready to spin. Unfortunately, the photographs I took of the system were actually of a later episode of washing a lousy Jacob fleece, so they may not look quite as you’d expect them to, but they will show you the process. Though I did manage to find a a few of the original locks so I can show you those. They are not quite as pristine as when they were first processed however so they aren’t as nice as they used to be. In addition, the light must have been wrong, because the background card on which they are displayed was a dark green, not the blue appearing in the photo!)

Locks

I obtained three large plastic crates and one smaller one which would fit inside any of these.  I made holes in the bottom and around the sides of the smaller crate with (so far as I can remember) a soldering iron, so that water would drain out of it easily.   Then I cut up an old net curtain into pieces the size of the base of the small crate.

Crates

I persuaded my husband to make me a couple of drying frames.  These were  wooden frames covered in chicken wire, and with removable legs long enough to keep the frame above the grass on our lawn.

On a fine day I assembled the “kit” on our patio ready to start.  This comprised the drying frames and a couple of old complete net curtains (which would stop the washed fibres falling through the netting); two buckets; a bottle of Fairy washing up liquid; rubber gloves; the three crates and bits of net curtain and my fleece (in the picture my pillowcase full of the Jacob fleece and the audio book I’d listen to while working).

The kit

I started with the “religious” (holey) crate, putting a piece of net in the bottom to stop fibres following the water out, then I pulled locks off the fleece.  I teased each of them out gently, (though in the pictures it’s just handfuls of Jacob locks) laid them out on the net, making sure that they did not cover each other.  When the bottom piece of net was covered, I laid another piece of net on top and carried on making layers of net and locks until the crate was full, finishing with a layer of net.

Layering the Locks

Next I filled one of the larger crates with rain water and dunked the religious crate inside it.  All the fibres wanted to float until I had managed to get them wet but I managed to get them to stay in the crate.

Religious Crate Full and in First Soak

I left them there for a couple of hours, then I gently lifted the inner crate out of the water and stood it on top of one of the larger crates so that the water would drain into it.  When most of the rainwater had drained away, I put the small crate with the wet locks into another of the larger crates, filled with clean water and Fairy Liquid – of a similar temperature to avoid shocking the locks. 

Soapy Wash Water

Once again I left it to soak and then lifted it out and drained it of soapy water as before (having emptied out the dirty rain water into watering cans to use on the garden.) Then put it into the other large crate, which had been filled with clean water.  I gently lifted the inner crate up and down a couple of times to rinse the locks, and then I took it right out and left it on top of an empty crate to drain. 

Once a good deal of the water had drained out of the locks, they needed to be fully dried.  I covered one of the drying racks with a fresh net curtain and laid out the locks on top of this.  A second layer of net curtain was added and the second drying rack was laid on top and secured with G cramps.  If I remember rightly it was actually a fairly breezy day so I stood the frames up rather than laying them down on the lawn so that the air could penetrate more easily. 

Washed Locks Being Laid Out to Dry
9 All Laid Out and Drying

The final result was lots of small fine locks all of which retained their lovely crimp.  They looked so scrumptious that I couldn’t bear the thought of spinning them up and loosing that, so I laid them out in lines across a piece of fabric and stitched them down at the cut end so that they showed all their glory.  I used this to make a padded waistcoat, they were the top of the sandwich of some cotton curtain lining (washed to remove the dressing) and some white wool fibres (I’m not sure what really, but possibly merino) nuno felted to some cotton scrim (thereby hangs another tale!)

Unfortunately it looked awful when I tried it on so it never got worn.  In the end I put the lot in the washing machine to felt and it will finally be worn as a bustle in this year’s panto – yet another tale! (tail?)

Why did I call the Jacob fleece lousy?  Have a look at this picture of the washed fleece – or at least some of it.  It must have been a really course fleece, possibly a ram’s. Whoever off loaded it on me really saw me coming!

10 Washed and Dried Jacob

I came home early from a very ­unenjoyable Guild  meeting in a filthy mood and decided I would make a large piece of Jacob felt so I could take my temper out on the fulling. Ha!  It. Would. Not. Felt – no matter how much “welly” I gave it. A lot of stamping on it and cursing later, it had just begun to felt but I could not get it any further (it’s a wonder it didn’t turn blue!)   I was exhausted and in no better mood when I gave it up.  The resulting heap of joined up fibres ended up in the cat’s bed – she loved it – and bits of it have been stolen back and used as the core of various needle felted things.  I’ve just about used it all up now – getting on for 10 years later.

Here’s a final picture of the Jacob fleece drying after it’s tour through the washing system, and you can see that my trusty assistant at least thought it was worth it.

11 Drying Fleece with Assistant
Fibre and Friends

Fibre and Friends

It’s been a while since I published anything, as I have been going through quite a difficult time.  But I was determined to finish the year with a blog, so this one is a bit of an amalgamation!  Way back in April, I was lucky enough to be invited on a day trip to Wonderwool 2022 by my friend Debbie.  I hadn’t even heard of Wonderwool when she invited me, but when she told me all about it, I couldn’t wait to go!!

For those of you (like me) who have not heard of Wonderwool, it is an annual wool and natural fibre festival that is held in The Royal Welsh Showground, Llanelwedd, Builth Wells, Powys, Wales.  It was first held in 2006, ‘to promote the market for Welsh wool and add value to product for small wool & fibre producers in Wales’.  The festival has grown over the years, and ‘covers everything from the start to the end of the creative process’.  There are exhibits of sheep, raw and hand dyed fibres, yarn, embellishments, equipment, dyes, books and also finished textile art, craft, clothing and home furnishings.   Basically, it’s a felt and fibre artist’s dream come true, where like-minded people can find almost anything they need, and it instills a feeling of excitement, much like a child in a toy shop (at least that’s how I felt!) Because of the covid pandemic, it hadn’t run for a year or two, but this year was to be the first event since the pandemic, so there was great anticipation of the resuming of this popular event.


Around the same time, I had been looking for a carding machine, as I wanted to start making my own wool batts to spin.  Just before my friend invited me to Wonderwool, I had found a lovely Pat Green Carder for sale on Facebook Marketplace, and I had decided to purchase it.  However, the lady selling it (Mary Rogers) lived in Birmingham, England, so I was trying to work out when I could make the drive up to Birmingham to collect it.  As it happened, Mary told me that she was planning to go to Wonderwool, and could bring the carder with her!  Fantastic, I thought… this is definitely meant to be!!  Don’t you just love it when things just fall into place?!


Having made all the arrangements, Debbie and I took the drive up to Builth Wells for the day, and boy, was I totally inspired!  When we walked into Wonderwool, I can honestly say my eyes must have lit up!  I really did feel like a child in a sweet shop!!  There was stall after stall of beautiful fibre, yarn, and all things sheep (not to mention other types of fibre, including alpaca, angora to name a few)!!  What struck me first, was the wonderful array of colour.  There were exhibitions of different fibre craft, demonstrations of spinning and weaving, with exhibitors from all over the UK.  We also had the chance to talk to a range of like-minded people, who were happy to share their tips and techniques with us.  Wow, what a wonderful time we had!


One of the exhibitors we spent time talking to, was a lady by the name of Edna Gibson, who explained that she had spent time living in Japan being taught the wonderful art of Kumihimo, an umbrella term for several kinds of Japanese braidmaking that were unknown outside Japan until about 30 years ago.  Edna told us that she was instrumental in introducing Kumihimo to the UK.   The term Kumihimo is a composite of two words, ‘kumi’ meaning coming together or group, and ‘himo’ meaning string, cord, rope or braid.  Whilst most of us will have  heard of Samurai,  I didn’t realise that the Samurai armour plates are laced together with cords, traditionally Kumihimo braids, which are also tied around ‘obis’, the sashes used on kimonos.  Edna explained that she was taught Kumihimo by a very skilled Japanese person, and brought her knowledge back to the UK.  The looms used for Kumihimo are known as ‘dai’ or ‘stands’, and are usually made from either wood or bamboo.  All the dai are set up with carefully measured threads (as many as 80 strands of fine silk are wound on each bobbin or ‘tama’).  The weighted bobbins are lifted and moved in specific repeated sequences  to produce each type of braid. Traditionally, silk was used to make braids but today, braiders also use artificial silk or rayon.

  This is my friend Debbie, with the lovely and very knowledgeable Edna.

This shows the two types of dai used.  Apologies for the poor quality of this photo, but it was taken from one of the information boards Edna had put up…

  The top photo shows braiding on a ‘Marudai’ and the bottom photo shows braiding on a ‘Takadai’.

Edna’s braiding…


As you can imagine, it was hard not to go on a full-out spending spree at Wonderwool!! There were so many beautiful fibres on offer, not to mention everything else!! I haven’t crocheted for many years, but was inspired by a beautiful pattern, by Janie Crow called ‘Mystical Lanterns’.  I ended up purchasing both the pattern and the yarn!  It’s a work in progress, but I’m enjoying the process!

These show some of the exhibits on show at Wonderwool.  Hopefully, my scarf will turn out as lovely.


There were so many exhibits and stalls, too many to include here, but this will give you a flavour of a few of the exhibits on show…

  To be honest, I was so busy choosing fibre to purchase, I didn’t take any photographs of the actual stalls!!


At the end of the day, I met up with Mary and her friend, to collect my drum carder.  It was lovely to share a coffee and a chat with her, and she was able to share the history of the carder with me.  We parted the day friends who share a passion for fibre, and agreed we would definitely meet up again at next year’s Wonderwool!  We shared a ‘selfie’ before we left…


As I mentioned, I haven’t posted for a while, due to going through a very difficult period in my life, which resulted in me not having the energy or inclination to do any fibre craft whatsoever, so I had not actually even tried out my new carder until quite recently.  But when I felt able to resume my spinning, I found it really helped me in a very mindful way.  I particularly found that spinning brought me a sense of calm and peacefulness, with positivity and joy.


My first project was back in October, hence the autumnal colours!  I put together a collection of merino fibre of different colours, with one part of bamboo in a dark shade.  I weighed the fibre first, as I wanted to make two batts of fibre that I could spin ready to weave with.


Having never used a drum carder before, this was all experimental but in the end, I was really pleased with how it turned out…

I didn’t want to blend the fibre too much, as I wanted to have the different colours come through when I spun it.  Also, I’d heard about people ending up with ‘mud’, so that was something else I wanted to avoid.  Having blended my fibre to reflect my need, I then proceeded to spin it….

This shows the difference when using a flash (on the left) verses no flash (right).

Once I had filled my bobbin completely, I proceeded to wind it into a ball, so I could ply it from both ends of the yarn.

This is the finished yarn, once it was soaked to set the twist, thwacked and dried…

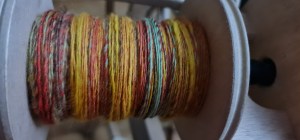
  I’m quite pleased with the results.  I also feel that my spinning has improved a bit since I posted on her last time!  I’m looking forward to weaving with this yarn over the Christmas holiday period.  Hopefully I will be able to show you the end product in my next blog!

Wishing you all a very merry Christmas and a happy, healthy 2023, from Lisa and Alex 🙂


Weaving (Part 2) a Viking Twill from Birka Sweden

Weaving (Part 2) a Viking Twill from Birka Sweden

I had told you about my original foray into weaving with Overshot done totally wrong in a previous post.  My original goal of learning to weave was to create fragment #10 from the Viking digs at Birka Sweden.

Map showing general area of Sweden that Birka is located. 1 This Map helpfully shows where Birka Sweden is.

BIrka is on Bjorko, an inland past Stockholm.2 BIrka is on Bjorko, an inland inland past Stockholm.

Birka was a Viking trading town founded in the mid 700’s and was an important trade city for about 200 years.  The town was abandoned around 975AD with the speculation, while I was at university, was that the harbor had become unusable (Silted up or glacial rebound) and the town relocated elsewhere. It became a UNESCO World Heritage Site in 1993.  There had been a lot of archeological work done at Birka starting in the late 1800’s.  The Birka Graves provided important artifacts, of both of domestic and foreign origins.  “Grave Bj 582: Female Warrior” in particular has attracted a lot of interest and debate. There have been extensive (4800) textile fragments fines from Birka. Only a small portion of which have been studied.  including the broken lozenge twill fragment labeled #10 when I was originally investigating the fragments.

It was particularly fine and in a high thread count. Therefore, there was debate; “was it locally produced”(how could locals produce such fine cloth?), “was it imported, if so who made it” this was the prevailing thought at the time, I felt it was unfair to think local weavers could not possibly have make such fine fabric.  I thought it was one of the most fabulous fabrics I had ever seen and was determined to figure out how to make it. At the time I could not find a draft for an obscure historical textiles so would have to figure it out from a photo I had been given of the fragment.

Photo of Icelandic Variant Warp-weighted Loom  from Reykjavik National Museum. Shows shed rod supports, upper beam with laced on warp , loom weights and sword beater.3

Diagram of Icelandic Variant Warp-weighted Loom  from Reykjavik National Museum. Shows shed rod supports, upper beam with laced on warp , loom weights and sword beater.4  Photo and Diagram of Icelandic Variant Warp-weighted Loom  from Reykjavik National Museum. Shows shed rod supports, upper beam with laced on warp , loom weights and sword beater.

It was originally woven on a warp-weighted loom. Even this loom is fabulously amazing! Not only is it a vertical loom (there are only a few types of loom that are vertical) but it’s the only one I have found that beats the warp up into the shed. Yes! you wind the finished cloth onto the top beam and the warp hangs beneath and is waited by rocks! Cool! I get to meld my interest in textiles with my interest in geology. Well actually, I measured the inside of my first car, a Pony Hatchback, then scaled the loom to fit the space from the inside of the hatchback to the back of the driver’s seat and wound up with my ¾ size Icelandic warp weighted loom when compared to one of the museum looms. My original loom weights were actually plates from roman lamilar armor. They sounded like wind chimes as I wove, the metal plates tapping agents each other. They “Mysteriously Disappeared”, in the last move. (They were heavy and made a lot of noise when I used the loom.)

I had found a hardwood 4×4 or it might have been a bit bigger as part of a skid (that is also known as a pallet, made of wood that forklifts lift piles of stuff on top of.) I took it over to my parents’ house and explained what I wanted to do trim off some edges, and dill holes down the length of the remaining edge side then lace a starting cord onto it through the holes. Dad looked a bit confused but said he would think about it and come back next weekend and we could finish figuring it out. (I had really been looking forward to getting to use the Drill press, maybe the table saw and of course the power sander!!!)

I arrived and was presented with the completed top beam notched, drilled and sanded ready to measure and make uprights. Oh well, I eventually bot my own drill press and table saw. We discussed the uprights and shed rods supports and got the whole loom done to the 3/4th scale I needed to fit in my little car.

I had been very lucky and purchased the Marta Hoffman book, The Warp-Weighted Loom, in 1990. So had the information she had on the different types of warp-weighted looms. I had chosen the Icelandic variant partly because of the lack of needing a card-woven starting border.

the Warp-Weighted Loom by Marta Hoffmann. This is a Fabulous tome of wisdom that I have been looking for a second copy of for decades…literately… decades. The orange cover shows two Greek woman weaving on an upright weighted loom.5 the Warp-Weighted Loom by Marta Hoffmann. This is a Fabulous tome of wisdom that I have been looking for a second copy of for decades…literately… decades. The orange cover shows two Greek woman weaving on an upright weighted loom.

Marta wrote the book in 1964, studying the archeological fines and looking for people who ether remembered the looms in use or had used them. The book has a number of examples of weavers preparing the warp, set up and weave on this type of loom.  Sadly this book has been out of print for a long time now. I have Very much wanted to get a copy for the guild library since my own copy is in a sad state and some what annotated. (Don’t hate me, the notes are in pencil!!!) but the library budget can not afford it. I keep looking for a light orange book in every thrift store used book section!! I live in hope.

I made a photocopy of the photograph of the fragment and blew it up as large as I could clearly. Next I selected a section that was a twill run and started counting threads, (under, under, over…) to create the  draw down and continue to create the rest of the draft.  From there I assigned each thread to a harness watching for the tread to repeat later in the pattern. Then worked out the tie up for each line and number the treads to figure out the sheds needed to weave the fragment. It worked out to require 3 shed rods and the natural shed on my Icelandic warp weighted loom, so this could be woven on a 4 harness floor loom. I am not sure where my original draft has disappeared to, but there are now various drafts on line labeled broken lozenge twill.

one of my four harness table looms set up to weave at a demo (Carp fair I recognize the tractors) with the broken lozenge twill draft on a paper beside it. The blue and gray blanket in the background is the same pattern.6 one of my four harness table looms set up to weave at a demo (Carp fair I recognize the tractors) with the broken lozenge twill draft on a paper beside it. The blue and gray blanket in the background is the same pattern.

working out from the draw down to find the threading and the treadling. (Weaving draft in black and white, the gray boxes indicate the treadle with the second number being the other harness the treadle engages)7 working out from the draw down to find the threading and the treadling. (Weaving draft in black and white, the gray boxes indicate the treadle with the second number being the other harness the treadle engages)

When I compare it to the ones I see on line, I suspect I had a photo of what has now been decided as the back of the fabric. Since I seem to have subtle changed in the treadling and threading part of the draft but still have the same draw-down.

on line example of broken lozenge twill8 on line example of broken lozenge twill

I have use this draft many times with both cotton and wool. I think the first time i time I wove the pattern was on my rather ancient Clement loom. It is a jack style loom (the harness move up as you push on a treadle (peddle)) and is a direct tie-up style, so there is one treadle per harness. This is a great way to learn how the threads are exchanged to create the structure of a weave. I wove it using grey wool with an accent of blue hand died South American wool (maybe coriadale?) I discovered it was less tightly spun than I would have liked, but it was the exact colour I wanted, unfortunately it broke frequently, so I got lots of practice fixing warp threads.

the grey blanket with the weakly spun blue warp stripe sitting on a chair with my apron in front of the display tables and behind the tip of my road bug spinning wheel. At the Richmond Fair.9 the grey blanket with the weakly spun blue warp stripe sitting on a chair with my apron in front of the display tables and behind the tip of my road bug spinning wheel. At the Richmond Fair.

the carp fair display the gray blanket with blue stripe in the center with other weaving around it. We have used emergency painters drop cloth plastic to make walls for the tent since it was raining.10 the carp fair display the gray blanket with blue stripe in the center with other weaving around it. We have used emergency painters drop cloth plastic to make walls for the tent since it was raining.     

A different Richmond Fair demo, the gray and blue blanket draped over my folding chair; you can now see the rest of my small travel wheel. Yes, that is a woolly winder on a road bug!11 A different Richmond Fair demo, the gray and blue blanket draped over my folding chair; you can now see the rest of my small travel wheel. Yes, that is a woolly winder on a road bug!

I wove another piece at a demo with Philosopher’s wool. It is an Ontario cooperative of wool producers who spun and died there wool without the use of harsh chemicals. While weaving it I got lots of complements on the pattern, “it  was so novel and original!” I did explain that it was the height of fashion for a 10c Viking woman. What is old is new again.

Philosophers Wool in blue and grey, in broken Lozenge Twill, the basket has its overshot in slub-cotton  and a needle felted basket dragon with hand died silk wings.12 Philosophers Wool in blue and grey, in broken Lozenge Twill, the basket has its overshot in slub-cotton  and a needle felted basket dragon with hand died silk wings.

I have taken these to various demos over the years. You may remember seeing them in displays at various demos I have shown you. We have used the larger shawl size to demonstrate the thermal value of wool. It has warmed myself and various others of the demo team as well as the general public who were wondering by the demo and looked particularly chilly.

Fellow weaver and guild member, trying to warm up (Carp fair)13 Fellow weaver and guild member, trying to warm up (Carp fair)

Another Weaver/ Spinner guild member demonstrating the thermal value of wool (trying to keep warm) (Carp fair)14 Another Weaver/ Spinner guild member demonstrating the thermal value of wool (trying to keep warm) (Carp fair)

I have set up the table looms I use for demos with a long cotton warp of lozenge twill and sometime Broken lozenge twill and let the public try out ether following the pattern or making up their own. It has been fun to see what had developed.

feels like miles of demo weaving, this warp took a few years of demoing to finish. You can see the various changes in patterns and changes in enthusiasm of beat.15 feels like miles of demo weaving, this warp took a few years of demoing to finish. You can see the various changes in patterns and changes in enthusiasm of beat.

If you too are having trouble finding a copy of the Marta Hoffman book you may want to look for the more recent book on warp weighted looms. ( I know you are all going to put down your felting needles, just for a moment, and rush out to the workshop to make your own Icelandic variant warp weighted looms!! But, maybe only half size so it’s more transportable)

a new book on warp-weighted looms by Kljasteinavefstadurinn Oppstadveven ( i have found a copy of this for the local guild library but they haven’t had the budget to pay me for it yet.)16 a new book on warp-weighted looms by Kljasteinavefstadurinn Oppstadveven ( i have found a copy of this for the local guild library but they haven’t had the budget to pay me for it yet.)

I want to leave you with one more reason to consider weaving.  This is one of my two harness table looms, its warped with worsted wool. I am doing test weaving for an Icelandic bed covering that has inserted locks of Icelandic tog (the course outer layer of the dual coated Icelandic sheep). It is said to trap the warm air from your body and keep you toasty while you sleep.

sample of Icelandic blanket, on a two harness table loom with wooden shuttle. The cloth looks furry. This was at the makers fair Demo at the Aberdeen pavilion in Ottawasample of Icelandic blanket, on a two harness table loom with wooden shuttle. The cloth looks furry. This was at the makers fair Demo at the Aberdeen pavilion in Ottawa17-18 sample of Icelandic blanket, on a two harness table loom with wooden shuttle. The cloth looks furry. This was at the makers fair Demo at the Aberdeen pavilion in Ottawa

I am trying multiple ways of laying in the staples of wool (Tog). From the archeology, there are multiple ways to add the fiber. The warp is white with two blue stripes.  The weft is white wool in the shuttle and white grey and charcoal tog inserted every few rows woven.

I hope you have enjoyed the wonder into weaving and I promise I will get back to felting tomorrow. I have to finish my notes for the “Needle Felted Thing” Workshop this coming Saturday! I will tell you more about that another time.

Let me know if you bump into a milk crate of lamilar armor that was just perfect as loom weights!