
Update needed on my Name tag Part 2 (a 3-part process).
Part 2 the Lanyard
For this falls’ guild sale and exhibition hands-on area, one of my suggestions was a cardstock marudai. Since then I have been sampling colours, and varying thicknesses of cotton yarn.
 Prototype marudai with garden Rabbit holder.
I started with the “embroidery” cotton from the local Dollerama. Since you can’t pull it apart it’s not really embroidery thread but it is cotton! The cotton comes in packs of dark solid colours, pastels and variegated colours. I have a fondness for blue so I pulled those colours for my lanyard. I had a mid-tone and light blue as well as variegated.
 “100% Cotton, each skein is 7.3m/23.9ft.”
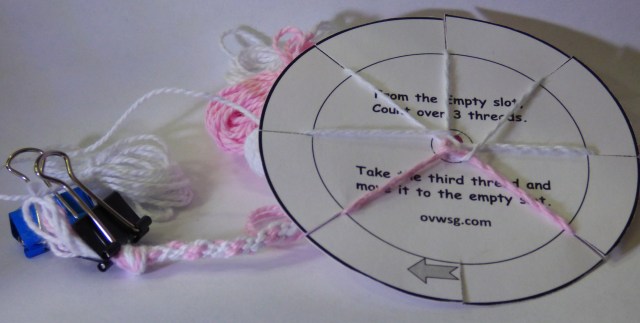
The marudai should be printed out on a heavy cardstock. I made a template in publisher then saved it in PDF and Jpeg.


the 4 version of the English edition
You will also require;
- 8 slots,
- a hole in the center and
- 7 strands of yarn.
Good options are
- tiny elastics and a
- mid-side Bulldog clip

Tiny hair elastics and Bull dog clips were available at the Dollar Tree and Dollarama

With help from the guild I made a French side. Originally it was to be on opposite sides from the English one but my printer would not pull the paper in consistently so I was getting miss-registration I couldn’t correct, So it looks like there will be French and English versions separately. (Sorry!!)

Set up:
Depending on how you set up the colours and position them you will get different patterns. (I have not yet tried all the variables) gather all the 7 strands together and Tie a knot (leave extra length after the knot if you want to have a fringe). Ether push the knot through the hole in the centre to the back side or from the back side, thread the yarn through leaving the knot. I add the bulldog clip to the knot so it won’t slide through the centre hole. Skipping one slot, space your strands into the 7 other slots. Wind your strands up so they’re about 4 inches loose; the rest wound up in a butterfly. Use the knot for marudai bobbins or elastic to keep if from slipping when you don’t want it to. (See the picture above)
How to weave:
This is really important. I’m sure you have heard how complicated weaving can be! without trepidation keep reading!
Step 1) From the empty slot count clockwise to the third strand.
Step 2) Pull it out of its’ slot and move it to the empty spot.
Step 3) rotate the marudai so that the empty slot is towards you again.
Repeat from step 1 until you run out of yarn to weave.
When the cordage you are making gets too long curl it up and clip it with the bulldog clip.
Keep the marudai surface flat and the strands will not tangle as much. Also keeping them not too long will help keep them in order.
So that wasn’t too bad for instructions. Even if you have the type of dyslexia that gets left and right confused and thinking clock wise and anticlockwise dose not help, it will still work as long as you keep going the same direction for the length of the band. I look forward to seeing what you do with your cordage. Trim for hats or ties to keep the hats on, lanyards for scissor cases?
Some of the patterns I have tried so far;
I tried 1 colour /6 of another colour

I tried 2 of one colour / 5 of a second colour
I tried 3 of one colour / 4 of a second colour


I tried 1 colour / 2 of one colour / 4 of a second colour


I also tried a pattern called Fenestrations (it’s a fancy way to say windows) but I did it backwards (it’s probably the dyslexia) Fenestration requires multiple threads or using a thread of a larger diameter for most of the yarn and the last one being significantly smaller (3 or 4 threads to 1 worked well for me with the embroidery cotton) It is supposed to look like windows if it’s done right. Mine was inverted so the window stuck out instead of in!


You can see how the dark blue is multi strand (3 or 4 strands) while the light blue is only one strand.
One of the weavers (Janet Whittam) brought in a bag of scraps and thrums (the leftovers from a woven warp which are lengths or bits or yarn) thrums can be cut up and carded into fiber to make interesting pops of colour. Or you can do as I did and take a long time untangling the mess it had become and use them for further experimentation with the cardstock moridis. (I’m sorry I didn’t take a before sorting picture it really was a mess)
 the mostly untangled thrums
I have 5 colour samples on the go plus a few others I have been puttering on in various baskets around the house. I have found they are easy to keep in an extra-large Sandwich Ziploc bag so you can easily bring them with you. I don’t find I get as many people asking what I am doing they may be miss identifying what I’m up to as corking instead of Japanese braiding.


This is a fast portable way to make cordage. This particular pattern, 7 strands in an 8 slot marudai, makes a number of variations depending on colour and strand placement. It is easy to pick up and put down and not lose your place. So interruptions won’t destroy your progress! i have defiantly found the equivalent to a drop spindle for weaving!
Cordage can be used as pull tabs for zippers, fobs for key rings, trim on garments or accessories, and ties and laces. It is highly portable. ( I keep mine in individual extra-large sandwich Ziploc bags. I used it last night chatting with Glenn at Al’s Diner before dinner arrived. ) they are also extremely cheap to make so you can have more than one! (OK i do have a lot more than one spinning wheel or one loom and a lot more than one felting project on the go!)

Check back, Part 3 will be the needle felting of the picture and the name. Now what will I do? I suppose I should stick with Jan since I can mostly spell that correctly!
6 thoughts on “Update needed on my Name tag Part 2 (a 3-part process).”
Thank you for sharing. . It looks like something I need to try my hand at.
I see these at wool events and often think of giving one a try. It’s a great way to use up thrums and scraps. Thanks for sharing.
Lovely clear tutorial Jan – a great way to make cords!
Great way to make cords Jan. I look forward to seeing your end result with the name tag.
I had no idea how to make cords. Thanks for sharing!
I am looking forward to seeing the new name tag.