Cheesecloth Meets Merino Wool
Today we have a guest post from Lyn.
***
I was lucky to win some of Ruth’s hand-dyed cheesecloth in a recent giveaway post – scrummy isn’t it?

I really liked the pattern in the dark green piece, top left, so I cut a 27cm circle from it, then placed it on top of 2 layers of white merino wool fibres that had been laid out to form a rough, slightly larger circle.
I used white merino so that after the nuno process the colours of the cheesecloth would remain the same, although they would be slightly muted because of the migration of the white fibres.
To reduce the dulling effect of the white fibres, I very carefully shaved the superfluous fibres from the top of the dry nuno felt. Shaving is a tricky process as the ruched fabric can easily be damaged.

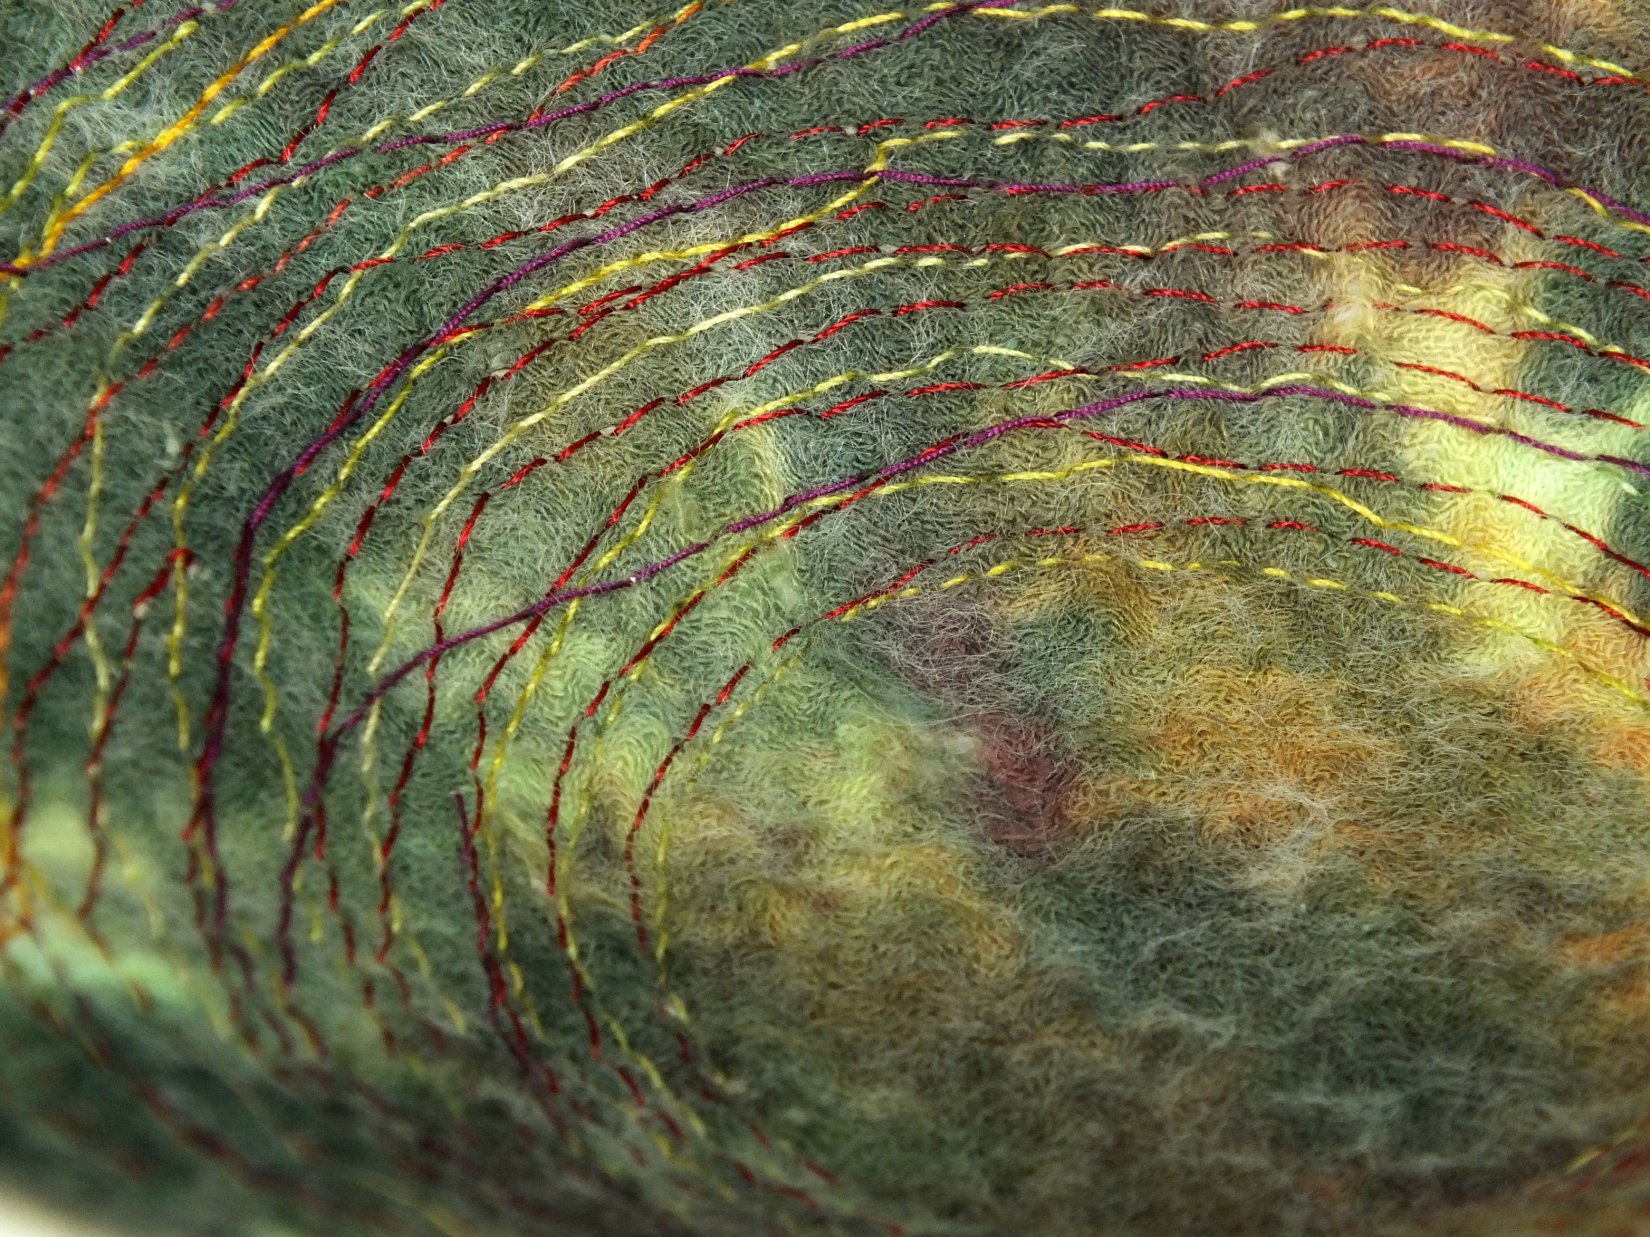
I then messy-stitched the piece of flat felt into a rustic bowl. I love this kind of stitching and it’s best described as stitching done with your eyes shut – different coloured threads, short stitches, long stitches and rows of stitches that meander wherever they choose.
I thought the centre of the bowl looked pretty without stitches, but it wanted to buckle a bit, so I cut a circle of stiff, iron-on interfacing – the exact same size as the centre of the bowl – then ironed it to the underneath of the bowl. I used the base of an upturned tall glass tumbler as an ironing board.
The finished rustic bowl:

Nuno felting is an easy way to add interest to a plain item. This pod was made with a 20cm circular resist.

I used four layers of merino wool on each side of the resist, then placed a circle of cheesecloth on the top of the side that would have the hole cut into it.

The cheesecloth added colour and texture to the top of the pod.

Thank you Ruth. I’ve now got two lovely items and plenty of cheesecloth leftover for my stash.
29 thoughts on “Cheesecloth Meets Merino Wool”
Very nice bowls! Also, thank you for giving a tip on how to strengthen the work to keep form (iron-on material) and ironing on a tumbler. You have such good ideas!
Thank you Nada – the ideas for using stiff iron-on stabliser for the base and the tumbler for an ironing board were both born from necessity.
Lovely idea to add the machine embroidery. Have done this on flat felt, but not to a bowl. Love the colours of the cheese cloth too.
Thank you vicky. I love stitching onto felt, and the messy stitching is sooo achievable – no-one can spot any mistakes!
They both turned out great, Lyn 🙂
You make me want to buy a new machine!
Thanks Zed. Go get a reliable machine – it’s worth it! Ignore the expensive, flashy, plastic new ones, an old bog-standard one does the job.
Love them both. 🙂
Thank you Judith.
These really look great. Good Job!
Thank you Judy, but I did have great cheesecloth to work with.
Looks wonderful! I particularly like the pod, but only because I keep thinking it would make a great present for my cats 🙂
They would love playing with it!
The green piece was my favorite piece too! Both pieces are great but that stitched bowl really shows off the cheesecloth. And thanks to http://cheeseclothfabric.com/ for giving us the opportunity to play with their product. 🙂
It would have been a shame to not use the beautiful pattern in the green piece – it was far too pretty to cut up into small pieces!
The bowl is purely ornamental and looks good on my table.
Both are beautiful Lyn and functional decorations. The pod looks so perfect. I have to try that.
Thank you Marilyn – loose weave fabric just seems to melt into the wool fibres when you’re making a pod.
This is a pod I made several years back, using my hand dyed scrim – it had a looser weave than the cheesecloth above.
http://www.craftsy.com/project/view/wet-felted-pod-/6056
Oooh, that is yummy! Thanks Lyn.
Lyn I went to the site joined and saved the project, but don’t know how to access it. The help was no help. :-). I’ll probably just access it on your website.
Craftsy keep messing us about. They got rid of the Felting categories and made all or projects and tutorials hard to find and deleted a lot of the links. I forgot to go back and fix mine, I probably should.
Zed, I’m not impressed with that site at all.
Lyn, I do like how both the bowl and pod turned out…beautiful colors! But is it the stitching that allows the flat circle to have the bowl shape, or your shaping during felting? What kind of sewing machine allows you to go through those layers? I just have your basic $200 Janome for straight stitching and sewing repairs.
Yes, it’s the stitching that turns the flat felt into a bowl. I have an old Bernina 801 (Annie has the 801 Sport. More or less the same. You can see it on the front page of our blog.)
Fancy stitches and computerisation are not necessary for free motion sewing.
By the way, the decorative bowl was made using only 2 layers of merino wool so it wasn’t thick.
Would love to try that bowl next with the embroidery…very cool!
Great Job Lyn, you make me feel guilty that I haven’t done anything about my cheesecloth yet.
Thanks Ann – I know what you mean – often when I see things on the forum I have panicky thoughts that I haven’t done as much as I could!
Hi, I love the use of the cheese cloth on the felted bowl!! Did you just lay the cloth on top of the final layer then go ahead with the usual steps in felting a vessel using a resist? Or are there a couple of extra pointers you can pass on at all? I have not yet attempted it but very keen to!
Thank you Vanessa – yes, the cloth was just laid on the top of the final layer and the wool fibres trap the cloth so there is no need to do anything else.
Tip: until the fibres have taken hold of the fabric, use gentle agitation – when the fabric doesn’t move around too much you can carry on making the pod as usual.