Browsed by
Tag: Lyn

Cheesecloth Meets Merino Wool

Cheesecloth Meets Merino Wool

Today we have a guest post from Lyn.

***

I was lucky to win some of Ruth’s hand-dyed cheesecloth in a recent giveaway post – scrummy isn’t it?

hand dyed cheesecloth - Ruth Lane - small image

I really liked the pattern in the dark green piece, top left, so I cut a 27cm circle from it, then placed it on top of 2 layers of white merino wool fibres that had been laid out to form a rough, slightly larger circle.

I used white merino so that after the nuno process the colours of the cheesecloth would remain the same, although they would be slightly muted because of the migration of the white fibres.
To reduce the dulling effect of the white fibres,  I very carefully shaved the superfluous fibres from the top of the dry nuno felt. Shaving is a tricky process as the ruched fabric can easily be damaged.

shaving the felt - small image
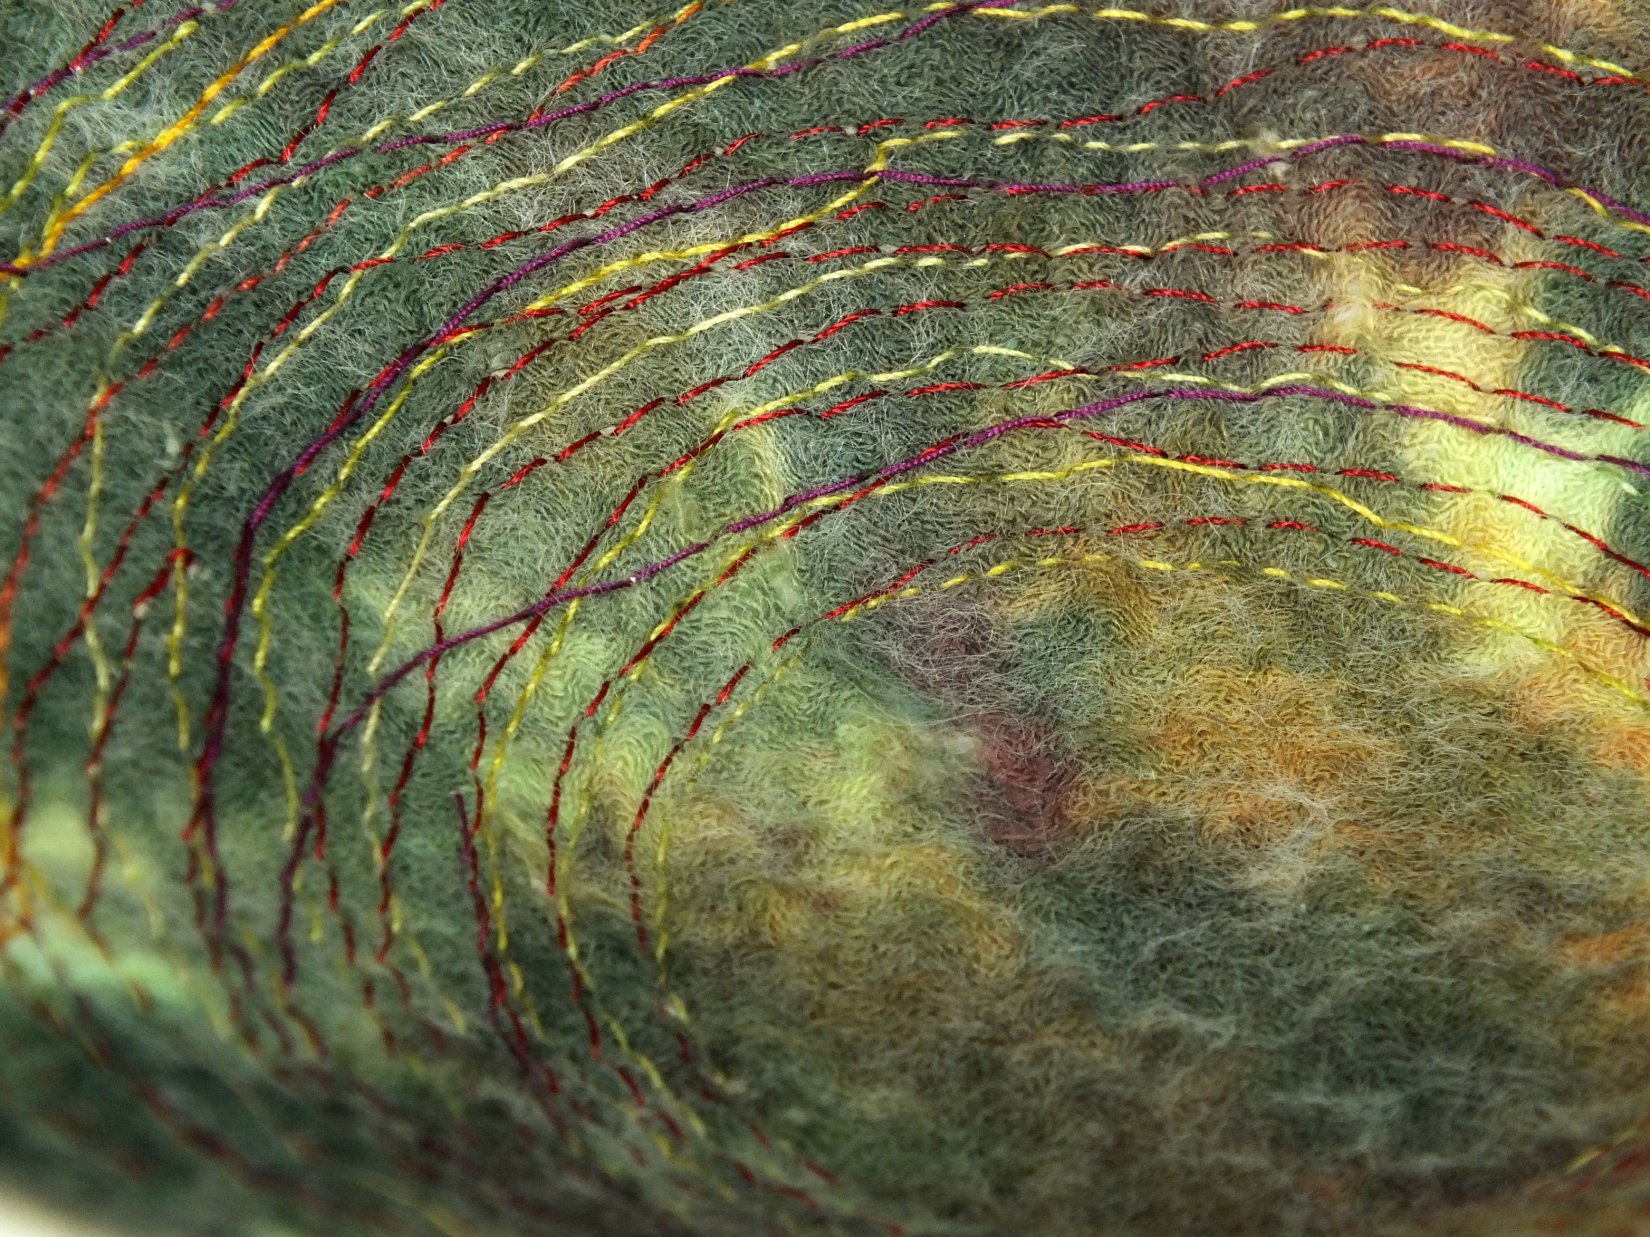
I then messy-stitched the piece of flat felt into a rustic bowl.  I love this kind of stitching and it’s best described as stitching done with your eyes shut – different coloured threads, short stitches, long stitches and rows of stitches that meander wherever they choose.

rustic stitching - small image
I thought the centre of the bowl looked pretty without stitches, but it wanted to buckle a bit, so I cut a circle of stiff, iron-on interfacing – the exact same size as the centre of the bowl – then ironed it to the underneath of the bowl.  I used the base of an upturned tall glass tumbler as an ironing board.

The finished rustic bowl:

rustic nuno and stitch bowl - small image

Nuno felting is an easy way to add interest to a plain item.  This pod was made with a 20cm circular resist.

pod with cheesecloth - small image
I used four layers of merino wool on each side of the resist, then placed a circle of cheesecloth on the top of the side that would have the hole cut into it.

cheesecloth on last layer of pod - small image
The cheesecloth added colour and texture to the top of the pod.

pod with cheesecloth close-up - small image
Thank you Ruth.  I’ve now got two lovely items and plenty of cheesecloth leftover for my stash.

Third Quarter Challenge – Lyn’s Entry

Third Quarter Challenge – Lyn’s Entry

Today’s post is by Lyn from rosiepink

Yacht Heeling
Yacht Heeling

I enjoy the Studio Challenges because they encourage me to try different things.  Karen’s challenge for this quarter is ‘Mixed Media’  and after spending a day on Lepe Beach during Cowes Week, I just had to do a yacht.

My husband likes painting so I thought a joint project would be fun.  I gave him a rectangle of machine-made white felt  (45cm x 33cm /18″ x 13″) and asked him to paint a sea/sky background using water colours.  I thought water colours would look good on white felt, sort of fuzzy and pretty, and it did look good … but as it dried the paint sunk right down into the felt!

He painted the background again… then we sadly watched it fade as before.

We stared at the felt, and had a think, then decided to try watered down acrylic paints.  It looked lovely but we weren’t going to stand by and nervously watch.  We decided to be proactive.  Out came two hairdryers and we blow-dried the watery paint on the felt as quickly as possible.  Success!

I cut a hull and sails from beautifully textured, shiny dupion silk then laid the pieces onto the painted background.  Yuk.  It didn’t look good.  So I tried other ideas such as using scraps of handmade felt and various fabrics.  Nothing seemed to work so I pushed it to the edge of the table and even considered abandoning the idea.

My room was a real mess because I’d got out so much of my stash searching in vain for just the right thing.  I took a deep breath and started to tidy, and that’s when serendipity happened.  A scrap of lightweight interfacing material somehow landed on the painted sea.  It looked good.  It wasn’t too heavy, as the other fabrics and felt had been, it would be easy to stitch into place and I could colour it.

yacht spinnaker in the water - small imageI cut out the shapes I needed then ran ‘messy’ free stitching over the interfacing until I was happy that it looked like a yacht heeling.  I considered leaving the interfacing unpainted (and I wish I’d taken a photo at that stage) because it had a delicacy about it that I liked, but I’d planned on having a colourful spinnaker so I applied water colours to the interfacing.  I used an almost dry brush because I thought that if I made the colours too solid they would overpower the background.

When I’d finished, my husband added a little more white acrylic paint to the bottom of the spinnaker and the hull of the boat.

I liked working on the joint project but it wasn’t easy on my ears.  My husband sails so he felt obliged to impart his knowledge by frequently pointing out that my stitching of the yacht wasn’t anywhere near technically correct!

Thank you Karen – I’ve benefited a lot from your challenge.