Browsed by
Month: August 2013

Something Different

Something Different

I’m still trying to finish projects and WIPs so I can tidy my summer sewing stuff away. I found an unfinished project from years ago when I was putting some felt offcuts away. Hopefully, this link will show some of the pieces I made, if not search my photostream for ’embellished’. It inspired me to finish it off and make some more. So I had a rummage through my offcuts and found lots of nice ones, so many that I started to think that maybe I wanted to do something a bit bigger, like a notebook cover (surprise, surprise!). I found some thin pieces of felt to use as a base and sewed them together. I really wanted to make something the complete opposite of the carefully measured and carefully and neatly sewn notebook covers I usually make. So after spreading all the felt offcuts out, I got some contrasting sewing thread and set to work attaching the pieces to my felt base. I didn’t expect it to take as long as it did and I got through quite a few episodes of Foyle’s War while I sewed 🙂

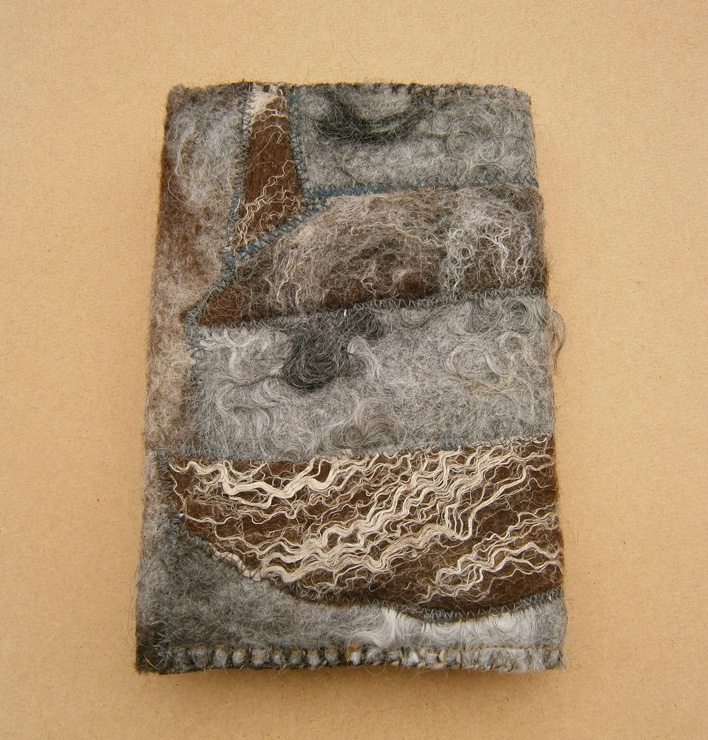
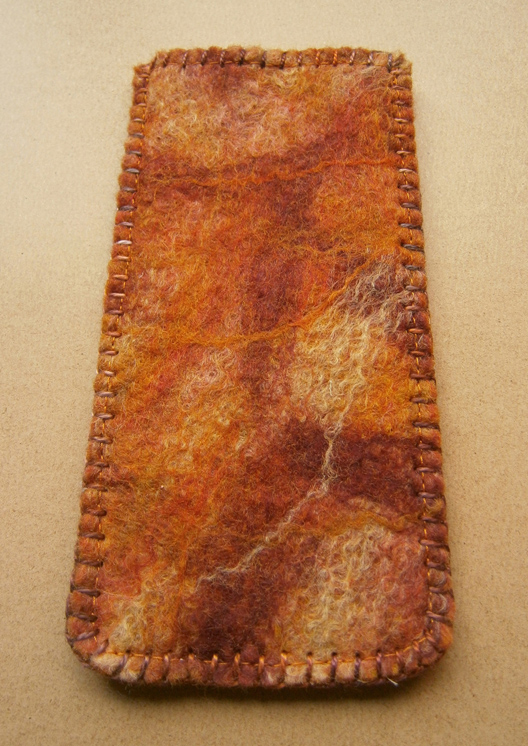
When I’d attached all the pieces, I attached a piece of thin blue cotton fabric to hide all the stitching and thread. Then I folded the flaps in, machine stitched them in place, then hand stitched the top and bottom edges. I think you’ll agree, that it’s nothing like what I usually make 🙂  This is the front:

OLYMPUS DIGITAL CAMERA
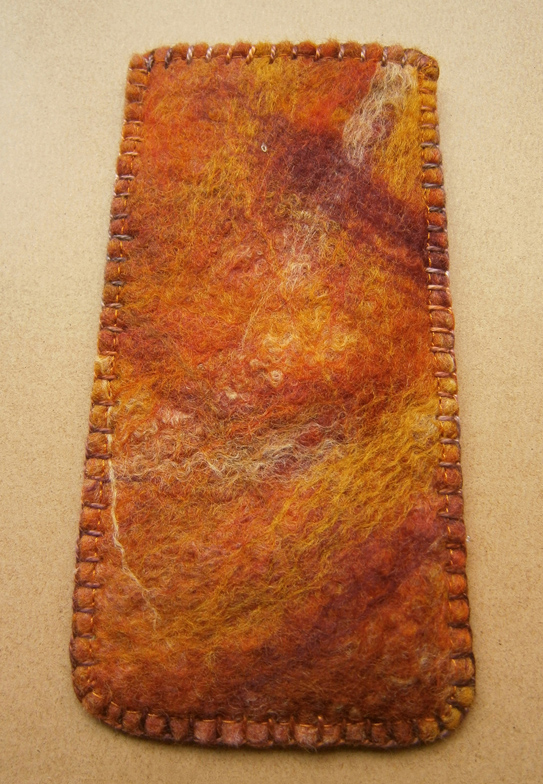
And this is the back:

OLYMPUS DIGITAL CAMERA
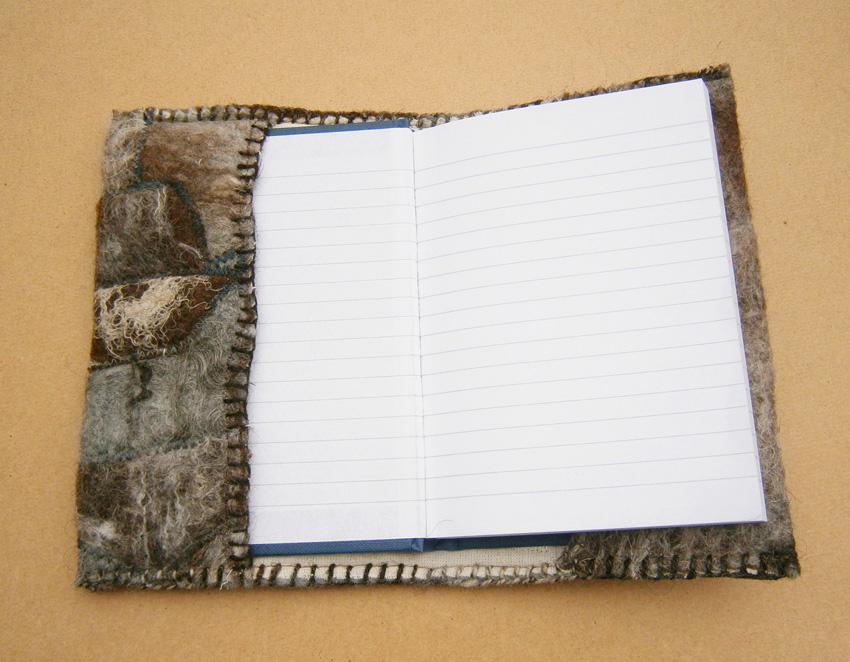
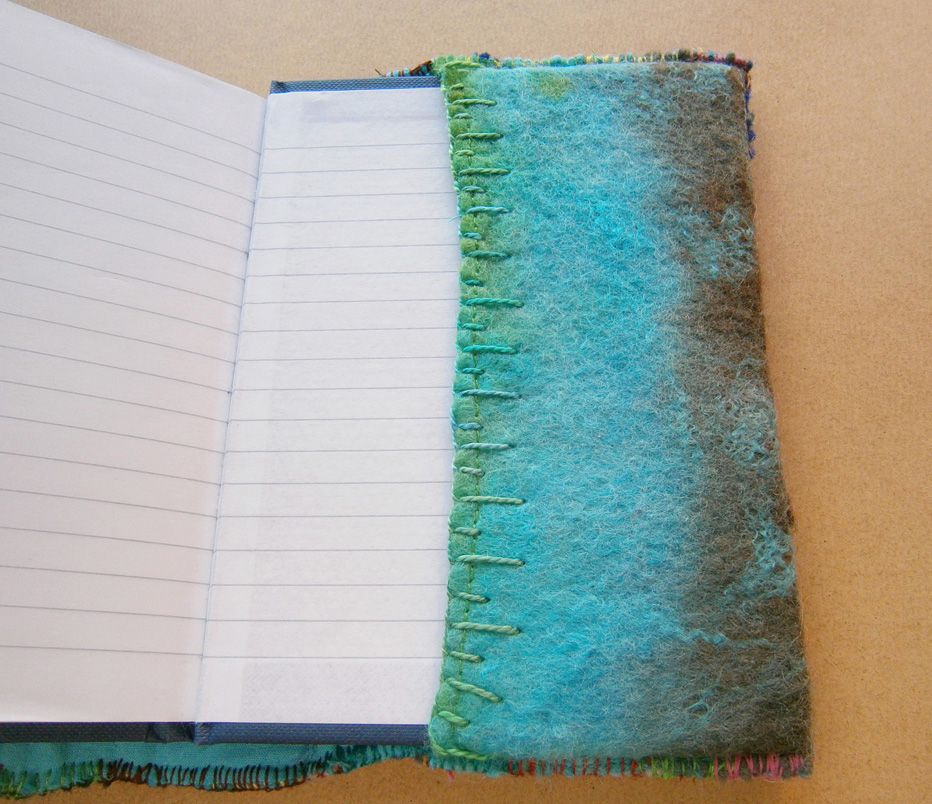
I tried hard to make sure nothing matched, and that it wasn’t too neat or even, including the top and bottom edges, I just followed the edges of the base felt. This is the cover opened out:

OLYMPUS DIGITAL CAMERAI didn’t attach felt pieces to the base where the flaps would be, I didn’t want it to be too thick. The felt I used for the flaps was originally white merino and cotton which I experimented on with direct dyeing.

OLYMPUS DIGITAL CAMERAOLYMPUS DIGITAL CAMERAI also made a strap closure for it in much the same way as I made the book:

OLYMPUS DIGITAL CAMERAIt just fits around the book and clips together with a Delrin clip.

OLYMPUS DIGITAL CAMERA
I thought this notebook would stick out like  a sore thumb in my etsy shop, but surprisingly it doesn’t. But maybe that’s because it probably has a little offcut from almost every other piece in there with it!

Yurt Tono and a Felting Party

Yurt Tono and a Felting Party

Dennis and I are still plugging away at the carpentry work on the yurt. This past weekend, we drilled the holes in the tono. The tono is the circle at the top of the yurt that the roof poles fit into. Dennis bought a special drill guide so that we could drill the holes at a 30 degree angle. I can’t imagine how we would have drilled at the proper angle without this guide.

Drill GuideIt works really slick. Dennis had measured and marked where all 52 holes needed to be around the outside of the circle.

Holes in TonoSo now we just need to sand the tono a bit more and it will be ready to paint. You can see that one of the holes is a little bit off. We’re not sure how that happened but it will just have to do.

Pole StopWe also felted two more wall panels on Sunday. Luckily, I got recruitment labor. 🙂  To prevent the felt from sliding around on the PVC pipe, we added a couple of additions. It’s pipe insulation covered with duct tape.

PVC Pipe ChangesWe also had to replace the small inner PVC pipe with a galvanized steel pipe. The plastic PVC was getting eaten by the chain inside.

Felt WalkersAfter the water was applied, all our felting party guests walked on it. Here’s a little video I took:

Two Walls Laid OutBecause I had helpers, we were able to lay out two walls and get them felted in a day.

RollersHere we are on the first roll of the day.

Getting the Air OutThat’s Paula trying to get rid of some of the air under the plastic.

Getting It TightIs it tight enough?

Tying the RollNow to get the ropes in place to tie the roll.

Square KnotsAnd tying it up with square knots. If you don’t get it tight enough, it really slides around a lot.

Getting Ready to RollThen the roll is attached to the tractor.

AttachedStart off slowly to make sure everything is going to roll properly.

Tractor FeltingAnd off it goes. The recipe is 5 times around the field, roll from the other end, another 5 times around, flip the felt over, 5 times around and roll from the other end with a final 5 times around. And it’s felt!! I didn’t get any photos of the finished felt but I will show you all the walls when they are completed. So one more wall panel and then we’ll start on the roof. Progress is being made and I’m shooting for completion by mid October.

A Busy Week and an Half

A Busy Week and an Half

I went to a small sale the other weekend. It was at a small pioneer village. http://www.langpioneervillage.ca/

I demonstrated spinning with a drop spindle and sold 10 drop spindle kits. I think I could have sold 10 more if I had had them.

lang museum

The museum is also working on getting an old Jacquard loom working. This is the one that will stay as just a static display.

lang jaquard loom

If you are old enough you will probably think the cards look like computer punch cards but these pre date computers by quite a bit. The cards are the pattern, they are sewn together. I will post more pictures of the loom over on the forum. http://feltandfiberstudio.proboards.com/thread/1059/jacquard-loom

After the show I stayed wit my friend Maureen who owns Dreamspin Fibres,  http://www.dreamspinfibres.ca/ (shameless plug for a friend) I made a hat using prefelt. I hadn’t done that before.

pink and green hat

The green stuff is some of that strange yarn everyone is knitting and crocheting the spiral scarves with. It is a tube so I cut the tube up one side and opened it out. It came out great.

Then this Monday I taught a bobble cuff workshop for the first time. The ladies in the class where a lot of fun. Audrey’s granddaughter was there and very interested so I gave her some wool and she made a small picture in a plastic bag and I showed her how to make a tube bead with some pencils.

cuff class

By the end of the class they had the marbles in the cuffs. The cuffs have to dry before you can cut them to get the marbles out. They will do that today. I made everyone a sample with marbles in them so they could try cutting the felt while I was still there.

cuff class finished

That’s been my very busy week and a half. I almost forgot to do my post today as I was busy making hats and scarves for a sale I have on September 7 and 8 in Almonte. http://mvtm.ca/museum/?page_id=2675 If you are in the area come out and say hi.

Notebook Covers

Notebook Covers

This first notebook cover that I finished this week took ages to make. My temperamental sewing machine keeps refusing to catch the bobbin thread with the needle. Occasionally I can force it to, then it runs for a while, then I go to turn the piece I’m working on and realise it was just making sewing noises and everything I thought I’d just sewn is loose 🙁   I kept going back to this until it was finished, then put the machine away so it can’t annoy me anymore. I had a collection of felt pieces I’d made with natural coloured wools and plant fibres. None of them were big enough for notebook covers and either too thick or too thin for coin purses, so I thought I’d make a few natural coloured collage notebook covers. Or just one as it turned out. I used some unbleached calico as the backing fabric to sew the pieces onto. I really like the way this turned out. This is the front:

frontSome of the grey pieces are from a piece of felt I made for Karen’s Weather Challenge, using grey Gotland Locks for rolling clouds. This is the back:

backI machine stitched the top edges together, then finished off the edges and the flaps with some grey/brown thread I spun myself. It was quite chunky for a thinnish thread, but I like the way it looks.

inside AThis next notebook cover is probably the nicest one I’ve ever made. I used a piece of nuno felt that I made for my Beyond Nuno book. It has some gorgeous flowery blue synthetic fabric nuno felted onto merino tops. I made a little tie for the front from an off-cut of the nuno felt. I cut a strip about 8-10mm wide and wet it with soapy water and rolled between my palms until it formed a cord. I used a spring toggle as the fastener. This is the front:

OLYMPUS DIGITAL CAMERAThis is the back:

OLYMPUS DIGITAL CAMERAI really love the colours and the way the fabric rippled so nicely.

OLYMPUS DIGITAL CAMERA
SuperMacro texture:

OLYMPUS DIGITAL CAMERAI’m getting better at letting things go and listing them on etsy, but if this doesn’t sell before the listing expires, I’m keeping it!

In Between Yurting

In Between Yurting

This has been a really busy summer for me. The yurt has taken up a large amount of time, the store has been busy and I had color class homework to complete. So in between the yurt efforts, I have been slowly completing the tasks on my list.

MINOLTA DIGITAL CAMERA

I was running quite low on cat toys at the store. So I made several batches. I put them all into the panty hose and then throw them into the washing machine. The other batches were different colors so now I have enough to last the next couple of months.

MINOLTA DIGITAL CAMERAThe rest of my spare time has been spent completing my color studies homework. So I have painted lots of color scales, color wheels, color schemes etc.

MINOLTA DIGITAL CAMERAThis little book (6″ x 6″) is filled with different color schemes.

MINOLTA DIGITAL CAMERAI haven’t finished the bigger book yet. It has all the scales and color wheels plus colored pencil studies, magazine color studies and other fun stuff.

MINOLTA DIGITAL CAMERAHere are my blue pages.

MINOLTA DIGITAL CAMERAAnd this is what I’m working on now. I am making a color study from the photograph with various pieces of painted paper. The colors are pulled from the photo and then different amounts of each color are used in the layers of color. I got in a hurry and spilled water all over the photo. I’ll have to print another one.

MINOLTA DIGITAL CAMERAIt seems like I spent a vast amount of time deciding how much of each color to show. Now I have to cut the pieces and tape them down to a background page. I’ll probably change my mind again as I’m taping them down.

I have also been preparing for my stitch class’s exhibit which will be in September. I had to get a few more pieces ready for hanging. I don’t have any photos but generally it was matting pieces and lacing pieces in preparation for framing. Have you been busy this summer? Do let us know what you’ve been up to. We’d love to see photos and hear all about it on the forum.

Eco Printing Onto a Silk Chiffon Scarf by Terriea Kwong

Eco Printing Onto a Silk Chiffon Scarf by Terriea Kwong

Our guest writer today is Terriea Kwong who has very kindly written a tutorial for us about eco printing onto silk.

********

This is the basic and simple way to do prints on silk chiffon.

a1. Materials used : eucalyptus cinerea leaves (silver dollar), 100% silk chiffon, vinegar, paper core roll, string and rubber bands. Well wash the fabric before use. Can be used when it’s wet or after it’s dried.

b2. Before putting leaves over the chiffon, dip in vinegar water.

cc3. Put the leaves over chiffon, 2-3 folds diagonally, put a little more leaves over it.

dd4. Then half fold it.

ee5. Roll up with the paper core roll tightly.

ff6. Bundle with rubber band, then tie with string.

gg7. Boil with some eucalyptus barks and the same sort of euc leaves (silver dollar) with 1/4 cup of vinegar.

hh8. After 1.5-2 hours boiling, unbundle it. The dye pot can be re-used.

ii9. Dark when it’s still wet.

jj10. Remove all leaves.

kk11. Dry in shade, then rinse and dry in air.

ll12. A scarf is made.

mm Tie lines and shades of eucalyptus leaves prints:

nn Soft and airy scarf:

oo This is silk chiffon, so color is a bit soft:

ppI’m pleased to share with like-minded and workshops can be arranged individually. Contacts via below:

My blog : http://terriekwong.blogspot.com

My email : terrieakwong@gmail.com

My page : www.facebook.com/TerLingCreation

******

Thanks a lot to Terriea for this excellent guide to eco-printing and dyeing 🙂 Terrie gets great results printing and dyeing, here is a gallery of some of her other work:

More Fingerless Mitts

More Fingerless Mitts

Can you tell I am on a roll with these. I did this pair a little differently. Instead of doing it around a resist I made a flat piece of black felt and then sewed on some sari waste ribbon.

flat fingerless mitts start

I want them to be sort off raggy looking in the end.

I wanted to put big black buttons to fasten it but I didn’t have enough so I used all different ones. I think it turned out better with the different coloured buttons.flat fingerless mitts finished

And here is what they look like on.

flat fingerless mitts on maegan

I really like the way they turned out and will probably make more this way.


Finished Pieces

Finished Pieces

I’m still going through some unfinished projects at the moment, mostly blanket stitching, hand-sewing buttonholes and fighting with my machine 🙂 I used one of the pieces of felt I’d made for the Australia Challenge to make a glasses case. I lined it with some orange cotton fabric and stitched around the edge with the machine before blanket stitching. Side one:

australiaSide Two:

AustraliaEarlier this year, when I made my coppery bronze felt, I had some pieces of commercial art yarn left over. I made a couple of small pieces of felt to use the pieces up. One of them just had pieces as embellishment just below the top layer of merino and they extended out of the sides. For texture on the top of the other piece, I made twists of merino and yarn. The felt pieces didn’t look big enough or thick enough to make anything practical out of them, they weren’t even the same size, so I thought it wouldn’t be a waste to sew them together to make a funky camera case. It turned out better than I expected really 🙂

camera caseI used the piece made with twists as the back as it was smaller.

 CAMERA caseI did manage to finish off another small coin purse that I started a while ago, another one made from felt and silk paper. I kept the natural edges for the front flap:

purseI was glad the felt piece was big enough to use the same felt for the inside pockets, I know only a little part of the back one is seen, but I think it’d look wrong with a plain piece.

purse openpurse backIn case you haven’t noticed, we now have a ‘Community‘ section to the website. If you hover over the tab, you can see from the drop down menu that we have pages for the Studio Challenges where you can find links to the original challenges, and also gallery sub pages to see all the art work created for the challenges from everyone who took part. If we’ve missed you off, we do apologise, there were quite a lot of posts here and on the forum to go through to find them. Send us a message via the Contact Us page if you want us to add your entry. There are also pages for finding links to interviews with guest artists and suppliers and also articles by guest writers. We have a really great article coming up this week from Terriea Kwong showing us how she gets her excellent results using plants for eco printing.

Yurt Update – Felting a Wall Panel

Yurt Update – Felting a Wall Panel

Dennis and I started felting a wall panel this past weekend. It was a ton of work but now that we have the process down, I think it will go faster (keep your fingers crossed!). This post has a ton of photos so I hope you make it to the end.

Respite StationI set up this tent and my massage table with a water thermos for breaks. I am having a few neck and back issues so I need to take frequent breaks.

Ready to StartI started with a 12 foot by 16 foot tarp and 4 batts of wool.

Field DraggerThis is the field dragger that goes behind the tractor. We will attach the felt roll to the back of this to roll it around the field.

Size MarkedFirst I measured and taped off what size I needed the wool to be before shrinkage. I was working on the idea that the felt would shrink 6-10%. The sample felted down by 6%.

Corners Marked

I just marked the edges and corners with blue tape.

6" ShortI was really disappointed that one batt didn’t cover the entire width. It was short about 6 inches.

Batt in ThirdsThe batts come folded up in thirds and then rolled. So I spread out the batt.

Need 6" MoreAnd then I had to take a portion of another batt and cover the extra 6″.

Cutting the BattSo I cut the batt and lined up the pieces along the edge.

First Layer Laid OutI did overlap slightly and spread the batt a little thinly at the edges so it wouldn’t be a big lump where the two batts attached during felting.

Watering Can with SoapI filled this 5 gallon watering can with cold water from the hose and soap.

Still Adding WaterAnd sprinkled about 5-6 cans on.

Removing AirCovered it with plastic and tried to get some air out. That didn’t work too well.

Hosing It DownSo I took off the plastic and sprayed it with the hose.

As Wet as It GetsHere’s the first layer after being wet down. You can see that it wasn’t all completely wet.

Second Layer at Right AngleNext I add a second layer of batt in the opposite direction.

Finishing Off the Second LayerThat had to be pieced and cut as well.

Second Layer Complete

So here’s both layers and I added more water with the hose after this photo.

Stompin' On ItThen we walked on it.

Straightening the EdgesNext I made sure the edges were relatively straight.

Adding More WaterWhere the edges weren’t completely wet, I sprayed them into submission.

Covered and Ready to RollCovered it with thin plastic,

Folding in the Tarp

folded the tarp in on both sides,

PVC Pipe in PlaceAnd then we’re ready to roll around the PVC pipe.

RollingHere I am starting to roll. I told Dennis at this point that it looks like I am all by myself and working really hard. But he helped, I promise. Just no photos as he had the camera most of the time.

RolledWe got it all rolled up,

Cable through PVC Pipe to TowYou can see the cable that will attach the roll to the tractor,

Outer Tarp for Protectionand then we decided we should put another tarp on the outside to keep the dirt away from the felt.

Tying It UpThen I tied it with rope.

Tractor ReadyThis was the way we tied it the first time and it didn’t hold well. After that, I cut the rope into equal pieces and just tied each one instead of wrapping longer pieces of rope.

Attaching to the TractorThen Dennis attached a chain to the end of the field dragger,

Hooking Up the Cablehooked the cable to the chain and,

It didn’t work, sigh…

Sawing Off the End of the PVC Pipe

So after a trip to the ranch supply store, we cut off the end of the bigger PVC pipe,

Making Another Cabletook an old cable we had and made loops on each end,

Putting Cable Through Smaller PVC Pipegot a skinnier PVC pipe and put the cable through it,

Ready to Try Rolling Again

and put the smaller PVC pipe into the larger one. And drum roll please –

It worked!!

After First Roll

As you can see in the video, the roll of felt moved on the PVC pipe. So we unrolled to check on the felt and it had started to felt.

Not Felted Yet

But it certainly didn’t pass the pinch test!

Adding Yet More WaterI added more water and we pulled it behind the tractor 5-6 more times around the field. I opened it and it was still not completely fulled. We quit for the day and just left the felt covered down in the field overnight. On Sunday, we started again, redid how we attached it to the tractor and found that the reason the roll was shifting was because the cable attachment kept moving. So we just attached it with chains which didn’t move and it worked great.

The Finished Felt Wall PanelHere’s the finished piece. It shrunk about a foot in each direction which was what I wanted. Yippee! It worked.

Bringing the Roll HomeAnd here’s Dennis triumphantly bringing the rolled felt up to the house. It took two days to dry. I have 3 more wall panels and 4 roof panels to finish. I decided I need reinforcements. The next felting session is planned for August 25th. Do you want to come help?? Please??

Felt fingerless Mitts Experiment

Felt fingerless Mitts Experiment

I am still making fingerless mitts for the fall shows. I have a wool batt that was made from the leftover bits or browns and natural wools. It looks like bark to me.

brown/gray/black/white batt

Then I thought I want the mitts to have more texture. So I got out my pile of trimmings.

left overs to roll 2

I gave them a roll

left overs to roll 3

I added them to the mitts in the hopes of making it look more bark like.

wood look cuff wood look cuff 2

I put the scraps under the last layer.

It worked out but I think fatter inserts might be better.

wood look cuff 3

It is not that exciting.  I may have to add something to it, I am not sure what. Maybe some twigs sticking up or a knot hole.

I have some other ideas to try out. I will share them with you as they happen. Theses are a great size for trying things out. If they work you have a salable item and if not you learn something and haven’t lost a lot. I am not good at making things that are just samples, I want it to be useful, crazy I know.