I am out of time to do an original post today. So it’s a throwback post. This one is from the early days of 2012.
Doing samples is fun and I still have the last two. They are just fun to have.
I haven’t been doing much that is interesting to look at lately. Everything is white and is waiting for the dye pot. I thought I would show you some samples I made a little while ago. The first 2 are purple merino with some silk strips on them. I thought they came out nicely with lots of texture.
Purple wool with strips of silk before feltingPurple samples after felting
The second is orange merino with some silk and curls on it, here I wanted to felt the curls right into the background. I also wanted to see how it would stick if I put it over the silk. I really like the way the little blob of curls all became one with nice texture. The curls going across the silk stuck down very well. Enough wool migrated through the silk to grab the courser wool of the curls.
Orange wool with silk and curls before feltingOrange sample after felting
This last set I wanted the curls to be attached at the base and left loose and hanging for the rest of their length. I use a small piece of scrap floor underlay with a hole in it so the wouldn’t stick down. It worked very well. I am not sure how I ended up with one really long curl.
Small samples with curls with their resists on before feltingSmall samples with curls after felting.
I am not sure what I am gong to do with these. I might make some buttons or hair clips. Do you have any ideas?
In December I was trying to supply lots of different places with felt things. In truth, I was a bit over-stretched. I decided to focus on making plant holders, with a few tea light holders and a couple of vases. Oh, and some cards. Here’s an overview of the things I made.
PLANT POTS AND VASES
First I made four plant pot covers from merino wool and silk pre-felt and incorporating different pieces of vintage lace
Strips of vintage lace laid verticallyVintage lace flowersTatted flowers from a vintage dressing table setA broad strip of vintage lace with textured flowersPlant pot covers with different types of recycled vintage lace
Next a couple of vases, also with a pre-felt base
Strip of broad vintage laceRecycled crochet pansiesThe left-hand one works both as a vase and a large tea light holder. For the vase on the right, I attached the pansies to the felt by felting over the strings that joined the flowers. I had to add a couple of stitches to the flowers on either end to secure them as there wasn’t any string to work with
On to some plant pot holders. When cutting the resist out of the vessel, I use the smallest hole I can that will allow me to fit the plant and its pot inside. All of these have a water proof plant pot holder inside, plus the plastic pot with drainage holes that the plants are supplied in. I like to start by looking at a plant and ‘asking’ it what sort of pot cover it might like.
A festive plant pot holder with green merino and red locks reflecting the leaf coloursA large nuno felted plant pot holderLayout of the under-side of the vesselLayout of the top of the vesselTop view finished pot holderSide view of finished plant pot holderRecycled silk from a very sheer silk beach dress I found in a £1 charity shop bargain binNesting bowls inside each otherNesting bowls separated out
These nesting bowls were made using a carded merino and silk batt and are very lightweight
A display of my work in Creek Creative gallery, Faversham
One of the galleries where my work was part of a month-long Christmas local makers market
PICTURES
Now we’re into the new year and I really have to focus on making some pictures. I mentioned at the end of my last blog that I’m delighted to have the opportunity to fill the walls of a lovely local Michelin starred pub / restaurant (The Sportsman in Seasalter) with felt pictures for 6 weeks in April / May this year. The ‘fill’ bit is something of a challenge. I tend to make enough work as I go along for my normal sales and exhibitions. Making an extra 35 to 40 wet felted pictures for this exhibition will take a lot of work. I’m finding the prospect of making all those pictures both exciting and rather daunting.
In preparation for the picture making, in November I ordered 2 batches of solid beach handmade frames from my lovely local frame maker: 10 at 63 x 63cm (approximately 25 x 25 inches) and 10 at 35 x 35 cm (approximately 14 x 14 ins). I will have to order more soon but I thought this would give me a good start. I had some serious studio-tidying to do last week before I set about the pictures… and finally I was ready to start. Where to begin?
First I made a ‘big wave’ picture for one of the larger frames. I say ‘big wave’ in inverted commas as the waves round where I live are generally very small so we’re not talking surfing potential. I’m endlessly intrigued by wave and sea patterns and have made this type of picture several times before. They always end up looking very different. I’ve taken lots of reference photos such as this one……
Example of a wave reference photo
…..that I use as a starting point.
Here’s the layout using lots of colours of (mostly) merino wool for the water; merino and kid mohair top, silk hankies, mohair and sheep locks and some vintage lace scraps for the wave; and hand-made pre-felt cut into pebble shapes for the beach. These were laid on 4 layers of merino for the base. I’m not really sure why I did 4 layers – it makes a lovely firm base but it’s a lot harder work to felt than 2 layers and as this is going behind glass, it was a bit over-kill. I’ll try not to do that again.
Once it was felted and dry, I used a small metal tool to pick up some sections of wave, to make it more 3D. Here’s the final picture and the picture sitting on top of its frame, waiting for me to get round to framing it.
Finished picture ‘ blue sea, big wave’Picture lying on top of its frame
I’ve worked on this for more than 12 hours spread over 4 days, not including making and cutting the pre-felt pebbles, which must have taken another couple of hours, and I’ve still got the framing to do. I’m very conscious of how many pictures I’ve got to make, so I decided to go smaller and quicker for the next 3.
One of the ways I can speed things up is to use recycled silk fabric to provide the pattern (and texture) for the water and the beach. As an avid buyer of silk scarves from charity shops, I have 2 huge bins of material to rummage through and upcycle.
Picture two – which I’ll call leopard print – I chose a sheer leopard print scarf for the beach and a small blue striped one for the water. Because the blue scarf is not very wide, I have to join two pieces of fabric. To reduce the visibility of the join, I first cut into one of the pieces so that the join would be staggered. You can see it in the layout but hardly at all by the time it’s fully felted.
Joining the silk picture layoutfinished picture finished picture sitting in its framePicture two – leopard print wave
I’m reasonably happy with this, though I think the wave is a bit too solid-looking.
Picture three – ‘dark blue sea’ – I go with a rather lovely dark blue patterned scarf for the water and a pale patterned beige one for the beach.
layoutfinished picture Picture three – dark blue sea wave
Again, reasonably happy with this. I like the sea effect and the less solid wave but the blue cobweb felt strip I put in front of the wave to look like the remains of a previous wave is a bit dense and straight.
Picture four – ‘reversible silk’ – I’m rummaging around for a different piece of silk to use for the water. I find one I like but I’m not sure quite how it will felt. It’s also reversible and I’m not sure which side to use. I decided to make a very small sample to see how it felts and it occurs to me also to see what happens if I cut strips to alternate the two sides of the fabric.
Here’s the sample layout. I’ve run out of merino wool in this pewter colour but fortunately have some Corriedale. I felted it very quickly and forgot to take a picture of the finished sample but it was enough for me to conclude it felted well and it was worth trying the reversed strips thing.
Quick sample layout to test the silk and laying out in strips
The beach fabric is also a little different – with a bigger and higher contrast pattern.
Here’s the layout and near-final picture. I say near-final as I only finished fulling it yesterday afternoon. It’s still damp (I think the silk will become a little lighter and shinier when fully dry) and I haven’t yet picked up any of the fibres in the wave.
Reversible silk sea big wave layoutReversible silk big wave near final picture – not quite dry
This is my favourite actual wave so far – I definitely like the variation in colour and greater impression of transparency. I’m pleased with the way the cut up silk worked for the water too. I’m not yet decided about the beach pattern – interesting or too much?
And finally, a photo of the large and a small picture side-by-side, so you can get some idea of scale
I’m framing the three small ones without glass and the large one with. People react differently to this. Some like to see (and feel) the texture and not have the reflections you get with glass. Others worry about dust. A few (me included) worry about moths. Most of the pictures will be behind glass but a few won’t. I’ll review this as I go along
By the time I write again in March, I should have lots more pictures made. Wish me luck! I will be making some large ones with sea birds but these take so long, I’ve decided to make some less complex ones first to see how long I’ve got to spend on the most time-consuming ones. I’m having to step-up my levels of planning and organising to try to make sure I have enough work to fill the venue.
Happy new year everyone. I hope it’s full of joy, peace and creativity.
Having just read Kiki’s tutorial https://feltingandfiberstudio.com/2023/11/19/left-overs-yessss/ on using up prefelt scraps, it occurs to me that I may not have mentioned something we used to do at our Guild (Dorset Guild of Weavers Spinners & Dyers) mainly to raise funds for the Guild but also for fun.
When I attended the Stitch and Creative Crafts Show at the Bath and West Showground in Shepton Mallet (Somerset, UK) back in 2010 – I saw a stand selling (for £8.00 each) bags containing 35gr of silk fibres, yarns, fabrics scraps, carrier rods and cocoons in various colours, left over from old projects which, when put together, made a fascinating collection for future projects. So fascinating that I bought three of them.
They must have made quite a bit of profit on them because they appeared mainly to be the “waste” from artwork.
At that time (when I was part of the sub-committee organising the Guild’s Exhibition and Sale of Work) we were looking for a Guild Project which could be part of the exhibition or something hopefully to help raise some funds. Well, I thought, our weavers must have lots of off-cuts of hand woven fabric, not to mention warp ends. Then there were the spinners who would have odd bits of spun and unspun fibres of all types and colours. We also had members who were dressmakers, beaders and embroiderers, and a soft furnisher, who were bound to have the odd bits and pieces that they didn’t really need. So, with the blessing of the committee, I put it to the members in the next newsletter that if they would donate to the Guild any odd bits of fibres, yarns, threads, warp ends, bits of fabric, beads, button, feathers, felt, cords, braids, tassels, sequins, sequin waste, ribbons, silk flowers and any other bits and pieces they could think of, we could make up some “Bags of Inspiration” and sell them to members of the public at our open days and outside demonstrations. (I don’t know about in the rest of the world, but in the UK the word “bags” means “lots of” as well as “containers”, so the punning name “Bags of Inspiration” seemed apt.)
We used A4 sized polythene bags (which I was able to buy quite cheaply from our local green grocer) with an A4 sheet of card inside for stiffening, and I made up some stickers with the Guild’s logo on and a brief description of the contents, and posters also giving details of the contents.
Bag of Inspiration Poster
We arranged a few bag making days at a pub in the village where our then President lived. She had persuaded them to let us use their skittle alley at no charge, and we had a great deal of fun making up the bags and tucking in to “refreshments” from the bar and kitchen.
The members who came to these, brought with them all sorts of goodies which we spread out on tables, so that we could make collections of pieces which seemed to go with each other. Those who didn’t think that their colour theory was good enough, could pick out a picture from a selection of magazines and have a go at matching colours from this It was amazing how compulsive making the bags became. You could pick up a piece of fabric that looked so dull and dreary and be amazed how it perked up and positively shone with life when paired with different fabrics, yarns, trimmings etc. You just couldn’t stop picking up likely bits. The difficulty was keeping the weight of each bag between 80gr and 100gr, so we quite often ended up making up at least 2 bags with similar contents.
Equipment & Extra “Bits” for making up Bags
Prospective contents of at least one Bag of Inspiration
We put a price of £3.50 on each bag and they went like hot cakes – we sold out on their first appearance at our exhibition and sale of work. Embroiderers and mixed media artists in particular liked them.
After a couple of years, we didn’t get so many volunteers to make up bags but we still had mountains of “stuff”. So we added another string for our open days – Pick and Mix Your Own. I had remembered that Woolworths (now there’s a blast from the past) used to have a counter full of different sweets and you could take a bowl and pick and mix what you wanted, and in the process buying a lot more than you would have if just buying a ready filled bag.
Pick and Mix Sweets.
It worked with our stuff too. We gave the visitors the polythene bags and they could wade through all the bits and pieces picking what they needed, and we weighed them when they’d finished, charging £3.50 for 100gr.
We had had a lot of fibres donated so we started making up what are now called Art Batts and selling them as “Batts of Inspirations”, but because we were mainly selling these to Guild spinners and felt makers, they didn’t do quite so well as they were mainly able to make their own.
In all we made around £1000.00 for the Guild in the four years we were doing this. Eventually though the members got fed up with spending time on making up the bags and the whole thing was shelved, as the Guild seemed to be relatively well off at the time.
Some time after that I took the idea back to myself and I was making up Batts to sell at Guild meetings, using luxury fibres as well as merino and synthetic fibres. I made up some bands to fix around the Batts detailing the various fibres included in each.
This slideshow requires JavaScript.
I was also making up and selling Bags, mainly at a Needlework Festival in Dorset where most of the vendors were selling materials and equipment for crafters, as well as various craft fairs and so on.
This slideshow requires JavaScript.
I was getting the odd question like “they’re lovely but what do you do with them?” and “can you make a bag out of what’s in here?” So I made a sign from images of items that I’d made myself over the years and that helped.
Some of the things I’ve made with the contents of BoI over the years
However, once Covid started causing problems, my selling opportunities dried up. I had been intending to try selling Bags and Batts via my website, but it was very difficult and too time consuming to photograph the Bags so that the contents were visible, because of reflections on the polythene bags. So that sort of died a death too and I’ve now shelved that project, and am using the bits and pieces I’ve collected over the years on theatrical costumes and props.
Perhaps some of our readers’ organisations, like Ann & Jan’s OVWSG, might use this idea to raise funds?
September has been a busy and exciting month in contemporary textile art (specifically felting art) in Ireland so I thought I would feature what I got up to, I will call it my September Adventures.
Weather wise, the month started as we hoped it would continue (it didn’t by the way) with a return to fine warm weather – something we had not seen since last June. So I took the opportunity to visit our National Botanical Gardens (https://www.botanicgardens.ie/) which are situated on Dublin’s north side. The gardens (there’s free entry, if you ever visit Dublin, Ireland) opened in 1800 and are an oasis of calm with restored glass houses, magnificent specimens, bee hives and, of course, a tea room. There’s also a pedestrian access to the historical cemetery next door which I suspect is not seen too often. Glasnevin Cemetery also houses a genealogical archive for anyone wishing to trace their Irish ancestors (https://www.dctrust.ie/genealogy/home.html).
But, I digress. Let’s go back to the gardens. My visit coincided with their annual exhibition ‘Sculpture in Context’. The exhibits feature artworks in various media including ceramics, wood, metal. I decided to focus purely on the textile element of the exhibition and to photograph any pieces I came across as I wandered around. I was aware that some of the members of Feltmakers Ireland had pieces accepted for the exhibition; Clare Merry (http://www.merryland.ie/index.htm) an exceptional artist who quietly creates her pieces was featured. If you would like to see some of Clare’s work please check out her website, which, she tells me, is not really up to date, or Google her and feast over the images; Fiona Leech(https://www.instagram.com/feltathome/?hl=en) had three beautiful pots which were originally housed in the cactus house. Annoyingly two of the three pots were stolen within a matter of hours of their arrival and the remaining one was moved to a safer spot in the garden’s gallery. I thought I would show you the three pots as they were originally grouped together.
Fiona Leech’s three pots (source: Fiona’s Instagram page)
I searched but could not find Leiko Uchiyama’s beautiful work but here is a link to her website if you would like to check her out: https://www.leikofelt.com/my-felt-work/ I found two other exhibits from members of the guild. Their featured work while not through the medium of felt were equally stunning. Congratulations Mel Bradley (https://melbradleysilks.ie/) and Mette Sophie Roche (https://metteroche.com/)
I put together a slideshow of my textile finds in the gardens which I hope you enjoy.
Mette Sophie Roche; The vital matter of Fungi
Mette Sophie Roche; The vital matter of Fungi (detail)
Mette Sophie Roche; The vital matter of Fungi (detail)
Fiona Leech; Drought
Fiona Leech; Drought (detail)
Frances Crowe; Terrain
Frances Crowe; Terrain (detail)
Frances Crowe; Terrain (detail)
Claire Merry; Floral Path
Claire Merry; Floral Path
Ella Quinn; It’s nothing but a dead fish
Niamh O’Connell; Cocoon
Mel Bradley; Grasses
Mel Bradley; Grasses
We had our first meeting after summer in Feltmakers Ireland and as usual the committee put an incredible amount of preparatory work into making it successful. It was a busy morning as everyone beavered away felting flowers to create a tapestry as part of the 20th anniversary celebration for the guild. Much to everyone’s delight, the guild’s founder Elizabeth Bonnar joined us. I thought I would feature Elizabeth here as without her it is doubtful that there would be such a vibrant community of feltmakers today. Here she is with her granddaughter and with the committee.
Feltmakers Ireland founder Elizabeth Bonnar and her granddaughter
Feltmakers Ireland committee with founder Elizabeth Bonnar (3rd from left)
Here are some photos taken on the day.
Feltmakers hard at work
Breda and Elizabeth hard at work!
Lots of flowers were made that morning by members
Suzanne, Breda, Deirdre and Elizabeth catching up
The finished tapestry was revealed at Feltmakers Ireland ‘Bountiful’ juried exhibition which opened on 30th September.
Feltmakers Ireland members: The Floral Tapestry to celebrate 20 years.
The exhibition also saw the launch of the new book “Exploring Irish Wool for Feltmaking” The book is the product of a collaboration between many members of Feltmakers Ireland guild, sheep farmers, shepherds, shearers and suppliers and not forgetting the various washers and carders who took the raw fleeces, converting them into usable fibres for testing. I think this approach was quite unique and it will certainly be a worthwhile and useable addition to any textile maker’s reference library. Understandably it was a huge project so congratulations are due to all, especially Annika (Berglund), Breda (Fay) and Sinead (Doyle) who collated all of the findings into an invaluable resource on Irish wool. It’s so full of well written practical advice and it was made extra special by the presence of one of our Government Ministers, Pippa Hackett an ardent supporter of the project, who officially launched the book and the exhibition . Here is a quick look at the contents page to give you an idea of the scope of the book:
Exploring Irish Wool Contents page
An added bonus is that feltmakers/wool artists can now make direct contact with numerous artisanal suppliers so there is no excuse for any of us not buying closer to source and of course for anyone overseas who wishes to use Irish wool fibre in their work purchasing from source.
I hope you have enjoyed my September adventures. It has been an exciting month. Once again I would like to thank Feltmakers Ireland and their hard working committee who work tirelessly to maintain this vibrant community – it makes such a difference that, as textile artists, we can gather together and create regularly. I take my hat off to Elizabeth Bonnar and her decision to found Feltmakers Ireland twenty years ago; the catalyst for lifelong friendships, masterclasses, collaborations, exhibitions, networks and travel.
To complete September’s birthday celebrations, I thought I would produce a slideshow of the Bountiful exhibition which is running for the month of October in Phoenix Park, Dublin Ireland. I took photos on the day so I apologise where the light may be shining on the artwork. There are over 30 pieces of art and it will give you an indication of where Ireland’s vibrant felting community is at in its journey. I hope you enjoy it!
Annika Berglund: Variations on a Green Theme II
Astrid Tomrop-Hofman: Positive Vibes
Deirdre Crofts: A good Day’s Catch
Clare Brophy: Share the Bounty!
Helene Dooley: Visualizing the beauty of the Sunflower Field
The silk recycling is woven, it’s all done, finished, tutto finito bandito! I actually ran out of the red and orange silk so for the last little bit I had to dig in the bag and retrieve some matching silk with blue, red and orange. It looks just fine. Once the weaving was done I hem stitched the edge, wove in any loose warp threads and washed the yardage.
The whole mass went into the washing machine on a regular cycle, in cool water with my usual detergent. This is the way I plan on washing the finished jacket. I also did this to release any dyes that are lurking in the silk. The jacket will probably bleed dye for the rest of its life because some dyers do not set the dye in silk. The cotton warp took on a slight pinkish tint, so that helped to level the overall look of the fabric.
I plan to hang dry the jacket, so the material was taken outside to hand dry and freshen in sunlight. This proved a tiny bit problematic. The fabric was really, really heavy when wet. This is also when the light began to dawn that this was not, I repeat not, just a four yard warp. I left the fabric to dry on the railing overnight, where it promptly froze into position. Freeze drying works too, so two days later, in it came.
I was able to measure and confirm that this was clearly a massive piece of fabric. Originally, the warp was estimated to be ‘maybe’ 4 yds or 3.5 meters. It was purchased at an estate sale from one of our guild’s best weavers, but the labels fell off and things got a bit muddled when best efforts were at hand. I knew I was taking a risk, even getting it on the loom was a challenge, but I have no regrets. The length proved a great surprise and reward at the same time. It also explains why I ran out of weaving material. There are 8 yards or 7.5 meters, plenty here to make two jackets if I’m careful!
The final product is gorgeous. It just shimmers in the right light and I really want to do it justice. Even though it is a recycled product, or maybe because it is recycled, it’s important that the final result show the very best characteristics of the fibres that have gone into making it.
Our guild has an amazing resource for researching just about anything fibre related. Jan is our librarian. She is the lead book slinger in our heavy rental group called Jan and the Librarians; they have sessions once a month at the guild. I joined in last weekend and Jan supplied me with my requests for information on Japanese clothes, braids and ‘Saori’ weaving.
Japanese clothes design save weavers from the angst of having to cut their beloved fabric. The patterns are usually straightforward, basic, and interesting. I qualified this statement with ‘usually straightforward’ because I had never seen Saori weaving before nor the clothes that have been designed to use the material woven on a Saori loom. the book is in Japanese, the patterns are like origami on crack and they fascinate me endlessly. Until I can figure out the patterns I opted for a very conservative jimbei pattern from the jacket my son lent me. There are examples of simple patterns in one of the books.
This jimbei is meant for hot summer days. The sides are not stitched close but fastened with a cable stitch or stitched close with a decorative embroidery stitch. The underarm is left open, again for summer comfort.
The front is loosely tied or left open as preferred. I was interested in the reinforcement used at the bottom of the sides. These were the same reinforcements I found on the kimonos, so they clearly work.
The female version of this simple jacket has a closed wrist. It’s called a hippari. I might do one of these for winter if I have enough material left. The photos of the jimbei and hippari are from “Make your own Japanese Clothes” by John Marshall ISBN 0-870110865-X, I really enjoyed reading this book, lots of ideas for ways to incorporate the Japanese style into my life.
There are so many new things I will need to explore once I decide to start sewing this jacket. I’m really looking forward to getting the sewing machine out again.
Some of the first felt objects I made were vases: made around a flat u-shaped resist that I designed to try to get a good even layer of felt on the base (wobbly bases not being good for vases). Every so often I get the urge to make a few vases, so I thought I’d show you some I’ve made recently.
My felt pictures are often inspired by my coastal environment. So, I thought I’d make some coast-inspired vases.
Silk laid out ready to prefeltPrefelt pebbles cut outVase layout ready for feltingFinished vase (with glass inside)
I prefelted some recycled silk scarf pieces to make pebbles then added pebble shapes to the lower section. The sea area had a pewter-coloured merino base with blue and green wisps of wool plus some silky fibre for the sea foam. The wave was a combination of some sort of knitted yarn I’d also found in a charity shop, with added mohair and the same silky fibre (I’m not completely sure what it was, it was just hanging around and looked suitable!)
2 more coastal vases – in the wild
I made 3 in total – here are the other 2.
Sometimes it’s the materials themselves that suggest pieces rather than the local scenery. I put some beautiful bright coral-coloured dyed locks against contrasting duck egg blue and teal merino and thought that might be interesting
‘Locks’ vase
Continuing my vase-making spree: I’d dyed some merino for a workshop last year and I thought it might be a good idea to use up some of the hand-dyed wool on vases.
Purple 18.5 micron merinoBlue / green 18.5 micron merinoRed / orange 21 micron merino The purple vase with hyacinthsRed / orange vase with roses
Now enter stage left the plant pot. A friend who’d previously bought a plant pot holder from me asked about making one specifically to suit a plant she had. I wrote a blog a while ago about my love / hate relationship with commissions but that was about pictures – I felt much happier about a plant pot as it’s not such a big commitment.
I was keen to include her in the design so I did a couple of very quick potential design sketches and consulted her on the fibre colour choices. As the plant was only in a plastic pot with holes in the bottom, I scoured my local charity shops and found a beer bucket to make the plant pot water-tight.
We decided to go for coral / pink / burgundy colours to highlight the under-sides of the leaves and an overall texture rather than a leaf-shape pattern.
Inner 2 wool layersOuter 2 wool layers
I decided to do the top of the inner 2 layers green so it would show when you look down at the pot. With hindsight I should have done the whole of the inner layers green but I wasn’t sure I had enough of the green so did the lower section white. I carded together various colours of merino and silk fibre rather than use the fibre labelled ‘carded’ on the fibre picture – but keep and eye on that as it comes back later on….. Then laid locks on top.
And here’s the plant in its personal designer pot. My friend was very pleased with it.
Then it was back to the vases but with a twist. I recently found in a charity shop an old chemistry lab heavy glass 3 neck flask and, as ever, I thought….I wonder how that would work with felt. There’s a little corner of my brain that is devoted entirely to felting possibilities and it kicks into play whenever I’m mooching about charity shops, which is often!
On the same day I found some interesting yarn in another charity shop so I splashed out a further 20p and thought I’d bring these 2 finds together.
I was clearly wearing my sensible head that day as I made a sample with the yarn to make sure it would felt and see how it came out. Even more sensibly, I used it on both sides of my sample (I wish I always remembered to do that) so I could decide which effect I liked best
Interesting yarn – cotton?Sample side 1Sample side 2
I stared to ponder the engineering challenge of the 3 neck vase and decided I’d have to have a hole underneath. Usually my vase covers are solid on the under side and the glass slips into the top. With this I wanted the felt to fit tightly round the necks so I’d have the glass entry point on the base. I carefully measured and calculated at least 40% shrinkage then made my resist. This time an upside-down U-shape
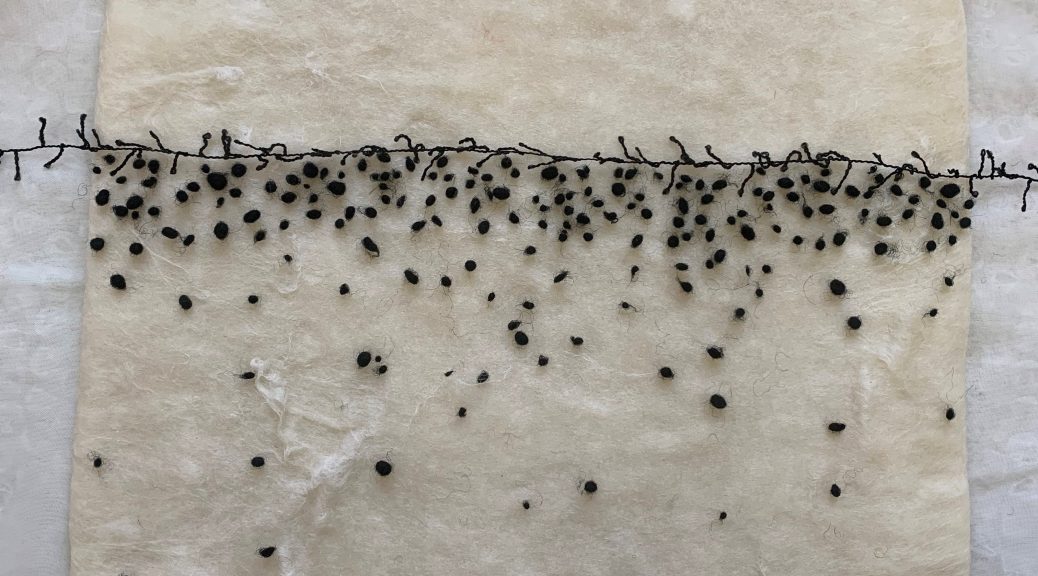
I laid 4 layers of natural white merino over both sides of the resist then ran a single strip of the yarn around. I then added single black nepps below the yarn line, more densely near the yarn and just a few further down the shape. This seemed like a good idea but it took absolutely ages to separate out individual nepps, pick out only round ones and of a similar size, and then place them where I wanted them to sit. One of those decisions you regret before you’re half-way through but can’t bear not to finish as you’ve already invested so much time in it!
Anyway, here’s the finished vase. Actually, I’m pleased with the pattern, although I’d intended the yarn to sit a bit further up the flask. I’d not properly taken into account how much of the felt would be underneath.
3 neck vase – with & without tulips
I thought I’d find some more old 3 necked lab flasks. Having consulted both EBay and Google it rapidly became clear that they are not to be had. I have not found a single similar 3 neck flask (there are new ones which are much thinner and tend to have domed bases, no good for vases). The nearest I could find was a similar heavy glass 2 necked flask which is on EBay for £40. £40! I now feel I can’t sell my vase as I don’t want someone to buy it for the flask and rip off the felt! So, that one is staying with me, at least for the time being.
And finally we come back to the pre-mixed fibre I mentioned (labelled ‘carded’). If you’re ever lucky enough to visit World of Wool in Yorkshire, you’ll see they have two huge skip-type bins full of ends of lines and wooly remnants (one with coloured fibres and one just cream /white). There’s a low fixed-price per weight for the content of each bin and you can ferret out all sorts of hidden gems. I can spend a long time almost falling into those bins. This mystery fibre-mix was one such find.
I thought I’d make a vase using that plus a piece of a pink silk scarf I’d just found in a charity shop. That day, alas, I was not wearing my sensible head and didn’t think to make a sample: partly because I didn’t have a lot of the fibre and partly, well, because I just didn’t think about it.
I laid out 2 layers of a matching pre-dyed merino, 2 layers of the mystery fibre and a strip of silk and set about felting. Fairly soon my error became clear. The mystery fibre was not felting at all. I persisted. It still didn’t felt. I persisted. And persisted. In the end it did felt, presumably with help from the 2 inner layers of merino. It shrank more than I’d expected and the fibre hadn’t been all that keen on pushing through the silk, which means the silk ruching is rather loose in places. But it’s fixed completely round the edges and anyway, I like a bit of loose ruching.
Fibres being laid outVase with tulips‘Raspberry Ripple’ Vase
So, here are my recent adventures in vase-making, with a little diversion via a plant pot. I hope you’ve enjoyed them. Do you have a favourite?
The loom has been sitting there needing attention for ages and I finally stopped procrastinating. Winter is a real challenge to get stuff done. I knew there would be threading errors; there are always threading errors when I do a loom. So I cracked out a good light and checked over the warp and found two. One required that I undo about four inches and re-thread everything, yuch. But the other was much easier. I just needed to move everything over by one thread in the reed. Very easy to fix.
All that needs to be done is wind 4.5 yards of warp yarn onto a bobbin, weight it, thread it through the empty space available in the reed and the harness, and let it hang out the back of the loom. The harness is the part of the loom that goes up and down and raises the threads and has wire “eyes” for each thread. I just use a very lightweight to keep the bobbin dragging a little. In this case, I used napkin rings.
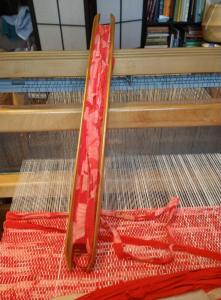
Next, I had to load up the really nice ski shuttle specifically designed for rag and rug weaving. The tools for weaving are sometimes the most beautiful things you can imagine, really beautifully made with an elegant design.
After a few passes, I noticed more threading errors. I fixed them and then noticed another. It became obvious the problem was the lovely ski shuttle was damaging the warp. I did a bit of research online and found out that the shuttles need to be maintained to a very high degree. The bottom of the shuttle needs to be polished and extremely smooth, none of my hand me downs were of that quality. I’ll fix them later, but for now, I needed an alternate solution. Back to fixing the warp.
I dug around in my baskets and found a different sort of rag shuttle along with several stick shuttles. The stick shuttle is a slower method of weaving, but it is all I had. I was really pleased with how well it worked.
The silk is weaving up softer and more flexible than I thought, the colours seem very compatible and I’m pleased with the results. The strips are attached with small knots and these are being used as design elements. I like the way they look when they pop up out of the warp. Because this is an experiment I will try to hold in my optimism for this to become the jacket I had hoped for; that might be too aspirational, but I am aiming in that direction if I can get enough yardage, but for now, I’m really pleased with how things are moving along.
A few weeks ago our guild was offered the estate of one of our more noteworthy weavers. She had stipulated that all her weaving supplies and equipment were to be sold and a scholarship be set up to help educate and promote weaving. We were deeply saddened by the loss of this talented woman, who was also a great resource for our guild. Her generosity set a high bar for all of us. I did participate in the fundraising efforts and purchased a cotton warp to encourage me to get back into weaving.
There was only a small problem with the warp; it no longer had a cross. The cross in a warp helps prevent the threads from tangling. This was going to be a huge challenge but one I wanted to tackle along with two other learning challenges.
Because I am self-taught there are huge gaps missing in my weaving knowledge. Some are very basic techniques. I desperately wanted to learn how to make a weavers knot. This is a knot that almost everyone involved in fibre seems to know how to make. Not me. I wanted it to become muscle memory, so I wanted to make lots and lots of knots. Then when the need arises it will be so easy for me to just – poof – make this non-slip permanent tiny little fastener.
Now comes part two of my learning challenge – reusing a threaded warp. If a weaver is careful and doesn’t remove the remnants of threads from the loom, and if they are long enough, they can be used as a labour-saving tool when threading through the heddles. The heddles are the little eyes on the loom. Threading heddles is a bit like threading very big needles and I really don’t like doing it.
I had preserved the previous warp. I knew it was narrower than the cotton warp I wanted to add, but I didn’t know how many threads were in the cotton warp. There is only one way to find out, count them. There are 225 threads by the way.
So I estimated I would need to add three inches of cotton on either side of the existing warp.
Then came the knots. First I just did overhand knots, but I really didn’t like them. They were thick and didn’t look like they would pass through the reed with ease. Then I started working on the weavers’ knots. Online demos are really interesting, but by the time I got back to the loom I’d forgotten how the loops worked and which way the thread wrapped around and it was all very frustrating. Finally, after a bit of digging, I found a printable diagram and that worked like a charm. My biggest concern is that I may not have a true weavers knot. This works, so maybe it doesn’t matter.
weaver’s knot
overhand knot
I had to thread the cotton through the heddles and Because the cotton along the sides was going to be a little shorter than the wool cotton combination in the middle I added a bit of an extender, sorry I didn’t get a picture of that.
And then it was time to start gently getting everything through the reed and the heddles. This was all done very slowly and carefully so that none of the threads would break. The weaver’s knot worked like a charm. The overhand knot was a bit thick and need some gentle nudging to make it through, but all in all, it worked.
Once the cotton was safely warped on the back beam it was a matter of untangling the threads and winding, untangling and winding. At some point, I was very tempted to just chop it all off the loom and throw it out. It was really getting to be a terrible mess, so discouraging. Then I would look at the back of the loom and see how ordered it was. Everything was coming together as it should, everything was aligned and going onto the beam the way it was supposed to, so I would take a break and come back to it a little later.
And then fairly quickly it was all done. I was a little surprised and definitely delighted.
All this time I had no idea what I was going to do on this warp, not a clue. Maybe make a table runner or some cushion covers. I have some really nice linen to use, some great thick and thin cotton or wool. Then last night it came to me. This lovely textured cotton warp with all its thick bits and thin threads, its ideal length of 4.5 yards (4 m) precise width of 18 in (45cm), it’s ability to take colour like a sponge will be perfect for the recycled kimono project!! Can hardly wait to get started.
Thinking I would share with you something from my past – I went to search for various elements that I knew I had not thrown away and had just seen in the last few months. Suddenly, I was thrown into the midst of a magic trick….pooooof….they had completely vanished!
Much searching and wand waving resulted, some days later, with the completion of the magic trick….the big reveal….of that which was lost.
In deciding to share this ‘something’ from my past, I gave myself a shock….it was from 1997! Although off-piste re wool fibre, I think it might still hold some interest, so please ignore the date and 24 year gap.
To briefly explain the background – I had enjoyed upholstery and soft furnishing as a hobby for many years, then an opportunity presented itself for me to teach these skills. To demonstrate competence, I was ‘very-encouraged’ to get some ‘official’ qualifications, so set about studying upholstery. I managed to complete the two-year course in one year and won a significant award. Following this a few interesting opportunities came my way including an invite to be part of a calendar production, I agreed, and was then commissioned to make an upholstered item.
I was to be ‘April’….you can wipe away all images you might have conjured up of flower bouquets, artists’ palettes, extra-large buns or samples of fabric strategically placed. This was not to be a repeat of the Calendar Girls!
April….mmmm!
Upholstery……..April….mmmm!
A few ideas floated around, but fairly quickly I had the….Tadaa moment….an upholstered screen!
I then pontificated (this word really does describe the process I went through) over how to represent the month of April in the screen. The big dilemma here, was that I normally used purchased commercial fabrics, so I was in a quandary as to how I could manipulate them.
Much of my early thinking revolved around the months, year and particularly the seasons and the continuum or seasonal cycle. There are four seasons so the screen could have four parts. Colours could blend from spring through summer and autumn to typical wintery colours. This also implied an organic quality. Another factor I had to bear in mind was that once finished with, the screen would be mine to keep, so I also needed to create something that would ‘fit’ into my life.
I then started to think more specifically about April and the first thing that came to mind was the phrase built into our British psyche – ‘April showers’ (in the UK April was always a month dominated by showers although global warming seems to be changing things a bit since). Then came the idea of which flowers bloomed in April – Forget-me-not, viola, wallflower, honesty, iris, primula, grape hyacinth etc. From this list I distilled the colours – yellow, purple, rose and blue. Then of course April is the fourth month….decision made – the screen must definitely have four parts!
So far so good.
Research & idea gathering
More research (there was no Google or Pinterest back in the day!) and thinking (my thinking, even to this day, involves doodles on scraps of paper, lots of them) followed, particularly in terms of how I could translate water/rain into an upholstered work. The only way I was going to achieve any of my ideas was to create my own fabric. So then started another direction of thinking and decision making. Fortunately, I had dabbled previously with painting on silk, so this seemed the natural path forward.
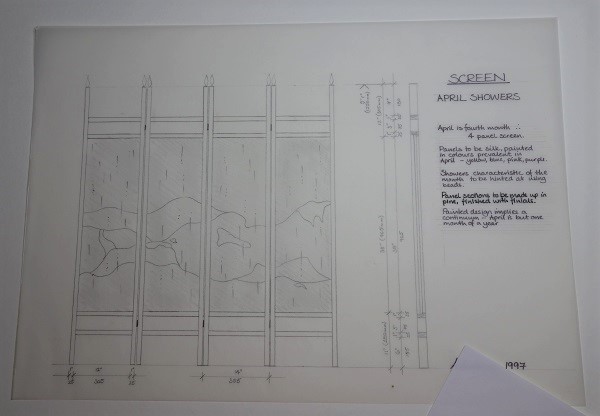
By this time I had also honed my thoughts as to the construction, made complicated by the fact that a screen can be viewed from two sides which meant attaching the fabric would be fiddly. With most of my main thoughts galvanised I produced a detailed drawing (the easiest task as an architect) that I sent off for approval from the relevant calendar committee.
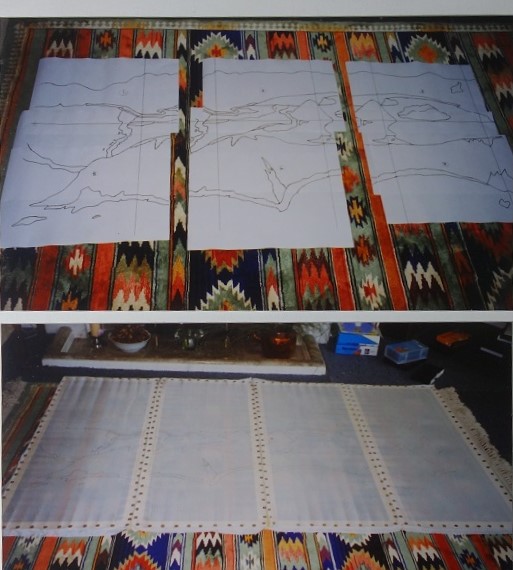
I couldn’t quite get the organic element I wanted then I struck lucky and saw an image in a National Geographic magazine that set the ball rolling for the final layout. Sadly, I cannot find that image today, but from memory it was one showing the broken circular rim of a volcano protruding through an ocean.
I often trace lines from magazine images, but these just didn’t cut the mustard.
Tadaa – the traced National Geographic image which I then enlarged.
A carpenter made 3 sets of frames – the main screen frame which I then dyed to the right colour and finished, the inner mounting frames for the fabrics and the frames for me to stretch and paint the silk.
I had the ironsmith create the post finials (normally found on iron railings) which I kept deliberately removable from the posts so that I would be able to transport the screen without injury either to person or vehicle!
Meanwhile I concentrated on getting the silk panels painted for which I trialled some coloured pencil alternatives. Missing ‘something’ I stamped a golden design over the top to create more texture using carved/scored pizza bases.
The photocopied enlarged design. The outline was traced with a clear gutta resist before applying heat-set silk paints
The silk was laid onto a strong supporting cotton fabric and bits of masking tape were used to plot where the raindrops should be. After some practice, these were then machine stitched using lustrous shiny threads. This was quite a nerve-wracking point as you can imagine. Realising that from a distance, the raindrops would need more impact against the colour, out came a variety of beads from yet another of my stashes!
Developing the raindrops idea.
My then seven-year-old son giving me a helping hand.
The silk panels were combined with the commercial fabric and the screen completed in sufficient time for the photo shoot.
Designed to fit into my ‘then’ house (floor to top of iron finial the screen measures 1.65m (5ft 5in)and taller than me!) which had 3m high ceilings. In my ‘now’ house I have just 28cm (11in) clearance above the screen!!!
24 years later!
April showers in sunshine.
Raindrop details.
The flip side
Continuing another side to the story….I’ll make it short!
The venue was set and to take place at the Keighley and Worth Valley Railway Museum in West Yorkshire. All the equipment was set up and my screen placed in position – complete with a free standing shower head!….April shower anyone? – Someone had some fun-thinking in the planning….all of which took hours as you can imagine.
Organised chaos and smoke screens!
Finally, after they had tested and rehearsed everything including a smoke bomb to represent the steam train, ‘the’ photo was captured.
The final museum photo with a museum railway guard doing the honors – I love how the colours echoed each other.
The published 1998 Calendar photo
Throughout the morning the crew and I had been laughing and joking….then came an unexpected question….would I be prepared to be tied up, and lie on the tracks in front of the train?….WHAT?!?!
Thus far the whole experience had been quite magical, and as I have a reasonably adventurous spirit….I agreed.
I won’t show you the photo where I was asked to ‘pretend’ to scream as if I was about to be run over by the train….I totally and utterly failed….it came out as a very real, loud, blood chilling, scream (definitely not a good photo)!
Waiting for them setting the camera up – thinking….“Did I really agree to this, it is soooo uncomfortable!”
What I haven’t mentioned is that all this took place on a Saturday and this popular museum was fully open to the general public….you might now be ahead of me….yes, we had built up quite an audience with our general activity behind the barriers….the ‘scream’ was the finale!
I will simply finish by saying – there was so much laughter all around, with folk bent over, much stomach holding and tears just rolling down.
Caught on camera, ages later, wiping away yet another round of laughter tears!
A long distant memory that continues to make me smile as I recount the tale 😊
Silk thrums are gorgeous, jewel-like bits of temptation, rich in colour, shiny and sparkly, promising all sorts of lovely uses that will amaze everyone. Or not. Silk thrums are one part of the left overs from the sari silk industry. This is what can’t be woven on the loom and has to be cut off. I would like to see how saris are woven to understand the way the wastage is generated, it still puzzles me, but silk thrums are available in vast quantities to crafters all over the world. The problem with sari silk, and its a huge problem, is how the silk is dyed. There do not appear to be industry standards for colour fastness. Silk is a tricky fiber on a good day, so if dyers can’t determine dye acidity, water temperature, water hardness, or can’t properly degum the silk, the dye will run. I decided to try to use this characteristic of sari thrums to an advantage to see if there could be any benefit to be had.
I took a brilliant red thrum, trimmed the ribbon end and trimmed some silk fibers. The ribbon was soaked in hot water to leech out the dye. The colour saturation was evident as soon as the ribbon was in the jar. The water was totally red, but there is no way to do any metrics on this because the original silk was dyed with an unknown quantity of dye. All this is just a “see if this works” experiment. I snipped a tiny quantity of silk fiber, set it aside to mix with the wool roving I had chosen for dying.
I spun the rest of the silk threads into a single ply yarn. I’m taking a liberty in calling this a single ply, it is in fact a multiple thread yarn. The sari silk is made up of extremely fine thread. I respun those into a single thread with added twist. I can’t show them to you because my camera just can’t pickup the delicacy of those threads.
It was difficult to spin at first, because the fibers are nearly 36 inches long and tended to get tangled. I’ll try a different method next time, but it is possible to spin this into a reasonably nice yarn. The single yarn is plied against some of the merino top that is the basis of the dye bath test. I’ll use this later as part of the dye test.
When I plied the single merino wool with the single red silk they worked well together This is the most durable, hard to break fiber I have ever handled. Silk really is amazing.
I presoaked the remaining merino, drained, opened it along a mid-seam, sprinkled the snipped silk threads all along the centre. I then rolled the merino into a tube and wrapped it with the ribbon from the soak jar. This was set in an acid bath and topped up with the dye water from the soak jar. I use an oven to dye my wool. I cooked this for about two hours at 100C/220F. I expected a more vibrant red, not the pale orange, but this is an experiment, so expectations have to go on the back burner.


 brilliant red thrum, trimmed the ribbon end and trimmed some silk fibers. The ribbon was soaked in hot water to le
 ech out the dye. The colour saturation was evident as soon as the ribbon was in the jar. The water was totally red, but there is no way to do any metrics on this because the original silk was dyed with an unknown quantity of dye. All this is just a “see if this works” experiment. I snipped a tiny quantity of silk fiber, set it aside to mix with the wool roving I ha
 d chosen for dying.

