Browsed by
Tag: felt bag

Felted bag class

Felted bag class

Last time you saw the bag I was making, as a sample for this class. The class was at https://www.forestcovefarm.ca/. It was lovely. It was outside, and it was quite hot, but not as hot as the next week. There were a couple of pop-up tents and lots of trees for shade. There is also their store that is air-conditioned, so we could cool down if needed.

Most of the pictures are quite blurry. I am having trouble with my camera not focusing. Near the end of the day, I did find out that if I zoomed out to .9 it would focus, so the final shots are better. I have been to the Apple store, and they are ordering me a new camera.

It was a great group, with a wide range in ages from late teens to retired.

Adding the colour to the ropes took longer than expected, but I was glad I made the cores for them.

Corinne sent me a few pictures of the day, so here I am teaching.

Here are the blurry shots of everyone’s bags before felting.

I seem to have missed one. There should be 8.

Last night Corinne from Forest Cove sent me a few pictures. She had a shot of the bag I missed.


After much rubbing and rolling and them all thinking nothing was happening, I had them check the bags against the resists, and they were very surprised at how much they had shrunk. This gave some more energy, and they were able to finish the fulling. I only managed 3 pictures of the finished bag. Everyone was in a hurry to pop into the store and get cool and do some shopping.

The grey and purple one was much better in person. And I suspect that the purple will show much more when it is dry. I am hoping some people will send me pictures of thier dry and finished bags. They had to add the handles after they were dry. I did get one, but my email seems to have eaten it. I sent them home with instructions on blocking them and drying them and some tips on blocking them more with a steam iron if they want to.

Everyone seemed happy, so I am happy. I think I will switch to a bag with a slit handle next time, as the rope handle took longer than expected. By my next blog post, I should have a new camera in my phone. Hopefully that means I will take better pictures.

Mega-Stega March Break Sampling

Mega-Stega March Break Sampling

March 2026 has been busy with Guild library work, questionable weather (is it spring yet? It must be spring, I feel so ill (stupid snow mould allergy), no, it’s snowing again). There was a bit of needle felting. There was even my birthday, I had forgotten to have one last year with all the anaesthetic (but math caught up to me on this one, so I am older than I originally thought).

walker seat is piled with 3 large clear bags of wool and a large zipper bag with more wool, and the camera bag.1.1) Arriving at the guild with my trusty vehicle, laden down with fibre, camera, and cookie.

This month, we had a chance to have a mid-week felting day in the local guild studio during the March school break. We had a few of the local felters (Wet and Dry) drop in for part or all of the day. We each had our own projects, and it was fun to do them together. We chatted and it was great to have others to discuss our projects with.   Ann had a sculptural project using differential shrinkage, and I returned to the Mega-stegosaurus-bag, this time it would be a bit less mega (smaller) but remain Stega.

My goal was to figure out the correct size for the pattern and do a bit of sampling to make a final decision on colours.

Ann and I discussed more of the mechanics for the legs. When I put the bag down, I want it to stand on its own. Who wants a stegosaurus that falls over? Originally, I was going to put large wooden dowels in the legs and a base inside the bag. This would make the legs wool on the outside with a wooden centre.  While chatting with Ann, we discussed removing the hollow legs and making the wood legs a feature, showing them.

I had planned a wooden base to hold the legs, but I can adjust this to the new plan. It will give a strong attachment site and keep the bottom of the bag flat.

Diagram showing bad drawing of stegasurus bag with wooden block legs and wooden base inside the bag2.1) Diagram of the side view of Mega-Stega leg design with four separate leg blocks

Since I want to have Mega-Stega stand when put down, he or she will need 4 legs screwed into the wooden base inside the bag. I may have to add 2 screws per leg to keep the legs from rotating or unscrewing. If I want to have fewer screws, I can use a block with a carved groove to represent the 2 front legs and another block to represent the 2 back legs.

front vew of mega-stega bag, with 2 options for legs2.2) Front view of Mega-Stega bag with separate legs vs 2 carved blocks representing 2 adjacent legs

paper pattern with extention for belly2.3) Dropping legs and adding belly to the general shape of Stegosaurus

floor underlay pattern with adjustment in size and angle of neck2.4) Ann suggested changing the angle of the neck and lengthening the tail.

Since I will need a way to get into the bag, I am considering the evil zipper. I am not fond of sewing zippers. I have done it before, but most of what I enjoy sewing are historical costumes, which don’t have them.

Because of the shape of Mega-Stega, having a head/neck end and a tail end, I have the option of making a pocket in each space or stuffing them to make them firm appendages. I also have the option of adding a partial armature so I can curl the head and or tail so it will hug the body rather than stick out in front of or behind. I will think about this more as I work through the rest of the design.

Ann reminded me that I should expand my pattern, but not as much as the last one. As you saw above, we removed the legs and added more belly to allow the belly to flatten to create the bottom of the bag.

Ann with her multipart resist sitting on table in the studio.3.1) Ann helped me create the floor underlay resist shape.

As you already know, a Stegosaurus has 2 rows of large plates running adjacent to the spine, and spikes at the end of its tail.

When I was in kindergarten, I got up very early (6 am) on Saturday mornings in the hopes that the TV would be showing the Palaeontology lectures from the University of the Air. (I was disappointed if the Math or English courses played.) One of the best classes had a gest Geologist discussing a new discovery: blood vessels in the plates of Stegosaurus. He suggested that this suggested that the plate might be a cooling system, which was unnecessary in cold-blooded creatures. By the time my parents woke up, I was finished with dinosaurs and was happily watching cartoons.

A year later, in grade 1, when the teacher said all dinosaurs are cold-blooded, I asked about Stegosaurus’ plates. She didn’t know what a stegosaurus was. Ah, yes, I see the problem! Adults don’t get up until after 7 am on Saturdays, so she must have missed the cool University lectures.

I will add plates, but I need to inset them slightly down the body, so I will have space to add the zipper.

mega-stega resist and ann's multi part resist3.2) Considering plate locations. Ann’s multi-part resist is on the other side of the table.

close up of positioning plates3.3) close up of plate location considerations

I want to give the suggestion of the flushing colours that a blood vessel system might have.  I dug through my bag of red/orange. I have this braid of BFL/Silk, and I have a small amount of pure silk in a similar colourway.

BFL braid in Orange red and yellow4.1) Blue Faced Leicester (BFL) and silk 100 gr in shades from yellow through orange into red

I had considered a white base layer. Let’s make a sample.

Sampleing white wool base with red/orange/yellow overlay4.2) Sampling over white wool

I found a bag of fibre that I thought was Corriedale. Whatever the fibre was, it seemed a bit spongy rather than firm as it felted.  Hummm. That is not quite what I wanted in either the firmness or colour.

Let me try again. I have a half bump of black, it may be Merino. Why is it not labelled? I used the plate shapes I had cut out of the floor underlay as a template. I don’t need them to be hollow, so I don’t need to add a resist to the plate.

I lay out the shape in many thin layers of black, then added wisps of yellow, orange, and Red BFL/Silk. I then flipped the plate and put the top colours on the other side.

black wool under layer with same colour blend that was used over the white wool in the previous picture4.3) sample on black wool

Yes, that is more what I was thinking. Essence of blushing blood vessels! I made more samples in the various plate sizes I had cut out. I tried to leave the bottom part loose so I can attach it to the body eventually.

4 samples of the plates in black under wool4.4) Samples of pates

I will have to make more, but this is a good beginning.   I like the colours with the black under layer. I should be able to trim the tip on the one that is a bit messy.

samples and resists used as templates4.5) samples and templates for the plate

I now have a colour scheme, a pattern which I think will work, and samples at least some of which I should be able to use. Now I just need a bit of free time and table space to try to create my Mega –Stega bag.

I will have to put this aside for a little while, as I finish the preparations for a new workshop I will be giving next week. I hope to show you more progress in the near future, have fun and keep felting.

Making a spindle case mark 1 continued

Making a spindle case mark 1 continued

Last time I was telling you about a spindle case I was working on. It is here if you missed it making-a-spindle-case-mark-1

last time I had added all the wool so now it was time for some decorations. I grabbed some of my handspun and covered the case in a random pattern all over, remembering to go under the flap and to leave some sticking out to wrap around so it is continuous on the other side.

The other side. I didn’t do the ends because they would be folded. I did cover all the yarn with a very very thin layer of the background wool as I wanted it to adhere without too much effort.

I gave everything a good rubbing until it was starting to shrink and the yarn was well stuck and then rolled it.  I got it back down to 12 inches in length but the other way didn’t want to shrink up.

I rolled it more and harder in that direction. I heated it and rolled it in my hand but it didn’t want to go where I wanted it. I thought I would try rinsing it, and throwing it in the sink and shocking it with hot and cold water. Fortunately, that did it. The next step would have been putting it aside for a few days and trying again. I do know from experience that letting something rest often works. But I didn’t want to wait.

Here it is finished. It looks ok. I am not sure I like the accordion folds on the ends. I have never been good at them, they never look sharp like I see others.  The next one may get different ends. Overall the look is good but it is not stiff enough.

spindle case closed

spindle case open


end of spindle case

Here it is with 3 different size spindles in it. I am using the clip to keep it open. the small one is very loose in it. The medium one is a fairly good fit and the large one will not fit at all.

felt spindle case with spindle
spindle case with small spindle
spindle bag with spindle
spindle case with medium spindle
spindle outside case for size
Medium spindle outside case for size.
Large spindle not fitting in bag
Large spindle not fitting spindle case

Different wool might be better. I used Merino because it is what I have the most of. Coriedale might be enough but maybe Finnish or Bergshef.  I also think it needs to be thicker as well as stiffer. It doesn’t feel like it would be very protective against bumps and knocks. What are your thoughts on improvements?

Making a spindle case mark 1

Making a spindle case mark 1

I saw this picture that is for a workshop by Marti Csille at the  https://giftofthelambs.hu/

There is no way I can get there but I thought a felt spindle case would be a nice thing to have. I have a whole afternoon when I am not supposed to be doing something,  I will make myself one.

12 inch finished length should be good but how big around? I didn’t have a handy spindle but I did have a couple of whorls waiting for shafts. I had to use string to measure it as I can never find a sewing tape when I need one.

I am going to use Merino so I will expect a 30% shrinkage. I added 50% to the measurements, then I added some points on the end so I could fold them in. I thought that looked nice and if needed you push them out and stuff extra wool into them.

I added an extra piece of underlay resist for the flap to close it.  I was going to add lone felt ropes to close it but although I like the way that looks I find them a nuisance to use. 2 or 3 button closures should work.

Next was adding some wool. I didn’t measure out how much. I just added sool until it felt right. I will have to weigh it when it’s dry here is the flap side laid out.

I will get you the rest next time. I ran out of time to tell you more. I was selling for Jan and myself at the Chestervill spin-in and forgot until midweek I had a wet felted flower class on Sunday. No in-progress pictures of that but I have a nice group shot of the end of class I will share with you.

3rd quarter challenge and Pinhey’s Point

3rd quarter challenge and Pinhey’s Point

I will start with the third quarter challenge.  Onf the challenges is to make something about where you live. I remembered this piece I made. It has a wet felted background, needle felted water and significant roads and stitched secondary roads.  It is about 6×6 inches or 15×15 cm. It was a fun piece to make. It just needs framing, like so many pieces.


I did a little bit of wet felting at a demo we did a few weeks ago at a historical site near Ottawa called Pinhey’s Point Historic Site. https://pinheyspoint.ca/visit-pinheys-point/

I made this little bag for my purse. I will add a few snaps.  One to keep the flap closed and 2 more in the top pouch part so I can keep something in there without it falling out every time I open it.  It is for keeping a power pack and my square point of sale device mostly. I forgot to take pictures during lay out but here it is on the resist to show the shrinkage. I will probably add some stitching at some point. the finished size is 7 1/2 inches x almost 5 inches   or 19cm x 12cm


I did take some pictures of the group spinning and showing how the tapestry and 4-shaft table looms work. these are definitely candid shots that I only just remembered to take so I wouldn’t be in hot water with Jan.   It was a quiet demo with there being a lot of smoke in the air from the fires in Quebec. You can see in the background the faint outline of some hills. That is about 1/2 a kilometre away across the Ottawa River to Quebec.  You couldn’t see that much when we arrived about 10 am to set up.  It was nice to spend time with friends and to chat with the few people that dropped by to see what we were doing.

This slideshow requires JavaScript.

That’s about all I have been up to other than a little spinning on my drop spindle. I will try to get some pictures of my little balls of yarn for next time.

Cases And a Cover

Cases And a Cover

I got a couple of cases made this week. I thought I’d made a mistake and forgotten to add the cord at the right stage for this first one, then remembered I wasn’t making a bag after all! I added a piece of braiding/trim and a split ring. This is the felt side:

And the back/fabric side:

I did change my mind about what I was going to do with the piece of felt I used on this next one. If you saw my last post, I’d planned to make a small shoulder bag. But as I was cutting it out, I thought it was too narrow to work that way, so also made this into a case:

I changed my mind about the fabric to use aswell, I wanted something a bit more sturdier, so chose what I think is upholstery fabric:

A while ago, I made a piece of nuno with lots of shrinkage and rippling. I kept looking at it and thinking it’d made a cool book cover, so that’s what I did. This is how it looked after sewing up, but without a book in, outside:

Inside:

I wanted to keep all the edges as they were, and only had to trim off one small part. I haven’t decided which side I like best, so here’s one side:

And the other:

I might go over the stitching again, I want it to be secure, but don’t want to zig-zag stitch it as I like how the edges look.

New bags finshed , old bags stitched.

New bags finshed , old bags stitched.

I finally finished felting the new little bags and they are ready to be stitched. Here they are drying along with a book cover.


Here they are all dry

I couldn’t get a good shot of the nuno inside. Either my fingers or shadow or something made it not work. So this is the best of a bad lot. You can just see the nuno inside.

This one I turned inside out.

and the other side

A close up of the silk ball cut open. I did cut the wool hole to large in the felt and it has shrunk away to much so I will need to do somthing to make sure it stays in place. The other thing that happened was the silk blead. The only one it really effected was the pink one. The yellow effected the colour making it orangey around the silk ball and down one side.

This is what they look like closed, I will iron them in the closed position so they stay flatter.

Here are the last batch with thier stitching done.

I am adding a magnet as a closure.

I practiced the shisa stitch and the variations with some cardboard circles.

The two black ones I think the thread was to fine so it looked odd. I went to thicker thread and that was better.

I am going to have to redo the pink one as it stitches were not tight enough. My friend Carleen suggested I use a metal button on the opposite side as it would be easier than the magnet and stitching. I am going to look at what I have. I plan to add grommets on one side but I have misplace them somewhere. I will have to buy new ones to find them.

I am quite pleased with how they turned out. I hope you like them too.

Ann


Second Quarter Challenge

Second Quarter Challenge

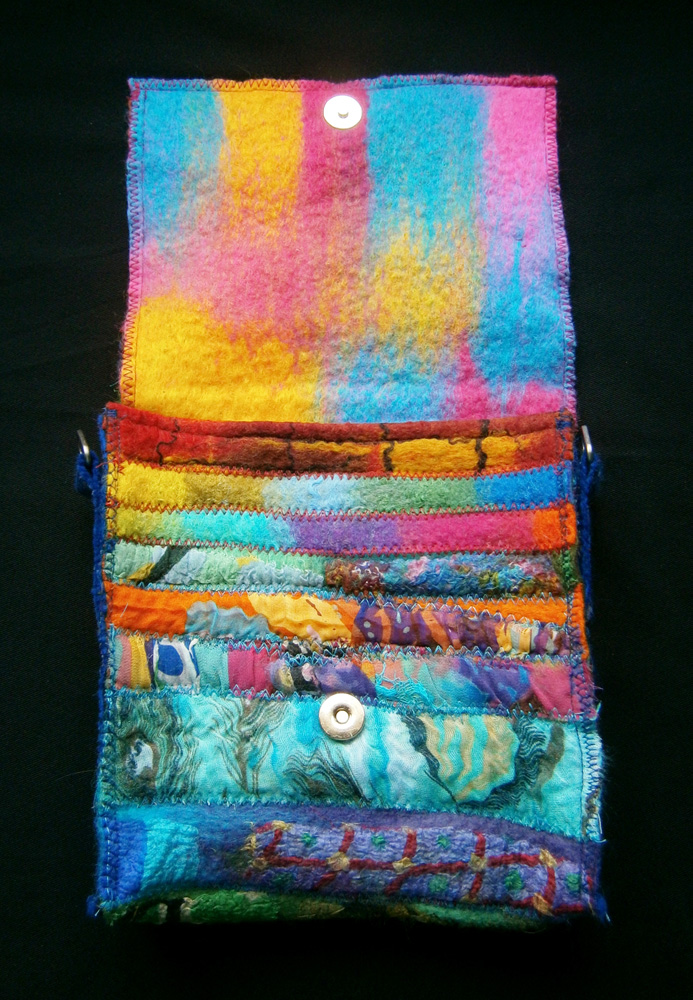
I know it’s taken me a while, but I finally got around to doing Ann’s 2nd Quarter Challenge! One thing I like more than colourful felt, is lots of colourful felt! So, when I have a nice collection of offcuts, I like to put them together in a collage and make something out of it. I’d been wanting an ‘alternative’ bag to my little drawstring bag for a while now, and I’ve got a canvas satchel which I really like, but I wanted something a little bit smaller, so I thought I’d go with a smaller version of that. I worked out the dimensions for the length and width I’d need it, marked out where the front, back and flap would be, then pieced all my strips together:

OLYMPUS DIGITAL CAMERAThe middle section with all the nuno pieces would be the back, I positioned them there because I know from experience that felt, especially Merino felt, can bobble/pill easily when it rubs a lot, like bags do around the hip area. When I trimmed the edges and folded it into shape, I realised the front flap was a bit too long to add satchel straps, so I went with a magnetic closure. This is what it looked like from the front when it was finished:

OLYMPUS DIGITAL CAMERAThis is how it looks when it’s open:

OLYMPUS DIGITAL CAMERAThis is the back (with the front flap open):

OLYMPUS DIGITAL CAMERAFor the side panels, I tried quite a few felt pieces, One which looked really good was a piece I’d made from woven pencil roving, but I knew it’d be too thick once the hook straps were added, so, and I don’t know why this is still hard to do after all these years, but many will understand, I cut up a piece of nuno felt I made a while ago. I’m not sure I ever showed it because it’s blue and I have a hard time taking photos of blue, but here’s one end of it:

OLYMPUS DIGITAL CAMERAI cut strips for the sides, and thinner strips to make the straps to hold the bag hooks in place:

OLYMPUS DIGITAL CAMERAI got the findings from another bag I bought from a charity shop just for them. I recently bought 10 metres of rainbow webbing with a bag in mind and it went perfectly with this bag, I even got the findings attached the right way around the first time!:

OLYMPUS DIGITAL CAMERAAnd on the rainbow theme, if there are any Mancs out there, Happy Pride weekend! 🙂

Project Bags and Tea Cozies

Project Bags and Tea Cozies

This last little while I have been making some project bags. I made a flat rectangular style using prefelt. I wrapped some prefelt around the resist. You can see I split the edges of the prefelt and cut one layer away so that the overlap would not be thicker than the rest of the bag.

overlaping prefelt ready to felt prefelt bag

Everything is prefelt except the stripes. They are an unknown wool roving I bought because I liked the colours. I put a stripe inside too so the bag will be reversible.  The finished pictures shows how you can use migration to your advantage. When I was about half way through fulling I cut a slit in each side for the handle. I healed the cut edges with some soap and finger rubbing. I stretched the hole upward to get the shape I wanted. I am pleased with how it turned out.

prefelt bag 1This side used dark green and white prefelt

prefelt bag 2This side used all black prefelt.

I also made 2 nice round bags with a built in strap. This pictues shows the bag with a balloon blown up inside it and the panty part of some panty hose stretch over it to hold it well while it is fulled to about the half way point. At that point it is nice and round and just needed to be shrunk more.

grenn bag on balloon

Once I was finished fulling it I rinsed it out and then blew another balloon up inside it to make sure it dried nice and round. I did a smaller blue one as well. Both were covered in one layer of silk hankie. The green one also had a silk hanky flower on it.

green bag dry blue bag dry

They need their closures. I haven’t decided what yet.

The other thing I made was a couple tea cozies. sorry for the picture quality but I couldn’t get it to show better despite trying several things on the camera and computer.

teacozies

The cat needs some whiskers. The flower is a made with a silk hankie.


Felted Knitting Bag

Felted Knitting Bag

I was asking people on face book what they make to sell in warm weather. One suggestion was a knitting bag.

I used the flat resist method and cut the handle and flap form the top of the resist.

yarn bag

After cutting the handle and flap I blew up a balloon inside it and wrapped it up and let it bounce around the dryer for a while.

yarn bag ready for a tumble

Next I cut the J. Thinking of the bag like a portable knitting bowl. Then another tumble.

yarn bowl J cut yarn bowl another tumble

I wanted to bind the edge. I tried leather but that wouldn’t work at all. Then I tried some bias tape. That worked better but not great. It was ugly but part of that is the bad sewing too.

yarn bowl binding attempt

I took that off and used a blanket stitch. that worked much better.

yarn bowl  finnished

I don’t like the way the jay effects the shape or the way it hangs open. Not bad for a first design. I will make some changes in the next one. I will make the handle longer so I have a bigger flap. I will make a smaller slit for the yarn to come out of the bag.  I realised with the bag having a flap over the top to stop the ball bouncing out I don’t need to make a J at all. I did see a bag with a grommet in the back near the bottom that looked very neat and tidy but if you use a hole you can’t take the yarn out of the bag without breaking the yarn. Ideally a little U shaped metal frame that could be squeezed shut around the felt (similar to when you put snaps onto a bag) would be best but I haven’t found anything like that. Purse frames work like that; you slide the felt into the channel of the frame and squeeze it shut and it grabs the felt or in some cases you sew the frame on. The problem is I just want a small U shaped piece. I always seem to be looking for things that don’t exist