
Felting Sea Patterns
I made my first felted picture maybe 8 years ago. It’s a seascape with a curlew based on a scene I’d photographed. I realise now I haven’t ever completely moved away from the sea and the birds in my felt making. The picture is still hanging on my living room wall, though it’s not really my favourite. I can see too much that I’d want to change.


Looking at the dark water I see I included strips of ribbon as well as nepps, locks and some non-wool fibres – probably bamboo. A little while later I made a second curlew which I much preferred. In this one the sea is slightly more abstract with silk hankies representing sea foam.

I live by the coast and seem always to return to the theme of water – specifically the sea and even more specifically the water near where I live, some of which is technically an estuary: the mouth of the river Thames. I’ve been looking recently at how I’ve tried to represent the sea in felt, then trying out some new water experiments.
In my last guest blog I showed how I made the watery background to my dark-bellied Brent goose. Here’s a reminder

Brent goose: making a felt picture
This technique of laying cobweb pre-felt on top of base layers was something I worked out for myself and often use as I really like the effect


The first picture, ‘Winter Sea’ I made entirely using this technique. For the second picture ‘Big Wave 3’ I used straightforward tufts of different coloured wool for the darker water but a cobweb strip in front of the wave to suggest water from a previous wave.

For ‘Wide Sea Pattern’ I’ve added some silk fibres to enhance the foamy effect.
I’ve also tried nuno felted seas using large pieces of fabric. I’ve made two pictures of a lovely little ringed plover I watched a short distance from my house.


In the left picture I used a UK charity shop wool scarf that already had a crimp. I ran pewter-coloured merino wool on the back in only one direction to enhance the crimp, which I hope gives a distant wave-like pattern. In the one on the right I used some very dense silk (from a US thrift store sarong) which I only partially felted in as I wanted to keep as much as possible of the sarong’s watery pattern (also, the silk was VERY dense!).
Thinking about how to represent sea patterns, I have spent a little time recently looking at photos and videos of how people do this when drawing or painting the sea, and wondering if I could use some of these ways of looking at and representing sea water in wet felt making.
Experiment one: I laid out two pewter merino layers then a fine horizontal layer of blues, which I pushed apart with 2 pencils hoping to evoke a choppy sea. Then, I suppose because I thought the darker tones may get lost, I added some more dark wool into the gaps.


I ended up with something that looked very flat – perhaps like dappled water but not what I had in mind. I wish I was more strict in sticking to my original intentions: I think it would have been better without the dark wool I added at the end. Maybe I’ll come back to that in the future and do the experiment properly.
Experiment two: Estuary Water. Next I wanted to experiment with the dark colour of the water. Out came the trusty drum carder and I blended pewter, beige and green wools which I laid horizontally on a vertical layer of mixed pewter and beige. I made a single layer of mixed blue prefelt that I pulled apart and laid on the top.


I call the result ‘Estuary Water’ as there’s often a lot of muddy sediment in the estuary which gives it an opaque, brown look. I like it but haven’t decided what to do with it yet – its dimensions don’t fit any standard canvases or frames. Maybe I’ll use it as the background to something else.
Experiment three: I decided to made some smaller felt pictures that were just sewn onto stretched painters’ canvases rather than being framed behind glass. Focussing on the sea water: this time I snipped into the prefelt blue layer with scissors after I’d laid it on the background.


I like this effect and could maybe take it a bit further in the future: make some bigger cuts or more of them. I stitched these onto pre-stretched canvases that are slightly smaller than the felt so the canvases aren’t visible when looking head on.
Experiment four: Harbour Water. I took a photo of the water in the harbour a few months ago that I found interesting and wanted to investigate in felt.

I’ve thought for a while I’d like to blend just two colours with each other and black and white and this seemed like a good opportunity. I used the drum carder to blend duck egg and teal merino wool with charcoal grey and natural white in various proportions.


I then made prefelts which I cut up and placed on a background of teal (1st, vertical layer) and duck egg (2nd, horizontal layer)


Quite interesting but I liked it a lot better before I’d felted it. I had a second go, using a piece of the duck egg prefelt as the base, which I like slightly better.


I like the shimmery water better than the round sections, which are a bit too round. Again, I’ve stitched the pieces of felt onto smaller canvases so they can hang but appear to be floating. I will look at them for a while until I decide how and if to develop the ideas further.
Experiment five: Choppy Whitstable Waves. In July a customer asked me to make her a picture similar to one I had but in a smaller size. I tried to use some of the things I’d seen in videos of how to paint water using acrylics and adapt them to my local sea colours and patterns and the medium of wet felting. I laid out darker ‘windows’ at the front of the waves with some water being pulled upwards by the wave (with the top fibre running upwards) then blue sky reflections made from cobweb prefelt sitting behind the wave foam.


I feel this has some potential. I particularly like the wave second from bottom and am tempted next to make a single long wave using this technique.
At this point I had to break off to set up my harbour hut exhibition for a week. Interestingly, the customer didn’t like the smaller picture I’d made as much as the original and decided to buy the bigger original instead.
I still find sea patterns endlessly fascinating. Each experiment seems to ask more questions than it answers and produce new avenues to investigate. I have no doubt I’ll keep on coming back to sea patterns (and birds) again and again.
Are there any effects here that you particularly like or don’t think worked so well?
Do you have a theme, subject or colour-way you keep going back to in your work?

 1 from last week
 2-4 The Infestation (not necessarily a bad thing)
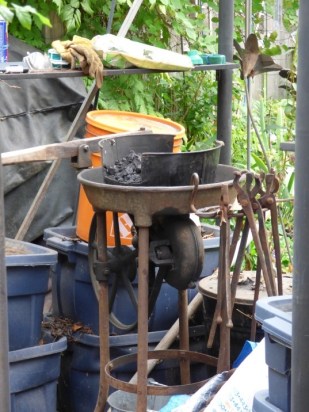
 5 hooks and guillotine
 6 These are over 2 years old and I need to use a wire brush and a bit of spray lacquer. After a couple of winters, they have picked up a bit of rust. I use them to hang and drain the strainer baskets between the washing and rinsing soaks of the fleeces.
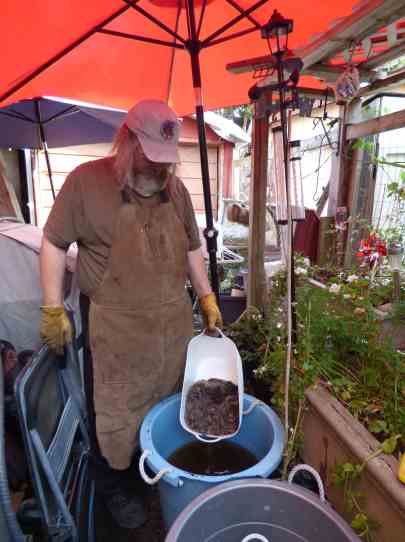 7 blacksmiths are also handy for lifting strainer baskets out of the soaking buckets.
 8 At his point I have a backlog of fleeces sorted and waiting to be washed.
 9-10 My present 2 hooks and the sorting table.
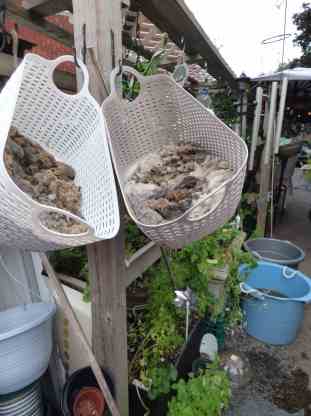
 11 I hang the baskets on an angle so the water drains from one corner removes more of the water than when it hangs straight.
 12 He has also made me a couple of hooks designed to hang over 2×4’s both horizontal and vertical orientation. I have been using this for the 3rd strainer basket but it drips right in the carrots and I don’t like to think of the soap and other material the carrots are getting from the drippings.
 13 Oops, found one more this was hiding!
 14 Once the fire is made and the coal had burnt off the green smoke (don’t breathe that part!) it’s time to start heating up the bar stock to make hooks.

 15-17 Blacksmith at work, don’t startle him.
 19 This is his bigger anvil hidden partly amongst this year’s very good growth of catnip. The tool in the hardy is for cutting metal.
 20 These are the hooks he made while I was wrangling dirty fleeces.


 This summer, the family took a cottage in the south west of Ireland – on the beautiful Valentia Island. Kerry is famous for its scenery and we made the most of every precious day there. One day involved a trip to Killarney’s National Park and I took this photo at the Torc Waterfall. It became the main source of inspiration for this piece.
 For this experiment I worked on a flat surface but the technique could easily be used on a 3D surface. Just be sure to make your resist big enough to accommodate your sewing as you will lose a fair bit of surface during the gathering and felting process. To familiarise myself with the fibre, I made up my sample which comprised of two layers (10 grams each) on a 25cm square. Shrinkage was around 30%.


 Now it’s time to play. Using the pins, start by creating folds in your prefelt and work on this until you create folds. My inspiration was the exposed tree roots (first photo) so I opted to have my folds radiating from the centre of the prefelt.
 I then took each fold and tacked a running stitch through it. To do this I started by knotting the thread unto itself (leave a tail and take your needle through the prefelt then back to the side facing you, tie the tail to the main body of the thread three or four times). Doing this will secure your thread so that it stays put when you pull to create the gathers. Then I ran a stitch through to the end of my fold, I gathered it up and tied it off (knotting the thread into the last stitch in the gather three or four times. It needs to be robust and not fall out when you start the felting process. Be sure to take out the pins as you go along. Continue gathering until you are happy that you have the basic shape you want to achieve.
 Now it’s time to start felting. I used a pair of poly gloves for this part of the process. I wet the piece in the usual manner (warm soapy water). At this point I needed to be methodical in how I felted the folds so I marked my starting point with a peg and started working my way around the folds (rubbing each one a hundred times). I did two rounds. The folds felted to each other really fast. I was able to turn the piece over and see that the underside of the piece had melded together so I was pretty confident that my cutting into the piece would not cause disintegration. I finished felting and fulling the piece and left it to dry.
 Then I cut into the folds. I used a very sharp scissors and cut through the folds just a little at a time. By doing this I controlled the colour that was visible. First skim revealed the third colour, second skim brought up the second layer colour etc.


 2-3 Fleece placed on the dryer rack
 4 next half of fleece in soap and soak stages of washing
 5 Filled one drying rack and pulled out the second.
 6 two umbrellas up and… it has stopped raining again.
 7-8 wet, very wet
 9 Sun coming out on my Tie basil plants in a broken pot, I will be trying to overwinter.


 10-13 all the wetness was worth it, look at that fleece!!
 14 The first part of the second Icelandic fleece is trying to dry.
 15 it rains again
 16 the drying racks


 17-20 Beth’s Black fleece of straw, the top section of the strainer bucket is self felted.


 I had three mystery fibers in grey and the black is merino that I used for my control. I laid them out with two layers. I wet them out with tepid soapy water and started the felting process by sanding on boths sides, rubbing and rolling. This is what they looked like.
 B was looking as it should for merino, but neither A, C or D passed the pinch test. I kept working at the samples and I finally got them to do a little something.


 Here we are above drying out in the sun. They felted better than expected, especially D. Here is the final outcome below.


 1-3 Floral wire from Dallerama unlabeled but probably 22 gauge
 4 finger making tool, Stick shuttle and ruler

 5-7 I was very pleased with the expressiveness the hands gave. You can also see more of the transition zone from shark to boy.

 8-10 “those hands look creepy”

 11-13 base layer, then adding wisps of colour
 14 Here is the wool that keeps getting extra rinses, this is just the first part of one of the two large rams fleeces I bought a couple of weeks ago. There is still a lot of VM including burrs to clean-out. Now back to Shark-boy!


 15-18 wool and hanging baskets survived adding detail at the intersection and along the spine.
 19 This summer Mrs. Crow and her family supervised me, as I have worked on the Mer family. Today they all dropped by for a visit.

 20-22 Adding more definition between belly and sides of sharks


 23-30
23-30