Wearable Arts In Auckland

Wearable Arts In Auckland

Despite the media hype around it, this dress didn’t even make my favourite top ten from this exhibition. Don’t get me wrong, the Imperial Yellow dress was beautiful and very intricately embroidered but the standard of all the dresses / gowns in this exhibition was genuinely mind-blowing, it was like being able to walk amongst a World of Wearable Arts show. A week later and my head is still buzzing with inspiration….

This photo doesn’t do the colour justice, it was a much brighter golden yellow with gold embroidery

Guo Pei’s story is as fascinating as the engineering behind her dresses. Growing up in communist China, fashion did not exist, so when she announced that she wanted to be a fashion designer everyone thought she wanted to be a seamstress, the concept that the shape and silhouette of clothing could be altered was not commonplace in China in the 1970’s and 80’s.

Added to that, China in the 70’s and 80’s was a very patriarchal society, women were not expected to be entrepreneurs, if they worked outside the home / domestic setting it was as an employee not an employer, making Guo Pei’s journey to owning her own fashion house all the more remarkable.

Sadly, it appears the hundreds of artisans who worked on bringing her designs to life, were not well paid, especially in the early days. Hopefully, the notoriety Guo Pei is receiving now will be reflected in the wages paid to her extremely talented embroiderers and seamstresses.

The attention to detail in each ensemble was impressive. Each gown had its own accessories and shoes which were works of art in their own right. However, I imagine some of the shoes would be like walking on stilts 🙂

I wouldn’t normally advocate taking photos up someone’s skirt but at this exhibition it is a must. I think the organisers missed a trick not putting mirrors on the floor under some of the dresses as the workmanship inside the skirts is amazing. The detailed beading and embroidery we see on the outside doesn’t stop at the hem.

View from the ground looking up a model’s leg

This dress was intriguing, viewed from the side the model appears to be very pregnant but from the front you are presented with a hollow but inflated skirt….

That is filled on the inside with hundreds of golden flowers…

I’m not sure if Guo Pei was trying to make a statement (I see soft, opulent petals in a voided pregnancy) with this dress but this idea of presenting two very different faces on the same garment fascinates me.

Some of the gowns were definitely more Art than Wearable…

The V at the front and silhouette created by the wide skirts of this dress kept luring me back to look at it. I feel the need to use this as inspiration for something but I’m not quite sure what yet….

I was equally fascinated by the engineering behind some of the dresses as I was by the beautiful designs and forms created. This voluminous skirt appears to be constructed from threading a flexible rod through a channel sewn into the fabric, creating a continuous coil that was attached at the waist.

Sadly we were not allowed to touch the dresses (there were attendants in every room making sure we did not get too close) but oh how I wanted to feel the fabrics and look more closely at how each dress was constructed!

If you get the opportunity, this really is a MUST SEE exhibition, I know a few people who have been to see it several times already!


2024 Photo shoot!! New Tools, Ann and Jan get new toys!

2024 Photo shoot!! New Tools, Ann and Jan get new toys!

Just before Christmas, Ann and I were chatting about photo shoots for things we had made from felting.

I had been using my, by now quite old, camera (Lumix DMC-FZ70 by Panasonic) and an older Flannelette half sheet as my backdrop.  The sheet is attached to bulldog clips, which are hooked on S-hooks. This has worked but I can only set it up directly in front of my computer, so conveniently located but not portable. It also is limited in colour, white. I guess I could get another sheet colour…

flanelet sheet held up by bulldog clips attached to S hooks. Ring light sitting in front1) sheet clips and ring light

Close up of bulldog clip2) Close-up of bulldog clip hooked over a large S hook.

moose bag #3 posisioned in front of Flanelet sheet set up3) using this set-up for a photo of Moose bag #3

The sheet is working OK, but I think I can do better.

Ann and I had looked at full-size photo backdrop set-ups, but they require a lot of floor space, which neither of us has extra of. (if you have floor space why are you not adding more wool?) We had looked at the smaller photo boxes but they work for small things, so would not work well with a felt hat or Mer-person.

Then we spotted a tabletop version of the large photo backdrop, which looked like it may work. It has a tripod base with an extendable upright, which supports a crossbar. It came in a few size variations, and after looking both, at those available through Amazon.ca and Aliexpress I selected this one. I ordered it from Amazon and let Ann know when it arrived.

This slideshow requires JavaScript.

4.1-4.3) 2.2ft Wide 2.6ft High (adjustable height from 1.5ft to 2.6ft)

https://www.amazon.ca/Linco-Lincostore-Photography-Backdrop-Background/dp/B072FJR8QW/ref=pd_vtp_h_pd_vtp_h_d_sccl_2/146-5765676-4725532?pd_rd_w=oP80i&content-id=amzn1.sym.54a077ab-41be-4d2b-b691-c4848b60dd3b&pf_rd_p=54a077ab-41be-4d2b-b691-c4848b60dd3b&pf_rd_r=Q1ZVP4V01FF62GNX9MSZ&pd_rd_wg=7N0fP&pd_rd_r=4c28de17-cf4b-4d95-bd52-6a3f2cec3b85&pd_rd_i=B072FJR8QW&psc=1

This is one of the smaller tabletop versions.  It has a sturdy wide base and comes apart to fit in a small bag. There are other models, which are both higher and with a longer cross arm. After considering what projects Ann or I would likely want to photograph, the smaller tabletop version should work for most of the projects.

the stand comes in parts, base, cross pices and clips.5) Un-assembled stand and clips. In the background, you can see the white styrofoam that the backdrops were warped around for shipping.

the bag the stand fits in6) all the parts fit in a bag for easy storage and transport.

I could use the flannelette sheet attached to the crossbar with the clips provided, but I would like more options as a background. The size that seemed to be the best option for backgrounds was 57cm by 87cm. As I investigated the options I found that there are 2-sided options (with different images or colours) as well as lots with the same colour on both sides.

I found some I liked at Aliexpress and ordered two options which arrived much quicker than expected. One was black and white.  The other was two mottled tones of rose and grey, which I suspected would be a more versatile option.

two sided black and white PVC photo back drop 2 sided PVC back drop in mottled grey and rose 7.1-7.2) The first two PVC sheets I ordered cost C$7.24 each.

I had taken Photography as one of the practical art options at university, but it was more focused on experimental composition and darkroom work. I am now working with digital photography, the darkroom work has changed to mostly adjusting the colour balance and a bit of cropping. While I didn’t study studio photography, I have a rough understanding of the concepts.  It will be fun to explore this further.

The local guild Ann and I belong to was having a last social/spin-in of the year on Dec. 30th, from 1-4 pm. We decided to come in early, so she could see the stand and the backgrounds that had arrived.  I brought the two Moose bags and Ann brought the samples for her Valentine’s Day workshop (No peeking, she will be showing you shortly).

The 2 background options had been rolled tightly around a Styrofoam core. then wrapped in packing foam and plastic which did protect them during their travels. It feels like a stiff plasticized paper and is described as “PVC Double sides printing Waterproof Photo Studio Photography”.  Whatever it is, it left them not inclined to stop curling immediately after unwrapping. I think they will stop curling if I can store them flat rather than rolled.  With a bit of sneaky persuasion (some mettle book ends, a clip and a magnet), we were able to proceed with the photo shoot.

mettle bookend and extending handle with magnet8) mettle book end with extendable handled magnet, usually used to pick up fallen needles.

Ann and her phone using the stand and the backdrop 9) Ann and her phone taking pictures she will show you later.

Ann tried both sides with her bags but I only used the mottled grey. I had a bit of trouble with deciding how to display the handles of the moose bag while shooting Moose bag #1, Glenn’s Moose.

This slideshow requires JavaScript.

10.1-10.4) Moose #1, Glenn’s Moose

Moose back #2 black moose with tan legs and blue yarn wrapped in antlers11) Moose #2 Jetta’s Moose

With moose 2, Jetta’s moose, I figured out I could have the handles looped over the top bar wing-nut to keep them out of the way.

As you can see the hole set up is not large, easily fitting on a 6×2 foot fold-up table, but it is large enough to photograph a large project bag. Since the backdrop is only clipped on, if you needed more width, you can position it horizontally rather than vertically. When set up vertically you can use the curve of the PVC to not get a distinct edge as you would find looking at a backsplash and kitchen counter. If you want to have that hard edge change, You can use a second background as a ground to position your subject on.

diagram of hard edge from photo backgrounds12) 2 backgrounds, one is used as the background and one as the surface the item sits on.

The third way to use the PVC photo backdrop paper is as a surface to place your item and shoot directly down. When Ann shows you her photos you will see her doing this.

Since we had fun with this photo shoot, when I got home I continued looking at PVC backdrops and ordered a few more options. I hope you will get to see them for some upcoming blog posts.

This slideshow requires JavaScript.

13.1-13.5) This second group was from a different seller and should arrived Jan 18.  The cost was $6.65each

If you are photographing your felting and fibre arts, having a stand and a few backgrounds would be fun. Consider what size most of your work is, to decide what will work best for you.  I would suggest considering the double-sided PVC sheets since they give you more options than the single-colour options.  If you decide on the  PVC versions, they can be used with wet felting, while it is still wet!  (this would not work out the same with cloth or paper).

That said, You don’t have to invest a lot of money to photograph your work. you can still do a lot with a couple of bulldog clips, a couple of S-hooks, an old sheet and a couple of ring lights or even a couple of flashlights or a window. My last frugal idea was some heavy-weight Christmas wrapping paper. Although it is not as sturdy as the PVC sheets, it will work for a single or a few photo shoots. The wrapping paper comes in lots of interesting patterns. Some are double-sided, so don’t forget to consider the back too. Even better it’s on sale just after Xmas!

christmass wrapping paper rolls in two patterns14) Christmas wrapping paper Moose with hat and copper snowflake

If you are looking for something in between the PVC and wrapping paper for backdrops, I can think of 2 other frugal options. First, as I originally started my fibre journey as a weaver, I have a few rolls of cheap wallpaper stored with the table looms. I went for the ugliest, cheapest, rolls of wallpaper from a second-hand store. You could keep an eye out for the slightly less hideous patterns than I have, as possible backgrounds. And lastly, I have various weights of canvas left over from painting which can be dyed or have washes of paint added to it to make a backdrop. lightweight canvas drop cloths are large and could be cut up into many pieces. Oddly, I still look at something and see that it could be used in some other way. I am not sure I will ever outgrow the frugal “starving art student brain” setting.

I know we haven’t chatted yet about lighting options.  You can see one of my 2 mid-size ring lights in photo #1 (ring light from Dollerama and the stand is an articulating desk stand from amazon.ca). Your lighting choices will depend on what you are photographing, where you are set up and whether you want a diffuses or more raking light source. The topic of lighting options can wander off into a big blog on its own, maybe a chat for another day.

Do you have favourite photo shoot equipment you use or cool tips for photographing your work?


1st quarter Challenge-done

1st quarter Challenge-done

Well, I must say this is the fastest I have ever done the challenge. In fact, I finished it before it was issued. It was a Christmas present for my hubby. My husband loves cast iron cookware. It does cook well and hold heat. He looks after them so I don’t have to worry about wrecking the seasoning by doing it wrong. The handles on the frying pans are hard to get a grip on when they are hot. Oven mitts always seem too big. we have some silicone ones but I always feel like the pan is trying to twist inside them. So this is where the felting comes in . I thought I would make some felt handle covers. wool is fire-resistant and a good insulator, so should work well

I measured the handles and then headed for the studio. I found a scrap of floor underlay for the resist and measured out 2 so I could do 2 at once.

Just about a perfect fit for my rolling mat.

I decided on a nice bright blue and added 4 layers of wool. I am not sure how much wool as it’s not a very large amount I just made sure both sides would have the same amount. Nothing beats guessing if it’s right. LOL

After both sides were wrapped around and wet I decided they were boring but being in a hurry ( leaving it too close to Christmas) I just added a strip of orange down the middle of both sides. I didn’t want there to be a right side up.

After wetting down it was on to felting: rub rub rub, roll, roll, roll.

I cut the handles in half so I had two the same size. Then a little more rolling and onto fulling. these are small and were coming together quickly so I fulled them in my hands by rolling them in a tube shape and in a ball.

One down and one to go

And they are now being used on the stove. they are nicly heat prove but not so thick you can’t get a good grip.

So how’s that for reading Lyn and Annie’s minds and being ready with my first post of the year? How about you? did you make someone something practical for Christmas or a birthday?


Mark Making on Felt – Online Class Registration Opens

Mark Making on Felt – Online Class Registration Opens

Would you like to learn new methods of “mark making” on your felt? Are you looking for ways to create work that is uniquely your own? Are you wondering about surface design on felt? If you are looking for a new learning experience, please join me. Registration opens today for my online classes! The classes are listed below with a link to each class page.  You don’t need to be present at any certain time to participate in a class and you will receive PDF’s to keep with all the relevant information learned in the class.

Screen Printed Felt Journals by Ruth Lane

All four modules of my class, EMBELLISHING FELT WITH SURFACE DESIGN TECHNIQUES – A MIXED MEDIA APPROACH, will begin on January 12th  and end on February 23rd. Registration opens today for these online classes. Click on the class link below to register for that particular class.

Nuno Felting with Paper Fabric Lamination

Experimental Screen Printing on Felt

Free Motion Machine Stitching on Felt

Printing, Stenciling, and Playing with Thickened Dye on Felt

Click on any of the links above to find out more about the class and to register and join in the fun.

Our Wet Felting for Beginners class is always available. You can start any time and follow along at your own pace. Register here.


2024 First Quarter Challenge

2024 First Quarter Challenge

Christmas Wreath

Annie’s Christmas door wreath made with foliage, fruit and berries from her garden

We wish you all a happy, creative 2024 – and what better way to start the new year than with a challenge!

The first quarter challenge is to make a cover using textile multi-media.

Damaged plant pots/vases need covers to keep them serviceable, sewing machines need covers to keep the dust from the workings, digital devices need covers to prevent scratches to screens, tables need covers to prevent damage and to look decorative  … this list could go on for a while!

Please post photos of your textile multi-media challenge makes in the Felting and Fiber Studio Challenges  or in the Gallery by submitting your photo here

In 2006, we visited Abbotsbury where the villagers and wider community got together to make a cover for the grand piano in the church.  Here are a couple of photos of parts of the cover.

Textile cover for grand piano

The studio challenges are open to everyone so please do join in!

Happy New Year!

Happy New Year!

Happy New Year to you all from all of us at The Felting and Fiber Studio.

Antje thought it would be fun if all of the cards from the card exchange could be brought together into one post. Some people have already posted about their cards and others have not. This way, you can see all the creativity in one post. There were 14 of us that decided to participate in the card exchange this year. Ann M. randomly chose partner’s names and we created a “card” that could be holiday themed but didn’t necessarily need to be.

Carlene and Ruth exchanged cards.

I have written about making the card for Carlene here.

Carlene explains about making my card here: In September and October, I collected some birch bark with the idea of trying to make something out of it.  I watched a number of videos on YouTube explaining how to collect and process birch bark.  I was particularly inspired by this video of Pat Kruse: Birch Bark Artist (https://www.youtube.com/watch?v=84JyLNUDXz0).  In the video there were some amazing motifs that were cut out of birch bark and sewn into a picture.  So I decided to try a simple flower motif and sew the stacked pieces together.  I also opted to add a felt backing for additional support and to give me something to sew clips to the flowers.  This would allow the flowers to be used as hair adornments or clipped onto a lapel.  Sewing through the bark was not too bad, though I did end up with some tearing.  And the back of my pieces were not very neat.  But the fronts looked OK.  Sewing on the clips was harder than I expected. I also applied a thin layer of white glue to the front of the bark to create a clean and shiny surface on the finished flowers.  The next challenge was mailing them.  I clipped them to a post card and put them into a plastic container to protect them from getting destroyed by the postal service.  It was an interesting experiment and I look forward to collecting more birch bark next summer and trying to make something larger.  (Those YouTube videos show some amazing projects.  But you need a good supply of high quality bark for those.)

Leonor and Helene exchanged cards.

Leonor’s post about her knitted card for Helene is here. And Helene’s post is here.

Karen and Caterina exchanged cards.


Karen explained her process in making a card for Caterina here. Caterina is writing a post for early January but gave me a bit of information about her card:

Firstly, I wetfelted a bigger abstract piece of nuno felt, using an upcycled piece of silk and viscose fabric in winter colours, merino wool, merino prefelt and upcycled yarn. I cut it into the right size for my card, choosing a part that I liked and felt meaningful. I was thinking about an abstract landscape or mindscape in winter colours for my card cover or first page. I felt it would “open the conversation”, kind of state the setting and also be recognisable as sent by me, and so prepare for the ” friendship message” in the second page.

To compose my second or inner page, I printed and marked some upcycled fabrics in white and pale blue with dyeing inks in blues and black and greys. I cut some of the printed fabrics and composed a collage of fabrics on a dark grey fabric background (a sample furniture fabric) with a dahlia flower. I added a scrap of the silk fabric used for the nuno felting of the first page of my card, and hand stitched it all together with different types of stitches, aiming to encourage a suggestion of stylized flowers and snow. The stitches helped to define and enrich the abstract marks on fabric, and also to attach the fabrics together in a less apparent way. I used white french knots to suggest snow coming from clouds above (the silk fabric looked a bit like clouds to me.). My message was a friendly offering of flowers in a winter landscape symbolising the Christmas season.

Ann and Lindsay exchanged cards.

Ann explained her proces for her tree card here. Lindsay writes about her process:

I decided to send Ann a sheep-themed card, given that she’s a shepherdess. I laid out a thin layer of merino and silk prefelt with some moody sky grey/blue merino inclusions. I then added some sheer silk, recycled from a dress I bought in a charity shop, on the bottom section, to give the impression of a hillside. When that was felted and dry, I ironed it and then heat printed a tree and two ewes that I’d adapted on photoshop to fit to scale. I hand stitched some glass bead ‘baubles’ onto the tree and a tiny metal star on the tree top. Using double sided tape I set the piece into a tri-fold card and wrote ‘Merry Christmas two ewes’.

Lisa and Capi exchanged cards.

Lisa explains about her Christmas tree card here:

I made my Christmas Card for Capi, based upon the old fashioned version of a boxed card. (The ones that were 3D, padded cards that came in a box).  It was decorated with little bells as the baubles, and some hand spun yarn for the garland. I inserted some fairy lights through the felt and put the controls under the snow, seen on  the first photo. The box frame can be opened from the front to access the light switch. It’s gone off to Capi, and I received hers yesterday.  I was blown away with Capi’s creation, put me to shame! But I hope she likes mine. Lisa reports that Capi based her card on her favorite scene from Hilton Head Island.

Jan and Marie exchanged cards.

Jan explained her process for the moose card here. Marie sent Jan a tree card:

My card was made from silk paper with some felted Christmas trees. The trees were machine stitched down, and I hand stitched some beads to one of the trees, and glued 2 small swarovski crystals to 2 trees and sequins to the rest (could not find my other crystals). The silk paper is in white, blue, wintery colours to indicate cold, snowy or frosty area. I have attempted to add a felted moon also. I attached the silk paper to some stiff art paper, and added a greeting on the back. I secured both with a close zigzag stitch around the outside edge.

Tesi and Antje exchanged cards.

Tesi talks about the card she made for Antje:

Handmade greeting card

Leftover acrylic paint used for mark making on cotton fabric is what I used for the postcard background. Then I added collage elements that I had made for my L3 Stitch course monocratic color scheme. I used green mixed with black, white, and grey and then used stencils with my gelli plate to pull the prints. When I got all my collage pieces added, I put a light coating of Matte Medium over the top of it and let it dry overnight. Then I added some sturdy interfacing to the back, stitched a couple of lines through it, added some backing fabric to cover up the stitching and zigzagged around the edges.

Antje writes about Tesi’s card:

DESIGN – My thinking process is like percolated coffee….it has to filter through the layers, and usually involves a few doodles along the way!

So ‘Christmas trees with stars on their top’ was my starting point becoming….Individual star topped trees triangular in shape – But trees are not all the same shape! – What happens if they all lie down with tops and stars to the centre? – Mmm, looks like a cut tree trunk – A tree has years of growth rings – Mmm, rather like us, all individual, with years of experience/knowledge, together forming a tight group around a central interest….and the idea was born (and doodled)!

PRODUCTION – My exchange partner, Tesi, I knew was a whizz at quilting and that stuck in my mind, although I knew I would definitely not be quilting as such! Instead I gathered a variety of cream/neutral fabrics, many were small off-cuts or snippets (that I always save) which I layered with Bondaweb to a thin background fabric. After simplifying the design, I then cut various triangles and machine stitched them to a background fabric, to which I had attached an off-centre golden circle. Once attached I hand embroidered the growth rings.

RESULT – Togetherness.
Unfortunately, in my haste packing for a few days away, I only took a quick photo of the card and envelope (so the image is blurred).

I did however pack the same collection of fabrics and paper to create some smaller versions, balancing them on my lap! They currently remain WIPs….I was having too much fun!

I hope you have enjoyed all the cards from our talented and creative group. We wish you all the best in 2024 and hope you have a creative year!

A Card for Caterina

A Card for Caterina

When Ann first invited us all to take part in a holiday card swap it was mentioned that our theme could be anything, it didn’t have to be particularly Christmassy…..and so mine wasn’t. I have to say that as more and more of the cards are now being shown, a part of me wishes I had gone with a Christmas theme, but it’s only a small part! My partner in the swap, Caterina, got in first with her card to me which I love and I felt that gave me permission to do what I really fancied doing! I won’t show Caterina’s card in case she’s going to do a post about it but let’s just say we were thinking along very similar lines.

I decided to make a mini Autumn/Winter forest floor mounted on to a 5” x 7” card. Starting with an off cut of Lutrador I used acrylics and Inktense to paint it grey with hints of green, or so I thought! Once I started to distress the Lutradur with the heat gun, what had looked very grey suddenly became very green as the green Inktense intensified. Rather than start again I decided to go with the flow and add more grey where needed later.

What was grey became very green!

Next I got out my box of Tyvek and Lutradur samples to see if there were any pieces of bark or leaves already made which I could use for this project.

The leaves were all too large apart from the one on the luggage label

All of the leaves turned out to be too large for the scale of the card apart from a small one attached to the luggage label on one of my workshop samples. This was the ideal shape and size so I used it as my template for the leaf to go on the card.

I had more luck with the tree bark as I found a few workshop samples, one of which hadn’t been painted and was the perfect size.

The barks been painted and I’m starting to audition pieces for the card

Moving the pieces around until I’m happy with the placement
I can spend ages arranging and rearranging the parts, distressing the smallest pieces of Lutradur to get pleasing shapes and checking I’ve made enough to cover the background. Once I was happy with the amount of pieces I had the bark was embroidered and everything stitched down to a piece of brown cotton fabric.
And this is the finished card complete with Colonial Knots, felt pebbles and the little leaf. OK, it doesn’t scream “Christmas” but, as a keepsake, I hope it will remind Caterina of the friendships she’s formed with the F&F group and of happy Christmas 2023 memories.


Once I’d got Caterina’s card in the post I caved in and made a reindeer themed “Christmassy” card for my local textile group swap. After trying, and failing miserably, to draw a simple reindeer I turned to clip art and found this cute reindeer pose.

I’d recently seen images of beautiful little birds online that had been made from scrap fabrics and free motion stitch and these inspired me to do something similar with the reindeer.

I had so much fun making this one that I tried another pose, got carried away and went in to production!

These have been cut from fabric scraps and free motion stitched on to patterned card (which makes a great stabiliser!) I figured the antlers and legs would be a bit fiddly in fabric so I simply used a marker pen for those.

Cards have never really interested me in the past but these were such fun to make, I can see myself creating more to put aside for next year!

I hope all our readers have had a peaceful Christmas and here’s to a healthy, happy and creative 2024 for all of us!

2023 Sails Off Into The Sunset

2023 Sails Off Into The Sunset

Another year almost behind us. Time goes so quickly these days, at least for me! I hope you all had a wonderful holiday. And may 2024 bring much joy and creativity to your lives!

I recently signed up for an online class with Wen Redmond. http://www.wenredmond.com/ through Fiber Arts Take Two. https://www.fibreartstaketwo.com/ FATT really present their courses very professionally. And they’ve got wonderful artist interviews on their YouTube channel. Wen’s course is called Photos, Fabric and Mixed Media. I’ve been wanting to focus more on using photos in my artwork and I think I will be learning a lot from this course. Wen is very generous with her methods of achieving remarkable fiber art.

One of my goals this coming year is to get good at using Photoshop and other apps of that nature. In November I decided to subscribe to Photoshop and once I got it loaded to my old laptop (2017) all sorts of problems occurred. I now have a new laptop. Then once I got everything transferred from my old laptop to the new laptop it wouldn’t connect to the internet! I now have a new modem. It was as old as my laptop was! So after about 3 weeks of frustration, I’m all up to date and maybe good for another 5 years or so.

I kind of lost my creative mojo while dealing with all that computer techy stuff. Hopefully I’m back on track again.

Last week I spent some time following Wen’s first module of her class. It focused on getting your fodder prepared for using in the upcoming modules. She uses acrylic paints watered down quite a bit so she can get some nice soft washes going to print on. I tried painting on a variety of cloth, interfacings and paper to see what I could achieve and hopefully give me a wide range of substrates. Wen said not to worry about the color wheel when choosing your paint colors, just play. But I decided to use a color scheme that I hadn’t explored yet so I could also use my fodder for my Gail Harker L3 course.

I struggled with getting my paint thin enough to do a wash. I also seem to have a hard time making things be lighter and softer with the idea of printing on them. Maybe once I learn more about Photoshop I’ll be able to lighten things up there. Hopefully I have enough usable fodder for Wen’s future teachings.

I went with a Tetrads scheme from a square: Yellow, violet, red orange and blue green. I tried to use up some craft paints a friend had gifted me that were beginning to dry out. And all the substrates take the paint so differently. The final results were almost always a surprise which was fun!

This is Lutradur:

acrylic paint on Lutradur

This is cotton twill:

acrylic paint on cotton twill

This is watercolor paper:

acrylic paint on watercolor paper

This is the plastic that some of the painted pieces were laying on:

acrylic paint on plastic

Another plastic one. Even though these are on plastic, the photos of them can be saved, manipulated in an app and printed onto another substrate. The plastic images are fascinating to me.

acrylic paint on plastic

And some tissue paper:

acrylic paint on tissue paper

Anyway, I had a LOT of fun painting last week as you can see.

assortment of acrylic painted fabrics, interfacings and papers

I decided I’d play a bit more and try to make a quick little collage. That bright yellow and orange piece on top of the above pile caught my eye to use as a background piece.

This is now a combination of cotton, cheesecloth, some kind of a rice paper and newspaper.

start of a collage

I added a bit of silk organza:

collage

The last photo is as far as I’ve gotten on this little collage.

collage

It reminds me of a ship sailing off into the sunset in shallow waters.

I’ll try to remember to post it after I finish it.

Happy New Year!

Tesi Vaara


December 25th 2023 Fiber-y Festive Best wishes, from Glenn and I and the Mer-Fishes

December 25th 2023 Fiber-y Festive Best wishes, from Glenn and I and the Mer-Fishes

(this is an unusually short post for me, so I can let you get in a quick bit of felting between today’s Holiday activities!)

As you are getting ready for the festive turkey experience or maybe are now recovering from it, I want to wish you Seasonal Wishes for Happy Fiber Creations!!! Belated Solstice, and belated Happy Hanukah, Mary Christmas and all the other seasonal celebrations that occur around this time of year! I am not sure how we got to the 25th of December so quickly?

The Mers’ send their Fishy best wishes to you! (The Mer’s Love a good excuse for a photo shoot!)

This slideshow requires JavaScript.

1.1-1.6) Mers Run Amuck at the photo shoot!

Unfortunately, I may have left them alone in their project bag for too long. They seem to have gotten distracted and have wandered off, back to their project bag.

Glenn’s Moose bag is finished, except for his yarn colour choice.

Glenn's Moose bag, a redish brown and charcole tones have been added over the bage. he has not said what colour yarn he wants in the antlers. green and brown fiber have been added to give a ground for moose to stand on.2) Glenn’s Moose has gained more colours and some ground to stand on. (Carlene shared the light green highlights from what she was spinning at the social.)

I think his moose is looking forward to carrying his horrible train games for him to the next gaming day! (I am sceptical about his train games; half the trains rust out halfway through the game and become useless!!! and Worse!!!, there is lots of MATH!! – how can that be fun? I think I will stick to stabbing and impaling.)

I may be moving from my Moose theme of 2023 and possibly a more Bird theme for early 2024. (I was persuaded to teach a chickadee workshop in January and am looking at a 2-D chickadee picture I want to try too. I have not forgotten about the Mers. I have more work to finish them off too! Today I sorted through some of Mrs. Mer’s Hair options. I was hoping to have a consultation with her and finalize a hairstyle and colour but my attempt at picking up a few groceries earlier in the week put me out of commission for a couple of days. (Ok, I get the hint, I will have to refrain from buying 2 large bottles of tonic water as well as a small amount of grocers in one trip.  I will try to do better next year.)

Have you watched your family rend all the wrapping paper into tiny bits? I hope that all were delighted by everything beneath the paper. I hope now you finally have a moment of peace and quiet, to grab a cup of tea or something stronger, and consider your next project, either the last for this year or plans for the first of the next.

I hope you have many good memories of 2023 and that you will have even better ones coming in 2024.

3) Happy Fiber arts to all and More Felting next year!

Slipper Workshop

Slipper Workshop

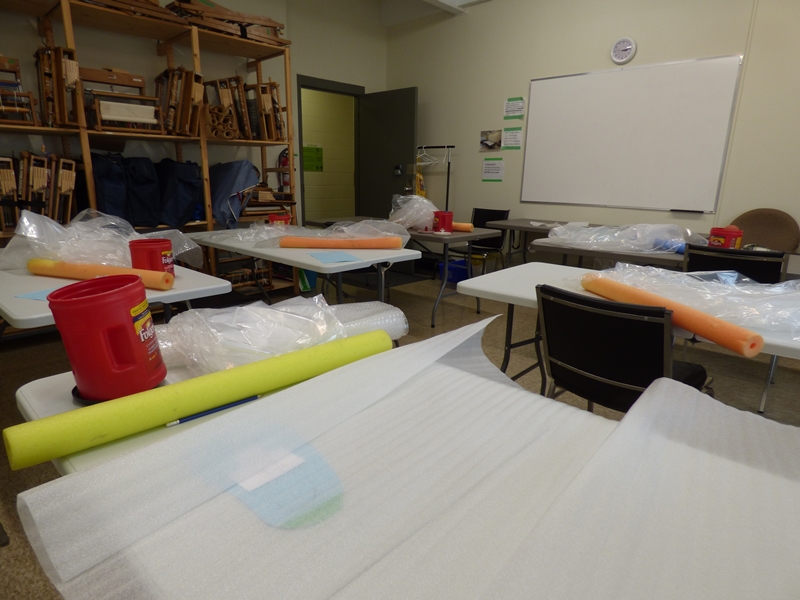
Not very long ago I taught a felt slipper workshop. There were 6 students including Jan. Here is the set-up in my guilds classroom It holds 6 tables reasonably well. You can see the table looms waiting for class on the left.


After we discussed the different styles of slippers, everyone traced their foot and sized up to make their template. We used floor underlay for the templates.


Everyone laid out both sides of their resist and got them nicely wrapped around

Then started embellishing them

Then it was time for felting. Start gently with some rubbing


Then rolling. No rolling pictures, you would think with everyone busy rolling I would have lots of time to take pictures but I guess I was too busy talking.

then more rubbing to heal the cut and on to fulling and shaping

And don’t forget to try them on to see where they need more work and in which directions. I brought new bread bags so they could try their slippers on without getting wet feet or socks.

Getting there

Here are some of the finished slippers.


Now you are probably thinking that at the top I said Jan was in the class but I haven’t seen her. Well, that is because Jan is the problem child of the class. She can’t just do what everyone else wants to do, and so she gets a section all of her own. Jan wants boot-style slippers. Ok, that’s no problem and you are wondering what’s the problem with that?  Well, she wants really tall rear entry boot, style “slippers”.

I had her come to class early so we would have time to discuss the how of making rear entry extra tall slippers. She says they are slippers and not boots.  You can see Jan’s diagram of what she wants in the first picture. I was explaining how the resists would work. This was best explained with a mini paper example.

Jan’s foot pattern and then her mane resist drawn out.


Jan started laying out wool about the same time as the others but she had much more wool and resist to cover.

she did a lot of rubbing but I didn’t get a picture of that and then she started rolling. By the end of class, the slippers had started to felt well but were not up to fulling yet. So now the next step is for her to visit me over the holidays and finish the slippers. I think this means I need to sweet-talk one of my men to bring the dryer into the studio. I am not sure where it got stored. I am sure letting the dryer do some of the manual work is a good idea. Maybe we can work on the dinosaur bag while it rolls around and around. These slippers should be good for sorting out what needs to be tweaked to make some more solid boots. These are Corriedale but we would both like to make some good boots out of Finnish wool. Have you made booths? What wool did you use?

As a measure of how much effort and concentration went into these, Jan only had about 20 or so pictures to share with me. All the pictures of Jan’s work are hers except the last one of Jan rolling.

Wishing Everyone a Very Happy Holiday Season!