September Adventures

September Adventures

September has been a busy and exciting month in contemporary textile art (specifically felting art) in Ireland so I thought I would feature what I got up to, I will call it my September Adventures.

Weather wise, the month started as we hoped it would continue (it didn’t by the way) with a return to fine warm weather – something we had not seen since last June.  So I took the opportunity to visit our National Botanical Gardens (https://www.botanicgardens.ie/) which are situated on Dublin’s north side.  The gardens (there’s free entry, if you ever visit Dublin, Ireland) opened in 1800 and are an oasis of calm with restored glass houses, magnificent specimens, bee hives and, of course, a tea room.  There’s also a pedestrian access to the historical cemetery next door which I suspect is not seen too often.    Glasnevin Cemetery also houses a genealogical archive for anyone wishing to trace their Irish ancestors (https://www.dctrust.ie/genealogy/home.html).

But, I digress.  Let’s go back to the gardens.  My visit coincided with their annual exhibition ‘Sculpture in Context’.  The exhibits feature artworks in various media including ceramics, wood, metal.  I decided to focus purely on the textile element of the exhibition and to photograph any pieces I came across as I wandered around.  I was aware that some of the members of Feltmakers Ireland had pieces accepted for the exhibition; Clare Merry (http://www.merryland.ie/index.htm) an exceptional artist who quietly creates her pieces was featured.  If you would like to see some of Clare’s work please check out her website, which, she tells me, is not really up to date, or Google her and feast over the images; Fiona Leech (https://www.instagram.com/feltathome/?hl=en) had three beautiful pots which were originally housed in the cactus house.   Annoyingly two of the three pots were stolen within a matter of hours of their arrival and the remaining one was moved to a safer spot in the garden’s gallery.  I thought I would show you the three pots as they were originally grouped together.

Fiona Leech’s three pots (source: Fiona’s Instagram page)

I searched but could not find Leiko Uchiyama’s beautiful work but here is a link to her website if you would like to check her out: https://www.leikofelt.com/my-felt-work/  I found two other exhibits from members of the guild.  Their featured work while not through the medium of felt were equally stunning.  Congratulations Mel Bradley (https://melbradleysilks.ie/)  and Mette Sophie Roche (https://metteroche.com/)

I put together a slideshow of my textile finds in the gardens which I hope you enjoy.

We had our first meeting after summer in Feltmakers Ireland and as usual the committee put an incredible amount of preparatory work into making it successful.  It was a busy morning as everyone beavered away felting flowers to create a tapestry as part of the 20th anniversary celebration for the guild.  Much to everyone’s delight, the guild’s founder Elizabeth Bonnar joined us. I thought I would feature Elizabeth here as without her it is doubtful that there would be such a vibrant community of feltmakers today.   Here she is with her granddaughter and with the committee.

Feltmakers Ireland founder Elizabeth Bonnar and her granddaughter
Feltmakers Ireland committee with founder Elizabeth Bonnar (3rd from left)

Here are some photos taken on the day.

The finished tapestry was revealed at Feltmakers Ireland ‘Bountiful’ juried exhibition which opened on 30th September.

Feltmakers Ireland members: The Floral Tapestry to celebrate 20 years.

The exhibition also saw the launch of the new book “Exploring Irish Wool for Feltmaking”  The book is the product of a collaboration between many members of Feltmakers Ireland guild, sheep farmers, shepherds, shearers and suppliers and not forgetting the various washers and carders who took the raw fleeces, converting them into usable fibres for testing.  I think this approach was quite unique and it will certainly be a worthwhile and useable addition to any textile maker’s reference library.  Understandably it was a huge project so congratulations are due to all, especially Annika (Berglund), Breda (Fay) and Sinead (Doyle) who collated all of the findings into an invaluable resource on Irish wool.  It’s so full of well written practical advice and it was made extra special by the presence of one of our Government Ministers, Pippa Hackett an ardent supporter of the project, who officially launched the book and the exhibition . Here is a quick look at the contents page to give you an idea of the scope of the book:

Exploring Irish Wool Contents page

An added bonus is that feltmakers/wool artists can now make direct contact with numerous artisanal suppliers so there is no excuse for any of us not buying closer to source and of course for anyone overseas who wishes to use Irish wool fibre in their work purchasing from source.

It is available to purchase from the following link and I understand will also be available in eBook format shortly:  https://feltmakersireland.com/exploring-irish-wool-for-feltmaking/

I hope you have enjoyed my September adventures.   It has been an exciting month.  Once again I would like to thank Feltmakers Ireland and their hard working committee who work tirelessly to maintain this vibrant community – it makes such a difference that, as textile artists, we can gather together and create regularly. I take my hat off to Elizabeth Bonnar and her decision to found Feltmakers Ireland twenty years ago; the catalyst for lifelong friendships, masterclasses, collaborations, exhibitions, networks and travel.

To complete September’s birthday celebrations, I thought I would produce a slideshow of the Bountiful exhibition which is running for the month of October in Phoenix Park, Dublin Ireland.  I took photos on the day so I apologise where the light may be shining on the artwork.  There are over 30 pieces of art and it will give you an indication of where Ireland’s vibrant felting community is at in its journey.  I hope you enjoy it!

Local Heraldry

Local Heraldry

Ever since I had visited Kew Gardens as a child and seen the statues of the Queen’s Beasts lined up outside the great Palm House, I have been fascinated with heraldic animals and heraldry generally.  [https://www.kew.org/read-and-watch/the-queens-beasts]

When we moved to Sturminster Newton, every day I came home over the mediaeval bridge I saw the Town’s Coat of Arms.  We have a large (about 10ft high) coloured display of these Arms marking the entrance to the town.

In 2007, when I’d reached the age of 60 and reduced my working days to just 3 days a week, I was looking for something to keep me occupied.  By that time, I had met our Town Crier, who when not Crying worked in a local store.  Kevin Knapp was a popular figure, regularly opening events and leading processions in the town.  He had also won numerous Crying competitions.

2 images of Kevin Knapp. On left he's leading the Town's 2008 Remembrance Parade. On Right he is posing in front of the Sturminster Newton Mill
Town Crier Kevin Knap – Left: Leading the Town’s 2008 Remembrance Parade. Right displaying his costume in front of Sturminster Newton Mill

Having inspected Kevin’s Crying uniform, I realised that he had lots of different badges, most relating to awards he had won but also the County Arms, but not the Town’s.  I thought that this could be a project to keep me busy, having consulted Kevin who said he’d be pleased if I could make a badge of the Arms for him.

After a visit to the Town Council offices, where I had discovered that the original Letters Patent – the deed granting the right to use the Arms – were held, I asked the Council formally for permission to photograph the Deed and to make the badge for Kevin. Once I had received permission, I went, with my husband, to the Offices and we photographed the Deed. That wasn’t easy as the Deed was housed in a purpose made, glazed, cabinet which hung on the wall in the Council Chamber. Eventually we managed to get a reasonably clear picture without too many reflections on the glass.

Image shows hand written Deed - Letters Patent - with images of the granted Arms and Badge painted on it
The original Letters Patent showing the Arms granted top left and the Bull’s Head badge bottom centre. The other Arms shown are those of the three Heralds who made the Grant.

The Letters Patent, couched in the archaic style of the Norman French which characterised early English deeds (though thankfully not totally in that actual language) was dated 1st September 1961. It evidenced that three English Kings of Arms – Garter Principal King of Arms,  Clarenceux King of Arms and Norroy & Ulster King of Arms. authorised by the Duke of Norfolk – Earl Marshal and Hereditary Marshal of England – granted to the then Sturminster Rural District Council “such Armorial Assigns and in the same Patent such Device or Badge as may be proper to be borne and used by the Sturminster Rural District Council and by its successors constituting each for the time being the local authority for such place and district on Seals or otherwise according to the Laws of Arms” (note the lack of punctuation – typical of legal documents in this country even today); hence the right of Sturminster Newton Town Council to use the Arms and also the Bull’s Head Badge. The Badge’s primary use would be to mark the Council’s property (including, some 800 odd years ago, it’s serfs, servants and men at arms!)

Image of a Bull's Head within a ring with "sun's rays" around the outside, all in Gold with black outline
The Bull’s Head Badge painted on the Letters Patent

The actual words of the Letters Patent describing exactly what was granted are: “Vert [green] a Saltire [diagonal cross on a shield] Wavy Argent [silver] between in pale [one above the other] two Crosses Moline [having jagged ends] and in fess [horizontally] two Garbs [sheaves of corn] Or [gold] And for the Crest [device sitting on a helmet] Out of a Coronet composed of four Ears of Wheat and four sprigs of Oak fructed [with fruits] set upon a Rim Or [gold] a Mount Sable [black] thereon an Heraldic Panther statant [standing on all 4 feet] guardant [shown full face] proper [lifelike colours(!)] Mantled [with cloth on helmet] Vert [green] Doubled Argent [on the reverse silver/white]” and the “Device or Badge”: “Within an Annulet [hollow roundel] Reyonnée [with sun’s rays] Or [gold] a Bull’s head caboshed [without a neck] Gold”. The Arms and the Badge were also drawn on the Deed for further reference.

Having got all this information from the Deed I started to prepare a working drawing indicating what stitches, yarns and cords I would be using.

A drawing of the Coat of Arms in outline with lists of goldwork stitches and indications of where these are to be placed
Working Drawing – you may be able to decipher my scrawl of what I was intending to do at that stage.

In doing so, I realised that the Heraldic Panther was a very odd creature: it appeared to have orange flames coming out of its ears and mouth and it was spotted – red, blue and green spots!

drawing of heraldic Panther, yellow body & face, with large blue red and green spots on the body and flames coming from ears and mouth
The Heraldic Panther painted on the Letters Patent

So I headed to the library to see if they had any reference books which might throw some light on this.  Luckily there were several in the catalogue, but none at our local branch, so I would have to wait for one to arrive.  When It did I was able to find that the flames were a mistake made by the artists painting the arms on early Letters Patent.  In the book there is a reference to the Garter King of Arms writing in the early 17th century regarding the Heraldic Panther: “this beast … is admired of all other beasts for the beauty of his skyn being spotted of variable colours; and beloved … for the sweetness of his breath that streameth forth of his nostrils and ears like smoke, wch our paynters mistaking corruptly do make fire.” Further reading indicated that the origin of the panther was likely to have been a cheetah, hence the (guessed at coloured) spots.  You will note that I was down another rabbit hole!

Well our panther was shown on the Arms as having flames coming from his ears and mouth, so that’s how I’d got to depict him.  It was also then that I realised that the Arms as granted were not exactly the same as the Arms currently used by the Council.

You will see that in the current version of the arms, the Bull’s Head Badge appears five times on the mantle, which has been altered to enable the badges to fit. (The mantle represents the cloth which the Crusaders wore over their helmets to ward off the rays of the sun)

Apparently the then Sturminster R.D.C. decided to use it to decorate the actual Arms instead of to mark it’s property (and/or servants!)

After some manipulation of the photograph of the Deed I managed to get a reasonably clear image of the Arms and could make a tracing to use to transfer the design to the background I had prepared

During the time that I’d been waiting for the book, I contemplated the fact that the actual badge would be very much smaller than the original tracing and I’d be lucky to be able to carry out all the various stitches I’d originally envisaged, and I wondered if I might make some of the badge in felt.  I needed to make a “sketch”.  Using a piece of old blanket as a base, I transferred the design and filled in some of it in needle felt.  I thought that this would work.

image of partial needle felted coat of arms
The partially needle felted “sketch” of the Arms

It would certainly make life a bit easier as I was not very experienced in gold work and doubted that I could do a good enough job in the smaller scale. As it was I managed to lose the “jagged” ends of the two gold crosses and the Saltire was not really “wavy”. It was supposed to be a nod to the river Stour, which divides Sturminster from Newton (which despite it’s name is in general the older part of the town).

In the end I felted the Helm, with the gold Rim and the Panther. I also padded the sheaves of corn. Here’s a progress picture and another with felting needle which will give you an idea of the actual size of the whole thing.

Once I was reasonably happy with the shape of the helm, I painted it with artists’ gesso and then (when it was dry) sanded it as smooth as I could get it.  Then I painted it with some of my husband’s metallic enamel paint to represent steel. (Can you imagine what a squire’s life must have been like sanding and polishing a suit of armour and weapons made of steel to get rid of and keep it free of rust? – no stainless in those days.)

It did take some time to complete the badge – some 4 years in fact although I wasn’t actually working on it all the time.

Image of finished Coat of Arms with full coloured green satin stitch, silver and gold work.
The finished Badge

Oh I nearly forgot – the motto “Quis Metuit?” means Who’s Affeared?  It is apparently used by many local authorities – I’m not sure why though and, for once, the question defeated Mr Google.

The Town Council, in the form of it’s Leader, formally presented the badge to Kevin on 30th November 2011.

Image of three people - Left Charles Fraser, the Author and Kevin Knapp, he being presented with the completed badge.
L – R: Charles Fraser, Town Council Leader; Me; Kevin Knap at the presentation of the Badge. The picture above my head shows Sturminster Newton Station as it was in the days of the Somerset and Dorset Joint Railway.

Kevin decided that rather than attach the badge to his coat, he would affix it to the back of the roll containing his Cry so that it would be visible when he was reading from it.

Sadly Kevin died on 9th October 2018.  His wife donated his costumes (which she herself had made) to the town’s Museum.  I’m not sure what happened to the Badge though as the Museum doesn’t have it.  The position of Town Crier remains vacant.  If you are interested, I’ve found an obituary for Kevin published by the Bournemouth Echo.  https://www.bournemouthecho.co.uk/news/16998263.kevin-knapp-died-earlier-month/


Fall 2023 Inkle Weaving Workshop

Fall 2023 Inkle Weaving Workshop

Today, which by now is yesterday, was my Intro to Inkle class. I was expecting 6 students, two of whom I knew had done some other types of weaving. after I sent out the last minute instructions (parking, how to get into the building, where local food could be found ) I found out two of my students were very young and would be accompanied by their Mom.

I have had young students before but these were 8 and 10 so the youngest. The eldest was very interested in weaving and had done some simple weaving before.

I got an email reply from one student they would be unable to make it and the last was a young gentleman but definitely quite a bit older than 10. He had not woven before but was quite intrigued to make cloth.

I had a very brief chat about inkle looms, their history and that we had both floor (better for long projects or for sitting in one location and weaving)  and table inkle looms (better for shorter length bands but much more portable to weave on) in the class.  I discussed what yarn would work best on an inkle Ioom, which is Smooth with a good twist, like a crochet cotton. I had brought one of my looms that had a silk warp on it to show them too.

Since we had weavers in the workshop I made sure I had options that would weave quickly for the new students and a finer yarn that would be a bit slower warping but give more design interest for patterns. The 3 sizes of yarn to work with were; for the advanced students #10 crochet cotton,  l also had #3 crochet cotton for a bit quicker warping. For those who wanted to warp the loom very quickly, I had the less tightly twisted mop type cotton. it is much faster to warp and weave and gives the opportunity to practice what the process is but unfortunately, it is not as smooth to advance the warp as the two crochet cottons.

I also had extensive notes so if they found an inkle loom at a garage sale in 6 months or a year from now they could go back and review the information we covered today. I also gave them multiple ways to do  steps since some people hate the magic knot to start weaving and no matter how many times we try to demo it or say the instructions in a different way it will not stick (sort of like the evil letters for me, so no shame. They may find a eureka moment and be able to make a slip that is solid when pulled to the right some other time.)

We had one student who I know is a good floor loom weaver and likes patterns, she tried the #10 cotton. it took longer to warp but she was a much faster weaver so other than momentarily slowing down to make and use the butterflies to add 2 slits in her band, she was very fast. Butterflies always are slower since you are weaving 3 sections of the warp separately to make the 2 slits.

Everyone got a box of Smarties (an important weaving tool) and finished with a scissors necklace. We chatted about how to improve the class and had the suggestion of breaking it into a couple of evenings, rather than one long day. It is a lot of new information to take in all at once. I think we could do the warping and review a bit more about drafts on one day and return to work on the weaving on the second. If we did a third night we could probably make a second scissors necklace (it is always is easier the second time).

I apologize, two of my students were very eager and turned up before I had finished setting up, so no pre-class shots, and then I got busy with teaching. I did pull out my camera at lunch to get some shots of the looms ready to go but again forgot it when I started teaching again. Luckily Carlene, who also rights on this blog and belongs to the same guild as Ann, Bernadette and I, was there and borrowed my camera. Now I have visual proof I was there!

But first, let me thank and show you my helpful Sherpa husband who brought everything out to the car and then from the car to the studio. After class, he took all the boxes I had packed up and put them back in the car, then disappeared them into the house as I wrote this blog post for you.

i overworked my sherpa, husband sleeping during my workshop1) My hubby recovering from the Kanata games club then transporting all my teaching stuff.

A few shots from the workshop;

2) Variegated yarn with a yellow border. (the variation gave an ikat like pattern.)2) Variegated yarn with a yellow border. (the variation gave an ikat-like pattern.)

3) This band had a heavier yarn for the border and the #5 cotton for the middle.3) This band had a heavier yarn for the border and the #5 cotton for the middle.

4) the class at work with 2 table inkles and 3 floor inkles.4) the class at work with 2 table inkles and 3 floor inkles.

4.1) Carlene is a sneaky at getting shots you don’t notice her taking as I am!4.1) Carlene is as sneaky at getting shots you don’t notice her taking as I am!

 5) A long day of weaving for my second youngest student!5) A long day of weaving for my second youngest student!

6) Another band with solid border and variegated center. It is fun to watch the colours change.6) Another band with a solid border and variegated centre. It is fun to watch the colours change.

7) my youngest students Mom helping with cutting the fringe to length. 7) my youngest student’s Mom helping with cutting the fringe to length.

8) Carlene and her scissors necklace. *note the new Lee Valley snips! She discovered the scissors open fully so we can just slide the loop from one end of the lanyard into the center of the scissors, rather than the knotting method the old black scissors required.8) Carlene and her scissors necklace. *note the new Lee Valley snips! She discovered the scissors open fully so we can just slide the loop from one end of the lanyard into the centre of the scissors, rather than the knotting method the old black scissors required.

9) Still some fringe twisting to do but a lovely first inkle band 9) There is still some fringe twisting to do but a lovely first inkle band.

10) a brand new weaver! Still a bit of fringe twisting to go but now has somewhere to keep his scissors. 10) A brand new weaver! Still a bit of fringe twisting to go but now has somewhere to keep his scissors.

 11) a bit of sewing up one side and hemming but a great first weaving! and he is almost 11!! (He was interested in the 12 harness countermarch loom in the studio, maybe he will be trying that after the beginning weaving on a table loom in a year or so?) I unfortunately did not get a shot of his brother’s scissors necklace or book mark when it was done.11) a bit of sewing up one side and hemming but a great first weaving! and he is almost 11!! (He was interested in the 12 harness countermarch loom in the studio, maybe he will be trying that after the beginning weaving on a table loom in a year or so?) I, unfortunately, did not get a shot of his brother’s scissors necklace or bookmark when it was done.

It looked like the students had fun. Most enjoyed their smarties (or found someone to get rid of the contents for them, so they could use the box.)

Eventually, we will re-run the Inkle Two workshop.  We look at 2 harness weaving that you don’t normally consider on an Inkle loom but that it can definitely weave.  The workshop contains lots of odd things you can do with an inkle loom such as weaving with wire to make a 3-Trim, or Boutonné weaving with a supplemental weft to make patterns with little loops or adding beads with a supplemental warp or weft thread.  It would also likely be better spread over a number of evenings rather than the 2 long days, as we have run it before. You may not use these techniques regularly, but they may spark some great project ideas or maybe inspire a new weaving interest.

Maybe making an inkle band of cotton, wool, silk or wire may inspire you to make a 3-D Felted Vessel with a decorative neckband or maybe a fancy strap to carry it?

I’ve been spinning too

I’ve been spinning too

Like Leonor, I have been spinning. Unlike Leonor, all I ever make are small skeins. I like to use my drop spindles and make little bits for in my felting.

I’ve been spinning some of World of Wool’s peacock fibre.  It is in the process of being played. I think the sparkle shows. It is 87.5% Corriedale Wool and 12.5% rainbow trilobal  Nylon.


It has a lovely sparkle and I really like it. Which is a good thing because I have 500 grams of it. I split a kg with Jan but she doesn’t like it, so may have to buy it back from her. Or maybe she will sell it at the upcoming Guild sale. Then she could use the money to buy different wool.

I do most of my spinning these days at guild socials. As long as Jan doesn’t have a giant pile of books for me to put away.  This is one I finished plying last Monday. I used the ball winder at the guild and then plyed it and made it into a ball again. It is much faster than doing it by hand but not as zen. Jan made a video of me using the ball winder. I don’t like this one it made a lopsided ball.

<iframe width=”560″ height=”315″ src=”https://www.youtube.com/embed/Wn80S3SQWRY?si=JjtJzoTOoPDmfWc1″ title=”YouTube video player” frameborder=”0″ allow=”accelerometer; autoplay; clipboard-write; encrypted-media; gyroscope; picture-in-picture; web-share” allowfullscreen></iframe>


I can’t remember what fibre this is,  merino and silk I think but I am not sure.


I have a zip lock freezer bag I keep in my basket that I put the finished balls in. This is what else was already in there. You may have seen them before but I can’t remember.

This is one I got at a festival. I think I showed you the fibre but not the spinning. It has lots of bits and bobs in it and some sparkle.

This one is from a World of Wool Bambino sample pack. It is 85% Merino Wool and 15% Bamboo. I think it is called Hickory Dickory  It spins very nicely.

Now I have to decide what to spin next. Maybe I will card myself some rolags.

Forest Floor Beginnings

Forest Floor Beginnings

I went through some of my sketchbooks/workbooks from my prior classes recently and found a few pieces that were inspiring. It’s nice to revisit old work and see if there is something there that will inspire new work.

Paper collage of landscape of forest floor, white flowers and tree trunks in the distance.

Here’s the forest floor collage that I found. I thought that this would make a nice landscape in fiber/textiles. I can’t seem to find the original photo that I used for inspiration so I’m working from the collage.

Multi colored nuno felt background.

Going through my pieces of already made nuno felt, I thought this piece would work. The top right corner made me think of “forest sky” and mottled light, so that’s a good start. The size is 12.5″ wide and 11″ high. Most of you will probably recognize this nuno felt as I have used it for several projects already. But the fun thing with this type of project, is that the background is just the start and the finished pieces will not look alike but would go together well if paired with one of my other pieces.

Next up was to look through my boxes of felt scraps and see if I could find something that would work for the more distant tree trunks. I started with the felt on the left but once I put it down, the value of the tree trunk to the background was too similar and the grey brown wasn’t very “exciting”. The middle felt trunks are actually the opposite side of the trunks on the right. The values were a bit better and I am leaning towards the ones on the right. I am planning on adding some stitched texture to the bark and can add more darkness into the trunks that way. I luckily have enough of this felt to do some sampling and see what kind of stitching will work best. Also, after I uploaded these photos and saw the tree trunks from a distance (smaller photo size), I noticed that it looked like the light was slanting through the trees. I need to remember to leave that lightness in the foreground to give that effect.

Multi colored nuno background with felt tree trunks placed on background and other felt colors being tried for appropriateness to landscape.

I continued to look through my felt scraps and dyed fabric. I found some nice greens, some “fallen trees” or “rocks” and some cheesecloth that will add texture. I kept looking for felt or fabric that would work for the flowers, I couldn’t really find anything that worked. I could felt some small white flowers but I’m not sure it’s worth that effort. The white flower I am showing is cut from watercolor paper (300 pound) and the center is a bit of yellow green cheesecloth. The paper would be simpler as it doesn’t fray and I noticed the contrasting sheen of the paper compared to the matte of the felt. The paper can also be shaped so it is 3D and coming off the surface of the landscape. As you can see in this photo, I have lost that brightness coming through the trees as I have it covered with green. This is just trying out colors and the final layout and shapes of pieces to applique down has not been decided.

Multi colored nuno felt background folded back to show white felt backing behind.

Because the nuno felt is thin, I decided I needed to back it with something a bit heavier to hold the weight of the heavier felt I will be stitching to the front. So I cut a piece of rayon wool commercial felt blend to the same size as the nuno background.

Multi colored nuno felt basted to white felt backing.

Next up was basting these two pieces of fabric together. I don’t always baste but I have found that in general, it’s better to take the time to baste the backing fabric to the background fabric. The integrity of the piece is always better after basting. It holds everything in place and provides support while stitching the foreground items. This is especially true if you are machine stitching as the machine has a tendency to move the nuno fabric in different directions than the backing fabric. Basting rant is now over.

Next, I will be doing some sampling to see how I want to stitch the tree trunks and previewing the green fabrics. More coming soon!


Fabric folder.

Fabric folder.

I needed something to keep my various sample pieces in one place, and that I would know without much head scratching or searching around for any particular piece of work. Of course, I would need to not misplace this folder too!

I had a fabric tote bag that had become a little frayed at the edges of the straps; the pieces of tweed used to make the bag were fine, with no damage or fraying. The bag just needed a wash.

The bag had been a Christmas present to me from my daughter several years ago, and I used it daily. I am not a ‘bag’ person, that is, having a bag for every and any social occasion, or day of the week for that matter. This bag was made at Garvald Textiles, this is a textile studio offering creative opportunities for adults with various learning disabilities, and the studio sells many of the items made by the artists there. My daughter worked for this registered charity in Edinburgh when she lived there some years ago, and much of her present buying that year was made from this source. Leonor may be aware of them, I think she lives in Edinburgh? Photo of the label attached, and remaining leftover bag pieces.

I have made another bag for myself from scrap pieces of tweed fabric bought when I visited Harris in the Western Isles.


To make the folder, I cut the body of the bag into smaller pieces and the stitched them onto a shaped piece of spare calico. I was hoping that I would have enough squares, but I did use another spare piece of tweed to complement the colours. I used my sewing machine to zig zag each piece together onto the calico. The size I was aiming for was an open A4 folder.


For the inside I choose to use up many small pieces of fabric, and to quilt them on to another piece of calico using a ‘crazy’ quilting theme, and also using hand stitching/embroidery. I embellished some pieces with embroidery, a piece of lace, a crinoline lady, and a couple of heart shaped pieces of fabric. I had 2 vintage hankies, and these I folded into ‘butterfly’ shapes and stitched them down

Both the inside and outside were completed separately, and then stitched together, inside out, before turning the right way out and securing the opening. I did think of adding some bias binding to the outside edge, but in the end I just stitched all around the edge with a blanket stitch.

I added a few felted leaves to the front of the folder, I had made these ?last year, and I think they complete the folder front very nicely. I added 2 pieces of ribbon to use for closure, but I will review this in time for my next post, and I will add some ‘pages’ to my folder to attach my work to.

I am very happy with this piece. I have reused some items, and other pieces I used were already in my fabric scrap box.


I’ve been spinning a little in the past month

I’ve been spinning a little in the past month

You know how when you get excited about one hobby, the other ones get left behind? Well, for some reason I’ve been bitten by the spinning bug in the last month, and I’ve a few skeins to show for.

Let’s start with the green-blues.

Four skeins of hand spun yarns by Eleanor Shadow

The big green skein was spun using some Leicester Longwool locks I dyed for this purpose, since I wanted to make a super Halloween-y textured art yarn; I plied it with some commercial yarn (also dyed by me) that I had to over twist in my wheel so it would un-twist as I paired it with the textured ply.

The smallest skein is baby llama, my very first time spinning such a fibre. I’m a fan! I’d love to spin more of this in the future. It’s very soft and warm.

To the right there’s a fun Blue Faced Leicester (BFL) and bio-nylon yarn that I tested for my own shop (got to know what I’m selling, right?) and I can say I love this fibre combination. The BFL is very soft and lofty, and the bio-nylon increases the strength of the wool without harming the environment since it’s as fully compostable as the natural animal fibre. I’d have no problems knitting some socks using this yarn.

At the bottom, a rather fun jewel tones Shetland and Tussah silk combo (70/30) that just glided off my hands effortlessly.

But wait, there’s more!

I was perusing World of Wool’s website a while back and came across their taster package in shades of pink, and was tempted. Each resulting mini skein is 25g and very squishy.

Six hand spun mini skeins in different shades of pink and in different fibre combinations

From left to right: merino and nylon sparkle; merino and silk; merino; wool and viscose; merino, alpaca and mohair; merino and bamboo.

My favourite to spin was the (mysterious) wool and viscose. Those tweedy bits kept me very engaged and wanting to keep treadling! The merino/alpaca/mohair blend to its right was also rather lovely. Although these all came from the same pack, I don’t feel the shades complement each other too well, so I might not try to add them to the same project in the future.

You’d think I’d be done by now, but… there’s more.

Three hand spun yarns by Eleanor Shadow

If my goth self in my 20s would’ve guessed I’d be spinning this much pink, I’d be appalled! But yes, those colours were all my choice. The pink of the left was a particularly bouncy merino and soy fibre combo, the middle one is a merino/alpaca/camel/silk blend (40/20/20/20) and the right skein is anyone’s guess (it’s a mix and match of several different wool nests a friend gave me to spin that I decided to merge together. I wish I had a jumper quantity of this!)

Lastly…

A merino hand spun skein in jewel tones by Eleanor Shadow

I dug into my own shop’s stash for this one. The colours were super well defined in the fibre braid, but I decided to spin them in a way that would blend everything and I don’t regret it one bit. This would knit up rather nicely, I’d say. If my knitting mojo comes back anytime soon I might give it a try…

There’s actually one more skein, but it’s a white one and it didn’t photograph well…

So, do you think my wheel was busy, or do any of you spin more in any given month? Let me know below.

Bat on a stick…..

Bat on a stick…..

One of the things that I have enjoyed doing over the last few years, is watching and chatting during live YouTube felting tutorials from Sara (Sarafina Fiber Art) and Marie (Living Felt). I have been inspired by projects shown by both felters.

As you probably have noticed, when seeing my adventures with the four-person Mer-family and their Mer-family pets, I don’t always follow the instructions exactly as suggested. In fact, I tend to fall off the rails…., wander off into left field, or was that right field?… ok, I tend to get distracted part way through a tutorial and wind up doing my own possibly completely different thing.  I am not saying that is a bad thing. It can open new options and create something that is vastly different than the original tutorial goal.

For Sara’s Mermaid project (google You Tube “Mermaid Felt Along 1: Armature”, “Mermaid Felt Along 2 – Body Shapes”, “Mermaid 3: Wet Felted Tail” and “Mermaid 4: Finishing” to see what I was supposed to do), I deviated first by wanting to do a merman but felt he needed a family. Instead of using both wet and dry felting, I used only dry felting.  With the change of scale and shape, I needed to augment the armature strength. Lastly, I made them Fish-People (Pike, Koi, Shark, and Arctic Char) rather than the more traditional mermaid shapes Sara was creating. I created some accessories for them and more will be needed. For the Mers themselves, I wandered off into thoughts of what kind of family pets would a Mer family have.  So the addition of family pets was created, Miss Manta and Sharkette. This could continue to spiral outwards from the original tutorial with Mer-Nabours and other yet unthought-of Mer-friends and accessories! Years of enjoyment even for someone who really would rather not get wet.


Two weeks ago Marie, from Living Felt, out of Texas, sent me off on another spiral with her “Needle Felt Simple Animals: Bat, Owl, and Red Panda Forest Friends!”.  This is a very beginner-friendly project, with simplified shapes and lots of explanations of tight wrapping to build up the core understructure. She did examples of blending and layering colours of fibre. All three projects were extremely cute. I am not sure I do cute, especially extreme cute, well not as cute and friendly as Marie can do at least.

Marie started by using a wooden skewer to tightly warp her layers of core wool, creating the basic shape. This got me wondering about other skewer like objects that you could use which I had on hand *actually I looked as far as the shelf beside my desk to find 3 options. I had also purchased at the Almonte Fibre Fest in early September, some short fibre Maori batts, one of which was white and another was charcoal. I had wanted to investigate working with short, somewhat springy, fibre and this seemed to be an excellent opportunity.

1) White Maori Batt, wooden skewer, knitting needle, one mettle chopstick

I decided to try the chopstick. It doesn’t have quite as much grip as the wood, but it’s not quite as slippery as the knitting needle.  I like the slight taper,  it was comfortable in my hand and oddly like the single knitting needle it happened to be sitting in a cup with my pens, markers, small files and metal pick set (that was for cleaning my drum carder, I don’t know why it’s here) by my desk.


one mettle chopstick on white batt of Maori short stale lenght fiber 2) selected a chopstick and Maori batt

using a chopstick to wrap fiber around and build up the core structure.
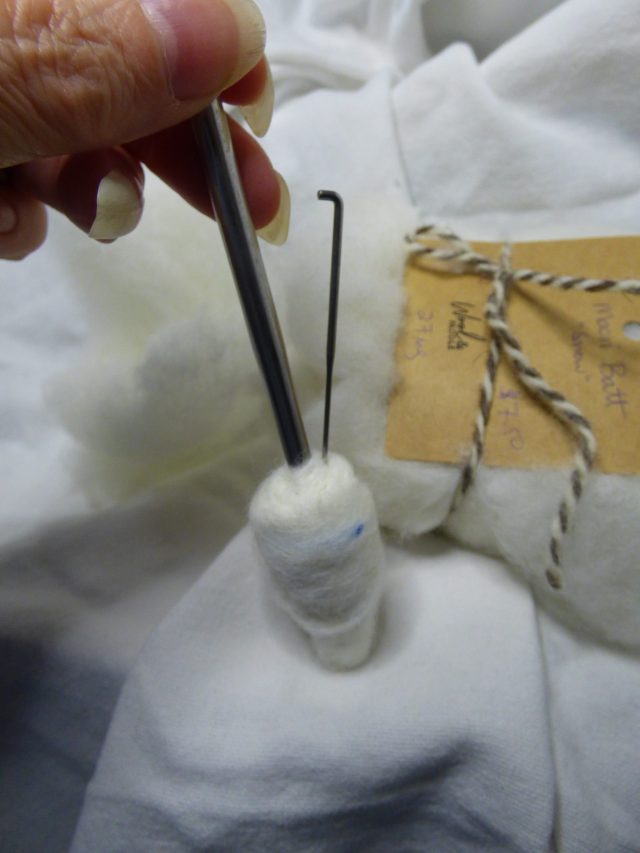
3) using a chopstick to wrap fibre around and build up the core structure.

Adding thin layers of roving, wrapping tightly and tacking down, then poking from the base to further firm core layer.

Tearing off thin strips from the batt then drafting them to a narrow roving. This shows the VM and makes it easy to remove.4) Tearing off thin strips from the batt then drafting them to a narrow roving. This shows the VM and makes it easy to remove.

I found the white short-fibre Maori batt had more bits of VM than most of my spinning fibre. It was not a large problem and easily picked out before wrapping it to the core. It compacted to a firm core shape and was easy to work with.

Looking at Marie’s bat she used commercial felt to make the wings. While extremely cute you can’t pose or position the wings. Ok, I am going off instructions already!  There are a few ways to add an appendage with wire to a body. This time, since I was adding a symmetrical structure, I chose to pierce the body with a floral wire (unlabeled but suspect it is 22g). I centred the body on the wire then folded each wire up at the point it pierced the body on each side. I then folded each half, in half, twisting to create the leading edge of the arm, leaving a loop to add the “fingers” at the end of each wing.

wire piercing body, center body on wire and bend the wires5) wire piercing body, centre body on wire and bend the wires

folding each wing wire in half6)folding each wing wire in half

Next, I needed to add the “fingers”  to the end loops.

wing one armature with fingers added and wire bent ready to add to bats right palm loop.7) wing one armature with fingers added and wire bent ready to add to bat’s right palm loop.

both wings have full arm armatures. note that the fingers have 3 different lengths.8) both wings have full arm armatures. note that the fingers have 3 different lengths.

I often make very thin wings for the little dragons I’ve been making. I usually wind up using a fine fibre combed top laid in thin wisps in various directions. I have also used hand-carded fibre such as on Mrs Mer’s Finns effectively.  I was curious how the short fibre of the Maori batt would work for a top coat as well as for thin wings.

The Charcoal coloured Maori batt beside the small white Maori batt9) The Charcoal coloured Maori batt beside the small white Maori batt

I started with wrapping the body and armature.

wing/ arm armature and body covered in the short staple Maori10) wing/ arm armature and body covered in the short staple Maori

It was a bit fuzzy, but with further poking the surface became smooth and firm.

At this point, I again became quite distracted with another thought. Those scrawny arms are not going to be able to move those wings!!! So I had to add deltoids and bicep muscles, now he could try out his arms as we went to enjoy hamburgers at the butcher shop in Bell Corners (he did not have any since he doesn’t have a mouth or eyes yet it could get messy.)

You Tube Video link  

11) Video: bat on a stick in KIA trying out his muscles before he gets his wing membranes

Ann checks out Bat in progress12) Ann checked how firm he was and laughed at his fabulous physique.  (don’t tell bat!)

I made a couple of attempts with just the Maori but was finding I was not getting as firm and thin as I would like, so added a longer fibre in a thin web to let the Maori attach to it. when I had a thin layer of felt  I carefully attached it to the fibre wrapping the wing armature. I bent the armature and then sculpted the wing membrane further.  Once I had the wings looking more wing-ish, I made quick ears and added them.

I decided I wanted a more three-dimensional face (oh no deviating again!) so added a small nose and eye sockets which I filled with small beads for eyes.

Marie’s Bat only had its stick stuck in while she was creating the core shape. It kept your fingers and the sharp end of the needle well away from each other. She then removed it and added the layers of colour to make her cute bat. I like the bat-on-a-stick look and have kept it so far. Bat on a stick may be a cool Halloween hair ornament or a felting supervisor in a demo basket.

I have not had time to finish off the last bits for Bat on a stick he still needs his teeth, I tried to make them with the Maori white but was not happy with the first attempts. Next, I resorted to wet felting but I was still not happy.  I have a couple more options to try to make tiny teeth. I am also considering feet or legs and feet, so I may be adding another part armature to finish him off.

In the meantime, I have been taking him with me to the OVWSG guild library. I am working through the last few years of donations, sorting ones to keep in the collection and getting the rest ready to sell. Bat has supervised as I wrote the database for the sale books. I am almost finished with the data entry for the books. The magazines that are extra I have sorted by title and year ready for shopping! (it was a big job)

box of magazines sorted by year 13)just a few of the magazines being prepped for sale.

He also watched as I had my last of 4 evenings of nalbinding workshops which has been fabulously fun. I now know I can’t count since I keep losing track of where I am in my increases for my hat. I am off to find a stitch counter so I have a hope of getting the mythical (in my case) flat starting disk to make my hat. For this workshop, I do want to follow the instructions. (I have had a blast wandering off instructions for the felting though)

Felt Bat on a mettle chop stick with articulated wings  14)Thumbs up!  Bat on his chopstick supervising from the shelf above the desk at the OVWSG Library.

Each trip to work on the library bat has accompanied me. He has found a spot on the shelf above the desk where he can sit in a clip on the extending magnet. He is giving me a thumbs-up on all the work! Even without his teeth or feet, he is very supportive.


I hope you too get a chance to watch some of the various online felt-alongs. You may also find inspiration in previous blog posts by all the fibre artists here. You never know what might inspire your next project, maybe you too will find a multi-year project! Or maybe just a quick little bat! (with or without a stick).

On to the stitching

On to the stitching

It is time to do some stitching on my visor cover. Stitching on felt is something I really enjoy. It feels nice to stitch on felt, It has texture even when it is smooth. You can feel the needle pass through the thickness of it.

I had people at my guild comment that the actual piece looked a lot more vibrant than it did on the screen. I fiddled with the colour a bit so I hope it looks a little better this time. It looks very bright on my screen. The crazy thing is it is sitting on the black, top of my laptop. I am getting some serious light bounce off the black.

I picked out some threads I think go with the colours. I need to find a “greener” green something in the middle I think but that requires digging in the mostly unpacked studio so it will have to wait.


I am a slow stitcher. I know I am not alone in this. There’s a whole movement called slow stitch. It suits me, stitching when I have a bit of time but with no deadline in sight.

I started with the turquoise green on the forest green part of the leaf. I thought it looked like a nice contrast even if it was still green. then I forgot to take a picture of just that stitching or rather I was probably intending to take a picture of just the stitching and forgot what I was doing.  So you get to see the contrasting orange I picked for the next part too. It’s a deep orange leaning towards burnt orange.

I did the first part in rice stitch. It’s fun to do but harder than you think to make it look random.

I tried an uneven long stitch for this part and didn’t like it. It was messy but not messy enough to seem like I did it on purpose just unpractised. Of course it was but we don’t want to advertise that too much, so I removed it.

The other nice thing about stitching on felt is when you take out stitches, it doesn’t show like it would on muslin or cotton fabric. I decided to do something else with the dark orange and a lighter orange for the cross stitching. I am not sure it is busy enough. I will leave it for now. I am also not sure it was worth changing oranges either.

Now I am onto wonder woman. I am hoping to stop it from looking like wonder woman and more like a flower with the stitching. However, I started with the “cape”. I am using the lighter orange. I am adding X’s as I liked the way they looked on the leaf. I tried looking online for open background or filler stitches but I am calling it the wrong thing, I think. Everything that Google gave me, were stitches to completely cover a space. I know I have seen them before. Does anyone know the right term?

That’s as far as I am. Well maybe a bit farther as I am writing a bit ahead as I will be busy baking for the Thanksgiving Day farmers market. In Canada, we celebrate earlier than our American friends and this year is earlier than usual on October 9th. with any luck, I will have a little time to do some stitching.

2023 Fourth Quarter Challenge

2023 Fourth Quarter Challenge

The fourth quarter challenges are for all fibre lovers – felters, sewists, knitters, crocheters, weavers and mixed media enthusiasts – so let’s get creative!

One of the challenges for this quarter is a bit predictable – but hey it’ll still be fun 😊

Make a Christmas decoration!   Here are a few ideas: something to hang on a tree; a table centre or runner; ear-rings; hats; window display; door wreath … but there are many more.

This tree hanging decoration is a crocheted snowflake stiffened with dilute pva.

crocheted snowflake tree decoration

Textile wreaths don’t have to be traditional.

Textile wreath

This holly wreath, plant stars and decorative pudding are all made from handmade felt and embellished with free motion stitching.

Holly wreath, plant stars, textile christmas pudding

This knitted stocking was hung in the fireplace just waiting to be filled with little gifts.

knitted christmas stocking hanging in a fireplace

It’s a magical time of the year for trees – any that are not evergreen will give a dazzling display of colour.

So continuing the tree challenge for this year, use the autumnal inspiration to make a piece of textile art of your chosen tree – or a different tree if you’ve had enough of the one you’ve been working on 😊 and of course it doesn’t have to be the whole tree!

Recently Karen Lane showed us some ‘Lutradur’ leaves made by her students – see her post here: https://feltingandfiberstudio.com/2023/09/24/melting-felting/

lutradur leaveslutradur leaves

Our ‘Autumn Leaf’ bowl is made of handmade felt embellished with free motion stitching.  Here it is laid flat after stitching…

Autumn leaves of handmade felt and free motion stitching

… and here it is after being stitched into a bowl.

autumn leaves textile bowl handmade felt and free motion stitching

We hope you can find something in this quarter’s challenge to make you want to have a go 😊

Please share your entries on https://feltandfiberstudio.proboards.com/board/18/studio-challenges

If you need help with posting a photo please see here:

https://feltingandfiberstudio.com/community-photo-submissions/