Giveaway Winner and a Quick Question

Giveaway Winner and a Quick Question

The Right Fibre smallGIVEAWAY WINNER: The Winner for The Right Fibre giveaway is… nanacathy! Well done, Cathy, I’ll email you a link to download the e-book 🙂

Did I say winner? I meant winnerS, I can’t have so many entries and just pick one, can I?! So, Meriel Kosakar, I’ll also be emailing a link to you too to download the book 🙂

Well done, and thank you so much to everyone who entered and for all the really nice comments. We do appreciate all our blog readers and it’s nice to get such positive feedback. I was hoping to have a bigger post and news about doing some fibre variety packs for sale on etsy or Facebook, but the battery died in my scales and I had to order new ones. So, I thought I might get chance to do some felting, but had the toothache from hell all week and couldn’t even look down without the whole right side of my face throbbing and feeling like my jaw was falling off. But if you do have time, I’d love to know if there’s much interest for a multi-pack of fibres? I don’t just mean a few of the usual ones, it’d have to be something a lot better to make it economical, somewhere in the 150-200g/4.5-7 0z range, maybe even samples of the whole 20 from The Right Fibre. Or even a few more! What do you think?

Project Bags and Tea Cozies

Project Bags and Tea Cozies

This last little while I have been making some project bags. I made a flat rectangular style using prefelt. I wrapped some prefelt around the resist. You can see I split the edges of the prefelt and cut one layer away so that the overlap would not be thicker than the rest of the bag.

overlaping prefelt ready to felt prefelt bag

Everything is prefelt except the stripes. They are an unknown wool roving I bought because I liked the colours. I put a stripe inside too so the bag will be reversible.  The finished pictures shows how you can use migration to your advantage. When I was about half way through fulling I cut a slit in each side for the handle. I healed the cut edges with some soap and finger rubbing. I stretched the hole upward to get the shape I wanted. I am pleased with how it turned out.

prefelt bag 1This side used dark green and white prefelt

prefelt bag 2This side used all black prefelt.

I also made 2 nice round bags with a built in strap. This pictues shows the bag with a balloon blown up inside it and the panty part of some panty hose stretch over it to hold it well while it is fulled to about the half way point. At that point it is nice and round and just needed to be shrunk more.

grenn bag on balloon

Once I was finished fulling it I rinsed it out and then blew another balloon up inside it to make sure it dried nice and round. I did a smaller blue one as well. Both were covered in one layer of silk hankie. The green one also had a silk hanky flower on it.

green bag dry blue bag dry

They need their closures. I haven’t decided what yet.

The other thing I made was a couple tea cozies. sorry for the picture quality but I couldn’t get it to show better despite trying several things on the camera and computer.

teacozies

The cat needs some whiskers. The flower is a made with a silk hankie.


Meet the Supplier

Meet the Supplier

I’d like you to meet a new supplier who just happens to be located in Montana where I live. The post today is about Karen Straight from Big Sky Fiber Arts.

Fibre 3, 2, 1
Q-3 Three types of fibre you can’t live without?

  1. Merino – I share in common with many felters a love for merino. I especially love extra fine merino (19 microns) as it felts so easily, takes dye beautifully, and it is perfect for wet and nuno felting. It is so much fun to hand dye and card merino into art batts. Carded art batts make terrific skies, rivers, and oceans. Hand dyed merino is terrific for capturing the variations in color found in nature. Photos: 19 micron solid merinos and sugar candies, (Last 3 photos) hand dyed merino, yak and silk


  2. Ramie – I adore this bast fiber. It has the sheen of silk, and it comes in a variety of terrific colors. It adds wonderful spark and interest to fiber arts projects. I card it into my art batts. I find it to be especially lovely to work with when working on sky or water in a wet felted landscape painting.
  3. Finn – Finn is a fabulously versatile fiber. It is good for wet felting and needle felting. I enjoy making felted vessels and needle felting 2D and 3 D animals. Finn comes in lovely natural shades that are perfect for animals. It is a durable fiber that has the necessary strength for beautiful vessels.

Q-2 Two tools you use all the time?

  1. Ashford wild carder – Carding is so much fun! The Ashford Wild Carder takes just about anything. In one batt, I will combine merino, mohair, mulberry silk, ramie, sari silk fibers, and more. It comes out beautifully.
  2. Sewing Machine – I love the creative process of free motion stitching my felted landscapes. I also create quilted backgrounds for needle felted creatures.Flowers Inspired by Moy Makay by Karen Straight

Q-1 One fibre art technique you love the most?

  1. I love 2-D needle felting on linen using an embroidery hoop. I find this technique to be a wonderful way to needle felt animals. I draw the on the linen, and then utilize natural rovings. Sometimes I make the picture quite flat. Other times, I build up the fiber so that the animal appears to come out of the picture. I enjoy cutting the felted animal out of the linen, and integrating the needle felted creature into an “art” quilt.

General Questions
What is your business? My business is Big Sky Fiber Arts.

What kind of items do you sell?  We sell fiber arts supplies for felters and spinners. Our goal is to encourage fiber artists to grow by experimenting with a wide range of fiber types and effect fibers. Our inventory includes a large variety of extra fine 19 micron merino roving in solid colors and sugar candies, natural wool roving, hand dyed roving (various fiber types), bast fibers including hemp, ramie, and bamboo, silk fibers, 5 mm habotai silk scarves, prefelt, silk yarns and ribbons, and more.

What do you think makes your business different from similar ones? 

Quality and Competitive Price – Our products are of the highest quality at a highly competitive price. I carefully researched companies in the US providing a similar level of product quality. I marked each product I sell lower than my competitors. To beat the prices I am offering, you would need to buy in bulk.

Variety of Wools Offered – We encourage our customers to break out of their comfort zone and try a variety of types of fibers. Many fiber artists will use only merino. But, for certain projects, using a wider range of fibers will increase the excitement in the final project. We carry a wide range of hand dyed fibers, natural fibers, merino, bast fibers, silk, and yarns. We provide examples of how each product might be used so that our customers feel encouraged to explore. My email, phone number, and Facebook address are readily available so customers can chat with me about their ideas and questions. We love to see the art our customers create from our products!

Owl Detail by Karen StraightCommitment to the environment – A desire to protect the environment and support communities are central to our mission. The majority of our textiles are certified by the International Oeko-Tex Association. Hand painted fibers are created by a trained biologist who takes great care in each step of the process. Our bamboo is naturally processed, and we feature lovely plant-based effect fibers that are renewable.

Bunny by Karen StraightCommitment to community – We recognize that where we purchase our products impacts communities. Through the careful selection of artistic supplies, we can support communities. Our yarns and several of our banana and silk effect fibers support women’s co-ops in Nepal and India. Your purchase of these products helps to improve the lives of these disadvantaged women. We also feature made in Montana products, and we look to expand our listings of rovings produced by local farmers.

Where are you located? We are an online business only located in beautiful Kalispell, Montana. Our family lives here with the Swan Mountains in the background on five acres with our six rescued horses, two dogs, and a cat.

Big Sky Fiber Arts, Karen Straight

Where can we find you on the internet? 

http://bigskyfiberarts.com

Readers are welcome to use code 52015 to receive 10% of their first purchase! Code valid on all products purchased until the end of June. The discount does not include shipment charges.

Big Sky Fiber Arts


Thanks Karen! I hope you enjoyed learning about Karen’s business and do check out her site to look at all the yummy fibers she has available.  

Lambing in Sweden 2015

Lambing in Sweden 2015

Our guest author/artist today is Zara Tuulikki Rooke.  She recently shared the experience of shearing her sheep with a note that Spring will bring new lambs. So, today we share her experience of the birth of new lambs.

Spring has arrived (according to the calendar), which means the lambing season has started. Most sheep become receptive to mating in the autumn, when the length of daylight starts decreasing, and have their lambs in the spring, after almost 5 months of pregnancy (on average 145 days). However, some breeds are less seasonal, and can be manipulated with artificial light to mate at other times of the year. Spring is often late in the north of Sweden, so we waited until mid-December before we released our ram with our ewes. That postponed our lambing until May.

Now, it would be nice if one could calculate the exact date for lambing, but nothing is ever that simple. The 145 days is an average plus/minus 3 days, and you never quite know when (or if) the ram actually mated with the ewes, as they are in estrus for 24 to 72 hours, every (again on average) 17 days. So when it is getting close, you need to look for tell-tale signs. Some are quite obvious, such as the swelling bellies (which look especially large when they are lying down). The base of the tail will also feel very loose (as if the tail had been dislocated), and when the belly drops, the area between the ewe´s hips and ribcage becomes concave. Suddenly the ewes look underfed, which mine are not. And the day before lambing, my ewes had conspicuously enlarged udders, showing that milk production had started.

image

I thought that Citronella (on the photos above) would be the first to lamb. She was huge and we watched her closely (and frequently) for two weeks. But then suddenly, Lisen developed a huge udder overnight, and the next morning my eldest daughter found her with a lamb by her side. After watching and waiting about 30 min, the kids had to leave for school/preschool (they were a bit late that day, but we phoned ahead to explain why). I then decided to just quickly run back to the house to fetch a cup of coffee. And sure enough, when I got back less than 5 min later, Lisen had just had a second lamb.


image
A few days later, we found Citronella in the barn with two new-born lambs. Luckily, the kids did not have to go to School/preschool that day, and could sit on a bale of straw (dressed in boots, nightclothes and a jacket) and watch the new-borns as long as they liked. It is such a relief when all goes well, and all the mothering instincts are in place. As a sheep-owner, you need to be prepared to intervene if there are any complications during lambing. We have opted for easy-lambing, traditional breeds, with smaller lambs (compared to meat breeds), and we do not give our ewes extra feed before mating (which can increase the number of lambs). Ewes only have two teats, and if a ewe has more than two lambs you usually end up having to bottle-feed the additional lambs. So far, all I have had to do after lambing is check for milk – and admire the lambs. I also weigh the lambs after birth and the next day, to ensure that they are gaining weight.

image
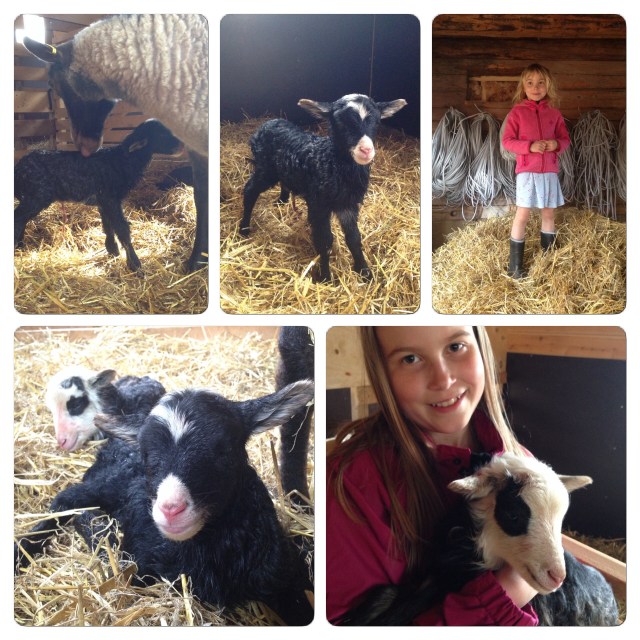
Last to lamb was Brittis. She looked so much smaller than the others, so we thought we would have to wait at least another week. But, suddenly, she also developed pronounced udders, and the next morning she was not very interested in her portion of pellets. Hmm… a sure tell-tale sign! Now this lambing I was determined not to miss! So, I climbed up on a bale of straw and waited, as Brittis moved around and pawed the straw-bed. It is a sort of nesting-behaviour before lambing – although a bit annoying when I had just laid out a fresh layer of straw for her. Now she was digging up the older layers of dirtier straw. She laid down, stood up, moved around, laid down again, breathed heavily and stood up again. Over and over. And yes, I do remember how uncomfortable I was just before I had my kids… After an hour, I just had to run back to the house to get a cup of coffee. After another hour, I fetched another cup of coffee and an unfinished crochet project I had laying around. I ended up spending five hours on that bale of straw. But it is quite a pleasant way to spend time – as long as you have coffee and a piece of craft to work on. Finally, she went into labour, and I actually got to see the whole lambing. It really is amazing to see how quickly these newly born lambs scrabble to their feet and start suckling, during the constant licking and low, encouraging, grunting noises from the caring mother.

image

Here is a short video of the first few minutes of the newborns life.

https://www.dropbox.com/s/tvzwkr8mzd8vw9d/Video%202015-05-23%2002%2027%2047.mov?oref=e&n=93043268

A general rule is to keep the mother and her lamb/lambs in a small lambing pen for as many days as the number of lambs, plus one day extra. This gives them time to bond properly before they are released with the rest of the flock. Suddenly our little flock has more than doubled in number and there seems to be little black lambs running and jumping around everywhere. It will still be a while before we can let them out to graze (spring is very late this year), but they have access to an outdoor enclosure. And they sleep in the barn at night, which is much safer with a lot of foxes, and occasionally other larger predators around.
image
And I just cannot resist also showing you some photos of the first chicken that hatched here this spring. There is something very beautiful about a pair of small child’s hand carefully cradling a newly hatched chicken. The same goes for small arms hugging a lamb.

image

Thanks Zara for sharing this wonderful experience with us.


Giveaway – The Right Fibre PDF e-book

Giveaway – The Right Fibre PDF e-book

I first had the idea for some kind of reference source for information about embellishment fibres about 7 or 8 years ago. This was before it was quite so easy to have your own website like this one, or publish e-books by yourself. When we started this website, we did try to add as much info as possible about embellishment fibres-you can find lots of pics under the Other Fibres drop down on the menu bar-and I’ve probably shown more than my fair share of felt pieces combining different wool breeds and fibres! But having access to info is never quite as convenient as having the info all in one place is it? Well, after many years and 3 different cameras (taking photos of fibrey things certainly wears the motors out!) I have finally finished my e-book, The Right Fibre.

The Right Fibre smallIt isn’t a project based book- I don’t tell you how I think you should use fibres, it’s an objective look at them.  I profile 20 different embellishment fibres, and show lots of photos of how they look after felting in various ways, so it’s easy to compare them with each other and see similarities and differences.

compilation 1There is also a section detailing various things which affect the way a fibre will felt and look after felting, so by the end you have the information you need to choose the right fibre and give you more control over the outcome.

compilation 2For more information, have a look at the full blurb on my blog. To win a free copy of The Right Fibre, all you have to do is leave a comment on this post. If you’d like to spread the word through your blog or facebook etc, it would be very much appreciated but it isn’t a requirement. I will randomly draw the winner 8 days from now on Sunday 31st May 2015, so please check back to see if you’ve won.

compilation 3The Giveaway is now closed. Thanks for the entries 🙂

Felted Flower Class and Some Lambs

Felted Flower Class and Some Lambs

I taught felted flowers this last week as a short evening class. We had a good time. This is proved by me not taking many pictures again.

First they did a morning glory style flower to get the idea of laying out. Some of the students had not ever used roving before. Here they are shaping their flowers.

shaping flowers morning glories

calenes morning gloryThis is Carlene’s flower

Next they made more delicate flowers using silk hankies and they learned to make stamen and stems.

Carlene’s again

carlenes silk flower

and everyone together

Flower class finnished

And be cause it’s spring her are some lamb pictures.

lamb on mom lambs and mom 2

when lambs are born we put them and their mom into a small pen to make sure mom has milk and  everything is going well. After a few days the lambs get their eartags and vaccinations. Then into a small group pen with other moms and lambs and then after a few more days out into the big group pen were they can get outside too. It is fun to run and jump with other lambs.

This is my house lamb, he is a preemie. He is very small with not much wool and no body fat. He was born late Tuesday night. And just because I like them here are the roosters roosting on some lambing pens for the night. They go to bed early as you see it is still daylight out.

preemie lamb roosters

Still Stitching Pomegranates

Still Stitching Pomegranates

I have stitched a little bit more on my pomegranate piece. I had time when we went on a quick road trip this past weekend. I’m still not sure what direction I am taking with this so it’s kind of just “free form” stitching at the moment.

Stitched Pomegranates

This is the entire piece. I mainly added more stem stitch around the various pomegranate shapes.

Stem Stitch

I like how the stem stitch really defines the shapes. It is my go-to stitch for curving lines.

Close Up Stem Stitch

Here’s  a little closer view.

Seed Stitches

I did add a few more seed stitches but not many.

Another Pomegranate

Now I need to decide if I am going to add more to the background. I was thinking about adding branches and leaves. What do you think?

For those of you in the northwest United States, Gail Harker from La Conner, Washington is coming to Kalispell, Montana at the end of June to give a Level 1 Experimental Hand Stitch course.

poster

Northwest Montana is a beautiful place to visit and you could combine the class with a vacation. Road trip anyone?

Level 1 Stitched Page


That Doesn’t Look Like My Old Jeans

That Doesn’t Look Like My Old Jeans

A while back I made a note to myself to make paper from and old pair of jeans.  I wanted to play with some fiber in a different way from felting.

The first thing I did was to cut the fabric into small 3/4″ squares, discarding the seams.  Then I dragged out my old papermaking equipment which includes an ancient blender.

2015-04-21 15.01.19

Using warm water I filled the bender half way, then added a pinch of the squares and ran the blender for 30 seconds or so until the water turned blue.  This was a long process since I couldn’t overload the blender.

2015-04-21 15.46.00

The resulting pulp was strained.  When I had about a quart (1.14 liters) of pulp, I gave the blender a rest.

2015-04-21 15.58.57 2015-04-21 16.05.21


The set up for making the paper included a big container of water, a mould, deckle, pellon and blanket sheets. The deckle in black, the screen covered mould on the left.

2015-04-22 14.50.35

Using a handful of pulp, I added it to the water and agitated it. With deckle on top of the mould, I submerged the pair into the water at a 45 degree angle and came out with a pulp filled sheet.  Without going into all the nitty gritty of all the papermaking steps and terms, I couched (pressed) the paper onto a wet pellon sheet and repeated the steps until I had used up all the pulp and had a pile of sheets.

2015-04-22 15.04.152015-04-22 15.10.20


The next step was to press the paper in my homemade paper press.

2015-04-22 15.42.09 2015-04-22 15.45.01


After letting it sit awhile, I gently placed the paper on a white board and used a haki brush to place it on the board to dry.

2015-04-22 15.55.27 2015-04-22 16.04.15


Since the blender was old, the fiber didn’t get chopped very fine, but it made an interesting texture and look with the various long fibers running through the paper.

2015-04-24 10.56.53 2015-04-24 10.59.45 2015-04-24 10.59.23 2015-04-24 10.58.28

Like an old pair of well worn jeans, the paper is soft. One side is smooth where the paper dried on the whiteboard, the other is textured.

I could run it through the process again, but I think I’ll try to felt with it before I do.  What would you do with denim paper?

Nuno and Stone Sheep

Nuno and Stone Sheep

I can’t remember the last time I got a chance to do some felting, but I got chance again the Sunday before last, and I’d had the pieces laid out for at least a week and half. Two of the pieces were nuno samples. I’d bought some scarves and wanted to see how the fabric felted. For both samples, I laid out two layers of Merino tops and laid the fabric on top. The first scarf I tried didn’t have a label on it, it felt like a synthetic chiffon, slightly ‘rough’. It felted quite nicely, though there were a couple of places along the edges where it didn’t attach securely.

OLYMPUS DIGITAL CAMERAThe nuno texture was really nice:

OLYMPUS DIGITAL CAMERAThe next piece I tried was viscose, it was really soft. It looked like crepe after felting:

OLYMPUS DIGITAL CAMERAA close up:

OLYMPUS DIGITAL CAMERAA supermacro close up, I think I got the colours matched pretty well 🙂

OLYMPUS DIGITAL CAMERAAnother piece I made was with Stone Sheep wool. I first tried this last month, probably the previous time I did some felting. I liked the way it felted and how fast it felted so thought it’d be really good for something I wanted to try out. I laid out a couple of layers of some carded Stone sheep wool, then added a big pile of fake Angora fibre in the centre. I covered it with a circular resist, covered the resist with some ‘Silk Schappe’ that I got from wollknoll (it seems like carded silk noil), then added another couple of layers of Stone sheep wool. I finished it off with some kapok fibre. When it was felted, I snipped a little hole to take the resist out and worked it until I got it how I wanted.

OLYMPUS DIGITAL CAMERAI thought the fake Angora might be a bit fluffier and looser than this, I mustn’t have piled quite enough in!

OLYMPUS DIGITAL CAMERAYou can see the Silk schappe from this angle:

OLYMPUS DIGITAL CAMERA

2nd Quarter Challenge Guest Post

2nd Quarter Challenge Guest Post

Today we have a Guest post by Leonor from Felt Buddies:

A few days ago, I decided to respond to this quarter’s challenge and make a colour palette out of a favourite picture of mine. I decided to go with one of my cat Squish.

I used Color Palette FX. If you are using an image of something real, you can almost make sure the colours will go well with each other in different ways and thus have a nice palette to work with.

Jungle SquishIn our daily lives we get so used to just looking at things with narrow focus – my cat is black, his eyes are yellow, plants are green, light is white. But if I take the time to actually notice things properly, I’ll see that there is depth to his black, with purples and blues showing, and his eyes have a beautiful green popping out. The plants are at least three tones of green and the reds and oranges just catch your eye. And look, the light is white, ecru, and yellow.

This is the result of the website’s narrowing of colours, still probably more than I’d notice with a naked eye.

Squish PaletteThe next step would be to choose the colours and the medium to work them. I went with a limited palette of the closest colours I had in my fibre stash. Below, starting on the bottom left: sari silk waste, natural white mohair, three batches of merino (purple, mint green and forest green), short silk fibres and dyed bamboo.

StashThen it was drum carder fun. I had to decide how to layer the fibres: most of the merino was placed first and then I added the other fibres, placing some in between the wool layers as well.

Drum Carder 1More fibre added. I just kept adding fibre until I ran out of merino (or the drum was full, whichever came first. It was the former.)

Drum Carder 2The bottom of the batt…

Bottom of Batt…and here the top of the batt is in all its glory. I really like how it turned out.

Long FibreThe finished item. That top left pile is fibre I took out of the drum carder when I was done.

Rolled Up Fibre 1bMy next step is to spin this, but as always, I still fear my spinning knowledge won’t do it justice, so I suspect it might stay in my stash for a while. Here’s hoping for some (near) future courage…

Rolled Up Fibre 2How about you, what are your plans for this quarterly challenge?