The other day I made a bangle. I have made them before but it has been a while. So long ago, I can’t find the pictures. I know I have seen them recently while looking for something else. I was not as good at labelling things then as I am now so searching didn’t help much. Anyway, for this one, I wanted to use some of my handspun. I have many little balls of yarn as I never make much of any one thing.
To start you need a piece of cord or yarn. Make it the size you want your finished bangle. It will not shrink in size. I used a scrap of yarn.
You need some wool and some yarn. I am using some very dark purple merino but you won’t see any of it when I am done. The yarns are some of my mostly wool handspun.
Wrap the roving around the string. Wrapping down through the hole and back around until its all covered.
At first, I thought I would wrap the 2 yarns side by side. The larger ball was too hard to poke through the hole all the time. I forgot to take a picture of wrapping the pattern I did but you can see here how snug I did it. It is compressing the roving but not a lot.
This is the wrapped and wet bangle.
At this point, I just wrapped my fingers around it and squshed it like making a playdough bracelet. Move the bangle around and around so it was all getting squished. I did that for a few minutes, not very long as I am impatient. I rolled it up in a rolling mat. It’s a piece of the foamy, rubbery shelf liner. I rolled maybe 10 times and then unrolled rotated and flipped it. I did that maybe 4 or 5 times. I wasn’t thinking about it as a tutorial at that point, so I wasn’t keeping track. When I was done it was flat.
Don’t panic, just pick it up and put one hand into the hole and one on the outside and roll it back and forth in the hands like making a playdough snake. Do that all around the bangle until it is round again and feels firm. You could just squeeze it for longer and then roll it in your hands if you don’t want to roll it in a mat.
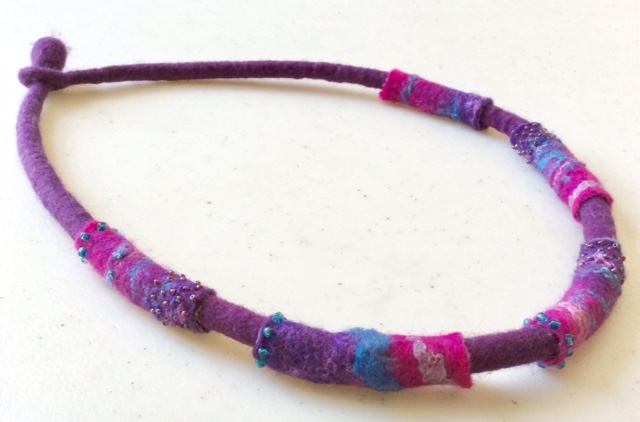
It really works, it is round and the yarn has given it texture, as well as colour. The longest part of making the bangle is wrapping the yarn. If you were not as neat as I was, you could do it much faster and would have a more textured bangle.
Here it is dry.
You can see it’s a little fuzzy. I wanted more texture and more sparkle. Both Yarns have silk and some Angelina in them. So I got out my trusty dollar store disposable razor and gave it a heavy shave.
There is a lot more texture and you can see some of the minor colours and some shiny and sparkly bits. I had a really hard time trying to capture the sparkle. Most of the little pink dots are sparkle and the orange Bits are silk.
It is too large for me really It would fall off if I would it loose on my wrist. I push it up to my forearm. On a less Rubenesque person or my much younger self, the upper arm would work well. It was fun to do and I should have thought of it for the first quarter challenge.
After doing lots of machine stitching on the last landscape that I showed you, I decided to try a more minimalist approach.
This is the starting point after nuno felting.
I then machine stitched the distant mountains as well as the lines on the water. I considered stitching heavily again to get the variety of colors in the mountains but thought, why not use paint? I hadn’t tried much painting on nuno felt but I decided to just go for it. I used Dye-Na-Flow paint that I already had. I watered it down a bit as it turns kind of plastic looking when dry used straight out of the bottle.
Here is it after painting. I had to be careful applying the paint as it had a tendency to spread so I carefully brushed it on and didn’t get very close to the edges of the stitching. Now it looks more like mountains and a lake. What to put in the foreground? I searched online for photos of Flathead Lake at sunset and found some that I liked and the photos helped with the foreground choice. Add trees, now why didn’t I think of that?
So I stitched in the outlines of the trees.
Then added the paint. I am still deciding if it is finished. I might add some hand stitching to the trees to give a bit more texture and variation in color. What do you think? Does it need more?
It was great to see that “Jewellery” was the subject for the 2020 first quarter challenge. I love making felted jewellery, whether that’s pendants, bangles or brooches.
This choker style necklace is wet felted Superfine Merino. It came about because I’d got some small offcuts of a very thin felt left over from a collar. Rather than throw them out (perish the thought!) I had the idea of sewing each one down the long edge, to form tubes, and then use them as “beads”, threading them onto a felted cord. To keep everything in place and avoid them slipping on the cord I attached small beads, sewing right through front to back.
The only problem is that when I try to wear it the cord slips around and ends up with the fastener at the front…..obviously the heaviest part finding its way to the lowest position! Fortunately the cord is long enough for me to correct this so I’m going to have to cut the fastener off, slide another “bead” on and join the cord under it.
Another drawback with wet felted Necklace cords (or at least with mine!) is that, no matter how hard I full them, they do tend to go fluffy quite quickly. To get around this I’ve started wrapping my cords with a machine zigzag stitch. I’m finding that this makes them much more durable and also the stitching gives another dimension to the pendant/necklace.
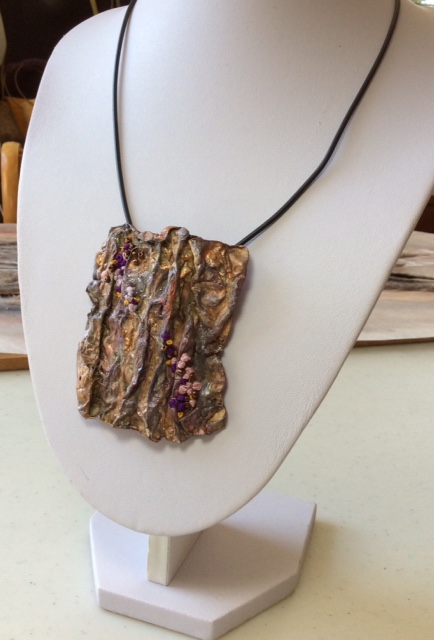
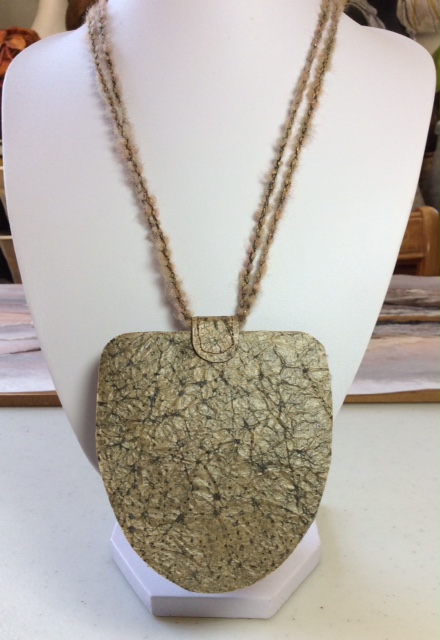
This challenge also came at the same time as I was working on some ideas for quick and easy mixed media jewellery. These next three pieces are a great way of using up small scraps of paper and fabrics plus any embellishments you might have lurking in the back of a drawer!
The rectangular pendant was made from heat distressed Tyvek which I’d first painted with metallic acrylics. I’ve embellished it with pink, purple and mustard colonial knots and a few bronze seed beads and strung it onto a rubber cord.
The next pendant was made from tiny scraps of polyester velour fabric, backed with Bondaweb and ironed onto a painted, pelmet vilene background. I’ve added beads, metal washers and a couple of “danglies” from a broken necklace. The cords are two lengths of knitting wool which have been machine wrapped using the zigzag stitch.
This larger pendant is my favourite. I’ve kept it very simple using a dark grey cotton velvet furnishing fabric on a pelmet vilene background. I’ve sewn on brown craft paper, scrunched and painted with black acrylic to give it a leathery look, and added a metal trim, wooden bead and two smaller metal beads. The back is also covered in the leathery craft paper. Again the cords are simply wrapped knitting yarn but these are much longer than they look in the photo so the pendant hangs below the bust line.
Although we are living in strange times with social distancing and having to isolate, as long as we can maintain our motivation and continue to feed our creativity we will be doing ok! Stay safe and have fun!
Alright, I have put aside the strange creature Glenn can’t identify to provide my last little sheep with a proper supervisor. (we are presently cat-less so it must be a shepherd)
1 I am sure all my felting friends will immediately recognize what I am making! <Grin> (the merino I have will not work for the topcoat so I have to hope to find something more appropriate in my stash or wait until the Co-op is excepting shoppers again!)
So change of gears and on to the shepherd. I looked at the height of the sheep then went for the 20 gauge floral wire I found when I started to clean my desk. ( I probably should finish cleaning it and see what else I’ve lost there). I double wound the wire leaving loops for hands, feet and head. I used the very spongy Rideau Arcott again for the first layer of the understructure. I then remeasured him against the sheep….. drat, he seems taller than I had anticipated. That will make for a very diminutive breed of sheep.
2 My shepherd somehow grew too much, starting shepherd #2.
Many years ago, long before any thoughts of felting flitted into my brain, I had purchased antique floral wire from the local Salvation Army thrift store (aka the Sally Ann). It was quite stiff and covered in fine cotton yarn. One piece had migrated from the bookshelf in the living room where it had come to reside on the desk in the office by the computer. I was considering making a dragon with it but hadn’t come to a final idea. It was just about the right length for the head, torso and legs for a shorter shepherd. I used the 20 gauge doubled for the arms.
3 Two different wires to create the armature.
I am again using the foam (like a pool noodle) kneeling pad and a combination of the 36 triangle and the unspecified “3 sizes” needles from Amazon. You can also see the 3 needle holder with the blue handle I got from one of the amazon resellers. It is not quite as sturdy as I had hoped but works if you keep your fingers holding the darker blue part. If they slide foreword the front cap/guard comes off. I did take it apart and with a bit of a struggle, I got it back together. It seems to have a few design weaknesses but does work. I think it will be more useful with picture felting or larger 3D projects.
4 Three needle holder from amazon reseller.
As I started adding wool to the second shorter shepherd I found I was breaking needles. Particularly just superior to the patella above the coccixs and the inferior aspect of the bracial plexis. (ok anatomy sticks in the brain even when felting) I am wanting a very firm understructure. Then plan to overlay in pasty pale northern skin tones then add the Pictish woad blue. I will have to take a quick peek and see if I can find the roman description of their Pictish opponents. I have no idea where I put my university history notes so I will do a bit of a search and see if I can find an English translation of the Roman text I remember.
From Tacitus’s Agricola – “the inhabitants of Caledonia, their red-gold hair and massive limbs proclaim German origin”. I am embarrassed to admit fell asleep while re-reading the Agricola. That was not the passage I was thinking of so maybe it was a quote from Bede I was thinking of that was a bit more descriptive?
I found that Pict derived from a Roman word meaning to paint. So I am still unsure if it was blue overall or patterns of blue. I found some illustrations I remember seeing before but are much later from the 1500’s. (I will have to figure out how to show that without being too educational.)
5 illustrations c1585, by John White. Woad stained Pict warriors (with careful smudge added to keep from shocking the kids)
I will continue to look at some of the Pictish patterns and make a final decision later. I spotted an unfinished standing stone that had blacksmithing tools at the bottom of it. I wish I remembered my university history class more clearly. Oh, maybe there is a reason university seems a little foggy is because it was over 30 years ago! EEK!
I got distracted when I started to work on him. I was listening to an audiobook by Kalayna Price. It was the second one of her books I’ve listened to. This one was called Grave Dance. As you can see, I made reasonable progress while listening to it.
This slideshow requires JavaScript.
6-9 Progress while listening to book 2 in the Alex Craft series
I am particularly pleased with the patella, glutes and gastrocs. The thorax is progressing but needs more work. I’m thinking washboard abs may be added. Still have more work to do. Yes, I noticed the hands and forearms are missing too. But for now, it’s past time to stop and make dinner (and I have to buy the next book in the series before I get back to felting). I will try harder to stop and take pictures.
I have been working on the feet fussing with the arch and malleoli. I have the right one close to what I want but the left still needs work. I used the embroidery snips to remove a bit of the hairiness from the felt and the ankle suddenly looked better.
10-16 progress on the right foot
I am having fun with him and am still debating how anatomically correct I should make him. If I make him check or plaid pants (trues/Breeks) or a grate cloak or maybe a tunic no one will know what is under his clothes! (if you don’t peek). Have fun and keep your hands in lots of warm soapy water felting!! (not dishes)
17 Humm, maybe a bit more lateral glute on the right side?
It was 2 days later that I got back to my pot. After some preliminary rolling in the dryer, I rolled it by hand.
It shrank quite a lot. it is very tight around the resist. It is time to do some cutting. I cut in the spaces between the fins.
You can see how much the hole grows as you work the edge. The little blob on the left is the piece I cut out.
I didn’t want to pull the resist out through the hole. It is bulkier and less flexible than usual with the duct tape holding on the fins. I cut an X in the bottom of the outside pot. If I had thought about it I would have done it in the bottom of the inside pot so no one would ever have seen it.
This is how much it has shrunk so far.
Next was a vigorous rub down with a rubbing tool. This is one Jan found in the pet section of our Dollar store. It’s for washing your very dirty dog. I covered the pot with some plastic before rubbing. It is too grabby to use directly on the felt.
It shrank a little more but now it is al flat and smooth.
Before doing any more I needed to rinse out the soap. It always takes much longer to get all the soap out than I think it should.
I start with hot water and finish with cold. I also want to get more shrinkage during this prosses so I am quite aggressive in getting the water through felt to get the soap out.
This is how much more it shrank. You can see the black lines of where it was before rinsing.
I stuck the yellow inside the red one. It wasn’t too hard because the how where they are joined is not very small. What was harder was getting the ball in so I could blow it up. I wanted to use a ball because I didn’t think a balloon would be strong enough. I did get this one I but ended up taking it out and switching to a smaller 8-inch ball. the ball is a Linsom ball, they are nonslip, sort of sticky on the outside. They are great balls because they come with a removable plug. I took a vessel class with Sharon Costello where we used them. I suppose it helped the first layer of wool to stick. The layout on a ball is very difficult. It was a great class, a lot of fun and we learned a lot but not one I like to use.
and in the dark
I think it turned out fairly well. If I were to do it again I think I would make the inside pot bigger so it would open up the fins. I may, depending on how ambitious I am, wet it down, blow up a ball inside and them stuff plastic bags in to make the outer pot bigger. I may cut the fins off and then so some stretching so you can see more of the inside pot. I am still thinking. What would you do?
I showed you the start for this landscape last week. It’s based on a photo of the trees in winter on the Whitefish river. I really like the way the orange branches look against the sky and in the reflections in the water.
Here’s the photo I took and then the layout of the felt on the right. I used what silk I already had to represent the sky and the water and then added a little wool for the land and for the large tree trunk on the left. The felted piece ended up about 8″ x 11″.
I then started stitching the most distant background features. I forgot to add any support behind the felt at this point but later on added a heavy weight Pellon interfacing to support some of the heavier machine stitching.
Now to add some sheer orange fabric for the trees. I also stitched in dark brown along the edge of the river and the shore.
Then on to adding in the trees along the shoreline. I did baste down the orange sheer fabric to hold it in place while stitching. I added more stitching for the reflections of the trees.
I cut back some of the orange in the trees to show the sky in places and added a second layer of sheer orange over some of the branches. I then stitched more branches in orange thread. I did the same for the reflected trees.
Now on to the large foreground tree. I added some bark details with my darkest brown thread.
And then stitched in the large foreground branches. I started from the top dark branches and moved downward. I added one layer of sheer fabric over the yellow in the bottom left hand corner by the trunk to tone it down just a little. After looking at this for a while, I decided to make a few small changes. The right hand corner was drawing my attention to much with the background trees. There was too much contrast between the white clouds and the dark branches. Also, the shoreline wasn’t quite right.
Lighter brown stitching was added to the background trees and to the shoreline. I used a small amount of oil pastel to make a shoreline reflection in the water. And it was finished. Or at least finished for now. I will need to find a background cotton fabric for it’s matte and then get it framed. On to the next landscape!
For those of you who wanted to see the end result of Penny Peters 25 Million Stitches piece, here it is. You can read more about it here.
We have also started writing a monthly newsletter and already sent the first one out last week. If you’d like to receive the newsletter, click on the link in the prior sentence and scroll down to the end of the newsletter. There is a link to click there to submit your email address. Or you can sign up on the right side bar here. Thanks!
Before we begin….I really hope you and your loved ones are safe and well, but if you are grieving for a loved one who lost their battle with Covid19, I am truly sorry for your loss, I can’t begin to imagine the pain of losing a loved one when you cannot be there to comfort them. Please don’t think for a moment that in this post I am comparing the anxiety many people are feeling and my own journey through this crisis in any way to the combination of grief and anxiety you are experiencing. My heart goes out to you.
Overwhelmed and impotent
We are just over 3 weeks into lockdown (in the UK) and the days have long since become indistinguishable from each other, some days drifting laboriously on, while for others (if I avoid the news) I can convince myself I am holiday and happily while away the day reading and pottering in the garden. I have lost all sense of time, what day of the week is this? Or what month!? Are you feeling the same?
Social media seems to be full of people enthusiastically telling us we need to use this time productively but, quite frankly, a lot of people, myself included, are just too exhausted from anxiety and worry to…. overhaul my website / clean the house from top to bottom / landscape the garden / make all my stock for Christmas *
*insert that overwhelming project that glares accusingly at you from your to-do list.
I know most of these people mean well but their posts really only serve to make me feel even more inadequate and impotent than this crisis already has. If this resonates with you, try to ignore them, mentally file these posts with the fake news and scam posts, they really aren’t worth your attention or energy.
I realised early on that my creative mojo was burrowing further and further into hiding the more my anxiety increased; the more anxious I felt (for myself, my loved ones and friends still working on the frontline), the harder it was to find that creative spark we all rely on. It took me a few days to realise this but just by limiting my access to the news to once a day and only grocery shopping once every 3 weeks I can (mostly) control my anxiety. Have you found a coping strategy? Did you lose your creative mojo too?
To begin with I couldn’t even face the prospect of starting a felt project, all the ideas usually overcrowding my tiny brain had flown away. So I set myself some quite mindless tasks, more to keep busy and distracted than with a goal in mind.
Tidying and organising the “wool room” (don’t be fooled by the name, like you, I have wool and other fibres stashed in EVERY room, but this room has almost nothing but wool and felting kit in it)
Painting colour charts for my watercolour paints (something I have wanted to do for a long time but never found time for)
Baking (if this keeps up, I will be too wide to fit through my front door by the time we are allowed out again)
A colour chart from my watercolour sketchbook
Then Fiona Duthie threw down a felting gauntlet…..
Those of you that have taken one of Fiona Duthie’s online classes will know about her “alumni” Facebook page, on there she posted a “coronavirus challenge” on the theme, “Separate Yet Connected”.
I have taken part in one of Fiona’s previous challenges (you can see the publication here) and really enjoyed it, especially reading about how everyone else had interpreted the same theme in such varied ways.
But I was filled with nagging doubts, could I come up with an idea and be inspired enough to see it through? I really wasn’t sure. I went back to baking…. and comfort eating…..
A little known piece of personal history for you… I studied coronaviruses for my PhD. It was a long time ago (early 2000’s) but I still feel personally connected to this virus despite the havoc and devastation it is inflicting on us all. This connection and a desire to turn the fear and anxiety into something positive, or at least constructive, kept bringing my thoughts back to Fiona’s challenge but what could I make?
The name corona-virus, comes from a very fuzzy electron micrograph image of crystalised coronavirus particles that show a corona (crown) of spike proteins protruding from the virus envelope.
Not as pretty as the whizzy computer-generated images the media are bombarding us with today but I see a simple organic elegance in these decades-old images
It was this micrograph that inspired a scruffy self portrait I drew a couple of years ago, where I applied the corona of spike particles to my portrait.
If you are wondering about my bizarre colour choices, they too were inspired by my PhD, I did a lot of confocal microscopy work that used fluorescent markers to highlight different cellular structures and virus proteins (even as a scientist colour was still a very important element in my work!).
Confocal micrographs from my thesis
Those who know me, know my favourite felt practice is sculpted, 3 dimensional wet-felting. It seemed like a natural step to translate the self portrait into a series of 3D faces.
This is the prototype of the “masks” being laid out… and with the shaping begun but far from finished
Drying and waiting to be shaved.
I applied quite a lot of silk to the “spike proteins” expecting them to add a dash of colour but the fuzzy nature of Black Welsh wool has all but engulfed them.
I am still undecided about the eyes, leaving them hollow / white as they are now is quite haunting to look at and makes me reflect on the very, very many people who have lost their lives and those left grieving for them but to add eyes could make the masks more human and relatable, what do you think?
My plan is to make a series of “masks” with different ethnicities to reflect the global impact and arrange them as a wall hanging with a rainbow theme linking them all in what has become the global symbol of hope in this pandemic.
This one will be the caucasian mask:
I will post an update as this project progresses but in the meantime please be kind to yourself as well as those around you, this situation and the feelings that accompany it is alien for almost all of us but together we will get through it.
Making my sheep presentable! The horror of naked sheep is averted at last.
Over the past few months, I have been making naked sheep. To replace my missing sample sheep. I need to leave some of them in their unsightly naked appearance but I also need to have a few finished ones to show what variations can be made with the top coats too.
1-2 20g Woad died Locks on sale at one of the fibre festivals.
So last week I found the little bag of Romney x BFL locks, died with woad. This is a very light woaden blue and makes me think of the story about Ted Carson, a Toronto spinning teacher, taking cool-aid died lambs with him to demo in town. He had said that when he brought the colourful lambs back to the rest of the flock he would see cars suddenly brake to stop and look at the green, pink, purple and blue tinted sheep standing in his field. Ok, this could be fun!
I curled up in front of the computer, got set up with the game I was playing and pulled out the sheep. I finished off the ears and did a bit of final touch up of the understructure then added the eyes. I could not find the black so she got the dark opalescent beads. I sewed in the eyes from opposite sides and buried the knot and thread in the wool.
3-4 Naked sheep body with ears added
Next, I added the top coat of locks. I kept them tight to the body and not as drapey as I usually do. In this fleece, the tips and tails were both quite crimpy and didn’t take the dye as much as the middle section of each lock. The darker ends were the tips and the whiter ends were the butt ends, if you were curious. I let the forelock and the bottom wooly part of the legs be a bit looser. Now she looks almost right. What is she missing?
5-7 Sheep with the top coat added. She is looking for grass.
I know! It’s the bell and bow from a hazelnut chocolate Easter rabbit! (Not this year’s rabbit, who was milk chocolate and had a red ribbon and was eaten ears first Sunday afternoon.)
8 My Pictish sheep with her bell and ribbon
Now that I have a woad sheep I may need a woad covered Pictish shepherd to go with her. Hum, that could be fun. I will have to see if I can find any photo reference on the wonderful google. Google was not as helpful as usual.
Was it Tacitus who wrote about the frightening Picts, who painted themselves blue with woad and would not fight correctly with chariots? I did read Germanicus but can’t remember if it was there or another roman author who talked about the Picts. It may have been the Germans or the most northern Celts that didn’t fight correctly against chariots. University was a while ago so as long as I don’t have a sudden history test I should be ok. I do remember Hadrian tried to build a wall to keep them contained but most of the wall was looted for later building material. Yes I think I will need to make a Pictish shepherd to go with the sheep!
I thought I would do another one just for fun. I decided it should be bigger this time. For the template, I used a wall clock I had that is to good to get rid of, but I don’t use. I am sure you all have things like that around. To give you an idea of sized it is the typical school or lunchroom clock that is everywhere.
The smaller circle is the one from drawing around the clock. I decided I wanted it a bit bigger so I drew another circle out about 2 inches or 5 cm by hand.
I cut it out leaving a small amount attached to the bigger piece and folded it over to make a second attached circle. I had decided I didn’t want a narrow neck on this one.
Now, you are probably thinking that isn’t very interesting. At least that is what I was thinking. Just to make things more interesting and difficult for myself I decided to add wings in a book resist type of thing. Not satisfied to do that the normal way I decided to make the wings/pages smaller than the rest of the pot. I used the actual size of the clock.
I also separated the pages so the outside edges ended up halfway between the 2 circles on the main resist. I added 2 pages to each side of the resist.
Next was laying out the fibres. About halfway through one side, I was cursing myself for making things so difficult. The problem, of course, was that I hadn’t done a book resist in a long time and had to figure out how best to do it again. You can see I add a piece of silk (I think) scarf to the yellow side that will go inside.
The second side when much quicker than the first
That is as far as I got. That was Sunday. My plan is to do the felting tomorrow and maybe the next day depending on how my knees feel about it. I have a tall table which is great for laying out but not as convenient to rub and roll on. I am going to try to use my tall chair to help with that. I will show you how it turns out for better or worse next time it’s my turn to post. That should be next Wednesday. Have you tried a vessel in a vessel? If not go watch the tutorial and give it a try.
I have started creating some nuno felted landscapes so that when the world returns to “normal”, I will have work that I can take to different galleries to sell. These are created with hand dyed silk (5 mm) and white merino prefelt. Some of the silk I used this time was dyed by my friend Paula Rindal. She gave me her silk when she decided to stop felting. Thanks Paula!
This is one of the pieces of silk from Paula. I see an autumn landscape developing from this piece. I don’t always have a plan in mind until after these are felted. Then I look at the piece from all angles and decide what I “see” in the piece. Then I progress from there. This one I am planning on hand stitching.
This piece was one of my hand dyed pieces of silk. I haven’t quite decided on this one yet but it might be mountains in the distance with Montana wildflowers in the foreground. I might use a combination of machine and hand stitching.
Again, another one of my hand dyed pieces of silk. I think this might be a lake with mountains in the distance, perhaps machine stitched?
This last one I based on a photo I took of the Whitefish river. I laid the pieces out based on the photo and then it will be all machine stitched. You can see I have started by adding background trees. I forgot to take a photo of this one before I started stitching.
So what do you see in these? It’s always interesting to me that people see different things in an abstract background. What would you create out of the top three backgrounds? I will be showing you the progression of each of these as I work through them but I’d love to hear your thoughts.


 1 I am sure all my felting friends will immediately recognize what I am making! <Grin> (the merino I have will not work for the topcoat so I have to hope to find something more appropriate in my stash or wait until the Co-op is excepting shoppers again!)
 2 My shepherd somehow grew too much, starting shepherd #2.
 3 Two different wires to create the armature.
 4 Three needle holder from amazon reseller.
 5 illustrations c1585, by John White. Woad stained Pict warriors (with careful smudge added to keep from shocking the kids)


 17 Humm, maybe a bit more lateral glute on the right side?


 5-7 Sheep with the top coat added. She is looking for grass.
 8 My Pictish sheep with her bell and ribbon


