Well, I must say this is the fastest I have ever done the challenge. In fact, I finished it before it was issued. It was a Christmas present for my hubby. My husband loves cast iron cookware. It does cook well and hold heat. He looks after them so I don’t have to worry about wrecking the seasoning by doing it wrong. The handles on the frying pans are hard to get a grip on when they are hot. Oven mitts always seem too big. we have some silicone ones but I always feel like the pan is trying to twist inside them. So this is where the felting comes in . I thought I would make some felt handle covers. wool is fire-resistant and a good insulator, so should work well
I measured the handles and then headed for the studio. I found a scrap of floor underlay for the resist and measured out 2 so I could do 2 at once.
Just about a perfect fit for my rolling mat.
I decided on a nice bright blue and added 4 layers of wool. I am not sure how much wool as it’s not a very large amount I just made sure both sides would have the same amount. Nothing beats guessing if it’s right. LOL
After both sides were wrapped around and wet I decided they were boring but being in a hurry ( leaving it too close to Christmas) I just added a strip of orange down the middle of both sides. I didn’t want there to be a right side up.
After wetting down it was on to felting: rub rub rub, roll, roll, roll.
I cut the handles in half so I had two the same size. Then a little more rolling and onto fulling. these are small and were coming together quickly so I fulled them in my hands by rolling them in a tube shape and in a ball.
One down and one to go
And they are now being used on the stove. they are nicly heat prove but not so thick you can’t get a good grip.
So how’s that for reading Lyn and Annie’s minds and being ready with my first post of the year? How about you? did you make someone something practical for Christmas or a birthday?
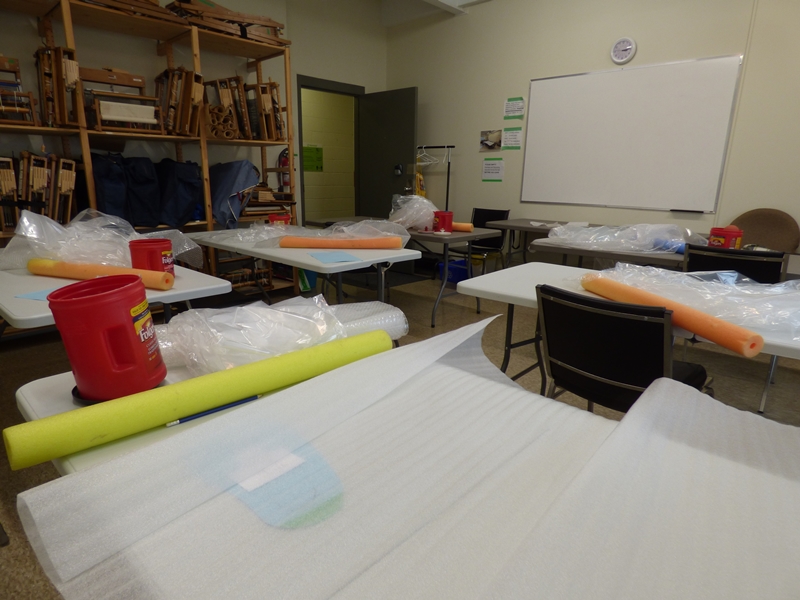
Not very long ago I taught a felt slipper workshop. There were 6 students including Jan. Here is the set-up in my guilds classroom It holds 6 tables reasonably well. You can see the table looms waiting for class on the left.
After we discussed the different styles of slippers, everyone traced their foot and sized up to make their template. We used floor underlay for the templates.
Everyone laid out both sides of their resist and got them nicely wrapped around
Then started embellishing them
Then it was time for felting. Start gently with some rubbing
Then rolling. No rolling pictures, you would think with everyone busy rolling I would have lots of time to take pictures but I guess I was too busy talking.
then more rubbing to heal the cut and on to fulling and shaping
And don’t forget to try them on to see where they need more work and in which directions. I brought new bread bags so they could try their slippers on without getting wet feet or socks.
Getting there
Here are some of the finished slippers.
Now you are probably thinking that at the top I said Jan was in the class but I haven’t seen her. Well, that is because Jan is the problem child of the class. She can’t just do what everyone else wants to do, and so she gets a section all of her own. Jan wants boot-style slippers. Ok, that’s no problem and you are wondering what’s the problem with that? Well, she wants really tall rear entry boot, style “slippers”.
I had her come to class early so we would have time to discuss the how of making rear entry extra tall slippers. She says they are slippers and not boots. You can see Jan’s diagram of what she wants in the first picture. I was explaining how the resists would work. This was best explained with a mini paper example.
Jan’s foot pattern and then her mane resist drawn out.
Jan started laying out wool about the same time as the others but she had much more wool and resist to cover.
she did a lot of rubbing but I didn’t get a picture of that and then she started rolling. By the end of class, the slippers had started to felt well but were not up to fulling yet. So now the next step is for her to visit me over the holidays and finish the slippers. I think this means I need to sweet-talk one of my men to bring the dryer into the studio. I am not sure where it got stored. I am sure letting the dryer do some of the manual work is a good idea. Maybe we can work on the dinosaur bag while it rolls around and around. These slippers should be good for sorting out what needs to be tweaked to make some more solid boots. These are Corriedale but we would both like to make some good boots out of Finnish wool. Have you made booths? What wool did you use?
As a measure of how much effort and concentration went into these, Jan only had about 20 or so pictures to share with me. All the pictures of Jan’s work are hers except the last one of Jan rolling.
As you’ve heard, here at the blog we did a Christmas card exchange. Well, not necessarily Christmas but I went with that theme.
I worked out my idea in my sketchbook and didn’t (I was sure I had) take a picture and now that pad has gone AWOL. It was simple trees. OK, I can use my computer to make a triangle by using the draw a shape thing in my wordprocessor program. No, problem. Now just drag it bigger to make the start size……nope triangles do not do that. I switched to publisher and with much fuss and bother and guidelines, I added the same amount to all sides and made a larger one.
I have already unpacked my stash of prefelt and put it into draws just like I was an organised, neat and tidy person. Well, that will last until I get everything else out of boxes and have to find a place for it all. Anyway, I got out the red and the white. seemed like appropriate colours. the red for the background and the white for the trees.
I wet the prefelt and shrunk it down to the size I wanted. checking against the picture I drew in my sketch pad.
then I cut the 2 sizes of trees the small ones will get needled onto the background and the big ones will be wet felted.
No jumping forward, I didn’t like the white trees but again I was sure I had taken some pictures here. Clearly, I was doing something wrong. I had my bag from the felted sheep glass handy and started adding curles. See the messy tendancies do come in handy sometimes. Now they are much better, textured, colourful and happy.
Here are the triangles ready for their turn felting
Again wite was do stark so I added some wool to them first. Blue, Green with sparkle and White with silk.
and all done and as shrunk as they can go.
I then added some curls as garland and embroidered some stars at the top so they look more like Christmas trees and not just random triangles. sorry no single picture of the green one.
For these trees, I added some pins and some gold string so they could be pinned or hung.
I thought about adding some baubles but |I thought they looked crowded on the small trees. They finished at about 2 inches I think.
Next, I pinned the trees to the card. I was going to send it this way but the packaging would have been too fat and turned it into a parcel and doubled the shipping. I took them off and put them into the envelope separately.
Usually, I make my cards postcard by ironing a print of the back of a paper postcard to it using fusible web. But I couldn’t find it. I printed out a card and tried to sew it onto the front of the card. I tried 3 times to do it and then gave up. I stuck some self-stick velcro dots onto the card and pressed the felt to it. No picture of that either as by then it was late and I wanted it in the envelope and ready to take with me to work the next day. It managed to fly over to the UK in record time and arrive safely at Lindsay’s house.
Lindsay kindly sent me a picture of what it looked like on the card.
This year, our merry (see what I did there?) group of crafters/blog writers decided to do a card swap among us. It didn’t really have to be Christmassy, it just needed to somewhat resemble a card.
The idea is to overthrow the ephemeral notion of a Seasons Greetings card on its head and make something with your own hands that a fellow crafter will appreciate and want to keep.
I was partnered with Hélène, felter extraordinaire, so I was naturally stressed out. I knew my card wouldn’t begin to compare with anything she created, but I put those pesky defeating voices aside and got to work.
It took me a few days to come up with a jolly (ha, again!, I crack myself up) theme for the time of year, and decided to join two strengths of mine: pattern search and knitting. Off to Ravelry I went browsing, and settled on Stay Cool by Drops Yarn.
First page results on Ravelry for the term “Snowflake.” Pretty, but not very card-like…
Stay Cool is meant to be a pot holder but I adapted it to be slightly longer on two sides and kept the back plain so I could attach it to cardboard. In hindsight, I could have knitted both sides in pattern, but at this point I was still a little fuzzy on my end goal. (Sorry, Hélène!)
I used my own hand spun yarn because I wanted the “card” to be as handmade and personal as I could possibly make it. If you want to get geeky with me with specs, I used white Shetland spun woollen from pencil roving for one yarn, and an Alpaca/Polwarth blend spun worsted for the brown.
Not unsurprisingly, the back came out “longer” than the front, despite having the same number of stitches. I should’ve predicted this because fair isle knitting constricts patterns a bit, but alas, I didn’t remember.
Now came the daunting part for me: wet felting. I wanted the end result to be a fuzzy and smaller version of the knit, so off I went to the kitchen sink armed with bubble wrap, soap and very hot water.
If you think this felted right away, you’d be wrong. Nothing happened for the longest time! In fact, I nearly despaired because my idea was to fuse the back to the front, and that never happened. Apparently, knitted jumpers accidentally machine washed only become tiny versions of themselves if you never intended for them to shrink – Sod’s law!
After what seemed like four years of wet felting, here’s what my snowflake looked like:
Hopefully it still looks like a snowflake to the untrained eye. I punched holes onto the thickest paper I could find and attached the wool to it with string, because I want Hélène to be able to take it out and use it as a coaster (or something else functional of her choice). This way she can always have a laugh every time she reaches for a hot drink and sees my meagre wet felting technique.
The ink I chose has gold shimmer in it, which I found quite Christmassy. I hope Hélène can forgive the “Xmas” instead of the word proper – I ran out of space.
(Aaand, a little confession: I cheated and sent my card swap partner something extra… ‘Tis the season, after all!)
That’s it from me. I have a newfound respect for anyone who takes the never-ending task of wet felting. What advice would you give me for future soapy endeavours?
It has been a busy few weeks getting everything ready for our Guild Sale. Now that’s done and over and I am sure Jan will show you lots of pictures. For me, I found the time to finish embellishing my visor mirror cover. For those that don’t remember the cover on the mirror of my car visor was broken when we bought it. When you flip the visor down while driving the mirror is there. It’s distracting. I decided it needed a cover. Nothing so simple as making a plain piece of felt to match the visor. That is much too easy. Here is a link to my last post showing how I created the cover. https://feltingandfiberstudio.com/2023/08/31/a-cover-for-my-visor-mirror-part-2/
I have continued on with my stitching. I wanted to use lots of different open background stitches. I didn’t want to cover up anything. I started working on the flower that looked like a superhero in flight.
I thought I better tackle the head next to stop it from looking like a person. I broke it into 2 areas. I think it worked well
Then I did this interesting stitch in the purple. Make 3 parallel lines and then come up in the middle go around all the threads and back down in the middle. I thought it was effective.
Then when I had just about finished everything else I decided to add 3 dots. I am not sure it looks like a flower but it looks a lot less like a superhero.
Next, it was this leaf. I thought I would do small stitches and go all the way around the middle but after a short distance, I didn’t like how the small stitches looked following the line exactly. I ripped them out.
I decided to use more threads and larger stitches and only follow one side.
And around the outside.
I liked it and I am getting very good at outline stitch. It was still a little plain so I added some colonial knots. Also in between I added some stitching to the small leaves. You can see a few in the picture.
I finished off this leaf and was thinking I was done, but…
My hubby said I needed to do the sheep and give him eyes and a nose. I had been going to leave him minimalist. It took 3 tries to get his eyes in the right place and the same size.
Now for the finished piece.
I had thought of cutting off the wonky outline but decided against it. Here it is installed. I used the hook side of some stick-on velcro dots, to attach it to the visor. It is a bit big but if it had been smaller the velcro dots wouldn’t have had a flat surface to stick to. Anyway, I like it and I will definitely do the wet wool technique again.
Hi folks. It seems I am running behind as I didn’t know it was Tuesday already. So lots of pictures and not much text today.
My guild Sale and Exhibition is in a couple of weeks and I promised a door prize of a lantern. In reality, it is a glass vase with a cover and fairy lights inside. They are very pretty. You want them to look interesting when they are not lit as well as when they are lit.
So I started out to make a scene. I used bats to save layout time.
water
ground
sky
And then wrap it around
and then I decided it was still boring so I should add a little village.
I thought the white was too bright so I went will black. I want a hint of a village in the distance. I did one on each side.
In retrospect, I should have gone with white. There would probably have been enough migration of fibres to dull it down a bit. As was predictable if I had thought about it they disappeared. I will shave it later to see if I can get a hint of where they are and add them back. but it can wait as after felting I decided it was way too thick for a lantern. I am definitely out of practice felting. I do like the scrunched-up water and flared sky though.
Try again. this time I am using a nice blue merino top and some orange and gold silk lap. the silk should be interesting enough on its own.
A nice thin layout
and some lovely silk lap
and done, here they are together, silk never shows as nice as it is in a picture.
The light forme the fairy light shines through nicely even with the light on
Much better than the first one
so that’s my adventure in felting this week. I hope you like it, I hope the winner likes their prize.
September has been a busy and exciting month in contemporary textile art (specifically felting art) in Ireland so I thought I would feature what I got up to, I will call it my September Adventures.
Weather wise, the month started as we hoped it would continue (it didn’t by the way) with a return to fine warm weather – something we had not seen since last June. So I took the opportunity to visit our National Botanical Gardens (https://www.botanicgardens.ie/) which are situated on Dublin’s north side. The gardens (there’s free entry, if you ever visit Dublin, Ireland) opened in 1800 and are an oasis of calm with restored glass houses, magnificent specimens, bee hives and, of course, a tea room. There’s also a pedestrian access to the historical cemetery next door which I suspect is not seen too often. Glasnevin Cemetery also houses a genealogical archive for anyone wishing to trace their Irish ancestors (https://www.dctrust.ie/genealogy/home.html).
But, I digress. Let’s go back to the gardens. My visit coincided with their annual exhibition ‘Sculpture in Context’. The exhibits feature artworks in various media including ceramics, wood, metal. I decided to focus purely on the textile element of the exhibition and to photograph any pieces I came across as I wandered around. I was aware that some of the members of Feltmakers Ireland had pieces accepted for the exhibition; Clare Merry (http://www.merryland.ie/index.htm) an exceptional artist who quietly creates her pieces was featured. If you would like to see some of Clare’s work please check out her website, which, she tells me, is not really up to date, or Google her and feast over the images; Fiona Leech(https://www.instagram.com/feltathome/?hl=en) had three beautiful pots which were originally housed in the cactus house. Annoyingly two of the three pots were stolen within a matter of hours of their arrival and the remaining one was moved to a safer spot in the garden’s gallery. I thought I would show you the three pots as they were originally grouped together.
Fiona Leech’s three pots (source: Fiona’s Instagram page)
I searched but could not find Leiko Uchiyama’s beautiful work but here is a link to her website if you would like to check her out: https://www.leikofelt.com/my-felt-work/ I found two other exhibits from members of the guild. Their featured work while not through the medium of felt were equally stunning. Congratulations Mel Bradley (https://melbradleysilks.ie/) and Mette Sophie Roche (https://metteroche.com/)
I put together a slideshow of my textile finds in the gardens which I hope you enjoy.
Mette Sophie Roche; The vital matter of Fungi
Mette Sophie Roche; The vital matter of Fungi (detail)
Mette Sophie Roche; The vital matter of Fungi (detail)
Fiona Leech; Drought
Fiona Leech; Drought (detail)
Frances Crowe; Terrain
Frances Crowe; Terrain (detail)
Frances Crowe; Terrain (detail)
Claire Merry; Floral Path
Claire Merry; Floral Path
Ella Quinn; It’s nothing but a dead fish
Niamh O’Connell; Cocoon
Mel Bradley; Grasses
Mel Bradley; Grasses
We had our first meeting after summer in Feltmakers Ireland and as usual the committee put an incredible amount of preparatory work into making it successful. It was a busy morning as everyone beavered away felting flowers to create a tapestry as part of the 20th anniversary celebration for the guild. Much to everyone’s delight, the guild’s founder Elizabeth Bonnar joined us. I thought I would feature Elizabeth here as without her it is doubtful that there would be such a vibrant community of feltmakers today. Here she is with her granddaughter and with the committee.
Feltmakers Ireland founder Elizabeth Bonnar and her granddaughter
Feltmakers Ireland committee with founder Elizabeth Bonnar (3rd from left)
Here are some photos taken on the day.
Feltmakers hard at work
Breda and Elizabeth hard at work!
Lots of flowers were made that morning by members
Suzanne, Breda, Deirdre and Elizabeth catching up
The finished tapestry was revealed at Feltmakers Ireland ‘Bountiful’ juried exhibition which opened on 30th September.
Feltmakers Ireland members: The Floral Tapestry to celebrate 20 years.
The exhibition also saw the launch of the new book “Exploring Irish Wool for Feltmaking” The book is the product of a collaboration between many members of Feltmakers Ireland guild, sheep farmers, shepherds, shearers and suppliers and not forgetting the various washers and carders who took the raw fleeces, converting them into usable fibres for testing. I think this approach was quite unique and it will certainly be a worthwhile and useable addition to any textile maker’s reference library. Understandably it was a huge project so congratulations are due to all, especially Annika (Berglund), Breda (Fay) and Sinead (Doyle) who collated all of the findings into an invaluable resource on Irish wool. It’s so full of well written practical advice and it was made extra special by the presence of one of our Government Ministers, Pippa Hackett an ardent supporter of the project, who officially launched the book and the exhibition . Here is a quick look at the contents page to give you an idea of the scope of the book:
Exploring Irish Wool Contents page
An added bonus is that feltmakers/wool artists can now make direct contact with numerous artisanal suppliers so there is no excuse for any of us not buying closer to source and of course for anyone overseas who wishes to use Irish wool fibre in their work purchasing from source.
I hope you have enjoyed my September adventures. It has been an exciting month. Once again I would like to thank Feltmakers Ireland and their hard working committee who work tirelessly to maintain this vibrant community – it makes such a difference that, as textile artists, we can gather together and create regularly. I take my hat off to Elizabeth Bonnar and her decision to found Feltmakers Ireland twenty years ago; the catalyst for lifelong friendships, masterclasses, collaborations, exhibitions, networks and travel.
To complete September’s birthday celebrations, I thought I would produce a slideshow of the Bountiful exhibition which is running for the month of October in Phoenix Park, Dublin Ireland. I took photos on the day so I apologise where the light may be shining on the artwork. There are over 30 pieces of art and it will give you an indication of where Ireland’s vibrant felting community is at in its journey. I hope you enjoy it!
Annika Berglund: Variations on a Green Theme II
Astrid Tomrop-Hofman: Positive Vibes
Deirdre Crofts: A good Day’s Catch
Clare Brophy: Share the Bounty!
Helene Dooley: Visualizing the beauty of the Sunflower Field
As much as I enjoy felting and working with natural fibres I also love mixed media work and getting creative with heat manipulative, man made fabrics. It’s all the more enjoyable when you ask at the start of a class if anyone hasn’t worked with a heat tool or a soldering iron and you see the hands go up. You just know there are going to be some “ooohs and ahhhs” and huge smiles coming from excited students once they get melting their fabrics! Last week I was invited to teach a group at Stainfield Village Hall, just a half hour from home. The groups organiser, Clare, had attended my Layer, Stitch & Burn workshop a few months previous in Sleaford and had so much fun creating this sea shell inspired piece she asked me to repeat the class with her group.
This technique was developed by the Canadian mixed media textile artist Susan Lenz. It involves layering synthetic fabrics on a background of acrylic felt before adding free motion stitch using cotton, viscose or rayon threads. The last stage involves “melting” the background fabric with a heat gun to create a lace like effect as seen in Susan’s In Box and Stained Glass Series
You would imagine all acrylic felt would melt and therefore be suitable for this process but I’ve discovered the hard way that’s not the case! If you’re going to try this technique I would suggest testing your background felt before stitching as some simply discolours and singes rather than melting! Having been caught out once I now order a sample before purchasing by the metre. My latest supply came from Empress Mills and melts a treat! In the workshop, although everyone is given the option of working with simple geometric shapes, I like to encourage students to think outside the box (pun intended!) and create a piece that’s unique to them. In the past I’ve had ladies using fossils, gum nuts leaves and all sorts of other motifs as their starting point for a design as you can see from these three examples…..
Working with a more organic design is also great for those who haven’t done free motion before, or maybe are not as confident with it, as your stitching doesn’t have to be precise. In fact a “sketchy” approach, similar to the leaf design, looks great!
At Stainfield not everyone got finished on the day but I’ve been told that, at the groups meeting this week, not only did they finish off what they had started with me but most of the ladies also began working on a second piece! The size we worked to was approximately 23cm square so it fits the square IKEA box frame.
Another heat manipulative workshop I teach is the Lutradur Leaves. This Wednesday evening I loaded the car and drove up to East Ayton near Scarborough, a really beautiful part of the country, ahead of Wednesdays class for Anita Cassidy and the Textile Experimental Group. I knew we were going to get on like a house on fire when I heard the name of the group! The village hall was very light, airy and spacious, perfect for this type of class. The group were encouraged to bring some leaves to use as inspiration and I supplied sketches for those that wanted them. Everyone worked with a medium weight 70gsm Lutradur and once again the ladies produced some fabulous work which sits nicely with their current theme of “decay”.
Between my last post and classes starting up again after the Summer I’ve done a bit of dressmaking, or “top” making to be precise. I’ve got a very simple linen, sleeveless, dart-less, top that I really like and I decided to clone it, adding darts to make it more fitted. Not having made anything with darts before I figured YouTube would be a good move….and it was! I tried the pattern out with a very cheap floral fabric from Boyes. I think it’s viscose, it’s not silky but it shifted constantly while I was working with it so I’m amazed it turned out wearable! The “palm tree” fabric is 100% cotton and was so easy to use, it’s definitely the better of the two.
The following week I had to create a wet felted shoulder bag to promote a forthcoming workshop. In the past I’ve sometimes deliberately used colours that I’m not that keen on to ensure I keep a piece as a sample and not be tempted to use the item myself! This time I did the opposite and carded Dream and Granite Corriedale slivers from World of Wool’s Hefty Hues range to make a bag that won’t be living in a box until the workshop in the new year!
I’ll finish with a quick update on the Making Waves fish. Jane has made this fun Pink Punk fish complete with studs, chain and wire specs…..
…..and Pip has almost finished her Scorpion fish. I’m told there’s just a bit of needle felting detail to add. Producing work like this it’s easy to forget that neither of these ladies have been felting for long.
I haven’t managed to get to the Waltham meetings for quite a while so I’m looking forward to catching up next month and seeing what else the members have been up to.
This last weekend I taught a Felted Birdhouse Class. A group of ladies and one daughter. We were at one of the lady’s houses, working outside and the setting was lovely and the weather was very cooperative.
Here are all the embellishment fibres set up on the deck.
And here they all are working away on laying out the fibres for their birdhouses. although some wanted bird feeders and some thought a plant might go well in one. That is why it is only a sort of birdhouse class. everyone chose a gourd except we morphed one into a teardrop shape.
They had lots of fun deciding on embellishment fibres and adding them to their pieces
This one looks sort of dull but it is the green Merino and multi-coloured tribal nylon mix from the world of wool.
This one was all silk I think.
This one is sari silk waste
This was just the beginning it had lots of stuff on it in the end. You will see it later.
This one had lots of the sparkly triloble nylon.
Then of course there was the rubbing and rolling
And then the scrunching and throwing to get it well filled.
Here everyone is with their finished pieces. They have balloons inside to help them have a good shape when dry. You will notice one was cut in half to become 2 plant holders but the one half is looking very much like a hat.
I got sent a couple of pictures of what they looked like now they are dry. I was right it did look a lot like a hat. the class was Sunday and today is Tuesday( Wednesday when this goes up) so not much time for them to get me pictures. If I get more I will edit them in.
It was a fantastic warm September day and a great way to spend it.
Summer is a busy time for me for sales, exhibitions and other, non-fibre related things, so when I looked back at the actual felt-making I’ve done since my last blog here in June, I realised the answer was ‘none’! Oh dear, this could be a very short blog. One thing I have wrestled with for some time, though, is whether to sell photographic prints of my felt pictures.
I have slightly (OK, very) purist tendencies when it comes to felting and I’ve previously resisted the idea. Textiles are 3D and photographs are essentially 2D. I do sell photographs, but of my beautiful local area. I’ve always made an exception for greetings cards, and the number of people who’ve bought cards with photos of my felt pictures and told me they’re going to put them in a frame has finally worn the purist down.
I had an exhibition in a local gallery called ‘The Fishslab’ in early August. It’s a lovely gallery and, as the name suggests, used to be a fishmongers. It has a huge sloped marble slab in the window that was used to display and sell the fish while the marble kept it cool. The front window lifted up so customers could see the fish from the street and, presumably, buy them through the window. Here’s a photo standing outside the gallery from a previous exhibition where you can see the marble slab that is the base of the window display and the handles on the window.
So, I ordered 12 small prints of felted pictures I’ve previously sold, printed on foam board, and included them in my week in the gallery. The prints are 20 x 20 cm.
20 x 20 cm photos of felt pictures on foam board
Priced at £20, I sold 9 of the 12 in the week, so I had to conclude there’s an appetite for these. About the same time, the print company I use for my photos had a super-special offer on 60 x 60 cm photo canvas prints, so I ordered 5 of those featuring felt pictures as well.
I’ve just spent a week in the beach hut gallery I sometimes have my work in. So, I displayed the canvases, along with my felt pictures and photo canvases.
It was a quiet week and although there was a bit of interest, I didn’t sell any. One thing I did notice, though, was that people kept touching the canvases to see if they had a texture. Annoying, but interesting. Happily, I took a commission for a felt picture (I’ve blogged previously on my mixed feelings about this too, you can see the link here, if interested https://feltingandfiberstudio.com/2021/09/20/do-you-take-commissions/) so I didn’t mind the otherwise low sales but I’m still left feeing a bit uncomfortable about printing photos of textiles. I will see what happens in future sales / exhibitions.
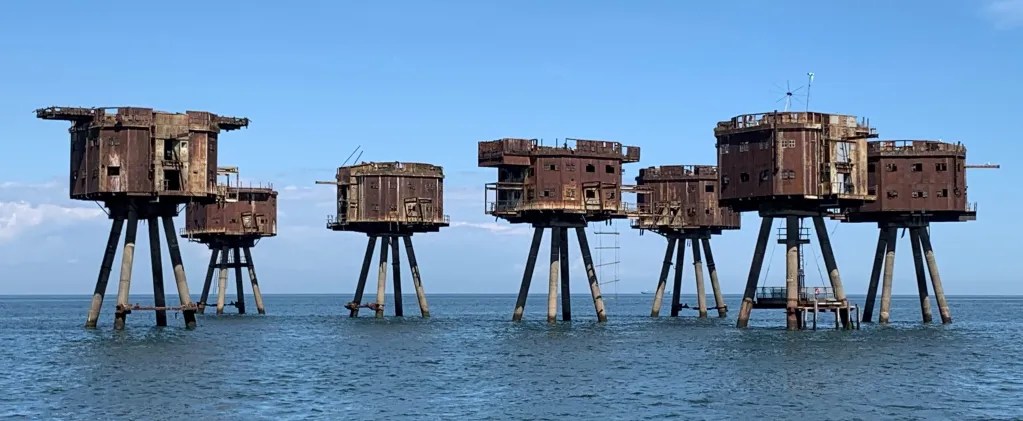
I’ll finish now with another of the many things I’ve been doing recently other than making felt. As I’ve mentioned more than once before, I am lucky enough to live in Whitstable, on the coast in south-east England. It’s a beautiful place and we get a lot of visitors on day-trips as well as longer vacations. There’s a Thames sailing barge called The Greta that in summer moors in the harbour where I often work. Built in 1892, she used to carry grain, malt and building products, and then beer, up the Thames estuary into London. She also took part in one of the most famous operations during World War 2 as a member of the makeshift flotilla that rescued thousands of troops during the evacuation of Dunkirk in 1940. Apparently, she’s the oldest active ‘little ship’ from that era. Anyway, some of my harbour colleagues go on an annual trip on the Greta to visit another World War 2 site, the Maunsell Forts, which are about 6 miles out to sea. These were part of a world war 2 sea-defence system designed to shoot down enemy aircraft that would fly up the Thames estuary from the coast to bomb London during the war. They were later used as a base for pirate radio stations broadcasting in the 1960s. Previously I’ve refused offers to join my friends on this trip as I’m a terrible sailor and believe I could feel nauseous in the bath. This year my desire to do the trip overcame my reservations and we set out on the calmest, most lovely day.
It was a fabulous day and I will definitely do the trip again. The final picture here shows the harbour village where I sell my work. I’ve never seen it from this angle before.


