I bought a new to me car. The visor mirror cover was glued shut for some reason. When we tried to unstick it, it just came right off. Maybe it had fallen off so they glued it back on? I don’t know. The result is when I put the visor down I have the mirror. Even though you are not really looking at the mirror, it is distracting while driving. Must be because I am so beautiful I can’t resist looking at myself. LOL It is actually very hard to take a picture of a mirror and not be in the picture.
My thought is to make a felt cover for it and velcro it on to hide the mirror but I could still remove it if I needed the mirror.
I measured the mirror and a small amount around it to get the finished size I will need. I think I will add a little more.
Then I thought why not try Ildi’s method of felting with outlines and wet wool? I have some pencil roving and lots of wool and it’s a good sized to try it out. Here is a link to one of Ildi’s posts so you can see what I am talking about. https://feltingandfiberstudio.com/2022/06/27/felted-rug/
So far I have measured and done a couple of sketches of possible designs. these are smaller than they need to be but that is the size of the paper. I will have to find one of the larger sketchbooks to do a final design and then try to use the computer and the printer to enlarge it for shrinkage.
Aaaand, that is as far as I am. The plan is to have it for my next blog post, but we all know about the best laid plans of mice and men. I have my fingers crossed. It’s going to be a busy week.
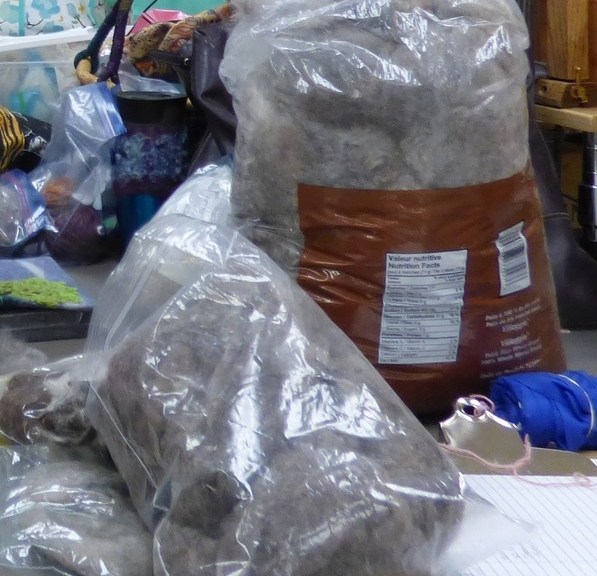
Thankfully I have friends with grey wool. Jan and Bernadette found me some grey in many shades so I could complete my picture. I explained to both that I only needed a little bit, a handful would be more than was needed. I just needed it for a few rocks on my picture
Picture of wool
picture of me taking a picture
I didn’t take any progress pictures of the rocks. I was busy poking and talking.
And finally the finished picture, or so I thought. when you take a picture, you can see so much more sometimes. I really don’t like the roots over the rock. I had tried putting a rock in front of the tree but that looked worse. So, I will take the roots off and continue from there.
I managed to take the roots off and played with the rock some more and now I think it really is done.
I was looking around my studio wondering what to write about in this blog. I was remembered Ruth Lane’s recent comment in her blog here about using up supplies. I have a carded batt of merino / A grade mulberry silk from World of Wool that’s been kicking around for a while. I can’t remember if I bought it for something specific that didn’t get made or if I bought it on spec. I was interested to find out how it felted and what I might do with it so I decided to make a small test vessel.
I cut out a circular resist using a small mat as a template then started laying out the fibre outwards towards the edge. Apologies that these pictures are mostly white on light colours – I was thinking more about the making than the photography. I laid the second layer in a circular pattern before flipping it over to smooth the overlap onto side 2. After 2 layers on the second side, I flipped back and laid 2 more layers on side 1, followed by 2 more on side 2.
The resist & its templateFirst layer side 1 startFirst layer side 1 completedLayers 1 & 2 side 14 layers each side, ready for wetting out
After wetting it down I spent a lot of my time working the edge by pulling the voile over the edge so I wouldn’t get a ridge around the middle of the finished vessel. It felted quickly and I was soon able to start fulling – initially without removing the resist.
Working the edges FullingWorking the felt
Once I’d cut out the resist I found, in my vast collection of miscellaneous wooden objects, that the handle of a wooden pestle (as in mortar & pestle) was the perfect size for getting inside the vessel and working it from the inside.
I spent a while fulling it as I wanted it to be smooth and very firm.
Wooden pestle handle for fullingPacked & dryingvessel on original templateThinking about the green colour insideFinished merino / mulberry test vessel
I packed the vessel with strips of recycled bubble wrap that I keep for this purpose – you can see it green inside. Looking at this green bubble wrap made me wonder if I could make a vessel with a coloured interior but retaining the pale colour outside. I thought maybe if I used silk rather than wool to add colour I’d get less colour transfer, so I thought I’d give it a go.
While pondering this, I decided to try using the same resist as the test vessel but to make 2 small bowls rather than one vessel: so, cutting it in two around the middle rather than making a hole at the top to remove the resist. I dipped into my big boxes full of second-hand silk scarves bought in charity shops and chose a plain turquoise and a patterned blue one.
Carded merino / mulberry silk batt & two silk scarves ready for recycling
I put a circle of silk on the resist and decided to run a small line of coloured merino tops around the edge: partly as I was interested to see how it would look and partly as I thought I might not know where to cut when I was ready to remove the resist and separate the little bowls – I’ve made that mistake before!
I put a circle of the blue patterned silk on the second side. The merino and silk fibre layout was the same as the previous vessel. This time I also remembered to do the circular layer first followed by the radiating layer – I’ve learned that one before and obviously temporarily forgot for the previous vessel. It makes following the resist with the circular layers much easier and I prefer to try not to overlap that layer if possible – again it reduces potential ridges and produces a better join if you only overlap the radiating layer, in my opinion. I’m sure some of you will disagree but that’s one of the many things I love about wet felting: with experience everyone works out the techniques and tools that work best for them.
Process shots of the bowls
I was interested that I could see quite a lot of the inner colour throughout. I quickly began to suspect this was more about the amount of dye bleeding from the turquoise silk as about seeing the silk through the wool. I was getting a lot of turquoise in the felting water.
Again, I fulled them thoroughly. During the fulling, I decided I liked the silk on the outside better than the inside so here they are, still wet.
Bowl insidesBowl outsidesThe finished small bowls
And here are the 3 items. You can see how green the wool of the little bowls is compared with the vessel. I’m pleased with the bowls’ blue rims – I like this effect – but the vessel is my favourite. In each of the test pieces the fibre has felted beautifully: it’s very firm and extremely light – it has an almost papery quality about it that I find really appealing.
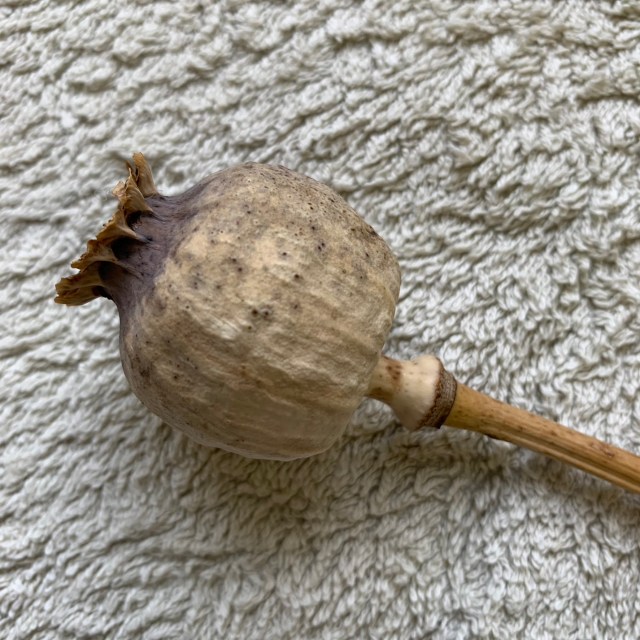
My imagination is now firing about what I could make next with this fibre. I have a dried poppy seed head sitting in a vase next to my desk. The felt reminded me of the texture and colour of the seed head. I’ve felted poppy seed heads before – one of my favourites. Another thing I have in the studio is some vintage cotton lace I was unable to resist when I saw it in a local second-hand shop.
Dried poppy seed headVintage cotton lace
I thought maybe that the lace would add a subtle surface texture so why not have a try? This time I made a small square sample using just 2 layers of the wool / silk mix batt with strips of lace in parallel lines.
Layout: fibre and laceFinished squareClose up of surfaceTest square of the batt with strips of vintage lace
Although it’s subtle, I really like the effect. As you can see in the close up shot, the batt has quite a bit of vegetable matter which in this case adds some interesting specks, enhancing the natural look.
I was running out of time but decide to start the poppy seed head. The merino fibre length in the batt is very short which makes the layout quite slow but very precise. In the first photo you can just see the strands of lace which I’ve laid out on top of 4 layers on the under side and are waiting for me to finish the final 2 layers on the top side before bringing them over.
The second photo shows how far I got yesterday before I had to stop. This is a multi-resist piece that will take a while to make. I’ll show it finished in my next blog.
I enjoyed letting the fibre lead my imagination in what I might do next. I’ve done mostly production felting recently – making multiples of things for shops and sales – so it was great just to see where things led me and enjoy felt-making for the sheer fun of it. I’m looking forward to getting back into the studio soon to finish the poppy seed head.
In my last post I mentioned a few of the projects I was working on with the “Making Waves” theme, along with other members of the Waltham Windmill Textile Group. I’d begun work on a 50cm x 90cm felted wallhanging inspired by the markings on large stone slabs on the beach at Seahouses in Northumberland.
Having recently bought myself a drum carder I carded a variety of left over bits of fibre, mainly blues, greens, yellows and neutrals, to make my background and laid them out with off cuts of hand dyed silk fabric, scrim and large nepps. On the left is how it looked after felting and on the right is where it’s at right now. I’ve added synthetic sheers, machine wrapped cords, hand and free motion stitch and in some areas I’ve heavily machine stitched to push them back and encourage the adjacent areas to stand out. The original bottom left section wasn’t working with those silk circles so they were pulled off and replaced with some stiffened, rust dyed fabric circles, recycled from another piece of work. I’m calling it Going With The Flow because a) it’s inspired by a trip to the beach b) it has flowing lines and c) like most of my work its design wasn’t preplanned. It’s evolving as I work on it, adding bits in and taking bits off until it feels right. It’s got a way to go yet before I can call it done.
One of the other challenges within the Making Waves theme is to make a 3D fish and my immediate thought was to create what many would regard as an ugly fish but which I prefer to think of as a fish with shedloads of character……..one that would get noticed amongst a group of pretty fish!
AnglerfishTasseled ScorpionfishOyster Toadfish
Having typed “ugly fish” into Google I lost many hours over the next few weeks looking at images and some incredible videos of life deep in the depths of the oceans. Each new search revealed yet another fascinating species of fish, some quite honestly didn’t look real while some, like the Tasseled Scorpionfish were strangely beautiful. One of the weirdest I discovered has to be the Red Lipped Batfish. If ever there was proof we descended from the oceans this red lipped, whiskered fish that “walks” on its specially adapted fins has to be it!
Red Lipped Batfish
Last month the Waltham group had a day making felted fish, some are finished, others are still work in progress.
Lucy made a wonderful wet felted Puffer Fish adding recycled plastics, including pipette tips, wine bottle netting and glass beads with recycling symbols underneath, to highlight the plight of our oceans.
Sue is very new to wet felting but she’s taken to it like a fish to water (couldn’t resist!) and has made “Angry Fish”. I think he looks more sulky than angry but he’s terrific!
Barbara’s felted fish is still work in progress but looking great, as is her sketch book and fabric fish purse!
Originally I had intended to wet felt my ugly fish but, after all those hours of studying them and getting excited about what I was going to make, for some reason when I took out my carded Corriedale fibres I found myself felting a cartoon version of an Angelfish…….I didn’t see that coming! Her name is TroutPout and she’s approximately 33cm x 36cm excluding her fins.
I’ve been enjoying teaching 3D Seed Pod workshops recently using wire wrapped with Tyvek fabric so decided to make my Anglerfish from wire rather than fibre. It was only when I’d got the 60cm x 33cm framework made that I sat back and realised I’d gone past the stage where I had meant to start adding my fabric! Time for plan B…..maybe I could use wire mesh to give it “body”?
I looked for some online but hesitated as I wasn’t sure how flexible or suitable the mesh would be. Having put the fish to one side, a few days later I joined the Lincolnshire Textile group and at my first meeting I was offered a piece of silver coloured Sinamay. Sinamay is one of the most popular hat-making foundations. It’s woven from the processed stalks of the abaca tree, a type of banana native to the Philippines. I couldn’t believe my luck……..being silver coloured this off cut looked like wire mesh but wasn’t and if I sprayed it lightly with water I could easily shape it to fit and stitch it with aluminium wire to my framework. So this is how far I’ve got. I’m going to add a few more wire spirals and do something more interesting with the eyes. He should have menacing teeth but I might not go that far!
Wire frame Anglerfish
Another feature of next years Making Waves exhibition will be an Octopus’s Garden so once the fish are done it’s straight on to making lots of coral and a few Octopus. I’m loving this theme and could quite happily continue with it way beyond our event next year…….it has to be the most interesting and enjoyable we’ve had so far!
I have had this mulberry paper with leaves embossed on it for quite a while. I loved the paper but never used it for anything. It is fairly thick and the embossed portions are really thick. The question was whether it would felt easily to the surface. I tore out a single leaf and placed it over a small torn piece of green, short fiber merino batt.
The wool and paper were then wet down (sorry for the blurry photo) and I felted as I had on my previous paper samples, treating the paper as if it was fabric as in nuno felting. I wondered whether I would lose the embossed lines of the leaf, whether the paper thickness was too heavy to felt in easily and if it would felt differently than the thinner papers I had tried previously.
Here’s the end result. You can still see the leaf. It felted very easily and doesn’t seem much different than the thinner papers. I think if I had done a lot of wringing of the felt it would have distorted the leaf but I was careful to avoid fulling in that manner.
Hmmm… how can I use this leaf paper in a design? What would happen if I added ink or dye to the paper before felting? What if I dry brushed paint over the surface of the paper after felting? What else could I do to the surface to enhance the feel of leafiness? How would hand or machine stitching look on the surface? Will it be easy to stitch through? Any other experimental ideas for me? Obviously, more samples to follow.
Next on to experimenting with paper in my landscapes. This is the layout of wool and a paper birch tree. (This also works for my spring tree for our year long tree challenge.) The piece is pretty small and ended up about 7″ x 9″ after felting.
Here’s the piece after wetting down and curbing the edges a bit before felting. Again, I treated this gently to allow the paper to felt in.
Here’s the piece after felting. I plan to add some free motion machine stitching to add more interest in the tree and more branches as well. I will probably add a few more leaves to the tree as well and perhaps a bit of detail to the rest of the landscape. The tree worked well and the paper really stands out to make the tree the focal point of the landscape. I definitely need to do more experiments with landscapes and paper. How else could I use the paper besides tree trunks? How would scraps of green paper felt in to make foliage? What would a variety of colors of paper layered over each other and then felted look like?
I love asking ‘what if’ and trying out these ideas, which lead to new ideas and further experimentation. I haven’t even begun to scrape the surface with how paper and felt can be used together. I would love to hear your ideas for experimentation so please leave a comment with your “what if’s”.
This last Sunday I taught the felted lantern cover workshop that should have happened in December but was delayed. I was teaching at the guild I belong to, Ottawa Valley Weravers’ and Spinners’ Guild.
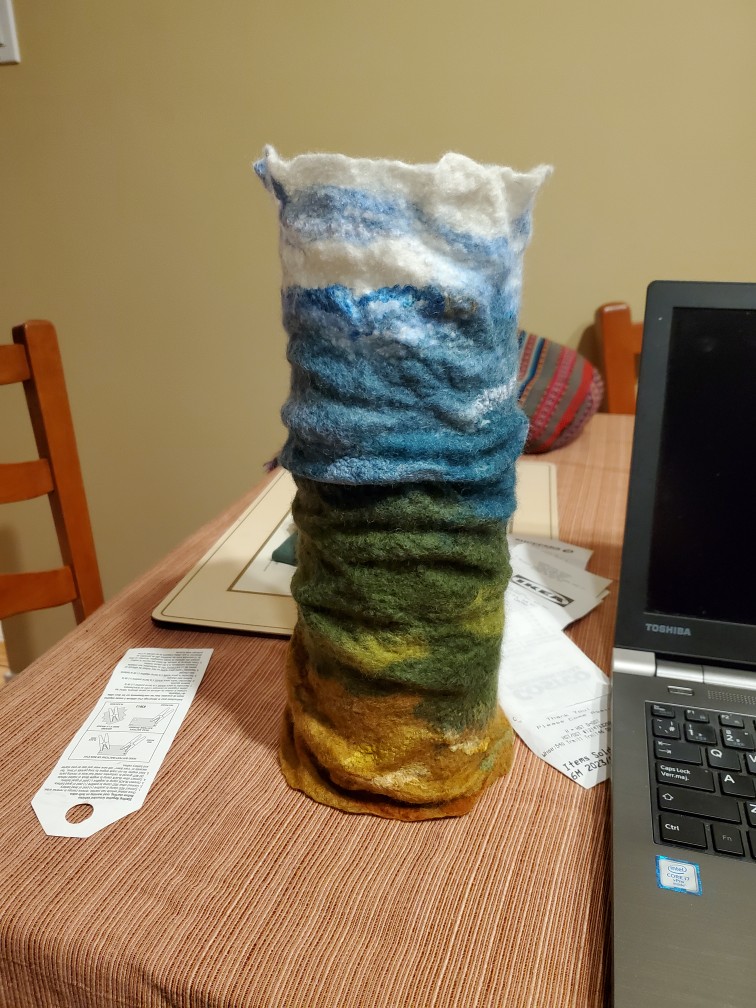
It was a half day class. the biggest challenge with the lantern covers is laying out the wool thin enough to let the light through but with enough wool to hang together. They don’t need to be strong because the lantern will give them structure. For this class, I provided a glass vase so everyone would be working to the same resist size. You can use a large pop bottle with the top cut off but I would add some weight to it to make it more stable.
I had 5 ladies for this class. I showed them two examples of covers I made.
Everyone wanted the longer one so they could add wrinkles
I only just realized we ended up with just 2 colour palettes. the largest part of this class is taken up with layout and decoration. We discussed how you can add things to the inside of the cover that won’t show when it’s not lit up but will show as silhouettes blocking more light. A couple of people decided to give that a try.
It is hard to see on the last one but she is adding white and blue silk hanky pieces to the wool. they disappear as soon as they get wet. They will show up again later. You can see them a little in the pictures below. I think everyone had a great afternoon.
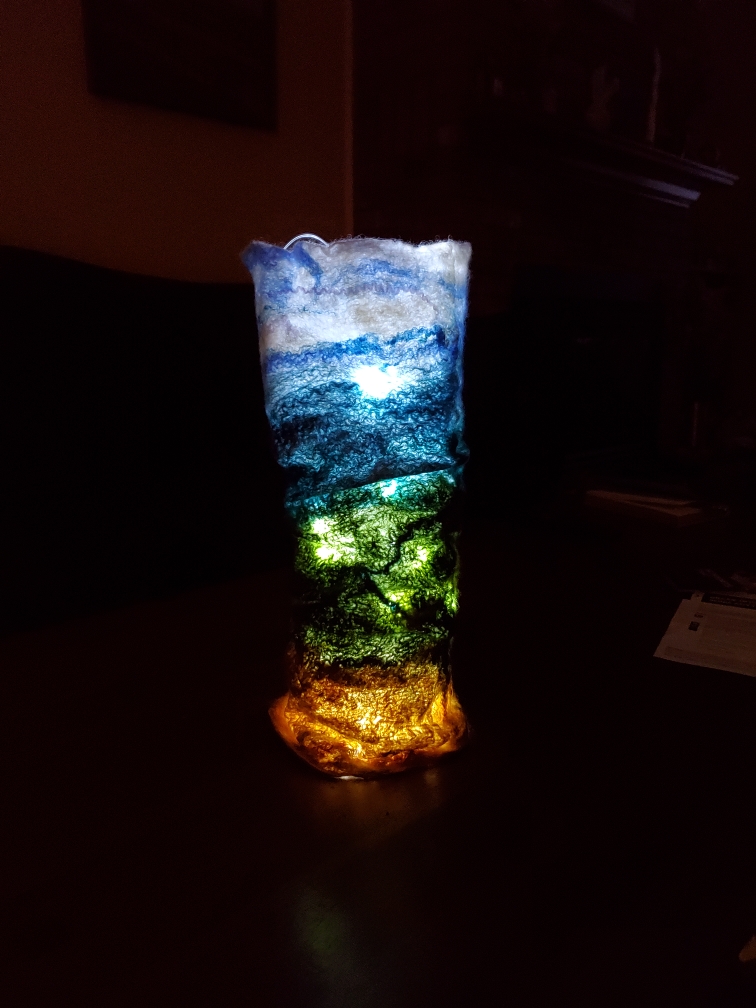
Two of my students sent me pictures of their covers dry and lit.
Christine
Janet
I hope the others will send me pictures as well. One was very thin and delicate and I think it will look amazing lit up. If they send them I will add them here.
I did have someone ask why I like to make covers rather than making them with a bottom. There are 4 reasons, first making a nice flat bottom that will allow the vase to stand properly can be tricky. A cover that is self-supporting needs to be felted much more or be thicker to be stiff enough. Having an internal structure gives you something to put the lights in and attach the controller to. And lastly, the container inside allows you to add water if you would like to use it for flowers.
The last couple of weekends I have been teaching some workshops. Last Sunday was Nunofelt Scarves. This was originally scheduled for December. But I caught whatever nasty head cold was going around, it came with a very annoying cough. I did a test for Covid and it was negative.
Anyway, after a couple of years of no workshops and a delay, it was good to be able to teach people in person again. I am still rusty when it comes to taking pictures during class, so there are not very many of this one.
Yesterday I taught Wet Felt Birdfeeder/house.
This is the picture we use to advertise it.
Everyone in the class chose to do a feeder( larger opening) in a gourd shape.
I remembered to take a few more pictures but I still had a hard time remembering.
Laying out the base wool.
Decorating
The finished birdfeeders. I think some of the holes may need to be enlarged. They have balloons in them to hold the shape while they dry.
All in all, we had a great time on both days. It was so nice to teach again to interact and answer questions and see people be amazed when it really does work.
I am continuing with my slow(very slow) stitching. I have accidentally done part of the first-quarter challenge. Last time I showed you my tree trunk. Next, I got some of my handspun to make the evergreen part.
I pulled a lighter green first. it was much too light. I switched to t a much darker green that works much better. it is a thicker yarn too, which I think works better.
The practice one worked out well so onto the good ones.
The trunk on this one ended up a bit fat but I don’t mind
And the third one
And this is how it looks now
I like it so far but I am not sure what to put in the blank corner. I thought maybe a branch so I did a test one. I may try to add some cones or snow. I am not sure what kind of tree it looks like. What do you think? what would you put there?
A wonderful 4-week holiday in Australia, Christmas markets and hosting lots of family visitors mean I’ve done very little news-worthy felt-making since my last Felting & Fiber Studio blog. ‘Production felting’ is my own term for making lots of similar things for shops and markets. I did a fair bit of this in November and December: mostly printed tea light holders, printed wool ‘pebbles’ and Christmas cards. These were my 2022 cards: handmade felt with hand-printing. I extracted the tree from a larger, royalty-free, public-domain image and added the heart before printing onto fine flat felt.
My 2022 handmade Christmas cards
I sold these through various outlets and sent a small number myself.
I’ve enjoyed making felt ‘pebbles’ for some years. Since learning to print on felt from Lindsey Tyson, I’ve been able to adapt photos of some of my Mum’s watercolour paintings to print onto the pebbles.
So, as I don’t have a lot of new stuff, I thought I’d contribute a few of my past makes and current thoughts as ideas for the first quarter and year-long challenges.
Alas, I left the base alone for a long time during a pandemic lockdown and it was attacked by moths. In a way, being eaten by moths was rather fitting: lifecycles in real life, but the moth holes meant I ended up cutting it up to make bookmarks (after some very hot washing). I did, however, recently sell the tree stump on its own and it now lives in Canada.
Pondering future projects for the tree challenge: I have a very tall, beautifully coloured ‘silver dollar’ eucalyptus tree in my garden.
The eucalyptus tree has potential for lot of other projects, including maybe using the leaves for eco printing onto felt. Eco printing is something I’d like to try, though whether I will get round to it remains to be seen. I don’t recommend any breath-holding for this.
Contemplating Caterina’s quarter-one challenge of making something practical that you can’t buy: one of my favourites is this case I made for my iPad mini. Nuno-felted with sections of recycled sheer silk scarf.
I know you can buy iPad cases but I like that this one is unique and fits perfectly without any fasteners. Because it’s an exact fit, the iPad stays put until you need it, then slides out easily. It’s getting rather battered now as I carry it around all the time so maybe it’s time to make a new one.
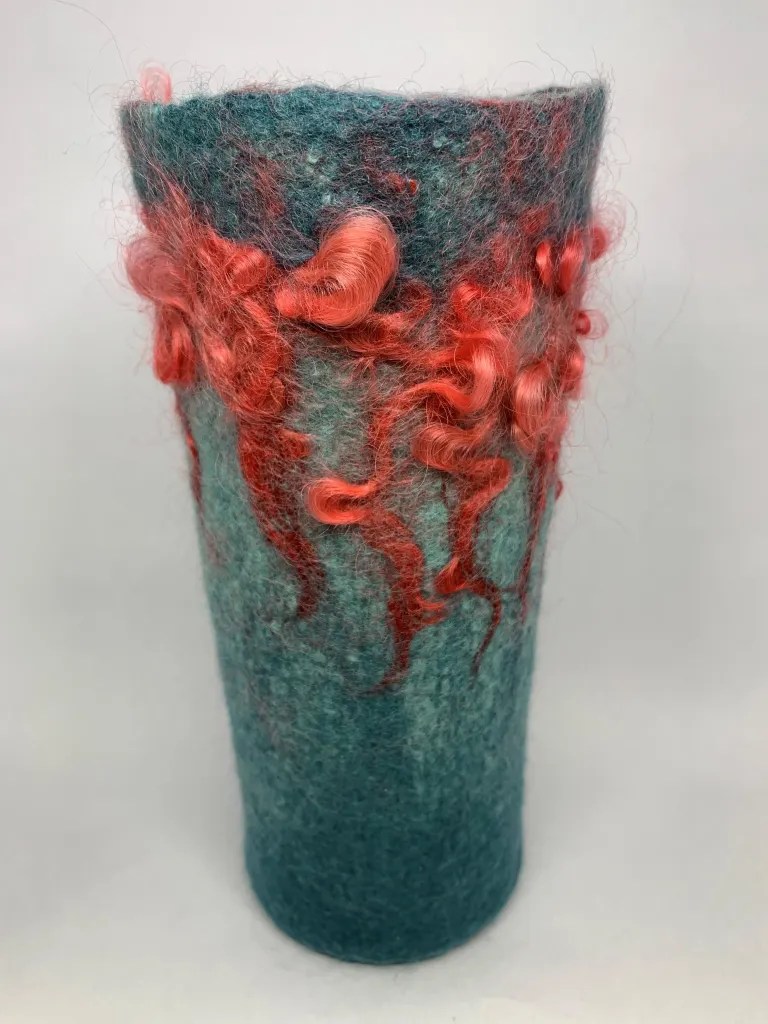
Felted vases and plant pots are also both unique and practical. Here are a few. I like that you can co-ordinate them to your décor, or to a specific plant or flower, or just go for colours and patterns you like.
And finally, here’s something that meets both last year’s challenge to complete some UFOs (un-finished objects) and this quarter’s challenge to make something that you can’t buy.
Here’s a pair of earrings that I started making a while ago using hand-dyed 14.5 micron Merino wool. I incorporated the earring post into the felt and some black sequin fabric inside using resists. These were inspired by the work of Aniko Boros and Judit Pocs.
The sequin section is more sparkly than in the photo
As you can see, I got quite a long way along, but while I finished fulling the one on the left, I stopped with the right-hand one in the pre-felt stage. I’m not completely sure why: probably it wasn’t quite what I had in mind. But it surely can’t take more than about an hour to finish that one, so I’m promising myself here that I will complete that second earring. The world will be minus one small UFO.
I hope I’ve given you a few ideas about different ways of taking on the challenges. How are people getting on with them? If you make something in response to these or any of our previous challenges, please do post your photos on the forum. We all love to see and be inspired by what other people are making.
I taught a new wet-felted bowl workshop recently so I decided I’d share my thoughts and ideas about developing and running that workshop in this blog.
I’ve taught a few different wet felting workshops over the years. I really prefer people to start with making good quality flat felt before moving on to other things, but sometimes I bow to the pressure to do something else. I try to remind myself that I’m not the felt police and neither can nor should be in charge of how other people choose to learn. (But, of course, there’s still a little bit of me that would like to be the felt police. If the vacancy comes up I will almost certainly apply!)
This time I decided to go even more 3D and do a basic bowl, working around a flat circular resist. I wanted the workshop to be suitable both for complete beginners and those with some felting experience who were interested in trying out a 3D make.
I dug about in the studio and in my photos to see if I could find some old bowl examples and came up with a few.
Bowls I’ve made in the past
I then walked my way through making a new sample bowl with a workshop hat on. By ‘workshop hat’ I mean focusing on what I think are the simplest techniques for inexperienced felt makers to achieve the best and most reliable results.
I decided on my layout: starting with a fanned-out layer from the centre then a second layer following the circumference of the circle. I intended the circular layer to overlap the edge as little as possible to reduce bulk in the middle, with the main overlap to connect the two sides on the ‘fanned’ layer.
I immediately realised I should have done the layers the other way around. It’s much easier to follow closely the edge of the circle if you can actually see it! I also realised it was better to start laying the wool around the edge and move inwards rather than starting at the centre and moving out.
I find it interesting how wearing a different ‘hat’ makes me think in a very different way from when I’m just making something myself. It’s a useful exercise.
I thought the sample bowl could demonstrate a couple of different surface design options so added some silk fabric, some locks and a little white wool to the grey area.
Sample bowl finished
It’s not the most beautiful bowl but it did its job. The collection of bowls then got me thinking about the size of opening. I like a small-holed bowl to look at but it’s not necessarily so useful and it is certainly harder to full, being difficult to work from the inside. I decided that participants could choose.
I gathered together a range of tools and smiled at the weird variety of odd things I own. This is only a small proportion.
Some of the ‘tools’ I use
Something these tools all have in common is that not one of them was designed for felt making. My most recent purchase was a job lot of 15 small plastic rattles bought second hand on eBay. Actually, these worked remarkably well, especially for the bowls with small openings, and the quantity would come in very handy if I was teaching a bigger group. That was £5.35 well spent.
The workshop venue was the Horsebridge Community Arts Centre in Whitstable. The Centre has a lovely workshop area: really light and spacious with good tables and lots of sinks. Ideal for our purposes. After welcoming the 4 participants and a short introductory chat I demonstrated the layout. Jenny, Suzanne, Jane & Ronn then chose their wools and set about their bowls.
I had decided to go for 2 layers of wool rather than 4 as I find most people lay the wool out quite thickly to start with. 2 participants had some felt making experience and 2 did not. All of them went for quite thick layers.
We wet the first 2 layers down before flipping to the other side as I find this helps to get the wool tight around the resist.
Next I showed them how to start to work the wet wool: paying lots of attention to the rim of the circle and encouraging the wool towards the centre to reduce the chance of creating an accidental ridge.
Once they’d reached the prefelt stage we did some rolling using just the bubble wrap and towel. Then they were ready to cut the opening & remove the resist. Jenny went for a small opening, Jane and Suzanne a slightly larger one, while Ronn had something more organic in mind. She made 6 cuts out from the centre to create a sort of flower / leaf shape that would hold a plant pot.
Plenty of chat, a little music and lots of elbow grease later ……..
….here are the ladies at the end of the day, delighted with their finished pieces.
And here’s a better view of their bowls (plus the one I’d made alongside them to demonstrate the different steps – 2nd left). I was very pleased not to see any accidental midriff ridges as I think a smooth transition between the two sides is one of the hardest things to achieve when starting to work with resists. The bowls were felted really well, which made my inner felt policewoman very happy, with just the plant pot holder needing a little more finishing at home to fit around its plant pot.
I always ask participants to complete a short feedback form at the end of the workshop. There’s a bit of admin then 3 boxes to complete: ‘what did you like about the workshop?‘; ‘what could be improved?’ and ‘any other comments?’.
I also make mental notes for myself along the same lines. So, here are my own observations
We had a really nice day. It was a lovely group with a friendly and relaxed atmosphere: everyone seemed to enjoy making their bowls. Judging by the feedback forms, people found me adaptable, clear, knowledgeable and helpful throughout the session so lots of positives there.
What could be improved?
The participants didn’t have any suggestion but for myself I thought the timing was a little generous. I’d allowed 6 ½ hours (including a lunch break). We finished slightly early so maybe 6 hours next time, though that may be different if there were more participants.
I realised I didn’t give enough thought to / instructions on the interior of the bowl design. Because my sample bowl had a small opening the interior isn’t visible so I forgot to think that bit through. In fact all the visible bowl middles were good but definitely more luck than judgement on my part.
My making a bowl alongside the participants worked OK but I had to work very quickly to get it to the next stage while spending most of my time helping and advising the others. It would have been simpler to have pre-prepared another bowl sample to pre-felt stage.
All in all a successful workshop with some notes for myself on how to improve a few things if I run it again. Hope you enjoyed your virtual visit to our bowl workshop.