I often work on the needle felting part of a project at home or at the guild. I end up with bags of possible fibres I might need and they usually hang around longer than the project. Every once and a while I have to gather them up and return all the wool to my studio. Then start again for the next thing I am working on. As you know I tend to work smaller, postcard and trading card sort of sizes. That means I don’t need a lot of any one colour. Somehow I always grab way more fiber than I need.
I keep looking at the little boxes of fibre that Ali Express and Amazon sell as part of felting kits. I don’t need the wool or the needles (I have my own local, very knowledgeable, needle dealer- Jan) So I went searching for the boxes. I found them on Ali Express. ali express box for sale I bought 2 Like this.
The boxes snap together so I took the lid of one and snapped them together.
Inside there are removable dividers.
I started adding small amounts of wool, a different colour group in each tray.
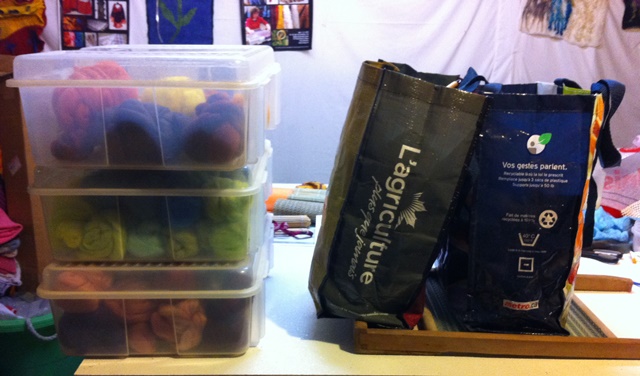
And this is what it looks like now. I do still need to add a few more colours but these are the ones I had handy in the house. I left the bottom one empty so I can add tools to it, needles, holders, and scissors to start. I need to sort my needles so I have a few of each in the tray and some of the handles.
Do you have a good portable storage system for your wool and supplies?
A good few years ago now, after I had acquired and learned how to use my spinning wheel, I was casting around for some means of storing the associated equipment in a reasonably respectable way. The wheel and associated bits lived with us in our living room and needed to be tidy.
Quite by chance I came across a shop selling off cheaply a large deep cane laundry (I think) basket. It was only going cheap because one of the handles was broken and it had no lid. The much reduced price compensated for something which was no problem as far as I was concerned.
I used to work in Maidstone (Kent) and nearby there was a lovely shop called C&H Fabrics (sadly no more) which sold both dressmaking and curtain fabrics and haberdashery. I could never bypass their remnant section – they almost always had something good and large enough to be really useful. I managed to purchase several large pieces of curtain fabric of a design which was really “with it” at the time (most rarely for me, I am usually following several years behind fashion fads). This was during the time when Macramé made it’s first appearance and I was very “into” this. So I removed the remaining cane handle and instead added two twisted cord macramé handles.
Then I set to and lined the whole of the basket using the curtain material, making sure that there were pockets around the sides of sufficient size to take threading hook, spare bobbins; flyer; carders; ball winder and my Neatsfoot oil – my wheel had a leather connection between the treadle and the footman – the bits that actually drive the wheel, and the neatsfoot oil is a good natural conditioner for leather and ok for oiling the metal parts. The rest of the associated bits – fleece, box of carded rolags, tea towel used as a lap cover, cord for tying skeins and niddy noddy would just sit in the middle.
Now I needed a lid for the basket to keep the dust out (our bungalow was very dusty because part of it was still a building site). So I cut two circles of the fabric and a circle of wadding. I attached the wadding to the wrong side of one of the circles, by machine quilting around the pattern/motifs printed on the fabric. On the other circle, which would be the underside of the lid, I added a zipped pocket. I then finished the lid by stitching the circles right sides together with another length of macraméd cord attached to one side. Then, after turning the circles the right side out, and hand stitching the turning gap, I attached the other end of the cord to the basket. The lid sat on top of the basket with everything safely inside; well except for the niddy noddy which was too tall and had to stick out of the side, so it made do with a length of cord to attach it to the basket. My brother in law had made the niddy noddy for me, having already made one for my sister. It is purposely on the large side because each circle of a skein wound on it would be 1 yard long. This made it easy to calculate the skein’s length.
Finished basket open
Finished basket, closed.
The fitted out basket sat comfortably by my chair and spinning wheel while I was working at home, but was a bit big to take with me when I went to my spinning group each week. Luckily my sister, having visited the Willows and Wetland Centre on the Somerset Levels, gave me a large basket which she had bought there. The Levels is a large flat low lying area where Withy Willows have been commercially grown for basket making for at least the last 200 years. In fact willow baskets and other items have been made there since pre-Roman times. If you are interested there is more information on the area here: Somerset Levels (As an aside, Glastonbury Abbey, also referred to in the link, used to own much of Sturminster Newton where I now live, despite Shaftesbury Abbey being much nearer to us and owning most of the rest of the surrounding land.)
But I digress. The basket which my sister gave me was intended as a picnic basket. It was short and wide and it’s carrying handles positioned so that it was carried flat.
See how the handles work to carry the basket flat?
It was just what I needed to carry tops (roving?) and spinning equipment when I was away from home. Of course it needed to be fitted out with pockets to keep everything tidy and safe. I had sufficient fabric left of the remnants used for the large basket to make them match. I lined the base of the basket adding pockets at one end for flyer and bobbin, lap cover and oil. I didn’t want to spoil the look by using the plastic box for my rolags and by then I had learned basket making courtesy of the WI. So I made a basket to fit, lined it and made a lid with more of the fabric. The lid of this little basket was quilted in the same way as the lid of the large basket, and also attached with macramé cords made from fine crochet cotton, with a wooden toggle closure.
Rolag basket in the sun
By this time I was also “into” Tunisian Crochet. I had been making ordinary crochet items for as long as I could remember but fell for this new (to me) technique. So in addition to storage for threading hook, personal bits, glasses etc., I needed storage for at least one Tunisian crochet hook – this looks like a knitting needle, but instead of a point it has a hook. I also needed somewhere safe to put large sheets of paper patterns, as I tend to use diagram type patterns and they take up a lot of room. So I set-to to line the lid of the basket with just one layer of the fabric, but with pockets, short & fat and long & thin attached. I sewed this onto the inside of the lid but left one of the shorter ends unattached so that I could tuck paperwork etc., inside.
All my equipment (almost) in the basket.
Incidentally, the sharp eyed amongst you may have noticed that odd bit of hooked wire tucked away in the longer tube/pocket and be wondering what it is. It’s a do-it-yourself lazy kate – a device for assisting with plying yarns from one, two or more separate bobbins. An old shoe box (or a basket) and this bit of wire are all you need, poke the wire through one end of the box, slot the bobbin(s) on and poke the wire through the other end of the box. It’s not the best way to do it, but if you put some tension on the yarn by passing it from the bobbin around the wire once before taking it to the wheel for plying, it works.
Oh and a quick boast – can you see the handle of the threading hook poking out of one of the lid pockets? The handle was actually a light pull which I had made while having a go at wood turning some years earlier, and the hook is only an unbent paperclip – but it works ok too.
So that was my basket set up and ready for journeys. Oh yes, the niddy noddy. That was too big again, so it had to sit on top.
Basket with niddy noddy (but the handles are down so I’ll have to remove the niddy noddy, put the handles up and replace it because the right handle won’t go over the end of the niddy noddy – then I can pick up the basket.)
Eventually the cane hinges of the lid, and the cane closure wore out so they were replaced with macramé cords.
Some time before I moved from Kent to Dorset in 1999, I wrote an article about these baskets and submitted it, with photographs, to the Journal for Weavers Spinners & Dyers as I thought it might be of interest to them. Apparently not though; I eventually received a letter returning the photos (but not the article, so I’ve had to rewrite it!) and saying “… the Editorial Committee … felt that the article was rather too indirectly concerned with weaving, spinning and dyeing ….” Oh well!
I recently moved from London to Edinburgh. When asked why I was moving farther north by my baffled English friends, I couldn’t resist telling them it was because England just wasn’t cold enough for me, nothing but Scottish weather would suffice! Some of them actually believed me…
It’s not easy packing up a whole life and its contents, but having a work studio mixed with the personal makes things even harder. Once almost your whole life is safely hidden in boxes, only half the work is done – the unpacking, deciding where everything goes, both in the domestic and business front, is hard work. I’ve been at it for two weeks already and my new place still isn’t finished!
Feel free to be horrified by the mess and judge me, I can’t hear you.
This was the lovely blank slate I had to work with. The ceiling is very high (typical of early 1900’s flats around here), the wood floor is real and the fireplace works. Happy sigh.
(Now comes the cringe-y part)
It looks like a hurricane passed by, I know. I think I panicked and simply started to take things out of boxes before I had any inkling where anything should go. I kept coming back to the room, standing in the middle and staring at everything, having no idea how to organise my precious stuff. This went on for days!
After a few days of this my brain seemed to finally awake and I’m now finally able to see where I want most things to be, and I’ve started arranging my fibre slowly.
I also got one of those adjustable tables that lets me use the computer whilst standing; I’ve yet to use my chair!
My sewing table is now tucked into the window nook, affording me a little view of the sea and the stunning cloud formations above it. Inspiration might strike more often from now on with all this weather drama…
I promise my floor is now a lot more bare of items, and I’ve finally figured out where certain pieces of furniture will go. Once it’s all done I’ll even have a knitting chair near the fireplace, so I’m feeling very happy indeed.
Let me know if you’d like to see the finished studio, I’m happy to share.
Have you moved recently? Share your experiences with me so I know I’m not alone in dreading the sight of a moving van or two in the near future…
This week has not been a felting week or even a thinking about felting week. This week has been finishing and tagging week. I will be at Fibrefest this coming weekend.
The first part of tagging is creating tags. It always takes longer than expected to do. I needed tags for the batts, the scissor pouches and new ones for the little cardholders.
I had to weigh the batts and fill in the tags. This one and its twin are already sold and put aside for a friend who can’t make it to the sale.
I had to add the grommets to the scissor cases and tag them with the new tags. I started by adding the grommets to the left side through both layers. It makes it tight for the scissors. So I switched to adding them to the right side through the backside. I think I like this better. I like the way it looks better too.
They are all tagged now.
The other thing I need to do yet is put the spinning kits together. I have to sand the holes of the whorls because they are to tight and I can’t get them on the dowels. Last year they were to loose and I had to glue them. The wool is in the bags at least. Now I have to print the instructions and finish the drop spindles. I am out of ink and today is a holiday so it will have to wait
Lastly, I need to figure out what I am taking as display items.
We’ve had new windows put in this week, so everything had to be moved out of the way, mainly to one corner or the sides of each room. Of course, I decided this was a perfect opportunity to have a clear out and rearrange things whilst putting stuff back, so I ran out of time to make something new to blog about. But since it was partly Ruth’s post which inspired me to make the most of my ‘studio’, I thought I’d take some photos along the way. It’s been less than 2 years since I last re-arranged my space (here’s the post), but I’ve ‘aquired’ a lot more stuff since then! This is how my storage tubs were back then:
They’re not much different now, though the paint which was in tubs on the left now have their own bookcases (they grew too!)
On the opposite side of the room I had a few tubs and my carder on an old toy chest. As the tub stacks grew, I used an old wardrobe on its side to store them, I can drop a curtain down and hide them now.
My carder feels more secure up there on the top too:
I previously had an old computer desk and pine table in the centre to work on. I got a 6ft fold up table to replace those. Both set ups had storage underneath, but they took up far too much room for what they contained, so they’re now storing general rubbish and old toys in the hall cupboard 🙂 All that’s left from underneath is the tubs which contain my netting:
There’s so much room with everything gone and the table folded away:
My shelves are pretty much the same as they were. I got a new bookcase and swapped the huge old telly for a stereo so there’s a bit more room.
I’m sure it won’t last long having the table folded up, and I still have so much to put back, but at least for now the clear space has the potential for creativity 🙂
Hi everyone this last weekend was the Ottawa Valley Weavers and Spinners Guild Exhibition and Sale. I had a good sale and we had some new vendors as well as returning ones.
This was my booth. I was in a new spot this year and I really liked the burnt orange wall. It showed off everything really well. I got lots of compliments on the new booth so I think I will be staying in this spot.
On the other side of the scarves on the left I hung some pictures.
I took some pictures of the other booths.
This slideshow requires JavaScript.
It was a very tiring weekend, but fun too. It was great to see everyone and what they are making. The new workshop schedule for 2018 was available for the first time. I got to meet some great people that come to see what we are up to, buy great items and sign up for workshops.
The first two years I was felting I used the shoe storage method to store my fiber. But as a fiber enthusiast and one to try new things my inventory and tool collection kept growing. So, it became quite unruly. The picture doesn’t show the overflow and piles in bins I couldn’t fit in.
I had piles of things everywhere.
For the past year I’ve been trying to find a system to keep my fiber and tools organized. I tried a wire cube system next. This was a real test of my patience.
I liked the openness of this system, but didn’t like it was so deep and I’d have to juggle the fibers to see all the colors I had. I did put my batts in bins on the floor.
So, I continued to look for another system. I wanted an open bookcase, but because of the dimensions I was limited to, I couldn’t find something that worked.
Then we had a big discussion on the forum about fiber and bugs, so I decided to try plastic drawers.
Now I have drawers organized by color. Here’s just a few. I also have one for alpaca, one for merino and silk mixes.
But I wasn’t finished. I organized my embellishments in two separate units.
This one is under my table.
I also used the furnace room door for coarser fibers and to hang my scarves and hand dyed yarns.
Here is my table with my tool drawer and a bin full of WOW fibers, some foam for needle felting and other useful tools all close at hand.
More fiber and bubble wrap marked.
Behind my table is my felting machine with more tools close at hand.
And my drum carder set off to the side next to another table.
The cube system is temporarily holding some folders until I figure out what to do with it.
Then there is the daybed covered with samples, bins of yarn, ribbon, scraps, etc. This still needs a bit of work. And my “paper” room which is now my dyeing room. That will also have to wait.
This system works for me right now. Its by no means perfect. I’m fortunate to have two water sources close at hand and extra space. I don’t think we intended it to be a studio but that’s what it is for me right now.
I am moving my studio over one room. The space is exactly the same size. You would think no problem, easy peasy. Not so. You still have to empty all the shelves and pack up everything. I did get a new old set of shelves that holds my wool better.
I moved the carder and my felting table in to one end.
The door will disappear and the table will move out form the corner once the other room is empty. I have my bins for shows under the table and the one set of storage bins under the end.
The other end has my book case, wool and other fiber storage.
The clothes wrack is on wheels I got it at the Target going out business sale.
I should have enough room to do some teaching. I have room to put up a couple of 6 foot tables. I like the way it’s set up it’s not crowded and feels more inviting than the old set up. I am really looking forward to getting back to work in it.
Did you feel the but coming? The problem is the stuff that’s left behind. I want most of it but what to do with it. For the moment and I hope short term it will be packed up and be stored. the sewing machine will go into the nest room along that eventually will be mine but it needs to be renovated and the plumbing fixed so I have sinks. Then I will have no excuse for not washing the fleeces I have.
You never know how much stuff you have until you have to move it. :O)
I have not done much felting lately. Instead I have been working on a Nuno Felt Bracelet Kit. Sounds simple enough. I wrote up the instructions over a few days, going back over everything and adding in more and more detail, making thing more clear. That was the easy part. Next I had to take pictures. I don’t have any way of taking pictures of myself felting by myself so I enlisted my son to do the picture taking. He was very patient as I made a bracelet and took notes on my instructions of things I needed to change and add. It this point I am thinking well that was not so bad.
Next was picking out and editing the pictures. I do not know how people do photo editing for a living. It takes for ever and it is booooring. I did eventually get that all done so it was time to send it off to the spelling and grammar police. Now normally I am not a big fan of the spelling and grammar police as I am on of the top ten worst spellers in the world. However when you want to sell something to the public it really should be spelled correctly so you don’t look too bad. Than another friend locked my instructions and took all the meta data off my pictures. I had no idea how to do that. Thank heavens for friends.
Next I think I would like to get the instructions printed. I nearly fainted when I saw the price of colour copies. It was decided that a CD would work very well and cost much less. So next was learning how to burn CDs. It’s not hard but it was time consuming. Good thing there was some good TV to watch while I did that.
Yesterday I spent the day assembling kits. That took way longer than I thought. I will never do well in a sweatshop, I am much to slow. In the end I have lots of kits ready for my next show (Twist http://www.festivaltwist.org/en/ ) I am sure I will not sell them all as I made up 50 but they will be ready for other shows later in the year.
Not a lot of felting itself going on this week but I have been busy. Like everyone else I never have enough storage space in my studio so I painted up all the peices and hubby and son put a new shelving unit together for me. I started to put sort and put things on it already but more needs to be done.
I am teaching at a multi guild gathering today. We call it Distaff day and for a small fee you get two 2 hour classes, lunch, vendors and lots of chatting with like minded people. I am teaching nuno felt bracelets and taking hookers necklace. I will have pictures of the day in a later post.
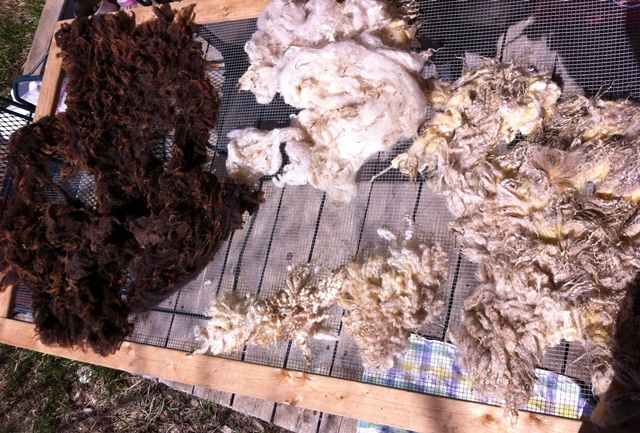
I washed some old fleeces I found stashed away and salvaged a small amount of curls I will cut from the matted back. I don’t know where I got these but they would have been free. They don’t look bad in the pictures but they were in rough shape.
I received a raw flees I ordered for a hat project that you will get to see when it’s done. I was down to picking between 2 fleeces and in the end picked this one because I liked the sheep’s name. The fleece is very curly. I love the smell of raw wool.
Lastly around the farm: the chickens and turkeys arrived. The Black chickens are egg layers and the yellows are meat birds.


 Do you have a good portable storage system for your wool and supplies?