Many years ago, almost forgotten in the mists of time…. Ok, when I was 16. I realized I could not possibly get an office or secretarial type summer job as many of my friends were getting (you have seen my spelling. Even now with the helpful suggestions from the computer I really cannot spell.) Working as a cashier was out because of the dyscalculia (Numbers are almost as bad as letters). So that left jobs the boys would not take at student manpower (shovel jobs) and finally I wound up working as a picture framer. Even with moving crates of glass (which are not light) it was better than shovel jobs. I wound up picture framing for 13 years until i damaged my ulnar nerve and switched careers but that is another story.
I was very lucky when I started to work. I was taught by a picture framer who was trained as a conservator. Acid free matting, backing and making rice paper glue with proper T hinges were part of my training. Mounting textiles on a ground was also something I did from small textile pieces to large quilts.
I even got to explain to people why their incredibly wrinkled Diploma could not be dry mounted because it was made of real parchment. I got that job because I would get so excited by real parchment I would explain how it was made and point out where the hair follicles had been. I would tell them how impressive it was to have parchment (made from stretched and prepared skins; usually calf, sheep or goat) rather than boring paper, so it was worth considering a conservator to get rid of the wrinkles. I would also explain not to hang it in the bathroom or direct sunlight. By the time I was done they were usually requesting the expensive restoration and very pleased with their masters or even sometimes a B.A. degree.
I framed small Tapestries in Theo Moormen technique with double glass and double mats on the front and single mat on the back. This allowed viewing of both sides of the piece but protected it from dust and handling.
Why would we want to frame a 2D felt picture?
- Framed work gives it more gravitas (something framed will be looked at differently than something not framed. A framed piece (or one finished to hang in another way) suggest more value than one that is not framed. This is why presentation or hanging is important for display in a gallery.)
- Protects the work from dust and unwanted handling/ fingering. (it also protects from possible vacuuming by over enthusiastic persons)
- Protects the fiber from the evils of wool moths or other horrors! (Such as a wooden frame with a paper backing or sandwiching your work between matts then add glass to the front and back. For further protection from dust or moths, the layers can be sealed with AF cloth tape along the edges.)
Why do some suggest Felt should not be framed with glass?
- Water damage when behind glass from wicking when washing the glass (this happens when Windex or other cleaning liquids are sprayed directly on the glass and drip down into the frame.) This wetness can wick around the glass and onto the work. If it is a photo it can actually become stuck to the glass, damaging the photo when the glass is removed. When cleaning framed pictures with glass, it is preferable to spray the cloth lightly with Windex or other cleaner then use the dampened cloth on the glass. Never spray the glass because of the possibility the liquid may leak into the frame and wick behind the glass or into the matt.
- Glass distorts the image. Using the wrong glass can distort the image. As non-glare glass is designed to work directly against the image but when elevated off an image it will blur and distort the image below. Choose Glass that is appropriate to your intended use. If you are using a shadow box, a filler strip under your matt or even sometimes just a double matt, consider either plain glass or one of the new glasses with a museum coating. Check if there is distortion at the height you will be placing the glass before final framing.
- Humidity forming behind the glass due to sunlight on it. (a lot of dyes, like paint, are fugitive. They fade in prolonged exposure to direct light.) Due to fugitive pigment, artwork should not be hung in direct sunlight, with or without glass. There are very expensive glass types that can reduce the UV damage but it’s better to just not put it there. Do not put artwork (or real parchment) in a very humid environment. You can damage the artwork and warp or distort the matt and backing. Sculptures with pipe cleaner armatures can also have trouble in places of high humidity too.
- Glass can flatten the felt. There are ways to elevate the glass off the pictures to allow for textural elements. If you have some 3-D elements in your picture you may require a shadow box (a frame with a very deep inside that your picture can expand into) if you only have a bit of texture or fluffiness you want to maintain you may only need to use a double mat (acid free). If you need a bit more height you can make a support to raise the matt up by adding foam core supports ether under the matt or between the layers of the double matt. (Under is more common). As you create a deeper collection of backing art, spacers, matts and glass. You may want to look more at a deeper wood frame although there were a couple options for deeper metal frames too. (There are some fiber artist that are laying out there wool in a picture and not felting it. Instead they are compressing it with the glass to hold it in position.)
- Glass is expensive and heavy. (Some of the specialty glass can be expensive, and in large sizes, it can be quite heavy. Plexi can be lighter but is not necessarily cheaper in larger sizes.)
Other considerations.
Framing is expensive. One way to reduce the expense is making sure your work is a standard finished size. This will allow you to pick up a stock frame matt and Glass. You can do this by making a matt template out of cheap cardstock or out of a cereal box type cardboard. Make templates with common matt opening sizes; 5×7, 8×10 and 11×14. You saw examples of this when I was working on my Christmas cards and the cardinal in previous posts.
If you are working from a photograph, try to scale your image to one of the standard sizes. Before you print it out to work with.
 1 Tulip scaled to fit in a 5×7 matt opening
Use a template (so you don’t get the matt dirty) to check as you work that you are keeping the image to the size you intended. I do often expand over the border just a bit so I have the option to shift my picture or elevate the matt without showing the underfelt.
 2 Tulip Framed
This is a Dollerama wooden frame, mat and glass I used from my mother’s day post Happy Mother’s Day 2021; May 17, 2021 https://feltingandfiberstudio.com/2021/05/17/happy-mothers-day-2021/
You can see the same technique of using a template used with the cardinal I was working on at the farm show demo.
This slideshow requires JavaScript.
3-7 Cardinals with matt template
The cardinals were from this blog post; So much time. So much to do! March 23, 2020 https://feltingandfiberstudio.com/2020/03/23/so-much-time-so-much-to-do/
Repurpose Frames you have or find
From the same blog, I showed you a different kind of frame I had found at a second hand store. They are called memory boxes or memory frames. There was a fabric backing over cork in the back of the frame and the front face with glass was hinged so you could change out what you put in there. Magnets hold the face and glass closed creating a shallow shadow box. The glass will protect the felt from dust but can be opened to clearly show that the picture is made of wool and not paint or pastels.
This slideshow requires JavaScript.
8-10 Memory Frames (decorative pins to hold the felt would work well)
These frames are fantastic for demos or felting displays so if you trip over one secondhand please consider buying it. I have the arctic landscape which was a water based challenge pinned in with sewing pins temporarily (I really should get a matt or felt to the edge but it shows that the piece is felt quite well.) Unfortunately they are a bit dinged up but still work well to protect and show the felt picture.
My final example of working with a mat template is from Sneaky Presents; January 10, 2019 blog post https://feltingandfiberstudio.com/2019/01/10/sneaky-presents/
The inside of an empty cereal box was my template. I again used the wooden frame mat and glass from Dollerama.

 11-12 Snowman
I wound up making three 5×7 pictures for that x-mass trip; The snowman, the cardinal and the bunny. All were expressing parts of Oakville (ok, the snowman was a bit optimistic considering the number of green Christmases we have had while visiting!)

 12-13 Christmas pictures
Ok I think we have the concept of using a template to make a standard size image to frame, fully explored. Now that you have the matt in front, what should you consider putting behind the pieces?
A few last things about Matts
Matts are available in both acid free and non acid free stock. Both types usually have an interior bevel of 45deg or a reverse bevel of the same angle but in the opposite direction. You can have a black or coloured core to the matt. Matts come in a huge array of colours, surfaces and textures. Some matts are hand made wrapped in silk, others some have lines or patterns drawn on them or powdered colour added (french matting). You can even add a wooden lip to the edge of the matt. All these options have a cost. Ideally try to get an Acid Free matt and backing that enhances your work.
Matts are cut on a matt cutter. If you are going to be framing a lot of your work you may consider an introductory course on matt cutting and framing. The price of a matt cutter for semi-professional use has come down so it may be worth investigating. A good quality matt cutter will save you a lot of frustration and wasted mattboard so don’t skimp on this tool.
Behind your artwork;
Ideally, a 2ply acid free matt board but since my days in framing this seems to have fallen out of favour. So let’s consider why we used to use one and what options there are now.
The 2ply was a barrier between the artwork (usually paper) and the cardboard backing. It was there to keep the piece from reacting with the cardboard and becoming either brittle or discoloured. This is not as much of a problem since the felt is not as sensitive to acidic cardboard but ideally a good acid free backing would be best for it. So let’s consider, if we can’t get 2 ply, what can we use instead? We can buy a sheet of 4ply to cut down for a backing (it’s a bit pricey to buy it by the small size you need since the backing you need for the 8×10 piece is almost the cost of a full uncut sheet. Since the cost is so close it is more economical to buy a full sheet and cut it carefully for what you need and save the rest for other picture backings.
Another option is acid free foamcore or even regular foamcore. Both make a good backing but they will start to add thickness so if you are working with a limited amount of depth in your frame this may not be as feasible.
Thinking a bit outside the frame you can find acid free paper in most reasonable quality sketchbooks. I have even spotted some available at Dollerama although they do cost $4.00 not $1.00! So, if you don’t want to sacrifice a sheet of your arches watercolor paper this may work as a separator from any acidic cardboard.
if you want to float your work on the backing, i would suggest using a fine pointed awl or heavy gauge sewing needle to punch 2 or more sets of small double holes through your backing and then you can carefully sew into the back of your work and down into the mounting board. With two holes you can tie a not on the back of the mounting board which will not be seen from the front.
There is a product called Coroplast, which is a fancy name for cardboard made from plastic. It can be used as backing without fear of acidity. You can see coroplast in a lot of yard signs (often a thinner quality but also cost less) or a thicker version is available at hardware stores like Home Depot. If you have a very thin felt picture (pre-felt with a light wool covering you may be able to sew or lace the felt around the foamcore or coroplast. Coroplast is stronger in one direction than the other. it is stronger with the holes running vertically with your work, (i hope this is clear). The felt can than be framed, but i would suggest a spacer to lift the glass. spacers can be made from foam core or you can buy clear acrylic strips which were available in my day for this purpose.
A non traditional approach to framing
 14 Farm show demo display with 3D felt pictures
The framing/hanging for the last guild art show required I start with a standardized 12×12 canvas. The rule was I could not exceed three inches in height so I removed the canvas and used the stretcher bars. I wrapped my felt to the lower level giving me almost an extra inch in height! The way I attached them is a combination of sewing (button hole thread) and lacing with a bit of needle felting to keep the center depressed. I had to felt the base quite firmly to keep the base recessed. You can see more here; Polar bear for the 150th Anniversary Art show February 12, 2018 https://feltingandfiberstudio.com/2018/02/12/polar-bear-for-the-150th-anniversary-art-show/
How odd! I do not seem to have a picture of the back to show you… oh time for another photo shoot! Muskox has volunteered.
 15 Sewing, lacing and felting to secure the picture to the stretcher bars
You can see the combination of lacing( with button hole thread) and then needle felting to give a solid base around the stretcher bars. (Something similar can be done over one or more layers of coroplast). This gave a finished ready to hang edge. Due to the depth of the figures, if I decide to frame this with glass I will need a deep shadow box or a bespoke (custom order) plexi box. Since the felt envelopes the back and front of the frame I may need a more complex way to keep the back moth proof. As it is, today we used screw eyes to the back of the frame as a way to hang it. We were using, I think, a #3 wire so I am not sure why I have a bit of spun yarn on the back of this one?

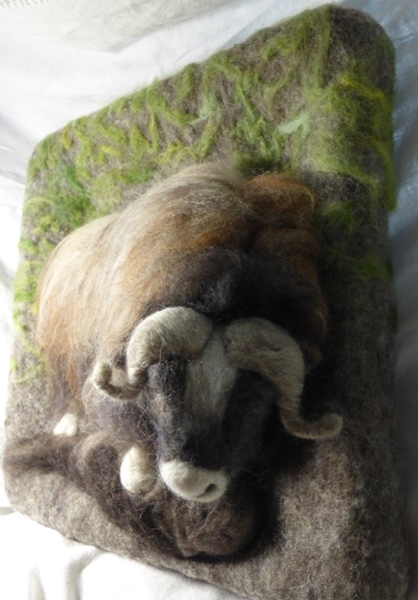 16 -17 Musox picture Back and Side
You can see how much depth I have in the head which is wired so it can adjust a bit.
 18 Muskox Front
Now let’s get back to more normal framing considerations. We have made the piece, discussed the matt and the backing. let’s consider how do we attach the piece to these parts. ( you can just pay for custom framing and not worry about how things are attached but if you want to make sure it is done to your specification or you want to save money you can do this yourself)
With paper items; rice paper T-hinges or there were also acid free tapes available to hold the artwork to the backing. With wool; most of these option will not stick well unless the felt is very thin and light. For most textiles a bit of careful sewing to attach it to the backing was usually the best option. It was removable and usually would do the least damage. A few fine textiles owners would insist their piece needed to be dry mounted but there was acid free dry mount tissue available. This might work for very light thin felt (like nuno felt) but I would not suggest it for anything thicker or heavier. You may also have problems with adhesion to the backing. (I would suggest a small separate test sample if you are sure this is the way you want to attach it.)
Another option for a base to mount on is a matt board with a bit of batting on top. Then wrap silk fabric over the batting. The felt picture can be pinned or sewn in place on the silk. Because the felt is floated on the silk an uneven or random edge can show as a feature of the piece. I would still put ether a matt or a spacer to elevate the glass off the felt.
With some felt pieces you may be able to pressure fit the felt between the matt and backing. This means no sewing, just carefully position the picture between the matt and backing, clean and add the glass, then place the frame over top. Turn everything over to show the back carefully and add the nails or bend over the tabs to keep everything in place. This does not always work as in the case of a shadow box so a few careful stiches hidden under the matt or into the back of the piece may be needed.
What are our options for Glass?
Now let’s consider glass options and I use the term loosely since Ikea’s “glass” is now Plexi. I have framed with very large sheets of plexi for commercial purposes (they were for the real estate industry; large floor plans and drawing of what the houses would look like) The plexi, especially at that size, was a pain. It tended to scratch easily, it distorted the image if the plexi was not very close to the image and it built up a static charge when you took off the protective coating (which would not be good for lightly felted wool). Its’ good point is that it did not cut you like glass occasionally tried to do. It looks like plexi has also improved over time so you may want to ask more questions at your local framing store. Do inquire about the static problem we use to encounter.
Most pre-made frames will come with standard regular glass. There are more options if you want to upgrade the glass. Since my time as a picture framer there are many more options for glass ranging from the cheapest, regular glass, to various types of coatings to reduce glare or UV damage to the artwork (some are quite expensive). Some of the new coatings look very effective but also advise not to use regular glass cleaners on them or you will destroy their coatings effectiveness. (Always apply any dampness to the cloth, not the glass when you are cleaning – remember about wicking and damaging your artwork)
Some of the “non-Glare” glasses are not suitable for shadow box applications since their pebbled surface distorts the image when not adjacent to it. You may want to consult your local framing store if you want to investigate the various glass options.
One other option when considering glass is you can show both sides of your felt by having glass at the front and back of the piece. When I framed some of my own parchment I showed both the front and back so you could see it was parchment and not paper. Oh no, I better grab the camera and show you what I mean.
 19 parchment with acid free suede matt and Museum glass
This was very expensive museum quality glass when I framed this about 30 years ago. (The piece has not been in direct sunlight and there has been no noticeable colour change over time. so i would say the price was worth it.) The glass on the back is regular glass since it would not be visible most of the time and not exposed to excessive light. I painted and framed it for my mother in law who was always very fond of angels. She sent it home with us last year. It now sits beside my husband’s computer. it is not in direct sunlight but is near a window.
 20 light showing through the parchment
I held the picture in front of the window so you can see the sun light coming through the parchment with the begonia shadows.

 21-22 framed in double glass and matts showing the front and back
There are matts on both sides of the parchment, covered by glass. There is tape over the edge of the glass and frame. The turnbuckles were screwed in through the tape on the frame. The tape is sealing the back so no dust can get in. If you noticed, the ripple in the top of the parchment is not due to humidity. This piece is from the outer edge of the skin and the ripple is showing where one of the tie points on the deer skin edge was.
A profile view of some types of framing
23- 25 Different parts of frames:
The Frame
Finally, let’s look at the frame. For traditional framing (with glass), you will need ether a wooden or metal frame. Wooden (or if you are looking at the dollar store versions some “wood” is actually plastic) Real wood is the direction I would tend to suggest for a strong frame and the ability to seal the back in brown paper. Once your have your piece assembled but before you put the hangers on, if you are not using double glass, you can add a paper dust cover to the back of a wooden frame. Stick the paper to the back edge of the frame with double sided tape. You can get rid of the excess paper around the edges of the frame by using a sanding block on a slight angle to cut off the extra paper. This gives a nice neat finished look to the back and keeps out dust and wool moths. Consider the profile (shape) of the frame for the positioning of the hanging wire. If you have used double glass you may need to elevate the wire position and keep the wire snug so it will not stretch above the frame when hung.
With wooden frames the glass/matt/felt/ backing are usually secured in place with finishing nails, brad points or turnbuckles if you are flush with the frame. There are a few options for hanging devices but most common were screw eyes and wire which are usually placed in the top 1/3 or the frame. An Awl makes a handy measuring device to make sure your positioning them at the same level!
Metal frames are available and are often a cheaper option. They go together with a screwdriver and usually use clips to hold the glass securely to the front of the frame. As long as you use a strong well-fitting backing and lots of metal spring clips, you should be able to keep the wool moths from being able to get to the wool. (As well as keep the dust out and protect from anyone wanting to vacuum the felt.)
As i showed you with the Guild Art Show, there are other ways to present a felt picture or hang a tapestry which does not involve traditional framing (with or without glass). Some of my examples; frog/ lily pad, polar bear and muskox are finished and ready to hang but are not formally framed. Ruth has had a number of posts with effective ideas to create a neat hanging presentation but without the traditional look. Depending on the piece you have created and the aesthetic you are creating you may want to try a less formal presentation. If you want to look at a more formal one, I hope I have given you a few frugal ideas and a starting point to work from.
Have Fun and Keep Felting!!!


 12 The photo was taken May 2nd, 2021. The needle felted picture is based on this tulip and was started the evening of May 6th and then worked on over the next 2 days while Glenn still puttered on the garage clearing.
  13 I used the template method of transfer, although the felt was thin and light so if we had a sunny day I could have done the window or lightbox method. I did not want to use the black permanent black markers and could not remember where I had put the coloured permanent markers so I used coloured pens instead. (the lost markers could have been replaced at Dollerama but are not considered essential!!!) I measured out the 5×7 box and since my cardboard mat has also disappeared after I cleaned my desk I just kept checking with the ruler to make sure I was staying in the correct size for framing. (It is a lot cheaper to work in a standard size so you don’t need to cut a custom mat later.)
 14-15 I laid in the background first and used both the single needle and fake clover multi-tool to get the background blocked in.


 20-22 getting a stronger contrast along the edge of the tulip
 23
23

 24-26
24-26
 27-28
27-28


 31-33 The later spring garden
 34 This is the same tulip I was felting. Now it is almost finished blooming and will soon drop its petals. What an amazing colour change!
 31 Hmm, maybe it’s time to clean up my desk too.