I am still slowly packing up the studio. The hard part is deciding what to leave so I can still do some work while we slowly work on the new space. slow is the operative word. It has to fit in around other things that are a more immediate need. It is looking emptier. I am not sure the picture really shows that. The pile to go is different stuff.
We have had several more lambs. I think we are at about 15. So the barn needed reconfiguring to make a group pen and space for lambing pens. they are so cute and of course, they can not wait.
This slideshow requires JavaScript.
I signed up for a stitch camp online. It starts tomorrow (17 January). It’s free but I thought it sounded fun. It’s one video a day for 5 days and they are available for a week after that. Seemed like a fun thing to try and maybe get some creative juices going. It’s here if you’re interested. https://training.textileartist.org/stitchcamp-signup-1/In
In the meantime, while sorting and packing I found some thread I got a long time ago. It is on cardboard, old-style spools. It says FILTEX on the top of some. From what I can find online it is a 40/2 polyester embroidery thread. It is very shiny. I thought I might use it to stitch on some felt balls just for fun.
And I can’t forget that it is Ava’s Birthday on Monday, Jan 17. A big 1 year old.
Hi, It’s me again, out of sync. We had a scheduling problem so I have jumped back in and Ruth will be me later.
A while ago I collected some used coffee pods to try doing some felting with. This was inspired by Judit Pócs. She is an incredible felter and has an amazing imagination. https://pocsjuditstudio.hu/home I believe she used them in a felted ring, free workshop for people that are members of the International Felt makers Association when they had their online conference. I am not a member. Anyway, there were all over Facebook and I wanted to try them out. This is the first attempt.
These are metal pods for a Nespresso machine. I got them by asking on my local buy/sell/give group on Facebook. People with these machines do not throw the pods out they collect them in a supplied bag and then send them back to the company postage paid for recycling. At least that seems less wasteful.
They are pretty and come in two sizes
I had to flatten the pods first. The large domes are much easier to flatten nicely.
I laid out a thickish base and then added to the 2 kinds of pods.
Then another double layer of wool on top.
I felted in the usual way and then cut holes over the disk. I cut the wrong side first, naturally
This is where it starts to go downhill. The texture of the disks makes it hard to rub and heal the cuts. I am not the most patient with this step normally so this was frustrating and didn’t work well.
As a first experiment, this was a good learning experience.
Next time I will mark the top and put a piece of underlay over the pods to make a smoother surface to work on after I cut the holes. That should make it easier to make a better edge. I also think I needed a thicker layer of wool over the pods to get a nicer deeper edge. Maybe just over the pods and not the whole piece. This piece is a good thickness for bag/pouch. Also, as usual, I need to slow down and be patient.
I also made a piece of felt to try out some stitching with the Solvy water-soluble stabilizer. It’s not very exciting to look at and I will probably iron it a little smoother and flatter. I think I will add some needle felting to part of it before using it so I have the 2 textures to try on.
I like figuring out how things are done. I enjoy making samples/experiments much more than I used to. I think it’s all the covid lockdowns and there being no shows. There is not much point in making 20 hats and scarves if you have nowhere to sell them. Have you successfully figured out how to do something you’ve seen online?
Imagine this: you’ve planned that project in your head. You’ve gone through all the steps and know what needs doing. You have all the materials, and you’re getting ready to work on it. It’s going to be epic!
Except… something goes terribly wrong and the end result is nothing like what you expected.
Sound familiar?
This hand dyed yarn looks great at first glance, but in reality it’s “muddy” – the colours have somehow blended into each other in a not-so flattering way.
I’m sure we’ve all been there. Craft long enough and, be it due to bad luck or simple statistics, something will go wrong.
The problem: The yarn above is a colourway of mine called Love Heart Meow. At first glance, it looks exactly as it should, except something went wrong during the dyeing process and the end result is “muddy.” You can’t really tell in the photo, but in real life I can definitely see it and it’s driving me mad.
The solution: I’m going to overdye it. I find that when things don’t go as planned, a blue overdye can save things around. Who knows, maybe I’ll create a new colourway?
(Shameless plugin moment: I’m getting back to blogging in my own website and I’ll be sharing the over dyeing process over there very soon! I’ll of course still be working on new content for our lovely blog here.)
A while back I was doing an exchange with a dyer friend of mine and decided to send her some hand dyed silk cocoons. Silk comes at a price for the poor silk worm, so I was very keen to “make it count” (yes, I’m the soppy type).
I carefully dyed each cocoon, making it so that the exterior and the interior were slightly different and adding variation in shade/colour. I was rather chuffed with the result.
Of course, I then proceeded to ruin things beautifully. I don’t know what happened in my brain but I decided to set the colours with more acid… by dunking the cocoons in hot water.
If you’ve ever dyed these precious things, you’ll know they need to be steam set if you want them to retain their shape. Hot water is most emphatically not the right thing to do, as I remembered even as I was dunking them in the H2O.
The problem: I had a hot mess in my hands, the cocoons all melted into each other, were soft and (to me, at the time) completely useless.
The temporary solution: Remove from water and back away from the project! Make some tea. Curse out loud. Come back later.
The real solution: After keeping whole thing away from sight a while, I looked at it again. It was a mess, but I could make it into something different. The colours were pretty. Then it hit me…
Tah-dah, wall art to the rescue. The colours are actually brighter in real life.
I sewed the Cocoon Combo to some black felt, added some beads and shiny embroidered stars in gold and silver. The shape of the thing was asking for an oval embroidery hoop, so I bought one in a suitable size and Bob’s your uncle.
It looks like something done on purpose, doesn’t it? It’ll be our secret.
Now, this wouldn’t be a post by yours truly if I didn’t add a little sewing, would it?
While perusing one of my usual fabric supply sites I stumbled upon the most fun cat fabric. As with most things in the crafty brain, I had the “button” sorted but not the “suit,” so to speak. I had to come up with something to create with that fabric!
I decided on the Metamorphic Dress by Sew Liberated because it looked comfy and, best of all, asked for two complementary fabrics (the cat fabric had a “friend” that I thought made the cats look even cuter. Aaand, I’ll stop using metaphors now.)
I love this dress. It works great on its own or as a top layer, making it good for more seasons. It’s meant to be reversible, but this one isn’t (there are reasons but I shan’t go into them).
One great thing about being short is, I never need as much fabric to make something as the pattern says I do. After careful calculations, I knew exactly how much to buy and order it I did.
The bad thing is, if you don’t have extra and make a mistake… well.
I was on the phone with my other half and got distracted. Instead of cutting the top layer a specific way, I did it wrongly. I immediately noticed the disaster, but it was too late. My soul hurt. I didn’t want to order more fabric because of this!
The problem: No extra fabric and the huge unwillingness to buy more. I was doomed.
The temporary solution: The same as with the cocoons! Back away from the project. Make some tea. Curse out loud. Come back later.
The real solution: I had a little extra of the gingham fabric. Patchwork to the saving.
I had only made a mistake with one half of the fabric, so that became the back. I cut that piece in two and added a strip of the under layer fabric to the middle. It almost looks like it’s a proper feature, at least to my eyes.
I’ll have to confess I felt rather smug after this. My solution worked, I didn’t have to buy extra fabric and my dress is perfectly wearable.
My smugness was somewhat abated after my mum saw the dress and said it looked like a maid’s apron, but that’s another story…
That’s it, three examples of things that didn’t go as planned but had a solution. If you let your brain think about it for a while in the background, I bet you’ll come up with alternative endings for your “mistakes.” Like the cliché goes, mistakes can be opportunities to do better later. Beats giving up, right?
Finally, the random photo of the day:
My lovely osteopath Jane went on holiday to the Shetland Islands and I asked her to send me some sheep pics. She obliged and I thought I’d share them with you.
I still have not decided what I what to do. It was suggested that using some stabilizer on top might help keep the stitches on the surface and not have them sink in and look quilted. so I thought I would make a new background and give the stabilizer a try.
I picked some colours and carded up a little bat to use to felt a new background.
When it was finished I thought it looked like the water in Monet’s pond. I decided to add a waterlily. I looked up some google and traced the outline onto some was away stabilizer.
For thread, I decided to use some maybe real and maybe artificial silk. some of it says silk on it and some Artsyl rope. I got this thread in a barely started embroidery kit at a garage sale. I don’t know how old it is but the company that made it stopped manufacturing silk in 1911. It does seem to have continued to sell thread and ribbon but I don’t know if they also sold artificial silk. I haven’t burn tested it. I don’t mind if it’s artificial, it’s pretty.
The thread is “2 ply” in appearance but each ply is made up of 5 individual threads. I used one ply for the outline and 3 of the smaller threads for leaf definition.
Onto the petals
As you can see my stabilizer started to fall apart. I am sure it’s because the underlying piece is so soft and squishy, it tears. I had the reference picture so it all worked out. I pulled most of the tattered bits away. the last thing was the yellow center.
And after washing away the rest of the stabilizer. Not too bad if you don’t look too close. that should be just about the actual size of the piece.
I was happy with it even if it was a little plane. than after sowing it to some friends on Zoom, they suggested a dragonfly or some bead water drops. I didn’t feel like making a dragonfly so I decided on fish.
make a “koi fish”
lift some fibres to make a pocket
stuff the fish in
I added 3 koi fish around the lily. I think it worked well. I decided against the water drops because it’s an outline. Seeing it as a picture I can see I need to rub out the needle marks.
I enjoyed making this piece and the stabilizer did help keep the stitches on the surface so that was a good idea. I want to try the other kind of stabilizer. The stuff that looks more like plastic wrap. After chatting with a friend we think perhaps a layer of the plastic stuff and a layer of my stuff might work best. Now I just have to find some of the plastic stuff.
It has been a very busy week and I am afraid I do not have much to report.
I added a few rocks to the picture and I built up the bottom edge to be more feeling of depth. it looks a little better in person but not sure if it was worth the effort, but maybe.
I still have to add a thread or fine yarn element. I thought a few dandelions around the rocks would work. I found a nice dark green variegated thread that Jan had picked up for me.
This is a needle felted picture it is squishy, not flat and “solid” like when I wet felt a picture and then add definition or extras with a needle. I think it may make things difficult. I made a few stitches, making sure to keep them loose because I don’t want the flowers quilted into the picture. As you can see in my mind these are large rocks, good for sitting on and watching the sea.
That did not work. It still looks quilted and I think the thread is too thin. they may have looked better with flower tops but still like they are in the rock rather than beside the rock. At least they were easy to take out.
Fine yarn is next up. Fine is a relative term, right? Yes, I am sure it is. This doesn’t have a label but I am sure it’s a Briggs and Little sport single.
I will try this next but I think it may be too thick. If this doesn’t work I will look for some green embroider floss. I am sure I have some. If that doesn’t work I may try to think of some stumpwork maybe, something else I could do separately with thread and then attach to the picture or maybe embrace the squishyness and quilt a simple flower or bird outline, large to cover the whole thing. Or maybe add some fabric like Ruth did and stitch on that.
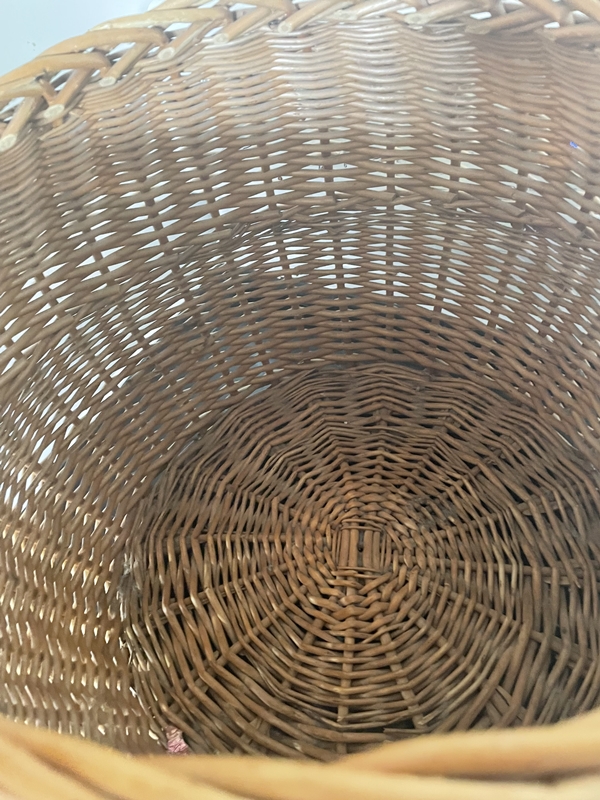
And one more thing, to make Jan and Bernadette jealous. My mom bought me a basket.
My husband said, “we don’t have a cobra.” I have a feeling he wants it to stay that way. LOL
It’s been a long time coming but last weekend I taught my first face to face workshop of 2021 at Cober Hill near Scarborough. Originally booked for summer 2020, this residential workshop for the East Yorkshire Embroiderers had to be carried over to this year due to the Covid lockdown restrictions.
I did wonder if it was too soon for some and if numbers would be depleted but it turned out the ladies were very keen to get back to normal! Nineteen of the twenty ladies booked for the weekend retreat turned up, sixteen came to do the workshop and three came simply to chill.
Cober Hill was built in 1890 and was purchased by Arnold Rowntree, former Liberal Member of Parliament for York, and nephew of the chocolate manufacturer Joseph Rowntree, in March 1920. Rowntree had a vision for it “to be a place of joy and beauty, …a centre of refreshment and inspiration for many of those engaged in difficult public services… I hope experiments in Weekend Schools, Winter and Summer Schools of various kinds and of longer or shorter duration may also be tried there…” The venue, with its gardens, tennis court, croquet lawn, theatre and numerous other communal spaces, has an annual programme of craft workshops as well as hosting private groups, businesses and schools.
The theme for our weekend was “trees” and the aim was for the students to combine layers of fabric and paint with machine and hand stitching. The finished work could then either be backed as a quilt or mounted in a frame.
After dinner on the Friday evening the group were shown examples of my “tree themed” work and I talked through the techniques I had used to create them. The ladies then started to plan their designs based on images they had brought for inspiration. Not everyone wanted to do trees, one lady chose to use the techniques discussed to do a moon gazing hare while another went completely “off piste” with her abstract take on an owl!
Maggie went her own way with an Owl.Dorothy and Debra painting their backgrounds.Ann laying down the background for her tree silhouettes.Melanie painting her background layer.Rachel’s background is painted and now she’s working on her foreground layers.Sandra adding detail to her foreground trees.
With the bulk of the painting completed and dried on Friday evening the ladies could concentrate on layering and stitching their fabrics on the Saturday.
Hilary’s background has been painted and now she is starting to layer fabrics to create her forest.Rhona’s moon gazing hare is taking shape.Dorothy’s forest is pinned and ready for stitching.Evelyn’s work in progress.
I think the surprise of the weekend was Melanie who only came to Cober Hill to keep Ann, her grandma, company. This young lady doesn’t have the use of a sewing machine and had never done any free motion stitching before…..she borrowed Ann’s machine and took to it like a duck to water!
Melanie’s lone tree is starting to take form.Rachel adding her gate and railings.Ruth is beginning to add hand embroidery to her tree.Debra used lots of free motion stitch on her version of a tree canopy.Using the same image as Debra for inspiration, Carol chose to give her tree canopy autumnal colouring.Judy’s version of my Walk in the Forest.Hilary made good use of zig zag free motion stitch for trees in the distance.Margaret’s version of my Three Tall Trees.Dorothy added hand embroidery for foreground grasses and flowers.Melanie’s finished work…..fantastic to think this was her first attempt at machine sewing and hand embroidery!Rhona’s moon gazing hare…..what this image doesn’t show clearly is the addition of black beads which adds texture and sparkle when you see it close up.Close up of Sandra’s finished trees.
What I hadn’t realised at the outset was that none of these lady’s had done anything like this before, so for some it had been a steep learning curve! It was great to see everyone throwing themselves into the task of painting, layering and stitching and the results speak for themselves! By the time we left Cober Hill on the Sunday there had been some terrific work created. I hope some of my students will continue to develop these techniques alongside their more traditional skills. At least one of them has since bought herself a soldering iron for doing more of this kind of work which was music to my ears!
I just want to say a huge thank you to the EYE’s group for inviting me back to teach their 2021 residential and for being such willing students and wonderful company. I shall look forward to working with you again at some point in the future.
The last time I showed you my Autumn Nuno slow stitch piece was back in April and it looked like this:
I have been continuing to stitch on this piece for 15-20 minutes per day. I have been concentrating on the bottom left corner and bottom foreground to fill in the vegetation/foliage in those areas.
Here’s a close up of that area which has the first pass of seed stitch and just needs some of the lighter areas filled in a bit more. I also think I need to evaluate the values once I’m happier with the foreground.
And here’s what the full piece currently looks like. You can click on any of the photos to enlarge them. So progress is being made, albeit slowly. I’m still enjoying the daily practice of hand stitching, adds a little zen to my day.
One year ago today, we adopted this little guy from Mission Valley Animal Shelter. His name is Edgar and he was a stray so we don’t know his breed or his age, but he has added so much joy to our lives. I thought you might want to help Edgar celebrate his adoption day and see how he is living his best life.
I have been felting and stitching a little picture again. And of course, my favourite sheep will make an appearance.
I did a sketch of the idea I wanted, I don’t think I have the patience for proper drawing. I do a quick general idea. I used a thick piece of “almost felt” and made the blue sky and snow base, wet felting them together. Next, I used Blue Faced Lester lock to make some evergreen trees.
I added some paths for the sheep. Sheep like to walk the same path other and over, one after the other, even in a green pasture. Once they are where they generally want to go, they wander off. I have no idea why they like to stand out in a snow covered field, but they do.
I added all my trees and tucked the edges around to make it neater. I added some blobs for the sheep so when I add the stitching they will stand out a little more. I also lightened up the paths a bit.
I used french knots to make the woolly coats and some embroidery for the heads and legs.
I fiddled with trees a bit and added trails into where the sheep are standing. I tried t add some shadow under the trees but it didn’t look right so I pulled it off. The trees still need some snow. I usually do that last, I am not sure why.
My problem is the bottom right. It seems very bare. I don’t know if I want another sheep or something else. I thought of some little birds on the snow but think as this is a small picture (about 5″x6″, 12×15 cm) they might end up looking like sheep droppings. I don’t want a fence. Does anyone have any ideas? It may end up being another sheep.
I simply had to develop one of the pieces from my play with multiple resist further. This particular piece intrigued me, and after we spent time together ie me staring at it for a considerable time, I knew where we were going. The centre felt like something had fractured, a cell broken apart. Having recently lost both my parents it felt like a metaphor for my grief and the feeling I was going through, emotions of pain and detachment. These became the red, pain, anger, hurt. The white, detachment, cold, an emptiness. And do our journey began.
To the original felted piece, I added some shaped prefelt which I added with a couching stitch. This gave me the raised effect. I then added beading from the centre of the “cell” out to either side. Throughout the whole piece, I chose a palette of white red black and grey ( there is a little exception to that but I will go further later ).
I wanted to use a material other than felt for the background of the piece and decided on mixed media. As a base, I used calico which I coloured with acrylic paint. As I turned out I needn’t of done this as I covered the whole piece in materials. I knew from the very beginning how the piece was going to turn out but wasn’t sure of the materials I was going to use to achieve the textures I wanted. So I had a play. I got several different materials and heat treated and used my embellishing machine to see the effects I could achieve.
For the red area, I decided upon prefelt with red satin added with the embellisher, heat treated tulle, crocheted wire and beads.
Arranging composition
In the white area, I decided upon prefelt embellished with satin I also heat treated a mixture of materials lutrador, plaid plastic bags and plastic netting (from a cheese sac) doing this gave the texture of ice which is what I wanted to achieve.
Developing the white area
For the other surrounding area, I cut up an old silk dress that had wonderful shades of grey. These were added with the embellisher around the edges. It had many shades of grey going to black so I could shade the composition. It did take the whole dress to complete it.
The base layer was now laid down so next I added the beading As part of the white area I wanted some raised beading so I beaded small clusters of beading on the net and glued the back. When dry I cut them out and arranged them on the piece.
In these little parts, I added only a couple of golden seed beads. My little sign of hope I suppose.
In the red area, I added beading in shades of deep red and dark green also many sequins which reflect light wonderfully. wire crocheted flame-shaped pieces were added radiating out into the grey area. I also embroidered with daisy chain stitch.
And so our journey ended. I have never worked on a piece that felt like a part of me more than this. Because of the lockdown here I am unable to get it framed but it will be. Then it will go on my wall
Like many of you, I belong to some textile groups that would normally meet in person but this year have needed to find alternative ways to work together. One such group is the Farnborough Embroiderer’s Guild (EG). This EG group is quite unusual in that rather than inviting speakers to talk about their practice, we all take it in turns to teach each other new skills. Three months ago we started meeting via Zoom and I have to confess in some ways I actually prefer it! We aren’t a large group but when we meet in person I often end up only talking to the 2-3 people I am sat nearest to, on Zoom the whole group shares the same conversation which is nice and feels very inclusive. The other advantage is the lack of commute, for me, this means I get to eat before we gather and I can have a glass of wine while we play together 🙂
Last month Sue took us through a technique to create foiled pictures; I don’t know about you but I can’t resist a bit of bling! As we are approaching holiday season it also feels very appropriate to share this with you now, I think it would make some wonderful textile Christmas cards and gifts. I hope you enjoy it and feel inspired to have a go!
Although I have played with foils before it was only as decorative finishing touches never as the basis to create a whole textile picture. Even so, I still managed to make every mistake in the book but was pleased to find foils are remarkably accommodating, if you make a mistake, it can (mostly) be rectified with layering more foil over the top.
Unfortunately it did not occur to me to take photos of the process until I was half way through my picture, I apologise for the lack of photos covering the initial stages of the process. The first few photos are where I went back and reapplied the bondaweb on the beak as my initial application had not transferred completely.
This was the reference photo I used for inspiration:
Some useful tips before you start:
set your iron on a low to medium (1 to 2 dots) setting without steam
always use a sheet of baking parchment to protect your iron
work on an ironing board
1: Cut a piece of medium weight, iron-fusible interfacing / fabric stabiliser slightly smaller than the background fabric and iron it to the back of your fabric. We used black cotton velvet but most non-synthetic fabrics will work (synthetic fabrics are best avoided for this technique as they might melt when heat is applied).
2: Draw out your design with a pencil on the paper side of a sheet of bondaweb. If you aren’t confident drawing freehand, you can trace the design from a printed image. Cut out your design, either as one solid shape or in sections if you plan to create a stained glass effect. For the hummingbird I cut out the whole bird as a single piece.
3: Transfer the bondaweb design onto your backing fabric.
If you are using the stained glass technique you might want to transfer one piece at a time, foil it then apply the next bondaweb shape.
4: Once cooled, carefully peel off the paper backing from the bondaweb.
5: Lay a piece of foil (coloured side facing you) over the exposed bondaweb and cover this with a piece of baking parchment, using the tip or edge of your iron, apply gentle pressure to the areas where you would like that coloured foil to appear.
Allow the piece too cool before peeling back the foil backing.
Tip: you can cut out pieces of baking parchment paper to mask off areas where you do not want that particular colour to appear.
If there are areas where the bondaweb has not transferred so well, or you have already applied several layers foils and want to lay a different colour over the top you can reapply the bondaweb but cutting a shape to match the area, I did this for the edge of breast where I wanted the purple to form a solid line:
If you want a sharp edge in a specific shape, it is also possible to cut the foil to match the shape you desire:
6: Continue adding different coloured foils to your design. If using cotton velvet for the backing it is possible to build up layers of different coloured foils without applying more bondaweb.
Tip: keep the scraps of partially used foils, they can be used to overlay different colours on top of each other very pretty marbled colours.
It is possible to “draw” lines of foil using just the tip or edge of your iron, I used this technique to create the feathers on the wings:
It is not very easy to capture foils in a photo, especially the holographic ones so I shot a short video that I hope shows all the different colours more effectively:
Our group met again last night to add some embroidery to our designs, this is how far I managed to travel in the couple of hours we had together.
…and a little sneak peek of my most recent foiled “painting”.