Browsed by
Category: Dyeing

Textured Felt and Some Dyeing

Textured Felt and Some Dyeing

I finished up some textured felt this week. First the pieces I started last week to cut up. They are the wet ones at the bottom of the post. https://feltingandfiberstudio.com/2016/07/26/making-some-progress-and-free-give-away-reminder/

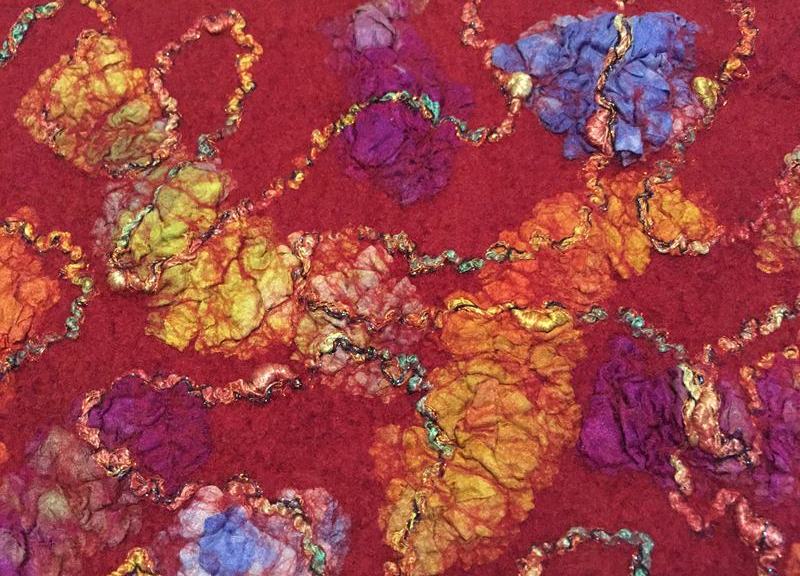
They turned out great. I am sorry for the quality of the pictures but the pictures are taken in full sunlight as that is all I had.

blue for cutting finnished blue close up

This one has so much depth. The yarn is quite sparkly. I am surprised It didn’t flash back more in the sun.

textured felt for cutting finnished. textured felt for cutting close.

textured felt for cutting angle.

I liked this so much I decided to make a scarf and matching hat.

The scarf is now drying.


scarf wet

The hat is just ready to cut open. I will show you it finished next time.

hat ready to cut open

Lastly I did some silk dying so I can make some scarves for the fall shows.

orange pink silk blanks

The green one on the left will probably get over dyed. It is two shades of green but they are to close. I will probably use some navy blue on part or it.

grean blue silk blanks

I can’t believe the summer is half over. I still have so much to do. How are you doing with your summer felting plans?


Playing with Natural Dyes Part 2

Playing with Natural Dyes Part 2

I’ve been trying out different natural dyes using similar materials.  This time I tried alkanet roots and logwood with and without iron.

Here are the alkanet roots before preparation which took two days to get ready to use.

20160629_115247

The logwood also had to be prepared ahead of time.

20160629_115247_edited-1

Again, I used mordanted corriedale and merino roving, mulberry silk, wool yarn, silk habotai and silk gauze as I did in my previous post  https://feltingandfiberstudio.com/2016/06/28/playing-with-natural-dyes-part-1/

According to some of the charts I saw on the colors to expect from the alkanet roots, it could be anything from gray to deep purple.  I had also read it was possible for blues or even red.  As you can see from the pot, there was a light purple tinge to the water. The dye liquor was definitely dark purple but then it was diluted with the water.

aklanet only pot


The result was a silver gray.  For all the experiments I leave the pot to cool overnight to get the most color.  This was a lot less than i expected, but its a pretty color.

alkanet

The next step was to add iron to the pot with another set of materials.

alkanet with iron wet alkanet with iron

The top picture is wet, the bottom is dry.  So, I now have silver and gold colors.

Next was the logwood. From all the pictures I’d seen and roving Cathy had dyed in Arkansas I thought I would get some type of purple.  It looked pale in the pot.

logwood pot

So, I was surprised when it dried and it was more of a taupe color. But surprises are half the fun!  Then I added iron and did another batch.

logwood side by side logwood iron top wo bottom

The darker ones on the bottom are with the iron and its more of a charcoal color.

Again, these are all experiments and results can vary depending on water, temperature, etc.  While I had a little different expectations, I’m not unhappy with the results.  I can always overdye.

What have your experiences with natural dyeing been?


Some Fiber Reactive Dyeing

Some Fiber Reactive Dyeing

The other Day I went over to my friend Elizabeth’s house To play with MX or fiber reactive dyes. these are the dye you use for cellulose fibers and silk. I had planed on doing some silk as I am low on some colours but I could not find my silk top. I know I have some but I do not know where it is hiding. Instead I took some flax/linen, hemp and tencel . I had never dyed any of them before.

Here is the dye set up, we are doing low water immersion dyeing.

dyeing 2 dyeing 1

While I was doing fibers

dyeing 4

Elizabeth was doing small skeins. Experimenting for dyeing warps for her loom and to sell.

dyeing3


Elizabeth is a “good” dyer. she measures and rights down how much of each colour she mixed and how much she used for each one. She will be able to reproduce what ever she or her customers would like.  Here are Elizabeth’s result. Various fibers: 2/8 and 2/16 cotton, 2/8 bamboo, cottolin and hemp/cotton.

Es dyeing

I on the other hand am a “bad” dyer. I just put a bit of dye in the water and wing it. That’s ok because I don’t need to reproduce the exact colour and shade again.

This is my result.

dyeing 5

Here they are with the undyed fibers, on the left hemp, on the right tencel and on the bottom is flax/linen.

dyeing 6

I did some close ups for you too. The hemp compacted a bit when I squeezed the excess water out. It fluffed up and softened when I shook it and gave it a wack on the table.

dyeing 8

The tencel got all crimpy. I was quite surprised.

dyeing 7

the flax/linen stayed compacted despite several good wacks on the table. I am not surprised really when yo spin linen you spin it wet. I think it helps it “glue” the fibers smoothly together.

dyeing 9

I think I will blend the fibers with some wool to try spinning and to felt with. It was a fun day with Elizabeth, It is always good when you are sharing with other fiber lovers.

Playing with Natural Dyes Part 1

Playing with Natural Dyes Part 1

With summer finally here in the US, it’s wonderful to see color in the yard and all around.  I recently had lunch with Cathy (Luvswool) and she showed me some of the prints and natural dyeing she’s been doing with lately. She’s been devoting most of her time natural dyeing and got me interested in trying it.  You can find her dye blog here https://naturedye.wordpress.com/

So, with her guidance I took the plunge and began experimenting. I ordered some dyes online from the Woolery and Dharma Trading.  My first try was with Osage Orange.  What I didn’t realize was that the item I ordered was Osage Sawdust so I had an extra couple of steps to get the dye liquor prepared for the bath.

20160617_153107

For each dye experiment I used a small amount of silk gauze, silk habotai, silk mulberry, wool yarn, merino and corriedale roving.

I could have used a copper penny to make a brighter color, but I was happy with the results. The top pic is while wet, the bottom two are after drying.  Its actually more light yellow than coffee color. You’ll see two small pieces of felt I threw into the pot without mordanting at the bottom.  They did take the color.

20160618_122138 20160620_153330

20160627_150117The next dye I tried was madder root.  I had recently used up some of the madder roving Cathy had given me from her Arkansas residency last year in my coral piece.  So I was anxious to see if I could get the same color.

https://feltingandfiberstudio.com/2016/06/04/under-water-again/

Again, I didn’t order powder, but actual roots, so there were extra steps involved to  get to the bath.

20160620_163111_001

While wet:

20160621_121230

After using the madder alone, I divided the fibers in half and used iron in a separate bath.

20160622_123004

Here they are dry:

20160622_123212

Its interesting the mulberry silk on the right with the iron did not get dark.20160623_120335

With each other, without iron on top, with iron on the bottom.

20160623_120511

20160627_150259 (1) 20160627_150427

Subtle differences, but not the same color that Cathy got in Arkansas.  But then there are differences in water, temperature, etc. But I’m pleased with the results.

Thanks Cathy for helping me through the process.


Completing Another UFO

Completing Another UFO

I have been inspired by Ann’s 2nd quarter challenge to start working on the piles of fabric and UFO’s in my studio that haven’t been completed. I dyed this silk fabric in August of last year. You can read about the dyeing experience here and here.  I decided to make some pillows for our living room to liven up the place a little. I had two yards of fabric and made three 18″ square pillows and one 16″ square pillow. The smaller pillow was a request from hubby to use in his chair. I didn’t think this through very well and almost ended up without enough fabric. But I squeaked by and covered the pillow forms I had.

I also didn’t pay enough attention to where my flowers were going to end up and which side should be front and which back but it all worked out OK in the end. I also don’t stitch silk very often. I forgot how slick, slippery, stretchy and generally uncooperative it can be. Fun was had by all including the sewing machine trying to eat the fabric several times and jamming itself up.

Back of Poppy Pillow

On the three larger ones, I made an envelope style back.

Poppy Pillows on Couch

Here are all the pillows on one couch. Didn’t realize my Glacier Park painting was crooked until I looked at this photo. Better go straighten that.

The smaller pillow for hubby is on the left and here is one of the pillows in one of our other chair. I like the bright colors against the deeper green of the couch. They definitely brighten up the room.

Pile of Scraps

But I still have a pile of strips of green and red silk that I can’t throw away. Now I have to think of another project for these. They are too heavy for nuno and I really don’t want to do any more sewing of this slippery fabric but perhaps I can add them to cards or collages??

I did some dying on the weekend.

I did some dying on the weekend.

I needed to dye some orange wool to make a flower for a customer so if I am going to get the dye pot out I might as well do a bunch of dying. You can never have enough dyed wool. I dye on the side burner of my BBQ outside when the weather is above freezing. Now it’s not much above freezing, it was only about 10c/50f  but that’s good enough for me.

I made a bunch of 100gram/3.5oz balls of merino top.  I heat up the big dye pot of water with some vinegar.  I Unwind a ball and soak it in warm slightly soapy water. I mix my dye and add it to the pot. I gently squeeze the water out of the soaked wool and pop it into the dye pot. I let it go from 20-40 min. If the waters clear I take it out early, if it’s not I leave it for the 40 min. While it’s cooking I start the next wool soaking and mix the dye. My water is very hard and it effects the dye process. I don’t think I have ever managed to get an even dye job. that is one of the reasons I usually recard most of my wool.  Dyeing with rain water is on my list for this summer. My rain water comes of a metal roof so I don’t know how much difference it will make but its worth a try .

This is the result of Saturday and Sunday.  The wind was not cooperating so excuse the sloppy display. I was just happy they stayed on the back of the chairs long enough to get  a picture.

whole group

Here they all are in groups

purplesI couldn’t get the colours one right no matter how I fiddled. There are 5 colours there. The middle 3 all look the same. Two are very close but one is purple and turquoise.

oranges This one is pretty close to true.

greensThis is very close to true.  The pale green is from an MX or fibre reactive dye used as an acid dye. Its called sage leaf. The one next to it, fourth  from the top is supposed to be olive drab but is more like sage leaf.  The yellow and green one is the exhaust batch after the greens and I quite like it. I think I will recard it to blend the small spots of green in to it. The blue is the exhaust after the purples.

While these where in the pot I added some yarns too. These are all form when I was learning to spin. I didn’t like the colours.

blue and brown yarn This was a natural brown plied with a white. It went into the bright blue dye bath.

brown and green yarn purple yarnThe purple one was white. The one on the right was natural grey plied with white. It went in the sage bath.. The one on the left was another brown and white and it went in the olive drab dye bath.  You can see the purple and the gray have gone all curly with not being plied properly. They are not balanced yarns. I think they will be fine to use for decoration on felt. It will add interest.

purple and blue yarn The one on the right is a commercial ladder yarn that was a horrible pale green. I had no idea what it was made off except it wasn’t natural. I tossed it into the bright blue bath to see what would happen. It came out great.  The top one went into one of the purple baths. It was a purple I mixed myself with turquoise and red. It spit into turquoise and purple. The others were ones that I bought mixed but they split too.  One of them started out pink but I can’t figure out which one now.

All in all a good weekend I didn’t even felt them badly like I usually do.


Dyeing with Avocado Skins Part 2

Dyeing with Avocado Skins Part 2

My next step was to use the avocado skins for dyeing.  Again, the instructions varied.  Some said to tear the skins, others use whole.  I went with using the whole skins.

I used approximately the same amount of wool, thick and thin yarn, silk habatoi, silk gauze and cotton voile.  What I did differently this time was to put everything in before it was heated.  I felt this would save some time waiting to put in the wool after cooling. I’m not sure this changed the outcome.

I let the pot come to a boil,  left it to simmer for almost an hour.  Then let it sit overnight to cool.

The results were interesting and different from the pits.  The color was like a latte for the wool and silk.  The cotton was a very pale pink.

20160123_114840 20160123_115531 20160124_115819 But I couldn’t stop there.  I had saved the dye pot from  the pits and used half and half with the skins and pits.  I also presoaked the wool, silk and cotton in an alum mordant for several hours.

20160124_120502

Again, I added the fabrics and wool before heating, heated to boiling then simmered for almost an hour and left it all sit overnight.  I wondered if the colors would be brighter and more intense with the addition of the alum.

Here are the results:

20160125_112754

The result a little more coppery except for the cotton.

Now here they are next to each other.  From left to right – pits, skins, pits and skins with alum.

20160125_113312I thought it was interesting that the silk gauze was the deepest color in the mixed batch.

They are all lovely colors. Now to figure what to do with them.  And yes, I’ll continue to save my avocados.

Dyeing with Avocado Pits Part 1

Dyeing with Avocado Pits Part 1

I don’t know where I ran across the blog on dyeing with avocado, but I eat a good amount of it and always feel guilty throwing it out.  My Son Brad and his wife Mari compost, but we don’t maintain a big enough garden to justify a compost heap.   So, when I read the blog and did some further research, I started freezing the pits and skins.

When I had about ten or eleven of them, I started my dyeing project.  There were several posts on how to dye with the pits.  One said to use the whole pit, another said to cut them.  I had started cutting them so I went with that.

20160120_121901

I prepared some merino (76 gm, thick and thin yarn 4-8 gm, silk habatoi -1/4 yard, silk gauze 1/4 yd and cotton voile 1/8 yd) by washing with synthropol and rinsing then soaking.

I put the pits in about 2 gallons of water and brought it to a boil, added the fabrics, then simmered for an hour. I let it cool down then added the wool and let it sit overnight.

20160121_111822

Here is what the liquid looked like.

20160121_113702

After rinsing and letting it dry, here were the results:

20160122_110441Close ups:

20160122_110547 20160122_110538 The silks were a pinkish coppery color and the wools a lighter version.  The cotton voile was a brighter pink.

Have you ever tried this?

Next up is the avocado skins.  Stay tuned until next week…

Bengala Dyes by Guest Artist Cathy Wycliff

Bengala Dyes by Guest Artist Cathy Wycliff

Our guest artist today is Cathy Wycliff aka Luvswool.
Over the past couple of years, I have been experimenting with different kinds of dyes. I started with Wilton icing gels, playing it safe for my first experience. I moved on to acid dyes, with the encouragement of Forum members, and I was delighted with the bright, beautiful colors.

Then I tried dyeing with natural plants, like madder, logwood, and osage orange. I ended up with some beautiful dyed wool. Marilyn and I brewed an indigo vat last summer, dyeing everything from lace curtains to wool and T-shirts. This summer I experimented with eco-printing and had some success, but a few failures as well.

When I studied Saori weaving in Minneapolis recently, my instructor, Chiaki O’Brien, also introduced me to Bengala dyes.

They are natural dyes made from the soil in Japan. I was excited to try yet another type of dyeing. I had the trial set of three colors–pink, orange and gray. I liked the idea of natural dyes, already prepared in liquid form, and non-toxic with no boiling water and no mordants. Following is my pictorial on two sessions of Bengala dyes.

I dyed some cotton, linen, silk ribbon and a silk scarf to see if there were any difference on how each dyed.

Session 1

IMG_1249 IMG_1250 IMG_1253 IMG_1254
Session 2

IMG_1306 IMG_1307 IMG_1308 IMG_1311 IMG_1312

If anyone is interested in using these dyes, they are available for purchase from Saori instructors throughout the world.

In the USA, you will find them here: saoristudiofun.com/bengala-dyes/

Otherwise, you can google “Bengala dyes” and find offerings from other parts of the world, including Japan, where they are made. I know for sure that Australia, Canada and the UK have the dyes available from Saori instructors. The dyes are particularly
useful when dyeing with young children.

Thanks Cathy for sharing your experience with us about these Bengala dyes!

Dyeing for Special Projects

Dyeing for Special Projects

On the Felting and Fiber Forum, I had mentioned doing some dyeing for projects and Zed encouraged me to write about it.

I’ve had a couple projects in mind that I needed specific colors in silk and wool and needed to mix colors to get the shades I needed.

The first one was for my daughter in law for a wall hanging.  More about this next week. This one I used a dye bath for silk gauze, silk roving and merino.  I also threw in some Corriedale to have on hand. I washed the silk gauze in synthropol an soaked it and the silk roving overnight in a vinegar bath.  I soaked the wools in a vinegar bath for about a half hour before dyeing.  I didn’t need too mix colors for this job. It was an Idye mix I had made a couple of years ago.  I wasn’t sure if it would still be ok, but it worked well.

I was pleased with the results and got the exact shade I needed.

20150609_152850

20150609_093921


The second project I wanted to try mixing browns,  greys and a green with acid dyes for another project. Here are a couple of my color tests.  I’m not sure where the rest went I had quite a few formulas I tried.

20150926_130628


I used saran wrap, a squirt bottle and a sponge brush to apply the mixed dyes to the pre-soaked silk pieces.

20150729_160902 2015-07-28 16.16.57


I used merino pre-soaked in vinegar in baggies and steam for this one.  I thought I had saturated the fibers enough and rubbed the acid dye into the fiber.  However, while it was in the steamer and left overnight the dye settled in spots.  I expected the mottling on the silk which was fine.

20150801_162918 20150801_162622 20150731_124308

However, all was not lost.  After running the grays through the drum carder the colors were perfect.

20150926_123929

Stay tuned for more on this project later.  I ended up only using the gray wools, then making prefelt for the project.  I will have to think of another project to use the silks and the browns.  I did use some of the green wool as well which was fine as it was.

I find it interesting to mix colors to get a specific colors, some times it works well, others not so much.  How has your experience been mixing dye colors?