The last few weeks have been filled with teaching events, as much as I love teaching felt-makers all over the world through online courses it is so nice to be able to teach face to face again, getting that immediate reward of seeing the delight when someone learns a new skill or makes their first piece of felt, is priceless.
My first group were felting novices, learning to felt a vessel over a flat resist. They were all super-creative and keen, producing some outstanding vessels that I hope they are all proudly displaying.
The second and third events were at the Auckland Creative Fibre Retreats. These are amazing weekends away where 20-30 fibre enthusiasts converge at a retreat centre to focus on all things fibre while a wonderful team from the centre look after us, feeding us and keeping us supplied with tea, coffee and hot chocolate.
These retreats are great opportunities to learn new skills, share ideas and teach (if you want to). I offered to teach felted soaps and it was a huge hit, with each person producing at least 2 beautiful soaps.
In return Shaz (in the green sweater) taught us a cable / crepe-style plying technique. This is the first stage:
And the finished yarn:
I am the first to admit this skein is a tad garish, however, Shaz also shared some gorgeous versions she had made with less contrasting colours. This is definitely a technique I would like to try again in different colour ways and with finer, more evenly spun yarn – this yarn was a bit rushed as we were all trying to finish the hank before dinner!
I also managed to finish / make progress on a couple of crochet projects at the retreats. This poncho is a brioche crochet project I started in 2021, the pattern I was following required quite a lot of focus so this project only saw the light of day when I knew I wouldn’t be multi-tasking, hence it took so long to complete.
I also made some good headway on a brioche cushion cover I started in August. I’m not following a pattern for this one, just making it up as I go. This is using some hand-spun yarn that I dyed before plying it a few months ago. The colours are brighter IRL and it reminds me of light coming through a stained glass window.
The retreats definitely aren’t all work, knowing you have comfy bed to fall into and don’t need to drive home, most of us arrived well supplied with chocolate, wine and other beverages…. (don’t be fooled by the oranges, they were just for show! 🙂 )
An awesome time was had by all!
If you ever find yourself near south Auckland I enthusiastically recommend a visit to the Franklin Arts Centre in Pukekohe, they have 2 excellent exhibition spaces and run a varied program of affordable arts and crafts courses from their workshop.
This post is going to be short and quick. It’s been a crazy couple weeks for us, and on top of that I am experiencing vertigo. Apparently a crystal in my inner ear, is floating around, where it’s not supposed to be. Eventually this crystal piece will move along, through the fluid in my middle ear, and out. Until then, I have to be careful of every movement of my head.
Today, I want to show you an idea, Brian came up with. We made a trip to Home Depot, the Friday before Mother’s Day, and my crystal incident. I wanted to get a nice potted plant for the inner courtyard at Mom’s Memory Care facility. I’ve never had good luck, at Home Depot in general, but this time we were pleasantly surprised. We found carts full of glorious colorful blooms, herb plants that were strong and healthy, and a couple varieties of heirloom tomatoes. Yay! Best of all, by the checkout, we saw a freestanding hanging plant stand, that would be perfect for hanging herbs off the ground and away from a curios canine. Brian created a perfect area for growing herbs, last year, when our puppy was very young. But, through the winter, Porter (at 75 lbs.) found my sage bushes, perfect for hiding lost tennis balls, and super comfy to lay on.
Beautiful plants and herbs surrounding a very white bucket.
Home Depot displayed their plant stand, with plastic 2 gallon paint buckets, filled with gardening tools. I thought that idea was genius. Hanging pots are so expensive, and paint buckets are relatively cheap. My only problem, all that white overwhelmed everything. Brian came to the rescue with the suggestion “Why don’t you Yarn Bomb them.” That’s a great idea, Brian!”
This was my first attempt. Didn’t consider drainage holes leaking dirt all over my hand dyed yarn.I think they call this free form crochet! I started with super bulky yarn, a US-P size hook, and made up my own doily pattern.
We had to think a few minutes, about how to attach the crochet to the bucket. Suddenly I realized, “S” hooks would work, and we had some with our grid wall supplies. That worked for the first bucket, so I ordered more hooks from Amazon. They were on our porch the next afternoon. With my dizziness, I was only able to get 3 of the 4 finished.
This is how it looks so far.
We have some fun ideas in mind: like hanging a full recycled bottle of water from a hole in the rim of the buckets. That will tip the buckets, so the plants will grow as if they are pouring out. No matter what happens with this project, we’ve had a lot of fun, thinking outside the box. I hope you find some joy in your own crafting this week!
Capi
Update: Thank you everyone for your wellness wishes. Thankfully, the crystal issue is gone. I had been tested and diagnosed with low Vitamin D years ago: we live in Michigan, so that’s not surprising. I normally take extra Vitamin D every day, but recently a new doctor warned me I was taking too much! I lowered the dose…and had crystal issue within 4 months. (I’m not a doctor, so don’t trust the following information without consulting with your own physician.) There are thoughts by some in the medical field, that extra Vitamin D3 chemically binds with crystal chemical properties…and essentially moves them along. I’m not saying that happened for me, but coincidentally after returning to my original dose, it cleared up quickly. 🤔
It’s been a while since I published anything, as I have been going through quite a difficult time. But I was determined to finish the year with a blog, so this one is a bit of an amalgamation! Way back in April, I was lucky enough to be invited on a day trip to Wonderwool 2022 by my friend Debbie. I hadn’t even heard of Wonderwool when she invited me, but when she told me all about it, I couldn’t wait to go!!
For those of you (like me) who have not heard of Wonderwool, it is an annual wool and natural fibre festival that is held in The Royal Welsh Showground, Llanelwedd, Builth Wells, Powys, Wales. It was first held in 2006, ‘to promote the market for Welsh wool and add value to product for small wool & fibre producers in Wales’. The festival has grown over the years, and ‘covers everything from the start to the end of the creative process’. There are exhibits of sheep, raw and hand dyed fibres, yarn, embellishments, equipment, dyes, books and also finished textile art, craft, clothing and home furnishings. Basically, it’s a felt and fibre artist’s dream come true, where like-minded people can find almost anything they need, and it instills a feeling of excitement, much like a child in a toy shop (at least that’s how I felt!) Because of the covid pandemic, it hadn’t run for a year or two, but this year was to be the first event since the pandemic, so there was great anticipation of the resuming of this popular event.
Around the same time, I had been looking for a carding machine, as I wanted to start making my own wool batts to spin. Just before my friend invited me to Wonderwool, I had found a lovely Pat Green Carder for sale on Facebook Marketplace, and I had decided to purchase it. However, the lady selling it (Mary Rogers) lived in Birmingham, England, so I was trying to work out when I could make the drive up to Birmingham to collect it. As it happened, Mary told me that she was planning to go to Wonderwool, and could bring the carder with her! Fantastic, I thought… this is definitely meant to be!! Don’t you just love it when things just fall into place?!
Having made all the arrangements, Debbie and I took the drive up to Builth Wells for the day, and boy, was I totally inspired! When we walked into Wonderwool, I can honestly say my eyes must have lit up! I really did feel like a child in a sweet shop!! There was stall after stall of beautiful fibre, yarn, and all things sheep (not to mention other types of fibre, including alpaca, angora to name a few)!! What struck me first, was the wonderful array of colour. There were exhibitions of different fibre craft, demonstrations of spinning and weaving, with exhibitors from all over the UK. We also had the chance to talk to a range of like-minded people, who were happy to share their tips and techniques with us. Wow, what a wonderful time we had!
One of the exhibitors we spent time talking to, was a lady by the name of Edna Gibson, who explained that she had spent time living in Japan being taught the wonderful art of Kumihimo, an umbrella term for several kinds of Japanese braidmaking that were unknown outside Japan until about 30 years ago. Edna told us that she was instrumental in introducing Kumihimo to the UK. The term Kumihimo is a composite of two words, ‘kumi’ meaning coming together or group, and ‘himo’ meaning string, cord, rope or braid. Whilst most of us will have heard of Samurai, I didn’t realise that the Samurai armour plates are laced together with cords, traditionally Kumihimo braids, which are also tied around ‘obis’, the sashes used on kimonos. Edna explained that she was taught Kumihimo by a very skilled Japanese person, and brought her knowledge back to the UK. The looms used for Kumihimo are known as ‘dai’ or ‘stands’, and are usually made from either wood or bamboo. All the dai are set up with carefully measured threads (as many as 80 strands of fine silk are wound on each bobbin or ‘tama’). The weighted bobbins are lifted and moved in specific repeated sequences to produce each type of braid. Traditionally, silk was used to make braids but today, braiders also use artificial silk or rayon.
This is my friend Debbie, with the lovely and very knowledgeable Edna.
This shows the two types of dai used. Apologies for the poor quality of this photo, but it was taken from one of the information boards Edna had put up…
The top photo shows braiding on a ‘Marudai’ and the bottom photo shows braiding on a ‘Takadai’.
Edna’s braiding…
As you can imagine, it was hard not to go on a full-out spending spree at Wonderwool!! There were so many beautiful fibres on offer, not to mention everything else!! I haven’t crocheted for many years, but was inspired by a beautiful pattern, by Janie Crow called ‘Mystical Lanterns’. I ended up purchasing both the pattern and the yarn! It’s a work in progress, but I’m enjoying the process!
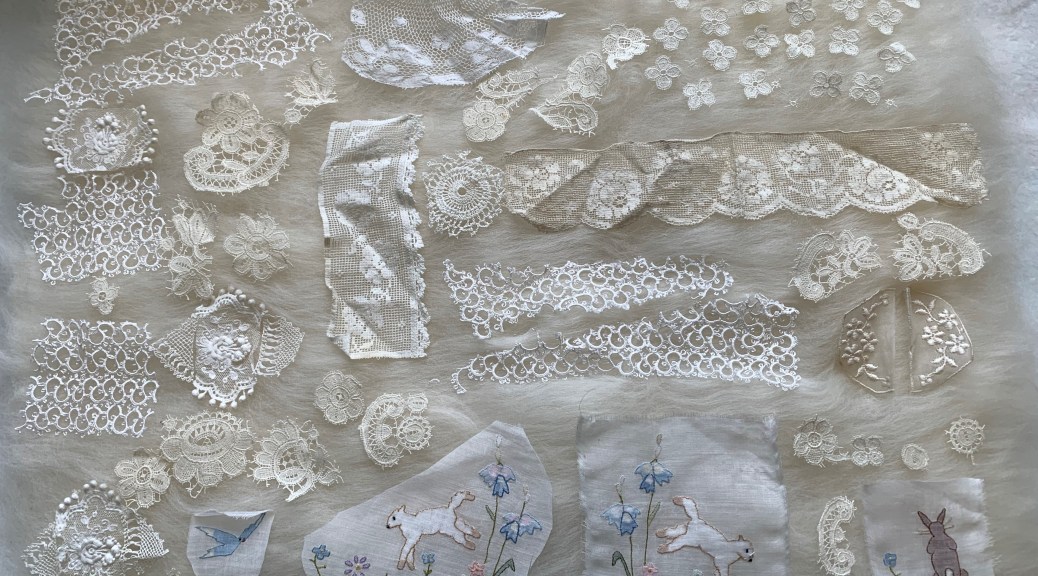
These show some of the exhibits on show at Wonderwool. Hopefully, my scarf will turn out as lovely.
There were so many exhibits and stalls, too many to include here, but this will give you a flavour of a few of the exhibits on show…
To be honest, I was so busy choosing fibre to purchase, I didn’t take any photographs of the actual stalls!!
At the end of the day, I met up with Mary and her friend, to collect my drum carder. It was lovely to share a coffee and a chat with her, and she was able to share the history of the carder with me. We parted the day friends who share a passion for fibre, and agreed we would definitely meet up again at next year’s Wonderwool! We shared a ‘selfie’ before we left…
As I mentioned, I haven’t posted for a while, due to going through a very difficult period in my life, which resulted in me not having the energy or inclination to do any fibre craft whatsoever, so I had not actually even tried out my new carder until quite recently. But when I felt able to resume my spinning, I found it really helped me in a very mindful way. I particularly found that spinning brought me a sense of calm and peacefulness, with positivity and joy.
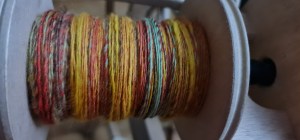
My first project was back in October, hence the autumnal colours! I put together a collection of merino fibre of different colours, with one part of bamboo in a dark shade. I weighed the fibre first, as I wanted to make two batts of fibre that I could spin ready to weave with.
Having never used a drum carder before, this was all experimental but in the end, I was really pleased with how it turned out…
I didn’t want to blend the fibre too much, as I wanted to have the different colours come through when I spun it. Also, I’d heard about people ending up with ‘mud’, so that was something else I wanted to avoid. Having blended my fibre to reflect my need, I then proceeded to spin it….
This shows the difference when using a flash (on the left) verses no flash (right).
Once I had filled my bobbin completely, I proceeded to wind it into a ball, so I could ply it from both ends of the yarn.
This is the finished yarn, once it was soaked to set the twist, thwacked and dried…
I’m quite pleased with the results. I also feel that my spinning has improved a bit since I posted on her last time! I’m looking forward to weaving with this yarn over the Christmas holiday period. Hopefully I will be able to show you the end product in my next blog!
Wishing you all a very merry Christmas and a happy, healthy 2023, from Lisa and Alex 🙂
As soon as I saw what Lyn was setting as our next Challenge I thought “but I can’t do that”. I have always stumbled when trying to understand Design because, although I can see pattern in a lot of things, I fail entirely in translating what I see into my work. I am very literal in my thinking, and when I see abstract pieces (usually “modern” embroidery pieces) based on images of say, a broken brick, or the reflection in a window, or a rusty piece of metal, or a “fractal”, I think to myself “yes, very clever, but why?” and “what would I do with it?” and “I can’t see that on my wall” (and just occasionally “I wouldn’t give that house room!”). This is why I tend to make my pictures or 3D sculptures as realistic as I can.
I was going to just not bother with this Challenge, and then I remembered that some years ago I had attended a course on Design – I had forgotten all about it and it is relevant to this Challenge.
In August 2015 the Association of Guilds of Weavers Spinners & Dyers included in it’s week long residential Summer School syllabus a course by Alison Daykin – “Design for the Terrified” and I was lucky enough to be allocated a place – most courses were usually over-subscribed. Here is the introductory list of available courses from the brochure for you to drool over!
The course was described as offering “help to ‘painting and drawing challenged’ weavers, spinners, dyers, or other textile practitioners, in understanding Design and using this in their chosen medium”. The brochure went on to say: “This course will provide simple, but effective guidelines in design, without the student feeling overwhelmed by theory. The tutor will also leave plenty of room for participants to express themselves in their chosen medium.
“By the course end students will have at least one sketchbook and understand the basics of: colour studies; textural studies; shape; line/stripes.
“Students are encouraged to make samples appropriate to their own textile skills. They may choose to bring their loom or wheel with them, or to develop further sketchbooks if they prefer.”
Frankly this description of the course frightened the life out of me and I nearly didn’t apply, not least because I would be foregoing the chance to take the offered very interesting felt making course. (It’s headline description was “… an ‘adventure with fibres and fabrics’, combining colour, texture and layering to produce felted fabrics for decorative purposes or garments” and that was what I was most interested in at the time.) However after exchanging a few emails with Alison, and reading the three blogs which she sent out about the course I decided to bite the bullet. The first blog post puts emphasis on your “Inspiration” and resulted in a further flurry of emails with Alison, since I had no idea what it meant or what my “Inspiration” should be in this context. She basically said that I should pick a subject which I found really interesting. I was undecided whether to plump for trees, which seemed a very big subject, or sea shells – almost as big but of which I had recently started a collection. In the end I went with sea shells.
Sea Shell collection with Sea Urchin “ skeletons”
The second and third blog posts and a “round robin” email from Alison encouraged us to bring along as many different types of art media as we might be able to lay our hands on, including different types and colours of paper and “mark making” equipment. In addition we were asked to only bring one image of our inspiration, but as many copies of it as possible. (As I hadn’t been able to choose just one shell my image consisted of most of my collection, which also included sea urchin “skeletons”.) We would also need to take a notice board (if we hadn’t already made a mood board – “Er …. what’s one of them?”) so that we could pin up various bits and pieces as we went through the course. We would also need the equipment and materials required to make samples in our chosen technique. As I didn’t know which shell would be my inspiration the “materials” consisted of most of my stashes of fibres, fabric & yarns! I’m sure you’ve all heard of the saying “everything but the kitchen sink” – very apt, my poor car was groaning when I set off with all this stuff plus clothes etc., and I had yet to fit in the friend I was giving a lift to, plus all her stuff and her walking aid. (She was still a bit frail after an illness.)
The Summer School was based at Moreton Morrell Agricultural College in Warwickshire, where (after we got lost twice on the way) I met Alison and the rest of the class members. There were weavers, spinners, an embroiderer and a felt maker – me. Alison showed us her own work, and took us through her process for designing woven fabrics for specific purposes, showing us her mood boards and pictures of finished fabrics “in situ”. Here is a much abbreviated view of how she followed one inspiration from an image of ancient ruins to cloth samples.
She then started us off on our own design journey. Alison suggested to me that I should pick my favourite shell from the picture of my collection and make an enlarged drawing of the shell, both in monochrome and in colour and using different media. I had a go at this, although my drawing skills are minimal. This was before she had found that we would be able to have access to the college’s print facilities, where we could get photographs printed, and colour and monochrome photocopies made on a copier, which was capable of enlarging. We all made great use of this facility – zeroing in on just part of our inspiration image and having multiple copies made on different colour papers as well as plain white – which enabled us to speed up our progress through the stages of the design processes that Alison had mapped out for us.
One of the “tricks” which Alison showed us was to take two images, cut (or tear) them into strips (leaving one side of the paper still intact, and then to weave the two images. This did produce some interesting results.
We also cut strips across an image and used this to reference yarn (in my case fibre) wraps. Using this method enabled us to achieve a colour swatch giving combinations, quantities and placement of harmonious colours.
Showing the progress from picture strip to felted swatch
Once we had all played around with these ideas for a day, we were encouraged to get on and start creating samples in our chosen techniques, keeping in mind how we might use the finished work. As I was interested in making felt for clothing and accessories, I had brought with me copies of designs from specific sewing patterns and tried to pick the patterns that would best suit. I had by this time branched out to using as inspiration two different Sea Urchin skeletons, one Cone shell (and when no-one was looking I did a bit of crochet based on the end of a Conch type shell).
Large Sea Urchin
Small Sea Urchin
Cone
As you can see, I’m still leaning towards the literal/representational side of designing.
Alison also encouraged us to take our cameras and go out around the college grounds and look for more inspirations for design. At this stage we had all got used to looking beyond the obvious and came up with some unusual images. This was the one I chose to do something with – don’t ask me why – it’s just a picture of the wood surround (and my toes) to a raised flower bed outside the portacabin which was our workshop, where we all congregated for coffee, snacks and chat.
Being full of enthusiasm for the project, I cut down the photograph to a corner and then cut out the image of part of the surround.
which I then had enlarged and with several copies started to develop the design
This is the design I finally ended up with.
There are five versions in this picture, the basic design on top with four colour changes of the small “pops” of colour. And here is the jacket pattern and a tracing of the design.
The last day of the course was mainly taken up with visiting the rooms where the other courses had been taking place for a grand Show & Tell. To this end, we had packed up all our equipment and materials and set up our notice boards and work tables as displays of what we had been doing. Here are mine
And here are some of the displays of other class members’ work. Not all of them I’m afraid, I had camera shake by then so I’ve only included the less blurred ones.
The whole Summer School experience was great, with evening entertainments, a fashion show, a display of entries for the Certificate of Achievement “exams”, a traders’ market (I spent too much money as usual) and a trip to Stratford Upon Avon for a tour of the Royal Shakespeare Company’s Theatre with a chance to see some of their costumes “up close and personal”.
We inhabited a bubble, with little contact with the outside world. (There wasn’t even a signal for our mobile phones, short of climbing a hill and standing in the middle of the road.) A wonderful experience and I’ve enjoyed revisiting it.
I am afraid that by the time I got home again I reverted to type and have not made any fabrics, felted or woven, from any of the designs. I just did what I usually end up doing after returning from a workshop – I put everything away and forgot about it! So I still don’t have a 2nd Quarter Challenge piece to show you; though as a result of writing this post and after seeing some of the pieces which FFS members have posted, I do feel better about the possibility of designing from random observations and images.
I am looking forward to seeing what the next quarter’s Challenge will be.
It’s that time of year when there are lots of Christmas fairs coming up & I need to make some festive items.
Recently, I picked up some Christmas-themed small wooden blanks (for tree decorations, or maybe gift tags) very cheaply in a charity shop. I started doodling on them with acrylic pens and found I was enjoying myself – it made me think about the recent popularity of adult colouring books. Good for mindfulness.
Some examples of the painted blanks – there was quite a variety of shapes.
I know these aren’t fibre-related but it set me off thinking about doing something similar with felt. I bought some bauble-shaped wooden blanks online and after colouring a few in (colouring in is a little addictive) …..
Some of the painted baubles
….. I decided to make a sheet of white felt, decorated with bits of vintage lace, old tatting and shadow-work embroidery, all bought in charity shops. I have a box full of old strips of hand and machine made ‘lace’, old dressing table doilies, bits of fine crochet….anything I think might felt. I thought this was an ideal opportunity to do some creative up-cycling.
As I was making the felt it struck me that I have lots of handmade felt off-cuts, test pieces and samples that I could use in a similar way. A good opportunity to recycle work and release a little studio space. To continue my recycling theme, I even used charity-shop-bought crochet cotton for the hanging strings.
These were cut from square samples I made during Fiona Duthie’s Ink + Felt class
Left, some more ink + cloth samples. Right, samples I made for my ‘hippie’ bag earlier this year
Left photo: Top left a nuno sample I made using recycled linen; the others were off-cuts from other projects
Right photo – the yellow was a coaster I made with coloured yarn; the green and pink are nuno samples, the blue is an example of paper felt with some acrylic pen
Finally, I painted some of the wooden bauble-shapes white, and married them with a broad strip of black vintage lace.
So, the chance purchase of second-hand wooden blanks led me to upcycling vintage textiles and recycling some of my own felt off-cuts and samples. I love seeking out and using second-hand materials, especially small hand made things, usually made by women, that tend to be disregarded by many people. Often they are from something that has worn out, like a pillow case, or is rarely now used, like dressing table sets or antimacassars.
I have one particular piece of embroidery on fine silk that I couldn’t bring myself to use. The work is so fine I endlessly marvel at the skills of the woman who made it. It’s so intricate and beautiful with such tiny stitches it makes me feel slightly sad. I bought it in a charity shop for £2. To me it’s a disregarded masterpiece.
Silk and embroidery (hand / finger included for scale)
The silk is starting to disintegrate and I’m really not sure what to do with it. Any suggestions?
I’ve had tradies in for weeks, so haven’t had a chance to felt. Having a rare bit of quiet time the other day, I thought ‘why not give crocheting another go?’ After about 8 videos, I remembered why! I did manage to make some things you could loosely describe as chains, though:
I thought felt and knitting were hard to photograph, until I tried to photograph crochet! All these photos have been redone at least 3 times. I thought I might have better ‘luck’ if I used some commercial yarn instead of my handspun superwash which spun about as well as it felted. I also looked for a better video, and finally found someone who spoke slowly enough for me to understand and had a really clear explanation:
So with some commercial Aran wool and a new video, I made a neater single chain:
The thing I’d had most trouble with on other videos was their explanation of how to do the next row, which stitch was the ‘second stitch’ etc. Luckily, Lesson 2 was SO clear, I did it first time:
My samples weren’t perfect, but much better than my first chains!
I thought I’d try it with the pencil roving I was using for knitting:
But, what now? I don’t know what the next part is called so couldn’t find a video for it. How do you do a 3rd row? Turn it over and do the same thing? It didn’t look the same, but I gave it a go:
Is that right, how it’s meant to look? If you have any tips for what I need to know next, I’d be grateful! So, wanting to keep practising my new ‘skill’, but not having a clue, I thought I’d freestyle it:
Yeah, that is some kind of small crochet bowl! I wondered if I might be better at bigger crocheting, like I am with chunky knitting. So yesterday, I made myself a chunky hook, here it is next to the size 4 one I was using:
It needs a bit more sanding and maybe a bit of beeswax or something, but I had a go and made a chunky sample:
I am now going to enjoy the first peace and quiet for weeks, by clearing a space to do some felting! Any crochet tips greatly appreciated!!
Lyn suggested I full it to make it sturdier. So I tried and no change other than being fuzzier. I checked the label on the yarn ball, but I was pretty sure I didn’t buy superwash. No, 100% wool.
So, I thought I would try boiling it. No change.
Lyn also suggested I decorate it. I tried using a thin wool, but didn’t like it. So, I used beads in little clusters around the bowl. But it was even more floppy.
The next step was to bring out the GAC 400 stiffener. I had bought it, but never used it. Why not give it a try? I used an empty mayonnaise jar for the shape, then painted on the GAC and let it dry.
When it dried it was perfectly solid and clear.
Now I had to decide what to use it for. There are a million things I could put in there, but it wasn’t too hard to decide.
I’ve been trying some new things to work on that I could do easily and fairly quick. Right, haha.
I had seen some crochet and bead earrings online I wanted to try. I used the same Aunt Lydia’s variegated cotton thread that I used on one of the scrubbies I posted about recently.
It turned out out to be a little fiddly, but I got the hang of it and was pleased with the results. I especially like the variegated thread since it makes it easy to wear with several colors. My favorite ocean like colorway. Here they are lying flat.
But then I thought they would nice hanging. So I scoured my house for something to hang them on.
Can you see the beading?
I keep pulling out my felt scraps and wonder what I can do with them. I had some prefelt leftover from making business cards covered with throwsters waste to add a little bling and just enough to make two earrings. I cut out two squares and played around with how to use them. I like dangling earrings but not too big. Since it was prefelt I didn’t want to add beads on it and weigh it down.
So, I used a head pin put a few beads on it then attached the prefelt around it just sewing it closed in the back. And finally attached the hooks. They aren’t perfect but they are handmade.
I started another round pair with beads, but got frustrated and put it aside for another time.
I still have piles of scraps. I’ll have to play with them some more and figure out what else I can use them for. Unfortunately, many pieces are too small to match and are odd shaped. What have you done with your scraps lately?
Since I started crocheting, I’m constantly seeing projects I’d like to try. Although, I’ve had to take a break to give my hands a vacation especially after this project.
Crocheting over wire looked interesting in the form of a bowl. I bought a Caron Sweet Roll because I liked the ocean colors, but I had a little bit of trouble finding plastic covered wire cording. I ended up with plastic clothesline in white.
It was a bit fiddly to begin with. I think if I had gotten the wire I would have had a bit more control. But I managed to get the bowl shape with a little heavy hand and forming it over a bowl.
The pattern I had seen had a flat brim on the bowl, but when I followed their instructions it was a mass of curls. So, I tore it out and made my own brim which is a little wavy but not curly. I didn’t take a picture of the curly brim since I decided on impulse to rip it out.
From the top:
Side:Bottom: Now that I was done, I wasn’t sure what to do with it. It reminded me of the beach, so I decided to give it some shells. I’ll have to find more shells to fill it some more.
Perhaps I should have left the curls to look like waves. Too late.
I also found some fun new yarn called Scrubbie cotton yarn by Red Heart Lion. So, I made some cloths and and brillo like pads with several colors. The pad is made using a combination of cotton thread and the scrubbie yarn.
Here are closeups of the pad then the washcloth:
I made a couple in turquoise.
Then another set in more neutral colors.
They were quick and easy to make and work well for the face or dishes.
After trying a few lace crochet samples, I finally graduated from making crochet samples to actually making things. But first the lace. This lilac one is Marielle lace which would be ideal for an airy scarf.
The Duchess lace is a little denser and looks slightly different on each side.
The Picot Trellis lace is a more traditional pattern made with cotton thread instead of yarn. This was challenging from the standpoint of using a much smaller hook which my joints weren’t really happy about.
The Star stitch was the basis of making a crochet hook case. You can clearly see on one side the holes in the stars.
The second side is where the hooks are inserted.
Unfortunately, my new ergonomic hooks didn’t fit. But it does make a nice roll or it can be folded over to lay flat.
Finished with a chain tie.
I was a little bummed that my hooks didn’t fit, but I found another use for it. I’m thinking of mounting it and hanging it. I just haven’t figured out how to do it yet.
My next project was really challenging. I saw this online and wanted to try it but had difficulty understanding the written instructions. Of course, I turned to You Tube and found a couple of videos that got me through it. It’s called a Starburst Hot Pad created by Loretta Schepp.
It started out making four squares like these.
Then adding more of a design.
Now came the tricky part crocheting them all together.
Then folding part of the design inward to create the starburst.
A closeup.Here it is after being flattened out a bit.
I used a variegated Caron Sweet Roll for this and was pleased how well the yarn worked with the design.
Needless to say I’m not using for a hot pad. I will find a spot to hang it.