Browsed by
Author: ruthlane

When I discovered felting in 2007, I finally found the creative outlet for which I had been searching. I love that the versatility of fiber allows me to “play” with a wide variety of materials including wool, silk, fabrics, yarns and threads. Creating one of a kind fiber art pieces to share with the world fulfills my creative passion.
A Little Hand Stitching

A Little Hand Stitching

In between projects and during waiting times, I work on hand stitch projects. I have been working on both of these for several months but I’m not progressing very quickly. I think one of the problems is that neither project is really my style. The reason I started both of these is that my local group is learning hand stitches and I needed a “sampler”. So both of these projects are samplers but I just haven’t gotten very excited about them.

Book Cover with Stem StitchThe first project is a little felt book. I had already made the book actually just to do the binding. It would have been simpler if I started with the pages and then bound the book together afterwards but I’m working backward. The flower design is done in all stem stitch. I used blanket stitch around the edges and then further embellished the edge of the blanket stitch with more detached blanket stitch.

Raised Chain Band BindingThe binding is done with raised chain band. I really like this binding and although it looks complex, it really isn’t that hard.

Thread Covered WashersHere’s the second page. I used brass washers and covered them with blanket stitch. I then stitched them down to the page and started adding detached chain stitch to make little flowers. I haven’t gotten very far on this page.

Crazy PatchOne of the members of our group made us all a crazy patch so we could embellish it with stitches. I have never done one of these before and somehow it just isn’t doing much for me. But I will fill it all up eventually.

Blue Flower Edge TreatmentThis is the first part that I did. Just a combination of blanket stitch, detached chain and French knots.

Stem StitchHere is more stem stitch (light blue line). We are supposed to be using the stitches we learn each month on these. I have a few I haven’t added yet including a spider web stitch and fly stitch.

Natural Dyed ThreadsActually to me, the most interesting part about this is that the wool threads that I dyed naturally recently are an exact match for the crazy patch. I hadn’t seen the fabrics before I dyed the threads so I had no idea they would match so perfectly. Do you like to hand stitch? I’d love to see what you’ve stitched. Feel free to add photos to Flickr or on the forum.


Fabric Paper Lamination

Fabric Paper Lamination

I met with my local surface design group yesterday and we learned the fabric paper lamination technique. We followed the directions from Paper and Metal Leaf Lamination: A Mixed Media Approach with Cloth by Claire Benn, Jane Dunnewold and Leslie Morgan. We just did the most basic technique of laminating paper to a sheer fabric. In the book, the authors use the resulting pieces of fabric and layer them together with stitch and other mixed media approaches. I thought that I might take the small samples I made and see if they would work with nuno felting since it is all done on a sheer fabric. But I haven’t tried that yet. I’ll let you know how it goes.

fabric paper laminationLouise had made some samples to show us. This photo shows two of her samples.

fabric paper laminationThis is one of her samples that she then painted.

gold leafingThis is a “gold” leaf sample on black organza. Don’t you think this would look cool on felt? I’m not sure how well the gold leaf would hold up to wear though.

base layer of paperSo the first step is to place a piece of paper down on your work surface. This is one of Louise’s dyed papers. You can use any thin paper that you would like, similar weight to newsprint works best.

cover with nylon sheer or organza


Then you cover the paper with a layer of sheer fabric. This is polyester organza.

fossils screened on with gel mediumI don’t have any photos of the process, but I then covered the organza with a silk screen that I already had. You could also use a stencil instead of a silk screen. Then you squeegee gel medium through the screen or stencil. The gel medium then sticks the paper and the organza together. Let that dry completely.

Carole's TreeHere’s Carole’s piece where she silk screened a tree on to a napkin.

newspaper photo with organza and matte mediumThis is one I did with a photo on newsprint.

Bunny's Asian ScreenHere’s one of Bunny’s with an Asian symbol screen printed on it.

Screening on NewspaperYou can’t hardly see the organza on this one but I did an ink blot on the newspaper.

Ginkgo Leaf Screened on LeafingThis is a ginkgo leaf with the gold leafing.

Bunny's SquaresThis is another one of Bunny’s. After the gel medium has dried, you iron the piece (not the gold leaf ones) for “10 minutes”. I only ironed mine for about 1-2 minutes as I couldn’t manage a full 10 minutes of ironing. Somehow that seemed excessive 🙂

removing paperThen you soak the piece in water for 10 minutes and scrape off the paper that hasn’t adhered to the gel medium.

Finished Fossils - Organza Side UpHere is my fossil piece. This is with the organza side up.

Finished Fossils - Paper Side UpThis is with the paper side up.

Organza with NewspaperThis is the ink blot and newspaper one.

Bear Photo FinishedAnd here’s the bear photo. They have already been soaked in water so they are impervious to any damage from more water. They are on organza so I can’t see why they wouldn’t nuno felt. What do you think? This could be a cool way to add photos and stencils to felt so that’s the next step, add wool and see how that works.


Fourth Quarter Studio Challenge – Autumn Scarf

Fourth Quarter Studio Challenge – Autumn Scarf

When Zed announced the 4th quarter challenge, I had already done some eco-printing on a couple of felt scarves. So I thought that this one would be the perfect project for the challenge. I wasn’t really happy with the results of the eco-printing and the scarf needed something more. So I took my mobius scarf which just happens to be a challenge piece from the “twisted” challenge and did some free motion machine stitching on it.

Natural Dyed, Free Motion Machine Stitched Felt ScarfI decided to use a variety of types of leaves and four different colored threads. Two of the threads were multi-colored threads and the others were red and orange to add a bit more color to the scarf.

Close Up - Free Motion StitchingI stitched aspen leaves, maple leaves and several other leaves that I had previously studied in my sketchbook.

Free Motion StitchingI always like to be able to refer to a photo or a sketch while I am free motion stitching.

More StitchingIt takes a bit of practice, but I love to stitch on felt.

Fall Leaves - Free Motion StitchingI’m not sure I “love” this scarf but I guess it looks better.

Free Motion Machine Stitched LeavesI think the orange and red thread is a bit bright. I might have liked it better if I just used the tan/brown thread. And then it would have been monochromatic too!

Free Motion Stitching on FeltBut it is finished and is my entry for Zed’s challenge.

Natural Dyed Felt Scarf with Free Motion Machine StitchingNow to see if I really wear it. I guess I’ll at least wear it for our cold autumn that we’re having here in Montana.

A Try at Eco Leaf Printing

A Try at Eco Leaf Printing

I have had one previous try at eco printing which didn’t turn out very well. But after Terriea’s recent post, I thought I would give it another go. You can see the process I followed on this post on my personal blog. I did some prints on paper as well, which you can see here. We used a variety of leaves. We did not have the correct kind of eucalyptus so the kind we used is the dried kind that must be artificially dyed. Where you see the bright blue green color on the fabric, it is from that kind of eucalyptus.

bundlesHere are the bundles that I rolled up with the leaves and cooked in the dye pot. I did one piece of silk, two felted scarves and one scarf that is a wool and silk blend. I also dyed several pieces of cotton too.

just opened fabricThese are the scarves after I opened them up and pulled off the leaves. So I did get some color but the leaf prints were still very vague. I was disappointed that you couldn’t see a leaf impression. The paper did much better than the fabric.

leaf impressionHere is a print that almost looks like a leaf. This is silk habotai.

The gallery above shows different portions of the silk. The silk seemed to work best with the leaf prints and took in the most color. I am planning on using this piece of silk for a nuno scarf.

These are photos of the cotton pieces. I didn’t do any leaf prints with these, just threw them into the different dye baths. I have to say that Zed made a comment a while back about some of the natural dye processes just leaving the fabric looking dirty and I agree that some of these fabrics look like dirty dish rags. But perhaps I will find that they will be the perfect background for a project.

And these last photos are of the wool items. The wool did get some color but again, I wasn’t really happy with the “prints”. My plan now is to add free motion machine stitching to the felted scarves in patterns of leaves with fall colored thread. Hopefully, that will make them a bit more attractive. 🙂

The Finale – Yurt Raising Party

The Finale – Yurt Raising Party

We had our yurt (ger) raising party last Sunday and had about 20 people show up to help us raise the yurt. It took about an hour and a half to raise but I think it will go much quicker the next time we put it up. The plan is to take it down for the winter and then next spring, we’ll buy a canvas cover and keep it up all the time. Before I show you the party, I’d like to explain how we tried to get the last piece of the roof felted completely. Dennis had suggested that we use a plate compactor like a sander to finish felting and to full the last roof piece.

Plate CompactorSo we rented a plate compactor. This piece of equipment is usually used to flatten sand or gravel before you lay a patio. But it’s like a giant sander, so in theory, it should work just like a hand sander on a small piece of felt. The first plate compactor we got was really hard to get started and then it just kept quitting and wouldn’t run correctly. So we had to call in and the rental company brought us another one. You should have seen the delivery man when he saw how we were using it. 🙂

More SandingSo we wet down the roof panel and laid pool cover on top of the felt bubble side down. And off I went with the big sander.

sanding large feltMy sister Margaret helped me by moving the pieces of pool cover so I could move from section to section. The compactor did work fairly well for getting the felt to hold together a bit better. However, it just was not getting hard at all. The temperature outdoors certainly didn’t help as it was about 40 degrees F and we only had the rental for four hours. So I finally just got down on my hands and knees and fulled the piece by hand. If you’ve never tried fulling a piece of felt this big, be prepared for a workout! I have some repair work to do on this piece because it just didn’t felt well. It has thin spots and holes. I’m not certain that this is the same breed of wool that I used for the rest of the walls and I think that might have been part of the issue. But I’ll worry about that next spring. Now on to the raising.

Gathering to Raise the YurtWe had about 20 people come over to help with the raising. We started with the tono on the ladder and then made a circle with 8 roof poles.

yurtraising6This gives a template so that the walls will be in a circle. You are supposed to get it as exact as possible so that the roof poles will fit correctly when you get to that step.

yurtraising7We then put up the four lattice walls (khana) and tied the sections together. The sections overlap and “weave” together. The “weaving” part is a bit tricky to figure out.

yurtraising8I’m on the opposite side on this photo tying the two adjacent walls together. We then ran a steel cable around the wall attaching it to each side of the door frame.

yurtraising9Once the walls were up, we started on the roof poles (uni). We started with four at right angles and then filled in from there. You attach the roof poles at the bottom with a cord wrapped around the top of one of the wall rods. There was much skepticism that this would work on the part of our guests.

yurtraising10But we persevered and tied them all down. You can see the cable just below my hands in this photo.

yurtraising11Once the roof poles were all attached to the walls and stuck into the tono holes, we lowered the ladder. And it worked! It all stayed together – our guests were betting on whether or not it would all fall on our heads.

yurtraising12The next step is to “seat” the tono. That means you are supposed to hang on it to pull it down on to the roof poles securely. We started with Kostya since he was the lightest. He could hang off it with no problem.

yurtraising13So then I tried it but I just pulled down, I never really hung off of it.

yurtraising4The next step was to wrap the frame with felt. Here’s the felt pieces ready to be attached.

yurtraising14We used several pieces of rope to tie the wall panels in place. We only used two this time but normally, three would be used. But the wall felt is still in place as I write this after four days.

yurtraising15The next step was to add the roof panels. Kostya is helping to pull the felt up over the roof with a rope tied to the top edge.

yurtraising16Barb used a stick to help adjust the roof pieces once they were up on the rafters.

yurtraising2And then we had a yurt! There are still some adjustments to make because of the door. Yurt doors are not usually standard height so our door is taller than it should be. The roof panels were big enough to cover the yurt if the door wasn’t so high. But because of that extra height, I will be making another rectangular panel to cover the area of the roof behind the door. Kostya thought it was great fun to stand on the ladder and stick his head out of the top of the tono.

yurtraising17


All the party goers thought it would be a good idea if Dennis carried me over the threshold. I didn’t think it was such a wonderful idea but Dennis was game.

yurtraising18And then they wanted photos with me sticking my head out of the top.

InsideHere’s an inside view. I really love how the orange looks against the wool.

The Tono from InsideIt’s fairly dark inside but the tono gives a lot of light. Our plan is to cover this with plastic or plexiglass. One section will have the stove-pipe going through. We already have a small wood burning stove. That section of the tono will be covered with metal that will have a hole for the stove-pipe. As you can see, the roof panels are not quite big enough but with the extra panel, it will have plenty of overlap.

Inside Roof Rafters


Here’s a view of the roof. Surprisingly, you can walk fairly close to the edge of the yurt since the angle is fairly steep. Traditionally, the furniture would be against the walls anyways, so there is plenty of head room.

Is It a Mushroom?And here’s a photo from the back. We did later tie down the roof panels. You can see the scale as the building to the right is our garage with the house behind it. We did take some videos but somehow I can’t seem to get the video off the camera and downloaded on to the computer. Plus it will need a lot of editing because it is really long and boring right now. So I’ll have to post the video another day. Thanks to everyone who came to the yurt raising and helped us out. It was great fun and it was so rewarding to see it all together after such hard work over the summer. I hope you all have enjoyed the yurt saga. It was a great experience and I have learned so much about making large felt.


Yurt Making with Kostya

Yurt Making with Kostya

My friend Paula and I were fulling the third piece of the roof felt down at Camas Creek Yarn store on Friday, when two women came down to see what we were doing. It was a mother and daughter. Tris, the daughter, explained that she had adopted a baby boy from Kazakhstan and that he was now 10 years old. She was very interested in the yurt building process so I invited Tris and her son Kostya to join us in felting the last piece of the roof on Sunday.

kostya10


My sister Margaret was also visiting. So just as we started laying out the wool, Tris and Kostya came to help.

kostya11I showed Kostya how to wet down the wool.

kostya12And he was off and spraying.

kostya13Then we covered it up and did a little felt walking to get the air out.

kostya3We folded it since it’s so big and then we rolled it up. We’re all working at getting the ties tightened down.

kostyaHere I am tightening it down.

kostya5And then off it went on the tractor. Kostya was a big help and it was hard to tell who got dirtier knees, me or Kostya.

kostya9I also showed Tris and Kostya the yurt frame and how it would go together.

kostya7And here he is with the felt that was drying from Friday’s fulling operation. Isn’t he great! I had a great time explaining the yurt and felting process and really appreciated the help – Thanks Kostya and Tris. Hopefully, they will be able to make it to the yurt raising next week.

Yurt RaisingAnd speaking of yurt raising, we did a sneak peek Monday to make sure we knew how it will all work and to see what else we need to do.

yurt raisingWe had to figure out what height the tono needs to be to achieve the correct angle for the roof poles. It was a bit tricky getting the separate lattice sections overlapped properly but we got that done.

Yurt Raising


So we kept putting it up higher and higher. The poles on the ground are to get the circle the correct size. It doesn’t work well if your circle is off to start.

Yurt RaisingWe eventually got it fairly well figured out. Now we have to tie more cord to attach the roof poles to the walls. But it’s coming together. The party invitations have gone out and the yurt raising is happening next weekend. So exciting!!


Yurt Update – The Light at the End of the Tunnel

Yurt Update – The Light at the End of the Tunnel

We are still working feverishly to get the yurt finished before winter sets in. Luckily, we had a nice weekend and we were able to felt the third roof piece this past weekend. The weekend before was cold and rainy but we did get started on putting the walls together.

Wall Laid Out We laid out all the pieces and lined them up.

Stringing the WallThen we started threading cord through each hole.

Before TyingHere you can see them threaded. The two on the right are tied. This is one of the walls that will be next to the door. You can tell that because of the 45 degree angle cut on the ends that will be up against the door.

Placing A RodIt took a bit to figure out the best way to get everything lined up and thread the holes. It worked best to have the single bottom layer of rods, put all the threads through and then add the top rods one at a time threading as you go. Then we tied all the knots once all the cords were threaded through.

Knots TiedHere’s one all tied up.

Standing WallAnd miraculously, it is standing all by itself!

Wall ClosedYou can fold it right up for moving/storage.

Wall Open - Middle Section


Here’s the second one we did. It is a middle panel. We ended up finishing three wall panels. We’ve got one more to put together.

Muddy FelterSo don’t let anyone tell you that felting is a clean activity. This is what I looked like after we felted on Sunday. That’s the third ceiling panel rolled up on the PVC pipe. I am happy that we are getting close to finished. I hope that we’ll have our “yurt raising” party in two weeks as long as the weather holds. Keep your fingers crossed!


Third Quarter Challenge – Marilyn’s Entry

Third Quarter Challenge – Marilyn’s Entry

Today’s post is by Marilyn Nelson (Pandagirl on the forum).

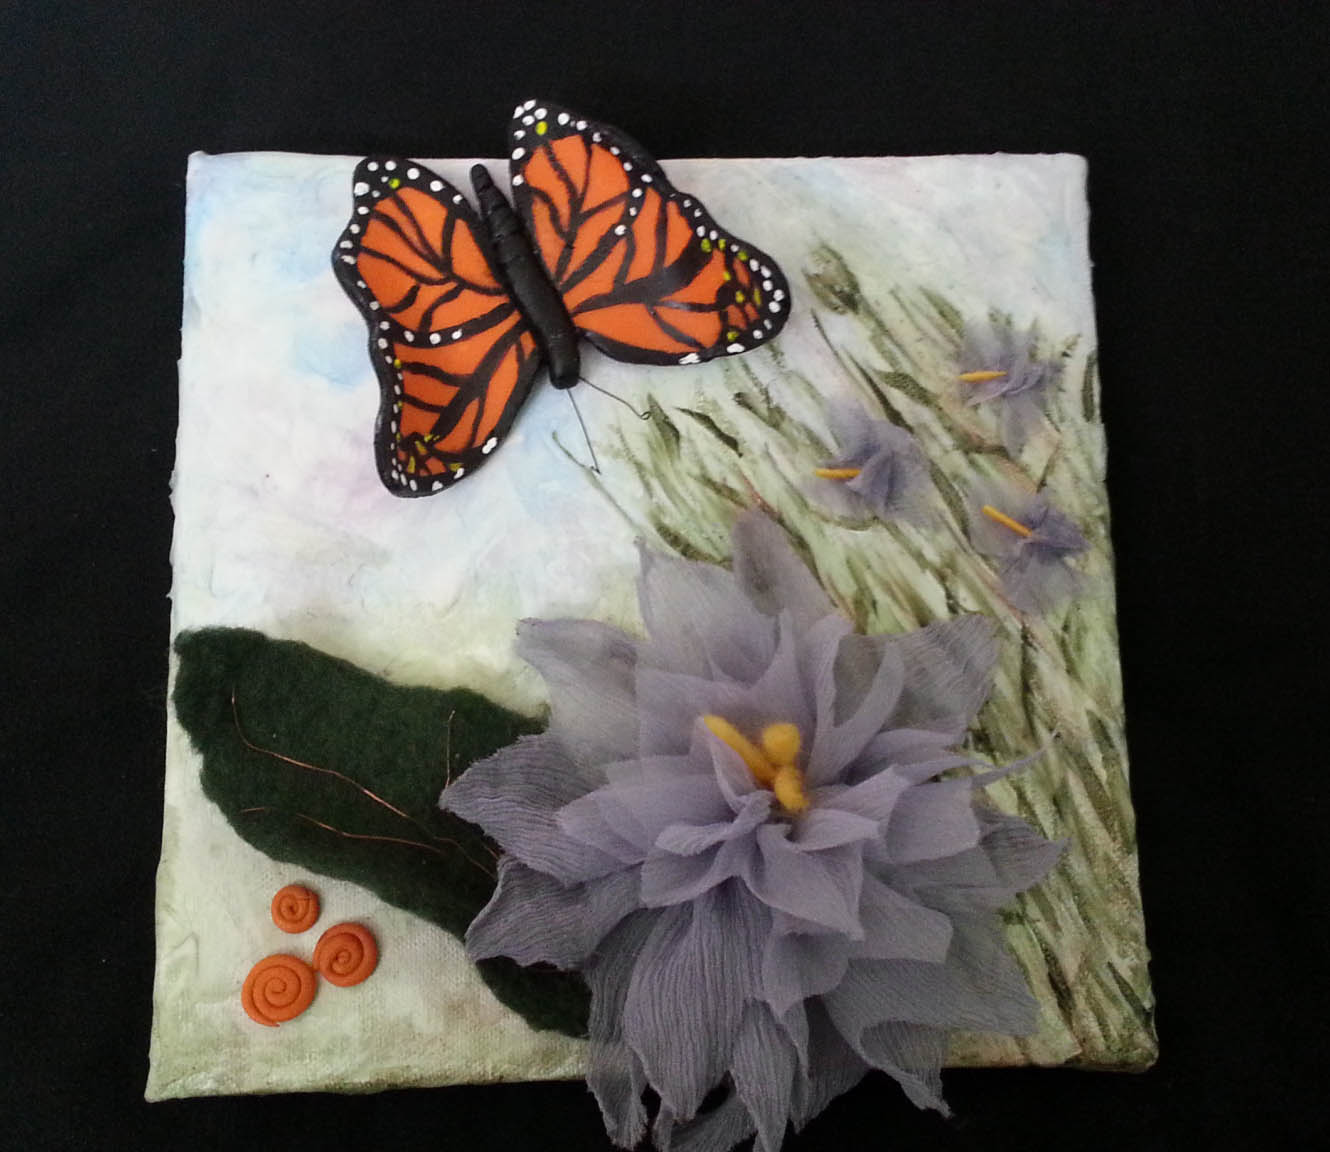
MNelsonchallengeoverviewThis was definitely a challenge for me since it was my first time using acrylics, modeling paste and curing modeling clay. I’m also more into abstract than realistic representation.

For some reason I was fixated on doing a butterfly (probably wanting to hold on to summer).  So, I worked on the butterfly first.  There were several renditions in silk and clay, but I ended up using the first clay one which I used wire between layers to bend the wings making it dimensional and painting both sides with acrylics. The antennae are wire.   A silk butterfly would have been even better, but I couldn’t figure out how to paint it like a Monarch.  I tried, but wasn’t happy with the results.

While I worked on the butterfly the rest of the picture seemed to come together.  I covered an 8×8″ stretched canvas with modeling paste and created a textured sky and meadow with a palette knife.  After it was dry, I began layering acrylic washes to intensify the dimension. However, after painting the texture wasn’t that obvious.

MNelsonChallenge side view 2

The bottom of the crinkled silk flower was left over from a failed felting experiment.  So, I cut another small piece to fill it out.  The stamens of the flower are yarn.  The leaf is prefelt that I felted a piece of wire on one side to be able to give it flexibility to form it.  Then I used copper wire taken from the ends of wired ribbon to make the veins in the leaf by running it lightly in spots through the felt to hold it.

I used the cut outs from the silk to make the smaller flowers. The orange spirals were a last-minute addition from left over clay I was playing with.Of course, I had to figure out how to attach everything.  I used a combination of modeling paste, acrylic medium and Mod Podge. (Not mixed together.) 🙂

MNelsonChallenge side view

I’ve included a couple of views to show the dimension of the piece.  I hope you can see the details.  I need to work on my photography skills.

Karen, a special thanks for posting the challenge and to all the members who have encouraged me to join the fun!  I had a great time and learned a lot.  I’m looking forward to the next challenge.

Marilyn Nelson


Yurt Update – Painting Begins

Yurt Update – Painting Begins

The yurt making is progressing, although not as quickly as I’d like. We continue to work on felting the cover nearly every Sunday, the sanding is completed, the painting has begun and we bought a door for the yurt. After our weekend of felting in the rain, it took a while for the felt to dry out.

Drying FeltHere are three pieces of felt drying in the sun. The two long ones are wall panels and the one on top is a roof panel. The felt is hanging on our front porch railing so you can see the scale and how big the pieces are. Unfortunately, I figured out that I had made the roof panel the wrong size. I thought, “16′ diameter, that’s the size I need”. But I forgot about the 33″ of the tono and the amount that the roof poles rise. So the first roof piece was too small. Luckily, it didn’t get felted all the way because of the rain (silver linings and all that).

Pre Felt Roof - Too SmallSo I laid it out again and re-did my measurements. It needed another 1 1/2′ – 2′ of wool added around the bottom edge. I had planned on using three batts of wool for each roof panel but now I realized that wasn’t enough, I needed four per panel. So four bags short. But Ed and Sue from Sugar Loaf Wool Mill are coming to the rescue and making up four more batts for us.

Add a Bit MoreCan you see the line marked line on the right side of the tarp? That’s how much more wool was needed. I added that on and put wool on either side of the already partially felted piece. I was a bit worried about it all holding together but it felted right in.

Sanded and Drilled Roof PolesI finally finished sanding the roof poles. Dennis drilled two holes in the bottom of each one. That is where they will connect to the wall.

Holes Drilled to Attach to WallI reamed out the holes with my little rotary tool and sanded the ends again. Now they are ready for painting. System for Hanging Rods to Paint

This is s a photo of the garage ceiling (see the light fixture to the left?) where Dennis rigged up a holding system to paint all those boards. He used plumbing supplies and attached a cable.

Wall Rods Ready to PaintSo we just slide the boards on to the cable through the top hole. (Ignore the skis in the background.)

Hanging SystemAll together, the cable will hold about 15 boards. We decided we needed two cables so we could paint more boards at a time.

Painting BeginsDennis started on the painting process. Our original plan was to use the paint sprayer but Dennis thought it would be too messy. So he is painting them with a brush. I think I would have voted for speed and a mess but…

A Few Wall Rods CompletedHere you can see the boards drying (exciting watch paint dry, huh?). If you’re wondering about the orange, it is a traditional color for painting yurt frames. Either that or red. I decided the orange would go well with the brown wool.

Painting TonoDennis also started painting the tono. I am planning on decorating the tono with more intricate designs, but that may have to wait until we’ve gotten the rest of the yurt finished. You can see some traditional yurt tonos here.

Second Coat on the TonoThe nice thing about the paint is it covers up some of the less than beautiful joints.

Connecting RopesDuring the evenings while we’re watching TV, Dennis and I have been getting the cords ready for connecting the wall poles together. Each piece of cord is 6″ long, burned at each end to keep it from fraying and one knot is tied.

Only 350 More To GoWe only have 350 more to go.

Tied TogetherThis is sample boards connected together with the cord. To make the lattice hold together, the wall boards will be connected with these cords. Anyone up for a lattice connecting party? I thought I had taken a photo of the door we bought but couldn’t find it. We originally checked at our local home stores but a door was going to be $180-$200. That seemed a bit high. So we went to a ‘Restore – Habitat for Humanity’. They have used building supplies. We found a framed, already hung door for $40. Of course it isn’t bright orange, so I’ll need to sand it down and paint it orange. So I guess I lied about the sanding being completed 🙂


Felting in the Rain

Felting in the Rain

The yurt plan for this weekend was to full a couple of the wall panels and make one roof panel. Two of the wall panels are very well felted and the other two were still a little bit soft. So they needed a bit more work behind the tractor. Mother Nature had something else to say though.

Starting to RainWhen Dennis and I first got outside the sun was shining and we wet down the two wall panels and rolled them both up to full more. Dennis pulled them around several times on the tractor and it started raining. You can’t really tell in this photo but it was starting to hail. So we left the felt in the field and dashed back to the house. Two of my recruits (more crazy than the rest) showed up even though it was pouring rain. So we waited a bit and the rain stopped and the skies cleared up.

Spraying Down Roof PanelSo we laid out the first roof panel and wet it down.

Paula Hosing Down the Roof PanelHere’s Paula spraying it down. We rolled it up and tried to pull it behind the tractor but it was wider than the last roll. Things kept getting off track and the roll was moving to one side. So we had to keep stopping and re-rolling.

Clean Hands?

This is what our hands looked like after rolling. Just a bit messy. The skies started getting dark again so we decided to quit. In the midst of putting everything away and bringing the felt and supplies back to the house, it started pouring. We got completely soaked through to the skin. And the roof panel is not felted, it is pre-felt. Dennis said “Next time, we are going to listen to the weather man!” Somehow felting in the rain was not as romantic as singing in the rain.