Browsed by
Author: Antje

Learning Curves – Part 2

Learning Curves – Part 2

Following on from my recent post….

The workshop with Clare was very different, in that it was nuno felting and very small. It was quite a surprise to a few of us (with felting experience) that she only uses one ‘thin’ layer of merino wool, to which she then adds various fine open weave strips of fabric. She creates small (often randomly shaped) pieces approx 15 x 10cm (6 x 4ins) which she carries everywhere in her bag to embroider on during any spare moment, hence ‘Travel cloth’. Once stitched Clare then stitches the pieces together to make a bigger cloth.
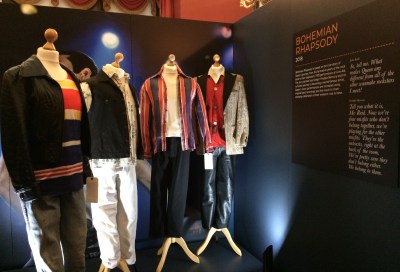
With the previous workshop result still frustrating me I established, before the due date, what our goal would be and decided to create a monochrome scheme (obvious here that I was now avoiding colour!) and set to rummaging in my monochrome stash.

We were given a list of materials etc to bring which included white merino wool and fine fabrics. As I have a very ‘what if’ enquiring mind (I’m a great fan of Zed’s experiments) I took along self carded shetland wool (of which I have a large amount) and a variety of thick, thin, and textured fabrics….my thinking….this would be the ideal opportunity to experiment.

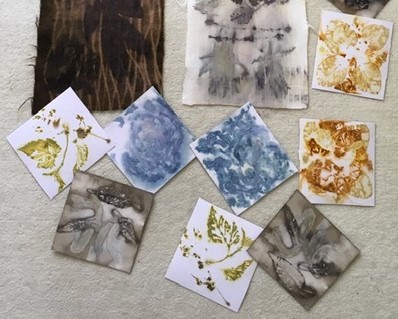
Just a few of the fabrics I used. Left photo – top left was a skirt, top right was a jacket, the bottom 3 fabrics were blouses. All from car boots, washed then cut up and stored. The grey fabric centre bottom (on top of the cream) is vilene I stripped from the jacket. Right photo – top is screen fabric from IKEA, bottom left is a bandage from hospital, on the right is an old cotton vest used as a cleaning cloth for years and ‘acquired’ from mum!

Where possible I do try to keep the labels for future reference

So I set to with laying out my one layer of thinly drafted wool and then added my fabrics on top. Following Clare’s rubbing method through thin plastic.

I just had to take a photo – the pattern appealed to me

Needless to say the felt shrunk, as expected, in one direction only, but when I set it aside I realised my ‘thinly’ drafted shingles were too thin! For the next pieces – I cheated and laid two layers in opposite directions and ignored the word ‘thin’. This gave much better results. I also created more rectilinear designs rather than just neighbouring strips….I’m not really a rebel!

Above you can see the lovely results from the members.

Using Clare’s method of fulling didn’t seem to shrink the shetland wool for me despite the hot and cold water treatment. Seeing this she took a piece and gave it the friction burn treatment between her hands….it certainly shrank….I actually had to rescue it, by putting another piece in her hands whilst she was talking, before it became postage stamp size! I also learned that sometimes ‘brutal’ works, although I would probably go back to my method of fulling.

The vilene (top right) worked really well, as did the scrim, finer fabrics, devore, the bandage (bottom right) and various yarns. The white is the vest. The skirt fabric (plaid dark grey) felted well, but the jacket (bottom left photo) not quite so, although has given great texture. Using a different wool might well produce different results.

At home I re-wet the pieces and continued fulling until they were all modular in size. Then unlike Clare I decided to stitch them together before starting the embroidery. The piece thus far is now 43 x 33cm (17 x 13ins), but will need a backing so the size may well change again.

Up against the light the reverse side shows how thin that first piece is (left section). You can actually see the fabric and is too thin to hold stitches so needs backing.

Within a few days of the workshop and I had started the embroidery!

In terms of design I am favouring the horizontal and want to overlay a design over the whole piece. So I started playing with some ideas on my iPad, but to do the ‘playing’ any justice, I will need to install a painting/drawing app….yet more learning!

Wood grain effect with lots of stitches came to mind. However, creating this post has brought the photo to light I originally took of the plastic….so maybe a simplified version of that will be my design springboard.

I printed out the plastic film photo, then overlayed tracing paper to mark the lines. I do have a small light box but mother nature is much better – I just needed to keep replenishing the blood into my arm!

Then came my next big challenge….to beat Microsoft. About 8 years ago they stopped the facility to directly scan from the printer into word etc without going on a very tortuous long winded route. A new printer, research, several attempts, a few hours and a Macro later….tadaa. I’m exstatic as I can now ‘play again’!

My scanned image split up in Powerpoint

I’ve also had an extremely steep learning curve, with these posts (learning to resize my photos to reduce the file size) which for this post I’ve now achieved. But my heartfelt thanks goes to Ruth for all her hard work and patience whilst I got here 🙂

In the meantime between various workshops I have been busy in the good weather we have been given to finally wash some more fleeces….still more to do! In the process I have finally perfected my back saving technique.

All I can say is that learning comes through experience and as I aim to learn at least one new thing per day (sadly, I might not remember what I have learned) then logic implies I must fill my life with many experiences….a faithful friend by my side helps!


I just had to finish this long post with a cute element!
Learning curves – Part 1

Learning curves – Part 1

In the last few months I’ve attended two felting workshops tutored by happy feltmakers who have been very generous with sharing their experiences and knowledge. The first by Jenny Pepper was titled Decorative felt Surfaces (I had no idea what this was to be), whilst the second by Clare Bullock was making nuno Travel Cloth at a workshop for our local textile group.

I have certainly experimented, I’ve gone out of my comfort zone totally but learnt a lot (and as you will read – continue to learn!).

Jenny demonstrated the laying of the felt to all giving the instruction to ‘lay the shingles thinly’ (important note to self), before she then added her decorations choosing from her vast collection of silk waste, silk fibres, silk gauze, silk carrier rods, wool locks, pieces of cut-off felt etc to name but a few.

I commenced my piece working to the maximum size possible on our tables by laying out my 3 layers. Ha…thinly has different thicknesses (note – next time I must check)! I draft very thinly compared with others, so on inspection Jenny suggested I add another two layers. Fine – five layers total not a problem….but I had forgotten the colour placing by this time!

Encouraged to try as many different decorative elements as possible – I went for it….although totally out of my comfort zone!

I came home and showed my endeavours to EPH (ever patient husband) who was quite silent. When I said I thought it was too busy (my five layers of colours didn’t help) his comment was ‘Mmmm it’s certainly not your usual style!’ Following several days of pondering I decided to mute the cracked area by picking up the colour of the silk carrier rods. To do this I blended suitable colours from my wool collection (BFL, merino & Nepalese). Using this I then needle felted it in.


Trying to make it secure I decided to brush the reverse side, raising the fibres, then further wet felt that area. Definitely a learning experience!

The surface pilled very badly so once dry I attacked it with a rasor and de-bobbler!

Three months later, the work measuring 380 x 420cm (15 x 16.5 ins), remains a PINOS (project in need of something), and currently hangs where I can see it every evening to ponder what I can add/do to make it acceptable in my eyes and to decide on its direction – I definitely know which two it is not! Although?

The two to the left I feel are a ‘No’. What do you think? Then come further questions – should I cut it square, or into strips? What can I do to it – apart from a very obvious one of ‘bin filing’?

My next post will be about the second class that I took, Clare Bullock was making nuno Travel Cloth at a workshop for our local textile group. Stay tuned!

Book Binding, Decorative Papers & Costumes

Book Binding, Decorative Papers & Costumes

Undertaking this post I was in a place of total indecision….to tell you about my book binding exploits or report on a wonderful costume exhibition….I’ve decided on both. So before you read on make yourselves a drink, plump up the cushions and get comfortable.

Decorative papers for book binding….

A while ago I mentioned I was asked to teach a workshop. This was to be to my local textile group following our AGM and there would be no charge (unlike normal visiting tutor workshops), then I was advised there were likely to be around 30-35 people….!!! Knowing this well before Christmas I let a few ideas percolate through the layers and finally at the beginning of the new year I set to creating a few examples of books and decorative papers. I should explain here that I haven’t done any book binding (except for the stitched eco printed leaf book shown in previous post) for around 13 years so I had to completely refresh my memory.

I decided to make ‘leather’ paper (using tissue paper) and crepe paper dyed designs. I discovered this last one many years ago, by total accident after I spilled some water. Rather than start from scratch I dug out my teaching notes from 2003 (it pays being a hoarder and never throwing things out!)

I once taught adults with learning disabilities, so these notes were geared to their needs.

The colouring I used was food colouring (easy for anyone to repeat) and some left-over inks that I had, in total – red, yellow, orange, green, brown, blue and violet. The tissue paper samples ranged from white to pale grey and mucky yellow.

Laying white copy paper directly on top of the tissue, and also on the turned-back film

I always try to maximise opportunities, so used the surplus surface colouring to make ‘ghost’ prints. These were easy to do and even when still damp can be over printed (with care) several times creating wonderful colour designs.


Ghost prints
Some finished leather paper samples, dried and ironed flat.

Crepe paper designs –

A blurred photo unfortunately, but I hope you can still make out the texture of the paper as I don’t know what it is called outside of the UK.

Again colours were limited to what our group had to keep costs down. The technique is very simple – cut pieces of crepe and sandwich between water sprayed paper. Obviously for this to work it is necessary to have non-dye fast crepe paper!

I personally love overlapping the pieces as the dyes bleed into each other.
From this technique there is also a fabulous by product….the actual crepe paper….the resulting pieces can be gorgeous

With the ‘un-arty’ scruffy wet crepe pieces I decided to scrunch, twist, roll and dob onto lining paper….the result was interesting….BUT……..the whole reason this works is because the paper is not dye fast. I had coloured fingers & nails for 3 days afterwards – so be warned!

Book binding….

The books – I made several small samples to stimulate ideas for ways to present textile works.

Accordian fold books – as the name implies the pages are continuous and can be coloured or plain, attached both ends or one end, folded to create pockets or cut on a slant. They can be bound in a folding cover hard or soft, or with individual front and back covers. The covers were bound using leather paper on used Christmas cards (cost saving) or other decorative papers such as a paper candy bag and floristry wrapping. If you look closely at the centre photo you can see the inside end paper is a ghost print.

A particular favourite

Stitched signatures – again as the name implies the pages are stitched in. These can be stitched on the inside or the outside allowing for embellishment with coloured thread or beads. The covers can be hard or soft. For the samples I used both using the crepe paper design pieces, coloured paper and envelope paper….take a look at the inside of envelopes and there are a wealth of patterns to be explored.

Crepe design paper used for the covers & ghost prints used internally

Pegged concertina – my name for this book type. A ‘spine’ is created by concertinering some card. Each folded section is then fed through a slit in the pages and held in place with a ‘peg’ (card, lolly pop stick etc) that is longer than the height of the spine. The covers are usually individual (front & back), the ‘spine’ being secured either on the inside or outsde.

With so many (imagine 30 ‘students’, a large hall and newspaper all over the floor with pieces drying) I didn’t get any time what so ever to take photos of work in production so I can only show you the samples I prepared in advance.

The workshop was definitely a challenge on time and energy….although I knew every wrinkle and possible question, had prepared ‘stage’ examples (to prevent boredom watching glue dry!) and had broken the workshop down into various sections so as not to inundate folk with information I still also learned a lot, the important points being –

  • Don’t be too ambitious – I’d planned 3 books, in reality only 1 was manageable coupled with making the papers.
  • Remember folk struggle with measuring – I’ve spent a life time measuring at the drawing board and working with paper so for me it is second nature.
  • Keep the numbers low – the instructions, whilst simple to me, can be difficult to others which requires a lot of individual attention.
  •  

Would I do it again? Yes. I’ve been very diligant in keep notes of everything – from supplies keeping costs low to ‘what could I do better next time’ notes………I just hope it won’t be another 13 years!

Costumes

If you are still with me then I’ll tell you about a wonderful exhibition called Costumes, that I attended with my textile group.

The costumes were all loaned to the Preston Park Museum from Angels. Angels (the name is the original surname) is a 7th generation run family business creating, making and loaning costumes to the theatre and film industry globally. Based in London the warehouse has 8 miles of clothing storage rails and evidently anyone going to work there spends 3 months learning the ‘filing’ system before they start their work proper. They employ specialists in the field from costumiers, miliners, cobblers to wig makers etc.

As a group we were guided around the exhibition by the curator who gave us some wonderful anecdotes to the costumes. And – we were allowed to get inches from the fabric, much to our delight.

The original dress worn by Elizabeth Taylor in Cleopatra.


This is a replica of Queen Elisabeth II coronation dress for the film The Queen. When a TV series was subsequently made, the dress was already in existence and fortunately it fit Claire Foy who plays ER II.
Queen Elizabeth was played by Judi Dench. She appeared in this dress for only 8 mins and it weighs 28lbs!!!!
It has metal that runs inside down the back to hold Judi and the dress upright.

As a group of textile enthusiasts cameras were clicking endlessly with this particular costume….the details were beautiful.

This dress was worn by Cate Blanchett. The museum have several medieval type mannequins with very tiny waists to display vintage corsetted garments….they used one for this costume but the museum staff couldn’t do this dress up! On close inspection none of us could believe the waist size.

Dresses for lesser characters in Beauty and the Beast


Tom Baker was the 4th incarnation of the Doctor. He was given ideas for his identity, but felt something was missing. He decided a scarf might work and gave his gran a bag of wool to make one. When he went to collect it he discovered that his gran had misunderstood and had used the entire bag of wool….his identity was born.


Harrison Ford’s costume – sadly no anecdote here.
Worn by Kate Winslett and Leonardo DiCaprio. Note the sailor’s jumper – the ‘White Star Line’ is backwards. The only place the filming could get a good ‘un-modern’ shot of the ship in harbour was the wrong way round to how it would have been setting off on it’s maiden voyage….solution – film it with the crew wearing backwards writing then turn the film over!
Bohemian Rhapsody was just on the point of being released when this exhibition was on. Angels surprised the museum by adding these costumes to the loaned collection.

And lastly –

Aidan Turner’s Poldark costume. I’m not sure if Poldark has ventured beyond our British shores so this may just apply to British audiences but the actor is….mmmmmmmm!
He has appeared a few times topless and has a well turned out physique – evidently in addition to your normal make-up artists there are special artists to enhance six-packs….I never knew that!

The curator told us of a lady in a previous group who went up to the costume to ‘smell’ Aidan Turner. We are a group of mature ladies but we were like young star struck girls who all went up to do likewise. I can report that Angels sadly did too good a job of keeping their costume clean!

Preston Park Museum is small but the exhibition was great. Their next exhibition is Wedding Belles: 140 years of Bridal Fashion 12 March – 6 May 2019 if you are in the area.

If you have made it this far congratulations….I hope you have found something in my offerings to interest you….now you deserve another drink!

Eco-printing

Eco-printing

A guest post by Antje Ream

Creating this post for the forum I’m being very loose with the term fibre – my excuse is that both paper and plants are fibrous.

A few months ago I attended a great eco-printing workshop by Jane Hare of Pippin Textiles with fellow members of our local textile group. It was a full day of very organised activity with each person having much to show at the end. In addition to what we ourselves had gathered from our gardens, we were greeted with a large pile of interesting plant material.

We were given clear instructions and then let loose laying out our plant designs on paper, cotton sheeting, wool blanket and Tyvek….even kitchen paper didn’t escape! We tried a vinegar mordant and boiling our rolled papers and fabric, then it was paper, fabric and Tyvek with an iron mordant using the steaming method before steaming our rolls of alum mordanted paper bundles.

Thankfully it was summer and we could open all the doors otherwise pegs might have been required for our delicate noses.

Needless to say most of us were very impatient to open our parcels and see the results of our minimal efforts combined with mother nature’s magic. We were all delighted with our results.

We each had this amount to show at the end of the day. The Tyvek pieces are the 4 light squares on the left hand side in the left photo. The dark long piece is the wool mordanted with iron.


Following any workshop comes the dilemma….What do I do with what I’ve produced? In August our group holds an exhibition of members’ work undertaken throughout the year. This event always galvanises my thoughts and with it fast approaching it prompted me into action.

A while ago I received a bouquet of flowers that came with a large almost cuboid box – far too good to throw out….I’m sure I’m not alone with hoarding potentially useful objects…taa daa! I used the Tyvek pieces which were almost square (13 x 13 cm) and machine embroidered them to some linen fabric, cut to size to wrap around the box.

I used a different embroidery stitch around each square

I then added some gold gutta to provide some highlights.

One of the results of our workshop was a set of ‘book’ printed pieces of thick paper/card stock with the front of the leaves on one piece and the back of the leaves on another. I trimmed these totally square (10 x 10cm) and backed each with very fine/thin fabric dot glued to the surface, just to hold until I had done the stitching. This allowed me to machine stitch onto the paper without ending up with lots of pieces, or holes, all torn at the perforations. I stitched each to highlight the details of the leaf (and even red cabbage) prints.

these are the pieces before stitching

On their own they didn’t look much (or more accurately – ‘what do I do with these!’) so I then decided to book bind them together.

A little blurred but you might just see how I joined the pages together
The front and back of the book

I mentioned kitchen paper above – this was only used to ‘protect’ some of our plant designs but I found it gave quite a delicate appearance, so I acrylic wax varnished it….warning – don’t then let it dry on a hard surface without laying cling film down first, otherwise hours of scraping can be enjoyed! I then used some of this paper to cover a tall Pringles tin (as the kitchen paper was translucent I covered the tin with plain white copy paper first), then added another layer of the varnish. My friend was delighted with her very simple gift.

Very similar to the tin, this is a work in progress on a white lamp shade it looks lovely when the light is on

Whilst at a car boot I purchased some unusual pictures – stitched suedette fabric on panels of wood. Playing with yet more of my stitched squares I added them to the panels.

the small panel is 20 x 20 cm

In the exhibition there were many lovely creations using our eco-printed products including a scarf, a cushion made using the wool and a box made from the Tyvek pieces.

The Tyvek box is on the front right – Oh, I’ve just seen the Pringles tin in the background!

Finally here are some pieces that are a favourite of mine done on wall lining paper, which I have coated with acrylic wax varnish each measuring 100 x 15 cm. They are two sided, the paler reverse side shows delicate squares – where the Tyvek pieces were laid and then all wrapped up tightly together. I like both sides and as yet haven’t come up with a way to show them off to advantage….any ideas much appreciated.

Since this very inspiring workshop and as a result of my book being in the exhibition I have been asked to do a workshop on bookbinding in January. I have a few examples of fun bindings done years ago so I will have to brush up on the techniques. I only hope that I can be as organised as Jane and enable my ‘students’ to produce lots of interesting samples.

Writing this guest post has been quite a feat and I owe a HUGE debt of thanks to the ever-so-patient Ruth who across thousands of miles (and an ocean) has not only held my hand but carried my entire bulk through what we thought would be a relatively easy process. I hope that she will continue to offer me the opportunity to post now that we have solved the problems.

Today is a special day and the bells are ringing out for Christmas so I wish everyone….

Joy and a Happy, Healthy and Creative 2019

….and will leave with a photo of the card I received from Pat Moore from Canada in the holiday card exchange….Thank you Pat it is lovely.